What can you do when your Zoom virtual background or green screen isn’t working correctly?
So your Zoom meeting is going to start at any minute. However, your background is all messy with kids running around and all sorts of events taking place.
With a Zoom virtual background, you can display your favorite picture or video instead. Thus, making your actual background disappear and hiding the world behind you.
Hence, many users enjoy the privacy of having a hidden background, allowing you to call from virtually anywhere.
Even if you’re by the beach, 🏖️!
Whereas businesses often use a custom Zoom background as an effective promotion and branding tool. Needless to say, for many users working or learning remotely, this feature has undoubtedly been a blessing and much-needed addition.
Nonetheless, despite how useful Zoom virtual backgrounds are, users encounter various types of problems with them:
Types of Zoom Virtual Background Problems
From our brief analysis of forums and comments sections, the following are common issues that users report with Zoom virtual backgrounds:
- The virtual background fully or partially covers you or your body, sometimes leaving your floating head 👨🦲.
- The user’s face merges with the background.
- The Zoom virtual background blends with the original background.
- The Virtual Background option doesn’t appear or is unavailable.
- Users keep getting the “Computer doesn’t meet requirements” error message.
- Users cannot add an image or video as the Zoom virtual background.
- Virtual background and filters are disabled by your admin.
- Users get the “Your device does not support virtual backgrounds” error message.
So, do you spot a similar Zoom background problem? Share your experience in the comments section below.
On that note, we assembled this guide to address why these problems occur, along with 13 fixes for when your Zoom virtual background or green screen isn’t working.
Plus, this guide caters to most devices you might use, mainly Windows, macOS, iPhones, iPads, and Androids.
With that settled, let’s jump in!
Table of Contents
Why Your Zoom Virtual Background Isn’t Working?
13 Steps to Fix Zoom Virtual Background or Green Screen Not Working
- Enable the Virtual Background Setting at the Zoom Website
- Log Out and Log Into Your Account on the Zoom Client/App
- Update the Zoom Client/App
- Turn Off the Green Screen Option
- Use a Different Zoom Virtual Background
- Check with a Different Zoom Account
- Update the WebCam Drivers
- Check for Pending OS Updates
- Optimize Your Video Calling Set-Up (Lighting, Background)
- Use a Different External WebCam
- Consider using a Green Screen
- Reinstall the Zoom Client/App
- Contact Zoom Technical Support
How to Fix a Flipped Virtual Background on Zoom?
Why Your Zoom Virtual Background Isn’t Working?
1. Your Device doesn’t meet the minimum requirements for the Zoom Virtual Background feature
As you might’ve noticed, Zoom’s virtual background tool is a power and resource-hungry feature. Basically, the feature tries to continuously distinguish and outline your body from the background throughout the video call. Thus, allowing a clean, precise, and unbroken stream of an artificial background.
Sounds pretty technical, right?
So, understandably, not every device can offer this feature. Otherwise, even if the setting is available, its performance may not live up to expectations when switched on.
You might be better off using your natural background to save your video stream from breaking.
On Androids or iPhones that are a few years old or outdated, you might not see the Virtual Background option in the settings, or after tapping More.
Besides that, for PC users, the “Computer doesn’t meet requirements” error message may keep popping up.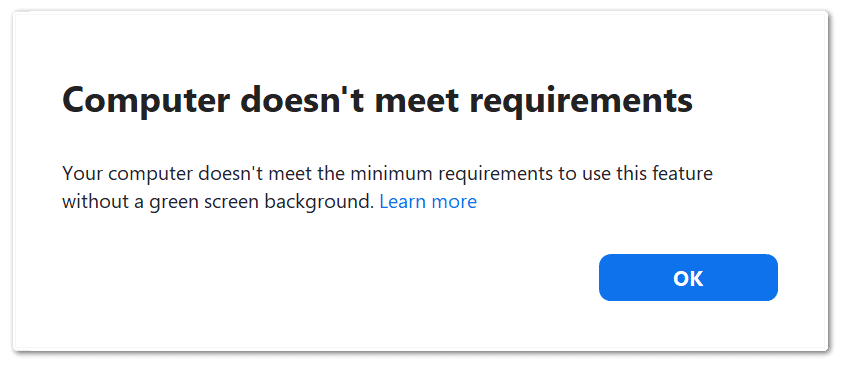
Therefore, we suggest checking the minimum system requirements for Zoom virtual backgrounds. Then, compare it with your device’s processors or OS version.
Additionally, try updating your OS. Doing this, ensures the system functions and drivers are well-optimized to handle Zoom virtual backgrounds.
2. The Image or Video isn’t suitable to be used as a Virtual Background
Many users often report that they can’t add a custom picture or video to their Zoom virtual background. When attempting to upload, they may be prompted with the following error message: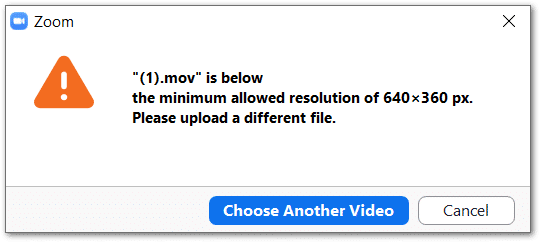
Hence, this is probably because the upload doesn’t fulfill Zoom’s criteria. The upload might be in the wrong format, too low/high resolution, incorrect bitrate, etc.
Therefore, you can check Zoom’s requirement for virtual background images and videos.
With that said, if you find your images or videos are in the wrong format, try converting them. For mobile users, there are video and image converter apps you can try.

Whereas for PC users, you can convert and change the bitrate and encoding of videos using the Handbrake transcoder.
3. Problems with Your Surrounding or Video Call Environment
A key criterion for a smooth and unproblematic Zoom virtual background is having an optimal video calling environment or set-up. This includes having enough lighting, a clean and static background, and a well-positioned webcam.
Sounds not too difficult, right?
Thus, if your video stream is disorderly and isn’t optimized, the virtual background feature can’t effectively differentiate you from your background.
Don’t worry, you don’t need a news anchor’s set-up.
Nonetheless, it’ll only take you about 5 minutes to prepare your video call environment. In step 9, we describe common mistakes with your video call set-up and ways to fix and improve them.
4. Problems with Your Webcam
Using a low resolution or broken webcam is a key reason your Zoom virtual backgrounds aren’t applying or working correctly. Typically, the in-built webcams on laptops are somewhat substandard, although it gets the job done.
Hence, it’s better to use external webcams (Step 10), giving you a clearer video stream that works perfectly with Zoom virtual backgrounds.
Also, by ensuring the webcam drivers are updated (Step 7), they’ll be kept well-optimized for video call sessions.
5. Zoom virtual backgrounds are disabled by your admin
Usually, users who are using a Zoom account assigned by their school, university or workplace, may have this feature disabled. Thus, you might not be able to see the Virtual Background option available in the settings.
On that note, we suggest using a different Zoom account (Step 6) and checking if the option appears there. If you don’t have an alternate account, simply create a new one or quickly check through your friend’s or family member’s.
Additionally, you can contact your school or workplace’s technical support or admin to enable the virtual background.
13 Steps to Fix the Zoom Virtual Background or Green Screen Not Working
1. Enable the Virtual Background Setting at the Zoom Website
As mentioned before, many users report not even seeing the Virtual Background option in their Zoom settings. Hence, it’ll not appear when selecting the arrow at the Video tab on your menu bar.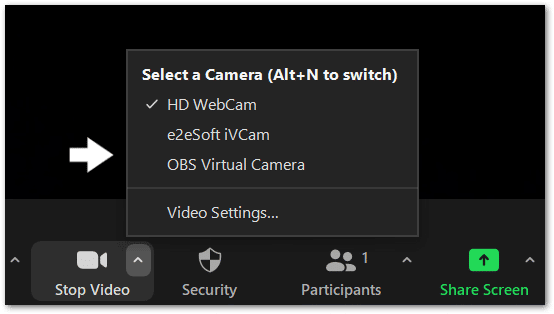
You can also check if it’s available in the Settings menu by selecting the Background & Filters tab.
All in all, this setting may appear hidden if it wasn’t turned on at the Zoom web portal.
So, if you find the Zoom Virtual Background setting is missing, we recommend checking and enabling it on their website.
- First, sign in to your account at the Zoom website.
- After that, on the left pane, under Personal, select Settings.
- Next, under the Meeting tab and under In Meeting (Advanced), find the Virtual Background option.
- Ensure that Virtual background and Virtual filters are switched on. If they were already turned on, you could try toggling them off and on to refresh the setting. Also, tick the “Allow use of videos for virtual backgrounds” box.
Afterwards, at the Zoom client, you’ll have to sign out and sign back into your account to see the changes.
So, the following fix, step 2, shows these steps in more detail, whether you’re using the Zoom desktop client or mobile app.
2. Log Out and Log Into Your Account on the Zoom Client/App
Moving on from the previous step, you’ll need to re-sign into your Zoom account to see the settings changes. Besides that, this step has generally been an effective fix for many users when their virtual background feature is missing.
We believe by performing this step, you’re refreshing your account settings with the Zoom client or app. That allows the platform to have your most recent settings configurations.
Thus, we felt it was only right to place it as a separate step.
So, to log out and log back into your Zoom account:
For Windows and macOS
- At the Zoom client, click your profile icon at the upper-right.
- Then, select Sign Out at the drop-down.
- Finally, enter your same account’s login info, and click Sign In.
For iPhone and Android
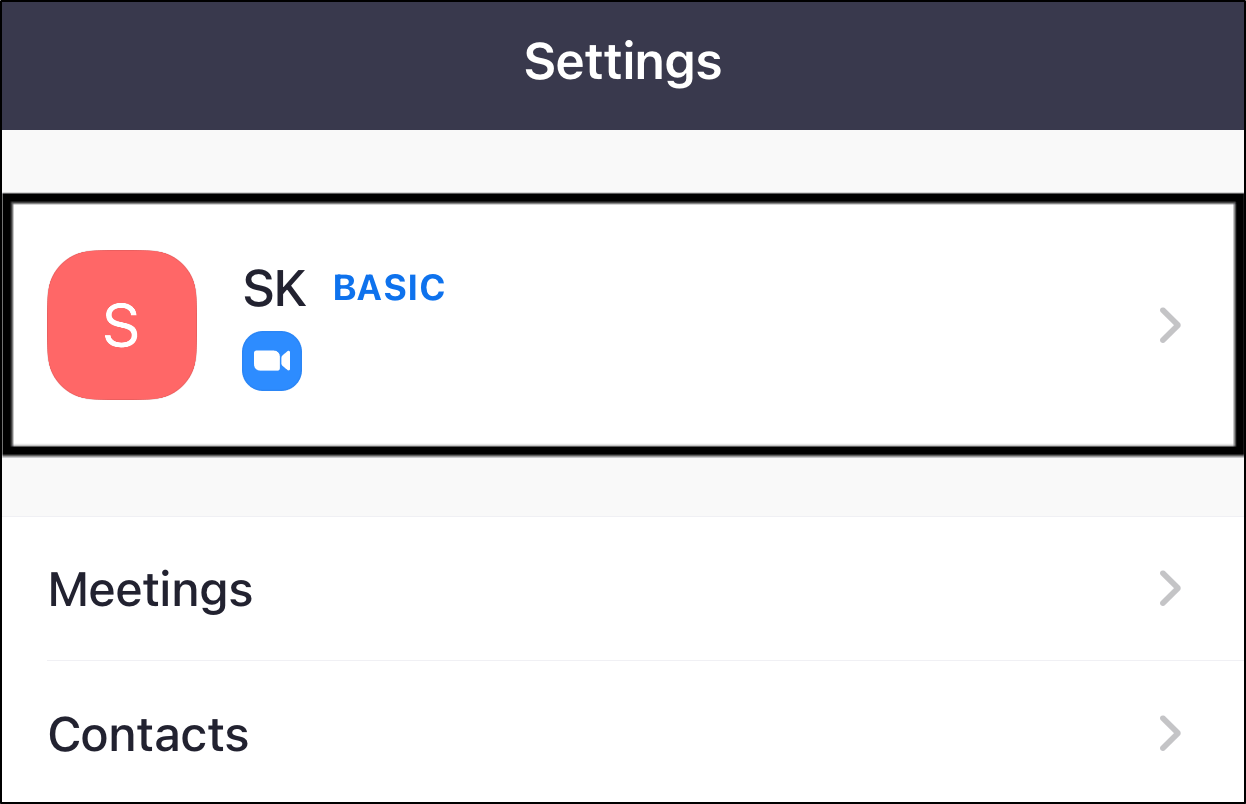
- First, tap Settings at the bottom bar.
- Then, select your profile tab.
- After that, scroll down and select Sign Out.
- Lastly, simply input your same account’s login credentials, and tap Sign In.
3. Update the Zoom Client/App
Another one of your first steps should be checking for pending Zoom client or app updates. Perhaps your Zoom virtual background issue is common for many users.
Hence, Zoom may release an update containing necessary bug fixes to address the previous version’s errors.
According to Zoom, you’ll need the client or app version 5.1.1 to upload and use background images or videos.
On that note, to check if you’re running the latest version of Zoom:
For Windows and macOS
To update the Zoom client, select your profile icon at the upper-right and select Check for Updates from the drop-down. Then, if an update is available, it’ll begin downloading and installing it automatically.
Alternatively, you might see a notification that says, “A new version is available!”. So, click Update at the notification.
For iPhone, iPad, and Android
- First, open your App Store (Apple) or Play Store (Android).
- Then, go to the Zoom app page, and if updates are available, tap the Update button.
4. Turn Off the Green Screen Option
With the “I have a green screen” option turned on, if you’re not actually using one, you might see problems with your Zoom video stream. This setting might be the culprit for your Zoom virtual background that’s covering your face or not working.
So, we suggest giving this a quick check if you’ve turned it on by accident.
Don’t get me wrong, this feature is effective if you’re indeed using a green screen (Step 11). Essentially, it identifies and converts everything green in your background to your uploaded picture or video. Hence, effectively streaming a virtual background throughout your video call sesh.
However, without a green screen, this setting may only backfire as it may incorrectly differentiate your background.
That being said, to turn off the “I have a green screen” option:
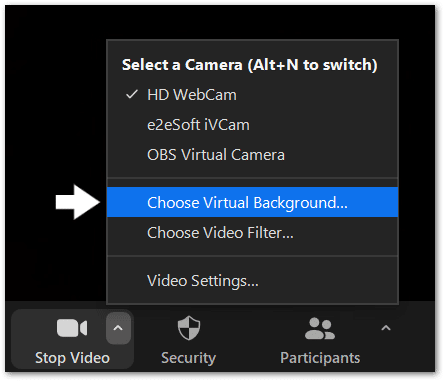
- First, click the arrow on the Video tab and select Choose Virtual Background.
- On the following page, uncheck the box next to “I have a green screen”.
5. Use a Different Zoom Virtual Background
Perhaps your Zoom virtual background issue is due to the image or video you uploaded. So, if you notice the background is blurry, having blending problems, or even if that image or video isn’t uploading, try using a different one.
This is more of a troubleshooting step to identify if the error lies with the image/video you’re using.
Plus, using an image/video that’s incorrectly sized or not following your camera’s aspect ratio can stretch the background. This could cause your Zoom virtual background to appear blurry.
Typically, Zoom recommends using the 16:9 ratio. So, you can crop your image to a size of 1280 X 720 pixels or 1920 X 1080 pixels. Whereas for videos, it’s recommended to have a minimum resolution of 480 X 360 pixels (360p) and a maximum of 1920 X 1080 pixels (1080p).
You can check Zoom’s requirements for picture and video backgrounds here.
For starters, we suggest switching to one of Zoom’s default backgrounds to identify any image-related issues.
That being said, to change the Zoom Virtual Background:
- First, click the arrow on the Video tab and select Choose Virtual Background.
- On the following page, under Virtual Backgrounds, click to choose one.
6. Check with a Different Zoom Account
If you still find the Virtual Background setting is missing, despite enabling it (Step 1), perhaps there’s an account-related issue. This could happen if you’re using an account given by your school or workplace. Then, the admin may have disabled Virtual Backgrounds by default for its users.
On that note, we suggest searching for the Virtual Background option on a different account, preferably a personal one.
So, to switch Zoom accounts:
- At the Zoom client, click your profile icon at the upper right
- Then, select Switch Account at the drop-down.
- After that, simply enter the credentials to your alternate account and select Sign In.
Now, if you find Zoom virtual backgrounds are available, you can try contacting your department’s admin or tech support. They should be able to enable the setting from their end.
If you’re the admin, this guide shows how you can enable Zoom virtual backgrounds for your group members.
In case that didn’t work either, you can contact Zoom Technical Support (Step 13) to identify any account problems.
7. Update the WebCam Drivers
Basically, installing the latest updates for your webcam drivers ensures its software is up-to-date. Hence, this optimizes your PC’s webcam and its integration and display support with apps like Zoom.
Overall, updating your webcam drivers maintains its performance and can prevent bugs when using the Zoom virtual background feature.
Luckily, for Windows PCs, you can easily check for individual driver updates from the Device Manager.
However, for other devices (macOS, Android, iOS), your only other option to update webcam drivers is through updating your OS (Step 8).
Having said that, to check for pending webcam driver updates on Windows:
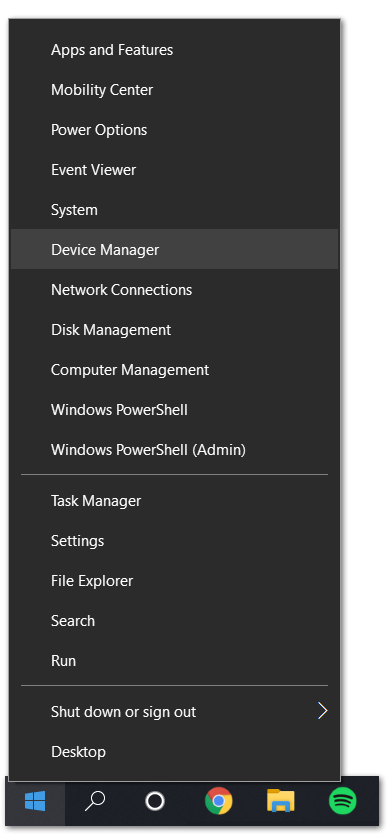
- First, right-click the Start menu, and select Device Manager.
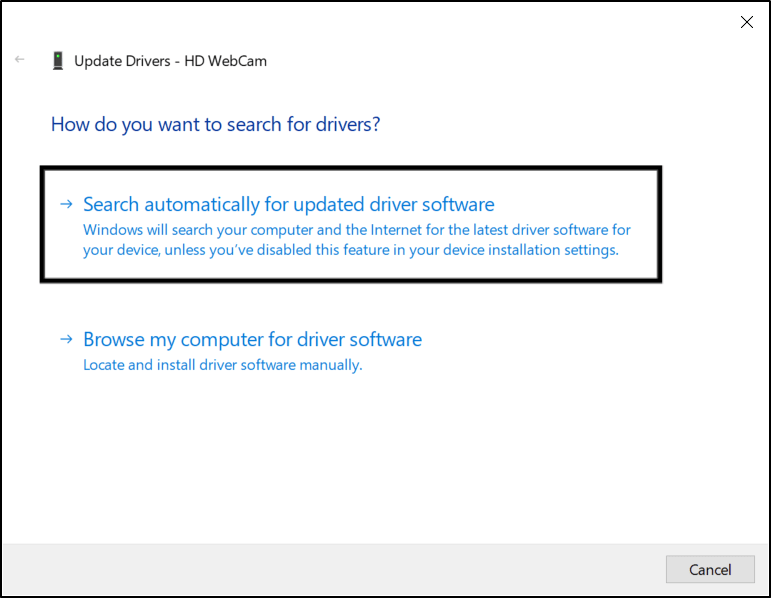
- Following that, under Cameras, right-click your webcam and choose Update driver.
- Next, select “Search automatically for updated driver software”.
After doing that, your PC will begin searching for available driver updates. Then, if there are available updates, it’ll start downloading and installing.
This will take about a few minutes till you get a success message.
8. Check for Pending OS Updates
Moving on, updating your device’s operating system (OS) is another method to ensure your drivers, including cameras, are kept up-to-date. Hence, as mentioned before, for devices other than Windows, this will be your only other go-to for updating camera drivers.
Besides that, by running the latest OS version, you can resolve OS-related bugs 👾 that could interfere with your camera and apps like Zoom.
So, to check for OS updates on your device:
For Windows
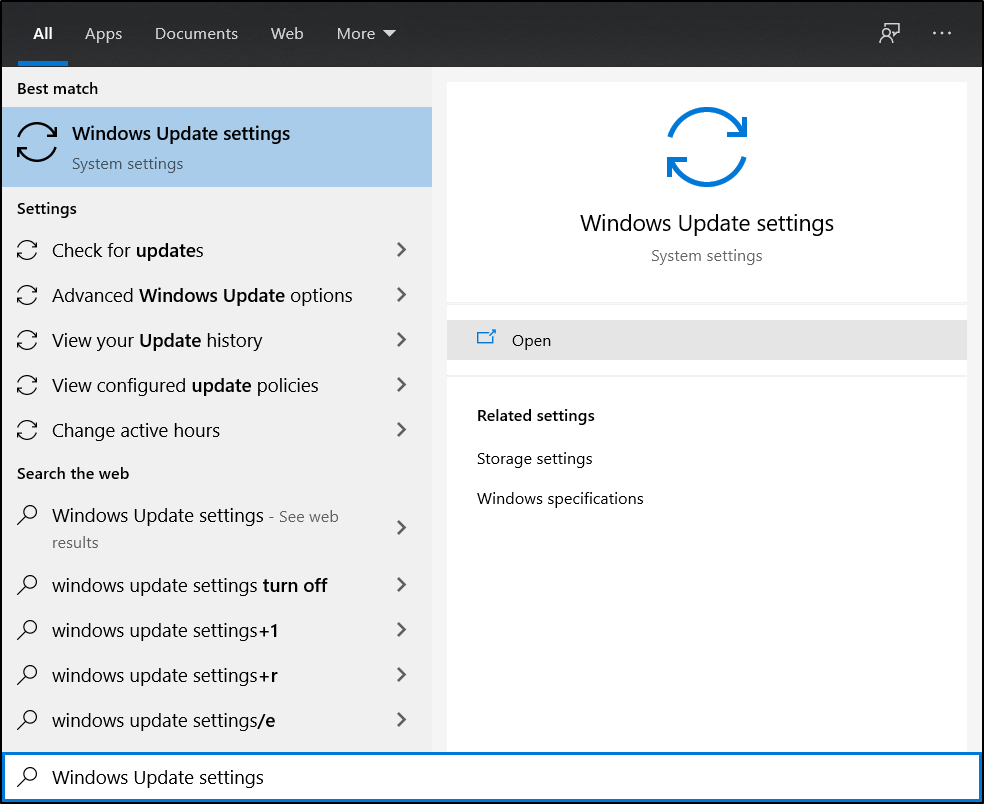
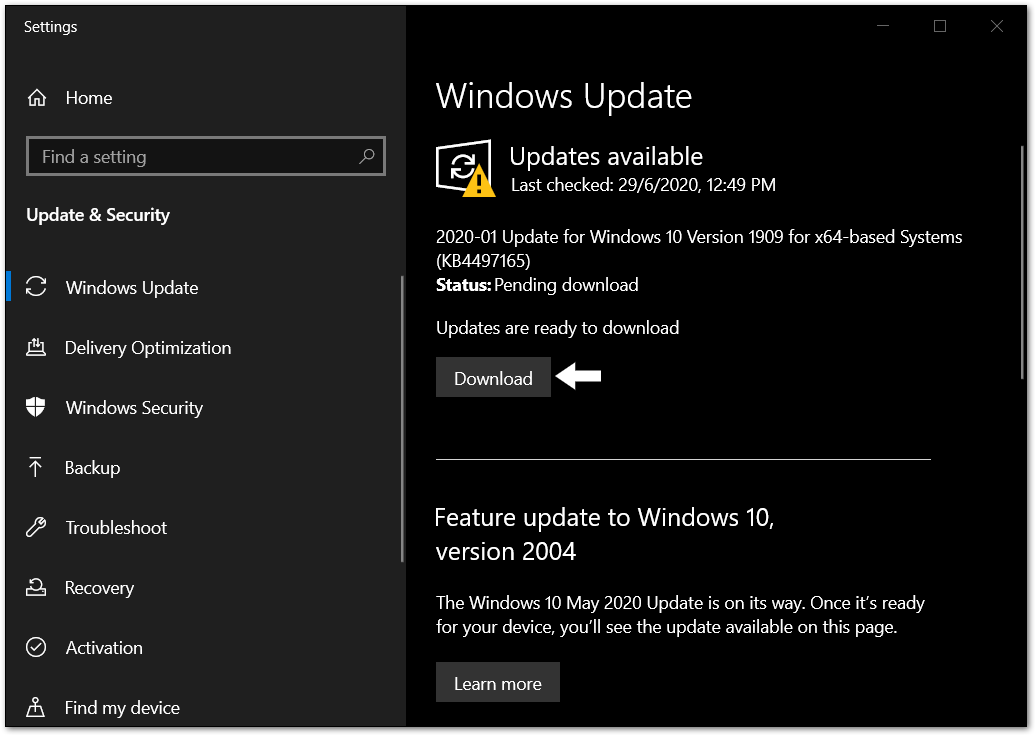
- First, open the Start menu, then search and open Windows Update settings.
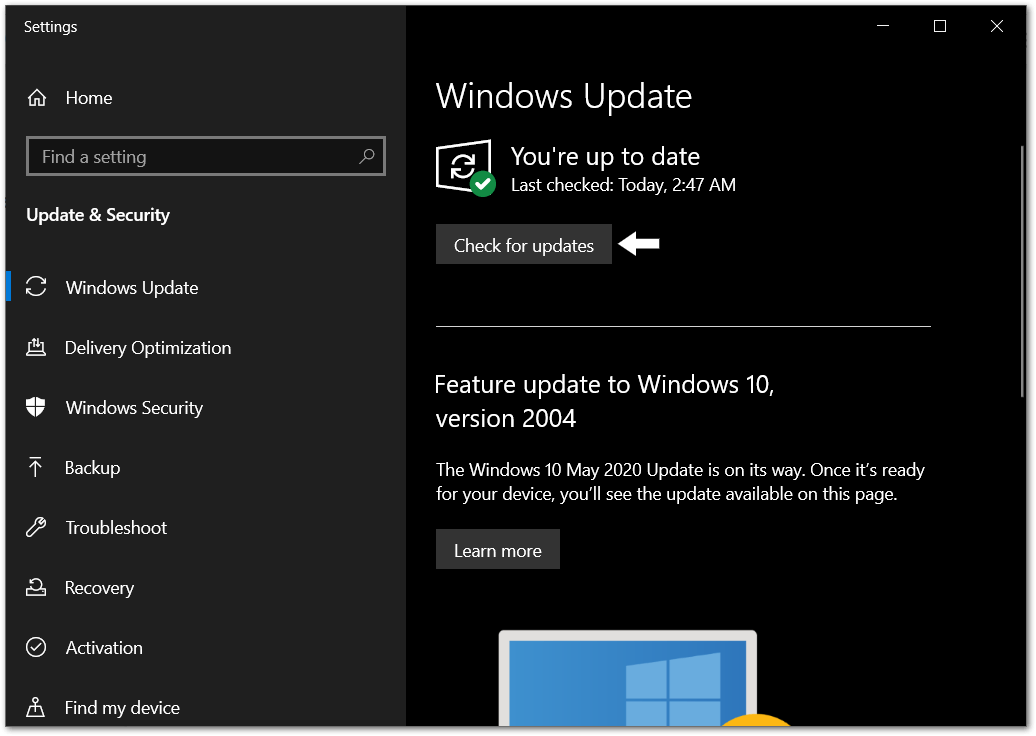
- Next, click the Check for updates button.
- After that, if there are updates available, click the Download button to begin downloading and installing them. Finally, you may be prompted to restart your PC to apply the changes.
For macOS
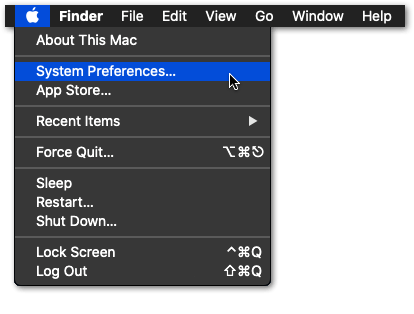
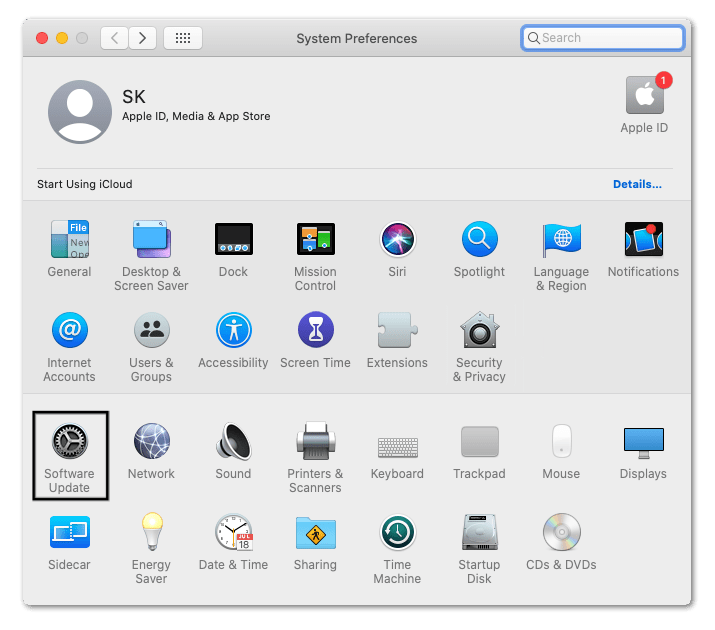
- To manually check for updates on macOS, first, select your Apple menu and tap System Preferences.
- After that, click Software Update.
For Android
- First, open the Settings app, scroll down, and select System.
- After that, select System Update.
- Then, on this page, you can tap Check for update to search for pending updates.
Do note that these steps may differ between Android devices depending on your phone’s model and current OS version. However, you should find the steps are generally like the above.
For iPhone and iPad
- First, open the Settings app and tap General.
- Next, select Software Update to search for pending updates.
9. Optimize Your Video Calling Set-Up (Lighting, Background)
As mentioned before, your video call surrounding plays an enormous part in ensuring your Zoom virtual background is bug-free and streams smoothly. With a clean background and a well-lit environment, it’s easier for Zoom to outline your body.
Therefore, we suggest taking just 5 minutes before your Zoom call to clean up and optimize your video call environment.
What’s more, you might not even have to cash out and get an external webcam. With our tips, you can make do with your pre-built webcams.
That being said, the following are some steps and considerations to improve your video call set-up for Zoom virtual backgrounds:
- Have moderate lighting 💡 on yourself. You can improve lighting by using a table lamp, positioning yourself near windows, or opening up some curtains. Zoom recommends the 3-point lighting set-up.
- Reduce or turn off any lighting in your background. Doing this can increase the contrast between you and your background.
- Move to a location that has a plain, solid-colored background. Preferably your background can be a plain wall with no moving objects.
- Try using a less cluttered background. Although, it’s alright having some stationary objects in your background.
- Avoid wearing attire with the same color as your background.
- Position your webcam straight at an eye-level.
- Avoid sitting on sofas. Instead, use a chair 🪑 that separates you from your background and doesn’t appear too much in your video.
With your video call environment well-optimized, now, whenever you have a Zoom meeting, you can use the same set-up. Thus, you can be sure to appear professional and presentable every time.
10. Use a Different External WebCam
If you’re video calling from your PC, you’re most likely using the in-built webcam, right? Although it certainly gets the job done, owing to its low resolution, it might not run Zoom virtual backgrounds so smoothly.
Perhaps you’re using an external webcam and still find virtual background problems. This could still happen if the camera is too old or has a low resolution.
That’s why we propose trying a different or external webcam.
For this, there are 2 options we propose to use a different webcam, the paid or free method:
Paid Method
This method involves purchasing one of our recommended choices of webcams available on Amazon. With a reliable and quality webcam, you no longer have to worry about low-resolution Zoom calls.
So feel free to check them out below:
Top-Notch WebCams from Amazon
Budget: Logitech HD Webcam C310
Premium: Logitech C920x Pro HD Webcam
Free Method
Perhaps you don’t want to break the bank on a new webcam and only need a temporary solution.
Now, what if we said the answer was in your pocket all along?
That’s right, you can use your smartphone 📱, either an iPhone or Android, as your PC’s webcam.
For this, we recommend using EpocCam or iVCam, available on the App Store and Play Store. Basically, these apps transform your phone’s front camera into a surprisingly high-quality webcam for your PC.
Once you installed the app, you can refer to their simple manual to set it up in just minutes.
11. Consider using a Green Screen
Moving on, if you would like to invest more in a professional video call set-up, you can try using a green screen. With this tool and the “I have a green screen” option enabled, you can expect to see the best performance for Zoom virtual backgrounds.
Essentially, having a green screen further differentiates you from your background. Hence, Zoom can easily convert everything that’s green in your background to your chosen image or video.
Plus, the virtual background will be more responsive, so feel free to use hand gestures 🤗.
That being said, there are plenty of green screen options available on Amazon. For our recommended choices, you can check the list below:
Superb Green Screens for Zoom Video Calls from Amazon
Budget: Yesker Chromakey Green Screen
Premium: AFHT 5’X7′ Portable Green Screen
12. Reinstall the Zoom Client/App
Towards the end, we usually recommend this general fix as it’s seen to resolve various issues with Zoom effectively. We believe it can be especially helpful if you keep finding the Zoom Virtual Background option missing in the settings.
Through a complete reinstall, you’re removing the previous Zoom client files, which may have been corrupted. Hence, affecting the app’s features, including Virtual Backgrounds. After that, you can install a fresh copy of Zoom and start from scratch.
With that said, to uninstall and reinstall Zoom on your device:
For Windows
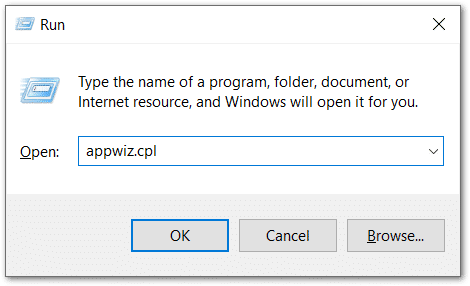
- First, open the Run prompt by pressing the Windows and R key together.
- After that, enter appwiz.cpl and click OK.
- From the list of apps, select Zoom and click Uninstall.
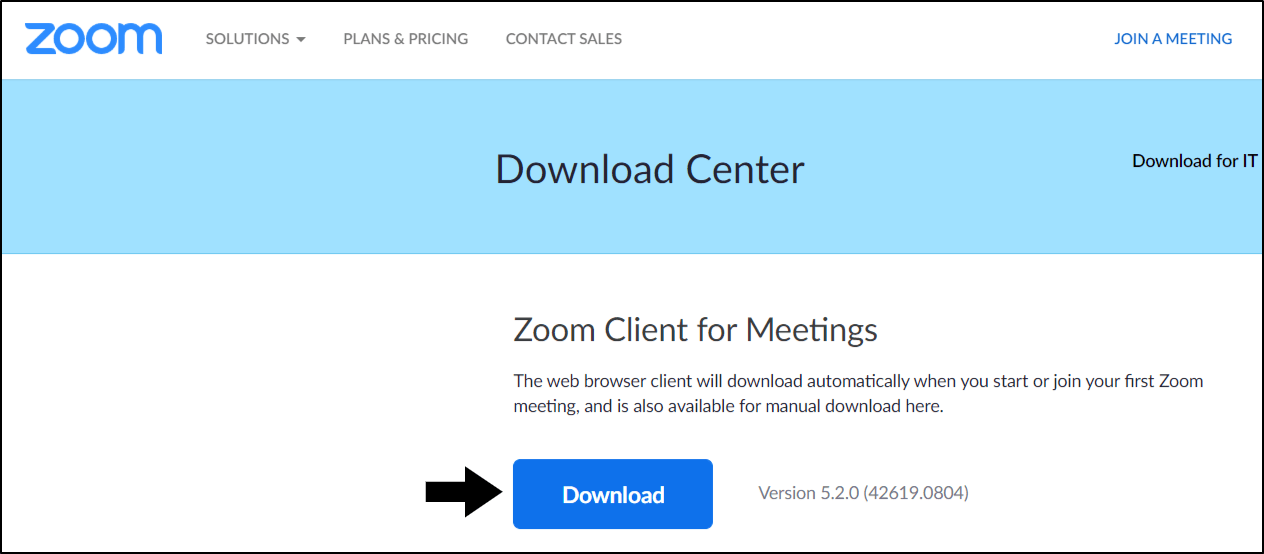
- Next, go to the Zoom Downloads Center, and download the Zoom client installation file.
- Finally, open the downloaded file, and proceed with the guided installation steps.
For macOS
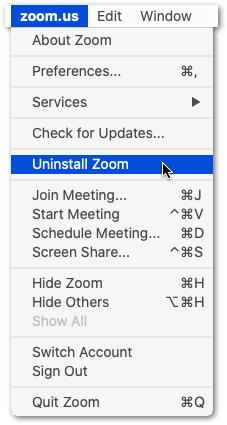
- First, with Zoom open, from the menu bar, click zoom.us and select Uninstall Zoom at the drop-down.
- After that, at the following “Do you want to uninstall this app?” message, click OK.
- Finally, go to the Zoom Downloads Center, and download the Zoom client installation file.
- Then, open the downloaded file and proceed with the installation steps.
For iPhone, iPad, and Android
The exact steps to reinstall Zoom may vary between different phone models and OS. However, the steps should generally look like the following:
- First, locate the Zoom app on your home screen or app list.
- Then, tap and long-press it to access the selection menu.
- After that, select Uninstall or Delete App.
- Lastly, go to the App Store (iPhone/iPad) or Play Store (Android), then at the Zoom app page, install it.
13. Contact Zoom Technical Support
Perhaps you still can’t find the Zoom Virtual Background option, or it’s not working correctly after trying everything. Then, you can raise the issue with their support team.
That way, they can identify any account-related issues that might prevent the virtual background setting from popping up. Besides that, if you’re facing any other issues with your virtual background stream, they can provide suitable fixes.
As a free user, to contact Zoom Technical Support, you can submit a support ticket at the Help Centre page.
On this page, fill in your details, along with a brief description of the Zoom virtual background problem you’re facing.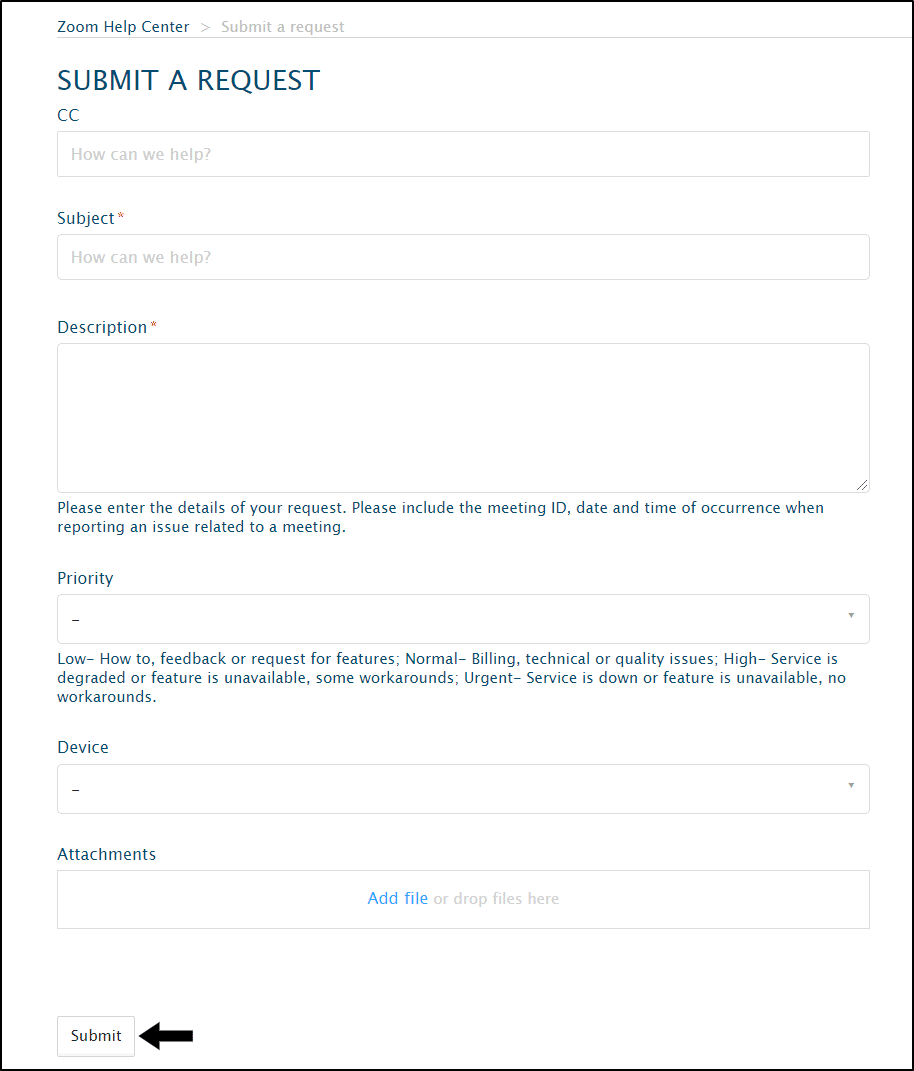
Once you’re done with that, click Submit, and all that’s left is to wait for Zoom to respond. Owing to its large user base, it could take a while for them to reach your ticket.
How to Fix a Flipped Virtual Background on Zoom?
For many Zoom users, they reported that their virtual background was being “flipped” horizontally. Therefore, users found that the edges of their body outline seemed too blurry as well. All in all, having a flipped virtual background can reduce the quality of your video stream.
Hence, if you’re facing a similar problem, we’ve got the right fix for you.
The following steps should guide you to flip back and position your virtual background correctly again:
- First, tap the upwards arrow at the Video tab, then select Choose Virtual Background.
- After that, untick or tick the Mirror my video box.
You can now check the Zoom video preview, to see your virtual background from your peers’ point of view.
If you were in a video call, we suggest re-logging into your Zoom account (Step 2) to see the changes being made.
Conclusion
To recap, it’s fairly common for users to face problems with the Zoom virtual background and green screen feature. However, don’t let these pesky errors put you off from trying it out and using custom backgrounds in your next meeting.
That’s why we’ve prepared this mega guide of 13 fixes and reasons your Zoom virtual background or green screen is not working.
So, having done these steps, you can be sure to appear like a true Zoom “professional” with a fool-proof background. You’ll certainly wow your peers, colleagues, or classmates 🤩.
Let your creativity be the talking point of the next online meeting!
Before leaving, share in the comments:
- Have you faced problems with your Zoom virtual background or green screen?
- Did any of the above fixes work for you?
- Do you have another fix for when the Zoom virtual background isn’t working? You might help a fellow reader, 😉.
Feel free to share this guide with your friend or colleague whose Zoom virtual background just isn’t working correctly 😊.
