Is your Microsoft Word spell checker not working suddenly and isn’t detecting any spelling and writing mistakes?
Microsoft Word is a special word-processing software released by the namesake company that many people are familiar with and continue to use today. Almost everyone is familiar with Microsoft Word and how it helps us complete everything from school assignments to comprehensive reports that help us get through our jobs.
The software is equipped with several tools that you can use to simplify your documents while making them easier to read and understand. A spell checker is a nifty tool that many users find helpful as it helps you fix any spelling and grammatical mistakes.
Despite this usefulness, the tool has limitations and is prone to suddenly stop working altogether while you are still writing or editing your documents. Microsoft Word might be unable to detect any spelling and grammar mistakes if you encounter this issue which can take a toll on your productivity.
Types of Microsoft Word Spell Checker Errors
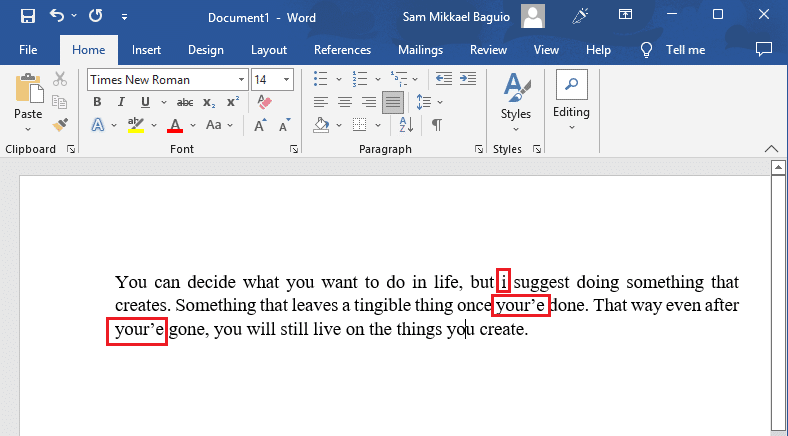
Several users who frequently use Microsoft Word have reported problems with the spell-checker function. This problem usually manifests in the software’s inability to detect any wrongly spelled words through its red underlines and offer suggestions to correct them. Another example of this problem is Word failing to automatically correct any wrongly spelled words and incorrect syntax and capitalization in the document.
Both instances of the spell checker misbehaving all boil down to a malfunction with the feature itself. This can be caused by something going wrong with the software or the system you are typing it on.
With everything in mind, we prepared this guide that will cover 5 common reasons why your spell checker might not be working as well as 8 fixes that you can try out that will try to fix and improve the situation.
All the fixes you find here will cover simple and basic troubleshooting fixes to more complicated and complex fixes you need to make with your system. With that out, let’s get down to fixing your spell checker!
Why is the Spell Check Feature in Microsoft Word Not Working?
1. The Spell Checkers Weren’t Installed into Your Microsoft Word
You might not be able to use the spell checker feature because the feature wasn’t installed in your Microsoft Word. While the Office installer ensures that your installations will be clean, it might not always be able to catch and fix all errors which can lead to this happening.
This happens during the installation process as Microsoft Word (and Office in general) supports “Add-ins” from their official site and third-party applications that can make your encoding process significantly easier. The spell checker function is considered an “Add-in” and might’ve not been added to your Microsoft Word during installation.
If you can’t access your spell check using the Review tab or shortcut button (F7, for example), the feature might not be installed. You can quickly resolve this problem by installing the proofing tools (Step 1) or repairing your Microsoft Office software lineup altogether (Step 2).
2. The Language You Are Typing in is Disabled in Add-ins
Recent versions of Microsoft Word tend to have more lenient and comprehensive spell checkers in contrast to the older versions, like 2003 and lower. Typing in different languages in newer versions is made more accessible by changing your speller language to that specified language.
Following the language you are typing in is essential for the spell checker. The feature tends to stop working entirely if you have too many spelling/grammar errors resulting from typing in another language.
In either scenario, you want to enable the language you are typing in (Step 3) so that you cannot only catch any spelling and grammar mistakes but also have your spell checker working and ready to go when you are ready to do any more encoding.
3. Spell Checker Feature was Disabled
Similar to the first reason, the spell checker feature might not work because you have the function disabled. It is possible for the spell checker feature to be installed but disabled either by you or your system automatically.
Microsoft Word’s spell checker functions in 2 ways. You can manually activate it and check for any errors after you have finished typing your document, or you can have it work alongside you to make any edits on the fly as you encode.
Regardless of how you prefer your spell checker to function, in either situation, you’d want to double-check your spell checker feature and re-enable it (Step 4), mainly if you are used to the latter version of the way spell checker functions.
4. Another Language was Set as your Default Option
Continuing from the second reason, your spell checker might not be working because you might’ve selected another language as your default one for the document you are working on. This situation would rarely pose a problem with your spell checker but can become very problematic and confusing when it does happen.
If this happens, you want to re-select the language option that your spell checker will use (Step 5) to ensure that it is following the right one to base its spelling and grammar.
5. Your Computer blocked the Feature
The last reason your feature might not be functioning at all might be a combination of several things that can lead it to get blocked 🛑 and falsely flagged🏳️ as malicious by your computer.
Microsoft Word can run and function almost as well, even if your spell checker is blocked, provided that no key features are also blocked. Since the spell checker feature is considered an add-on, the software can continue running, albeit without the feature working.
There are several workarounds and fixes that you can take to address this problem, with the first workaround being opening your document (and by extension Microsoft Word) in Safe mode (Step 6), with the following fix being to unblock and whitelist Microsoft Word from your Security (Step 7). Finally, you can modify your computer registers related to the spell checker feature and Microsoft Word (Step 8).
8 Fixes for When Microsoft Word Spell Checker is Not Working
1. Installing Proofing Tools for Microsoft Word
Typically, Microsoft Office installs all the essential features you might need with Microsoft Word when you first install it. In some cases, however, the features might not be installed due to a bug or glitch.
Luckily, you can still fix this problem by manually installing the feature by following these steps:
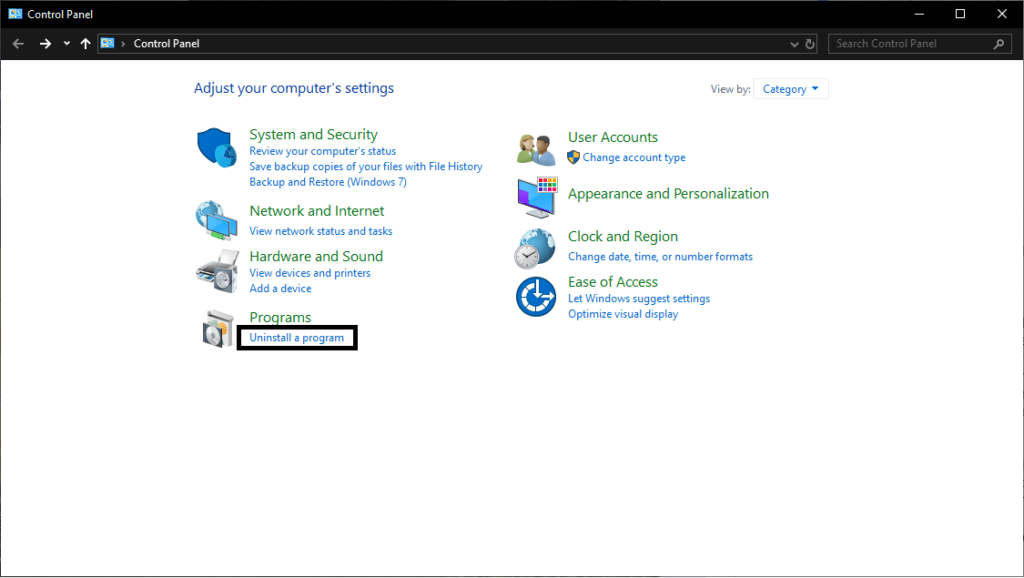
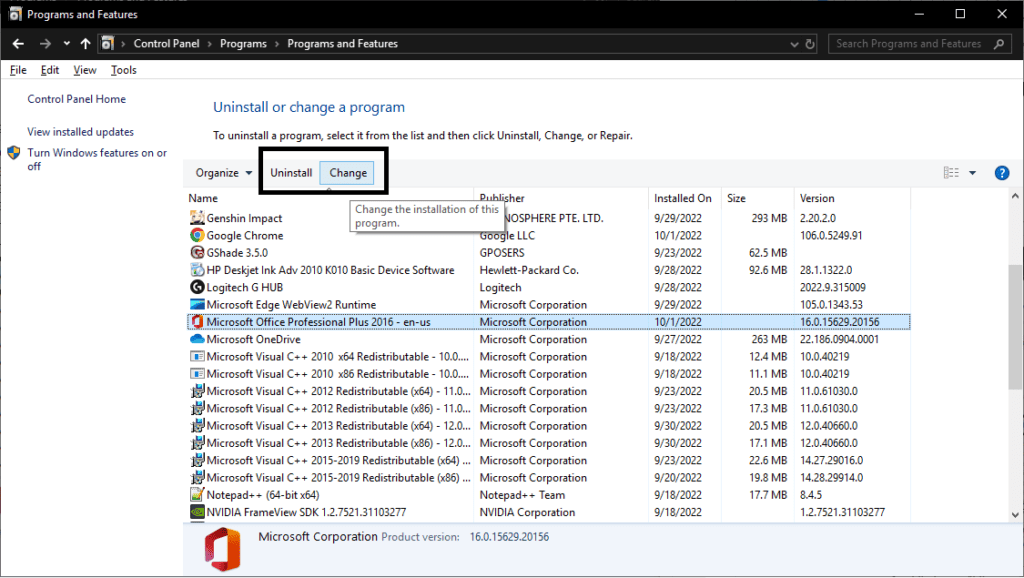
- Open your Control Panel by searching it on your Computer.

- Select “Uninstall a Program” found underneath the Programs category.
- Select “Microsoft Office Professional….” from the program list.
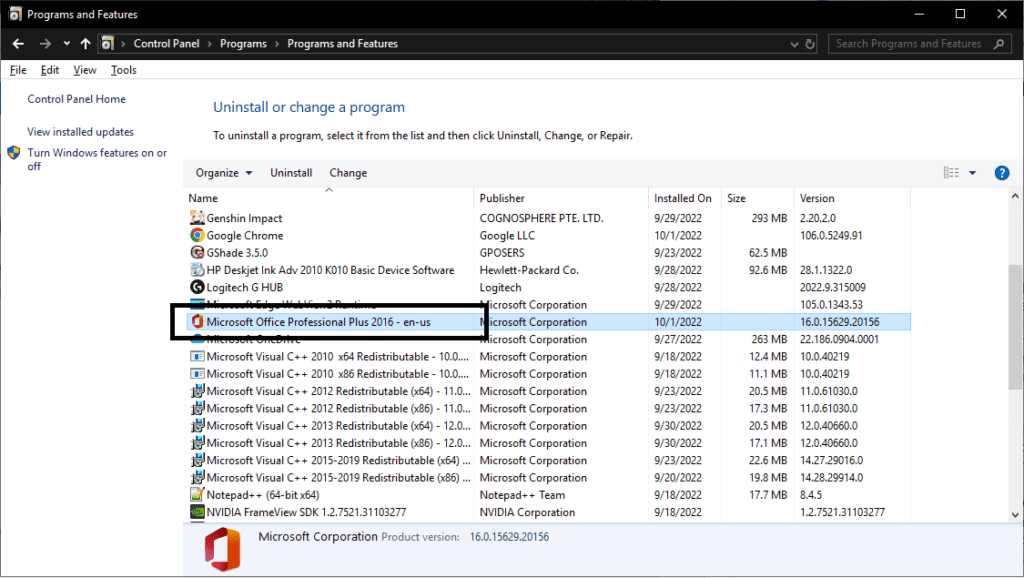
- Click on “Change” from the top of the program list or “Uninstall” if the former option is unavailable.
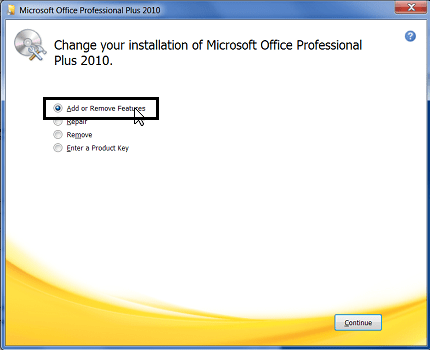
- Select “Add or Remove Feature” in the installation window of your Microsoft Office. If you selected Uninstall, cancel it and select the appropriate action before continuing.
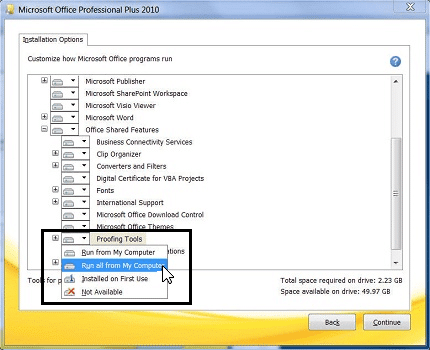
- Scroll down the Installation Options list until you find “Office Shared Features” then expand it. Select “Run all from my Computer” underneath the “Proofing Tools” option.
The steps above will reinstall and activate your spell checker in your Microsoft Word. We recommend restarting your computer after installation to ensure everything is properly functioning the next time you open Microsoft Word.
2. Repair Microsoft Office
Suppose you are experiencing problems with other Microsoft Office programs outside of Microsoft Word. In that case, repairing your Microsoft Office will solve your spell checker issues and any additional issues with your Microsoft Office.
Here’s how you can repair your Microsoft Office:
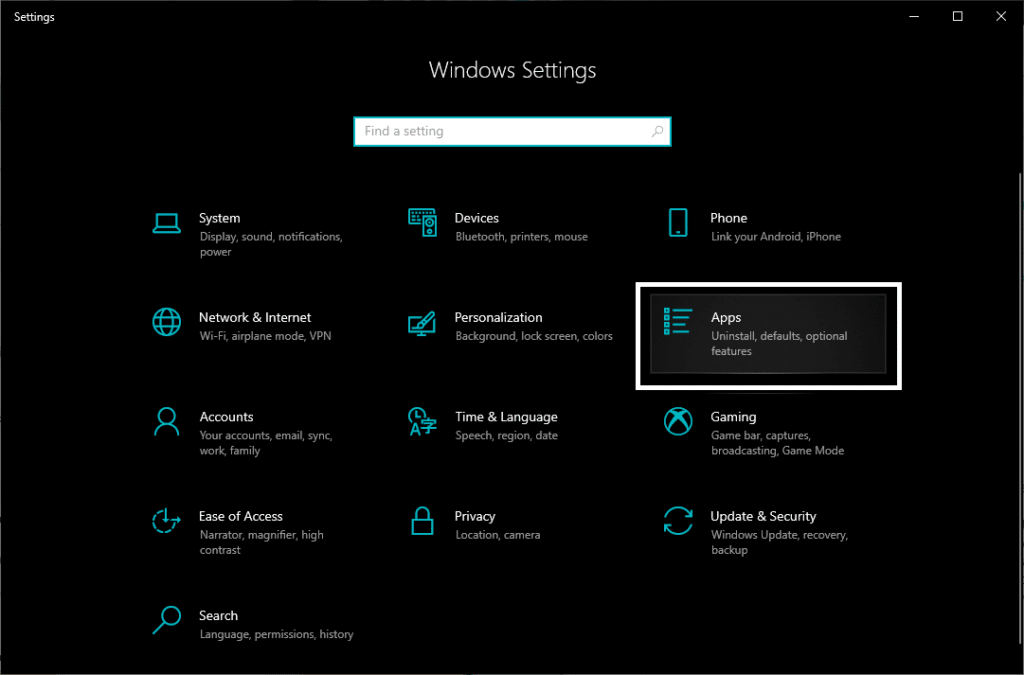
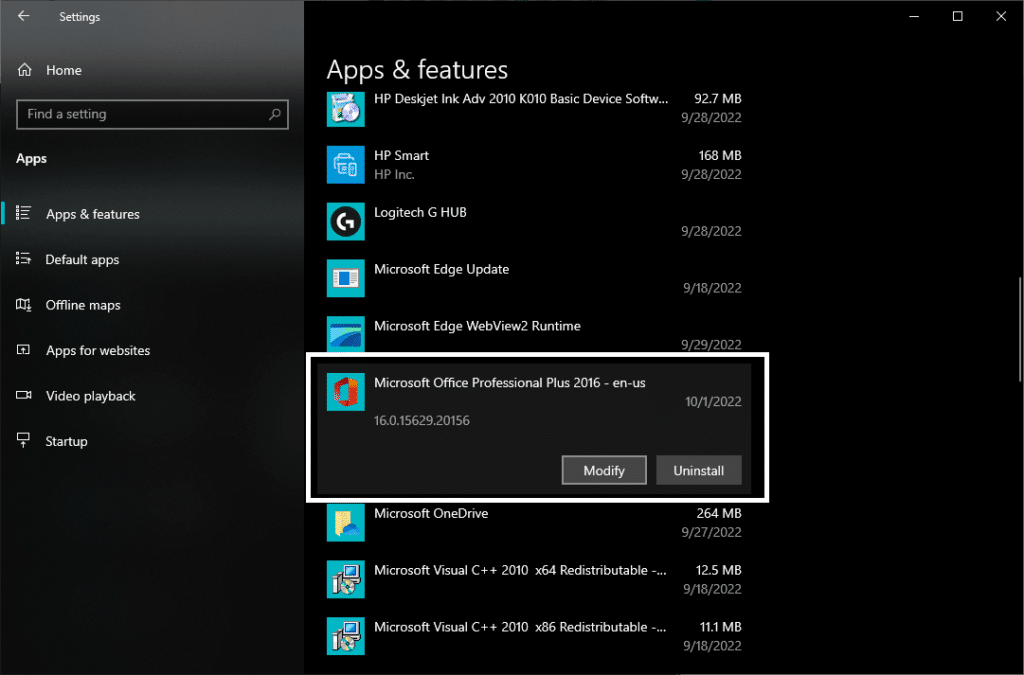
- Open “Settings” ⚙️ on your computer by searching it on your system.

- Select “Apps” from among the categories in your Settings.
- In the App List in the bottom portion of the window, scroll down until you find “Microsoft Office Professional….” and select it. Click on “Modify” and continue with any system permission requests.
- In the Microsoft windows that pop up, select “Quick Repair”🔧. You can also opt to choose “Online Repair” albeit it will take a longer time to finish.
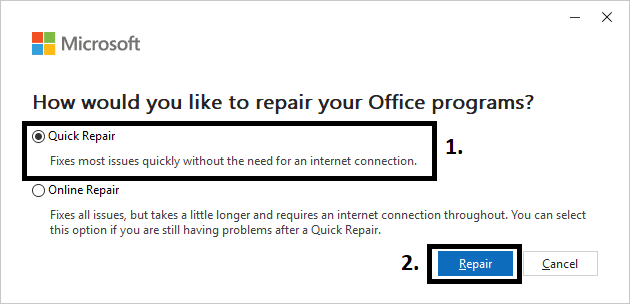
Please wait for the repair request to be finished and for the prompt that it was successful. Once the repair is finished, restart your computer and launch Microsoft Word to see if the problem is fixed.
Note: As the name suggests, Online Repair will require a stable internet connection to proceed as it will attempt to redownload any broken files. We only recommend choosing this if you have access to stable internet and as a last resort.
3. Re-Enable the Language you are Typing in (e.g., EN-US)
There are some instances of the spell checker language getting randomly disabled due to a bug or glitch with Microsoft Word. This rarely gets fixed automatically unless you reinstall the program, which is why you would want to check if it was disabled entirely.
Here’s what you can do to be able to do just that:
- Launch Microsoft Word and Select “File” from the menu.
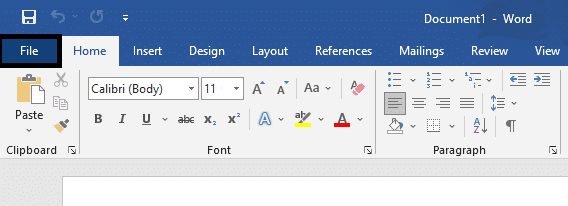
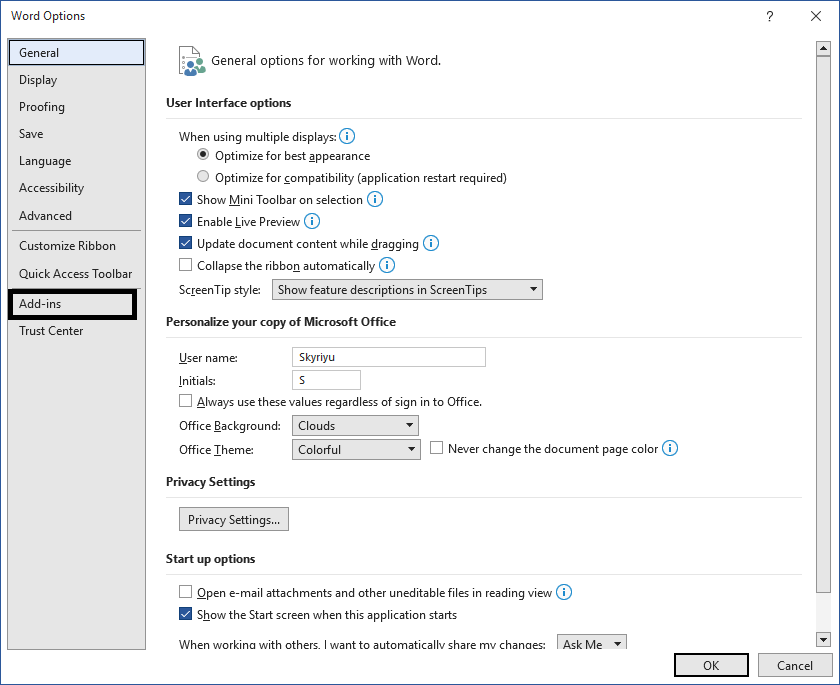
- Select “Options” found in the bottom left corner of the File tab.
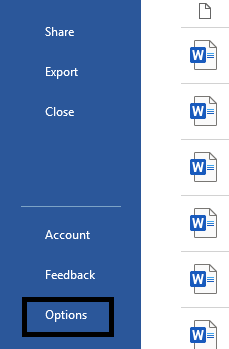
- In the Word Options popup window, select “Add-ins”.
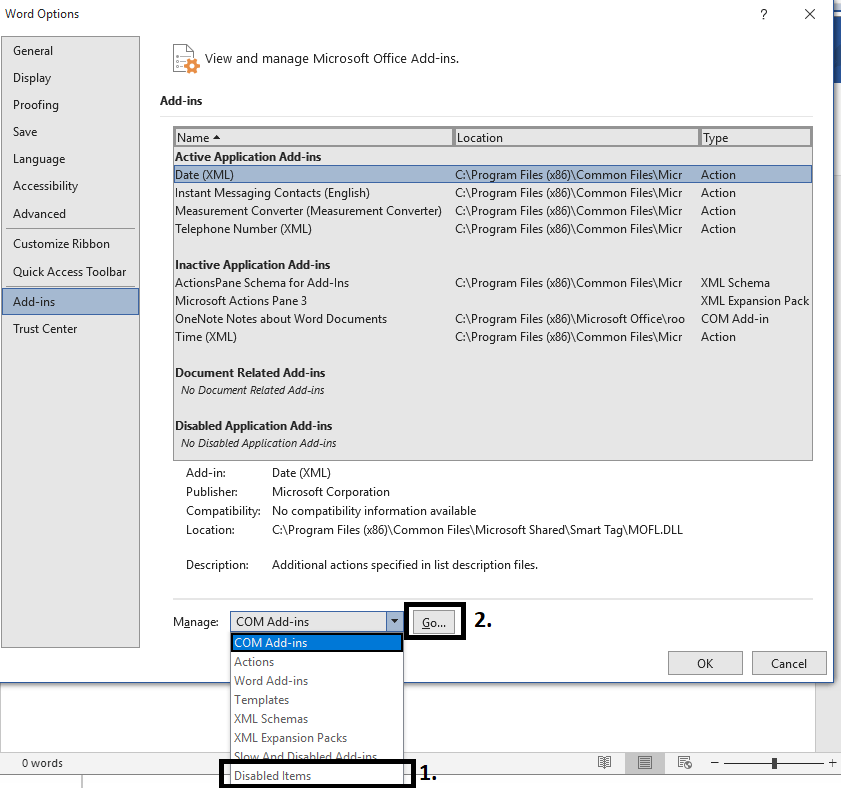
- On the bottom portion of the window, expand the “Manage” dropbox and select “Disabled Items” and then “Go”.
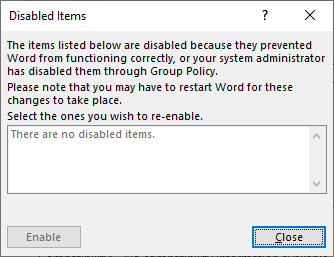
- A “Disabled Items” popup window will appear that will contain any disabled feature/s in Microsoft Word. check to see if “Speller EN-US (nlsdata0009.dll)” is listed here.
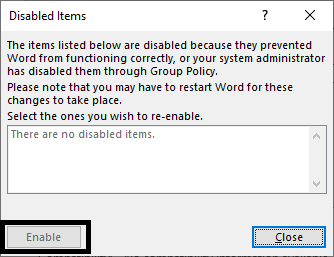
- If something is listed in the list that you are using, select it and click on “Enable”
After following the steps above, we recommend you restart your Microsoft Word to ensure that any changes you make will be applied.
4. Enable the Spell Checker Feature in Microsoft Word
Similar to the previous fix, you also want to check the spell-checking and proofing function entirely in your Microsoft Word to see if it was enabled correctly and running. If it was disabled in the last step, there’s a high chance that you need to re-enable it.
Here’s how you can do it:
- Launch Microsoft Word and Select “File” from the menu.
- Click on “Options” found in the bottom left corner of the File tab.
- In the Word Options popup window, select “Proofing.”
- Underneath “When Correcting Spelling and Grammar in Word,” check ☑️ both “Check Spelling as you type” and “Check Grammar with Spelling.”
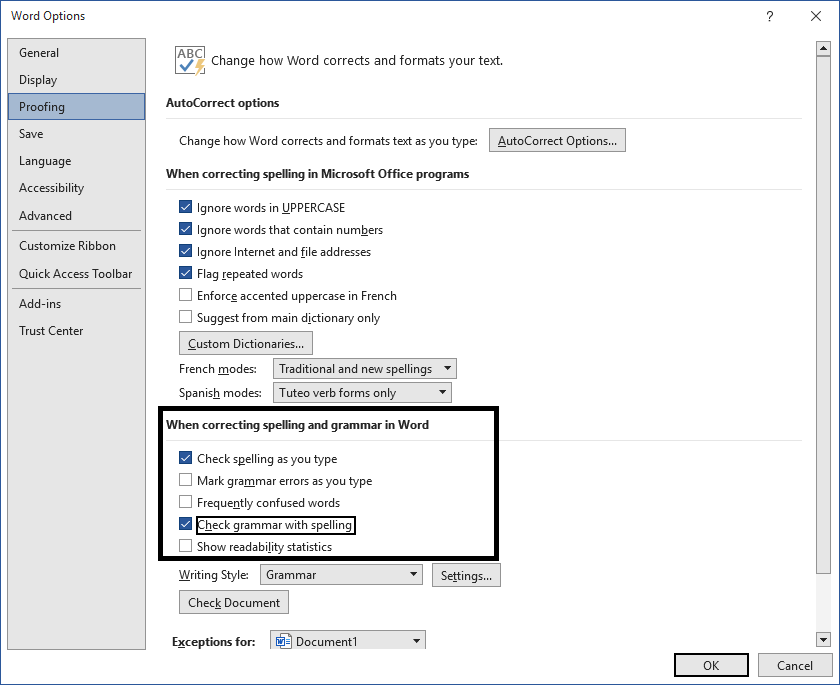
- Click on “OK” in the window’s bottom right corner.
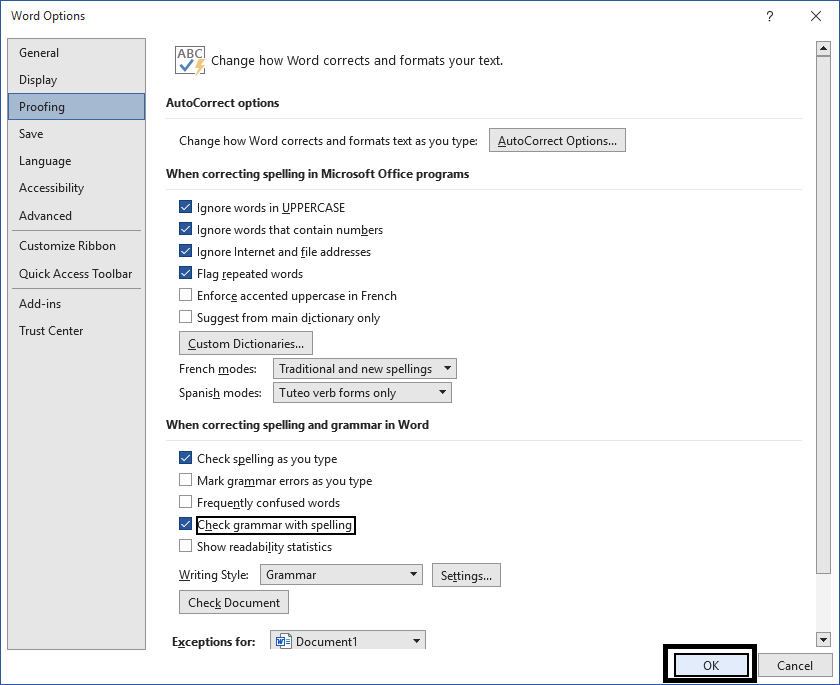
The first option allows Microsoft Word to check your spelling and grammar as you type in the document. The second option essentially enables the spell-checker feature to work.

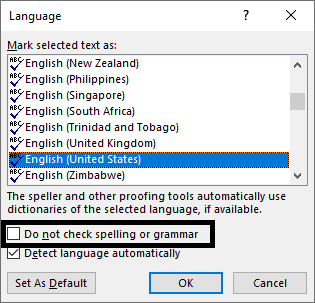
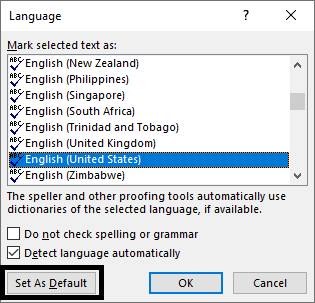
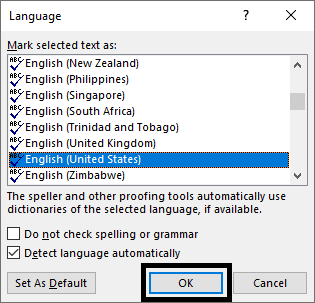
5. Set Your Proofing Language for Microsoft Word
Many Microsoft Word languages are set to your system’s default language. In most cases, the software will default back to “English – US,” and if this happens not to be the language you are typing in, you might want to manually set it by following these steps:
- Select “Review” from the top menu in the Microsoft Word software window.

- Click on “Language” and then select “Set Proofing Language”.
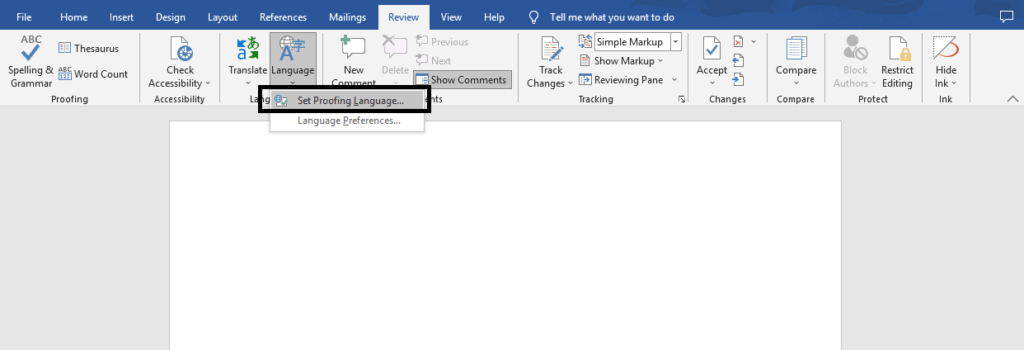
- Select the Language you will be typing in (E.G, English (United States)).
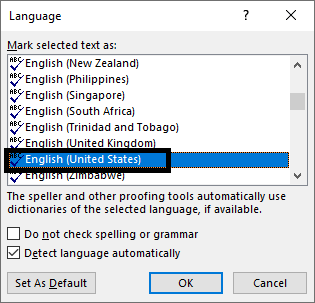
- Uncheck “Do not check spelling or grammar.” You can also opt to uncheck “Detect language automatically”.
- If you frequently type in the language, you set your Microsoft Word as we recommend by clicking on “Set as Default.” Otherwise, having English as your default and selecting another language is better overall.
- Click on “Ok” to apply the changes and start typing away.
6. Run Microsoft Word in Safe Mode
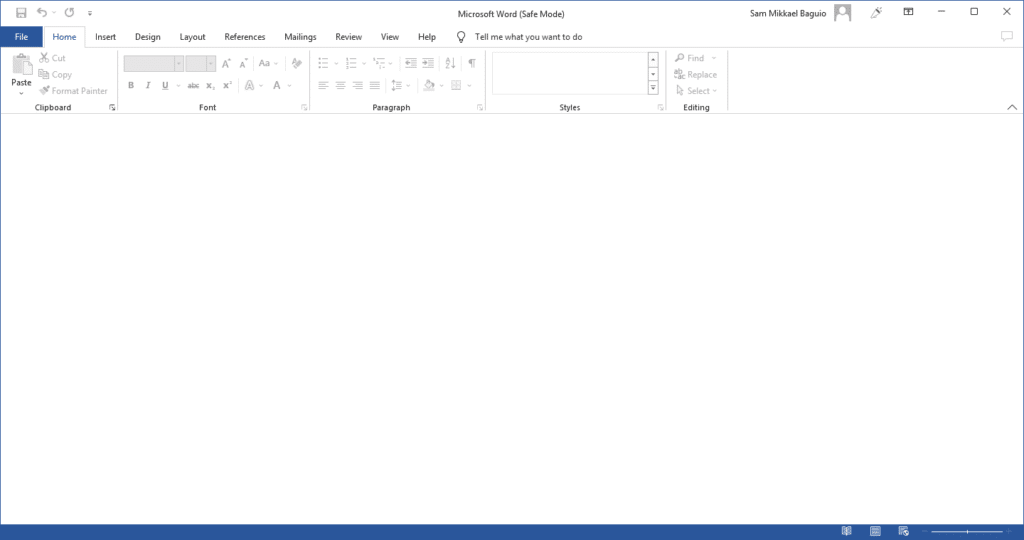
Safe Mode is a way for Microsoft Office to open documents without running the risk of unwanted malware overrunning your computer. The spell checker function is also available in Safe Mode and can be accessed by simply launching Word in Safe Mode in these 2 methods.
You can start with the First Method by following these steps:
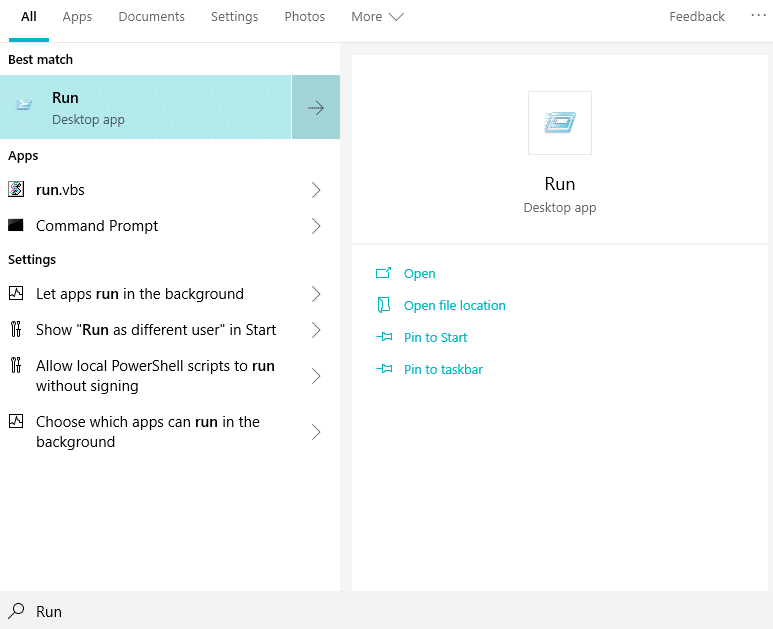
- Open the “Run” Command by either searching it or pressing Windows Key+R on your keyboard.
- In your Run window, type in “winword /safe” and click “OK”.
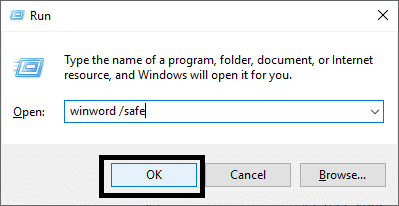
- This will open your Microsoft Word in Safe Mode automatically.
Second Method
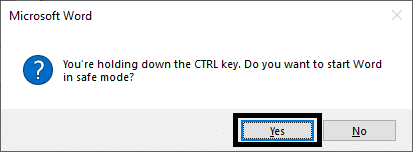
- Find Microsoft Word on your Computer either through the app or its shortcut. Searching for it works the best.
- Open the application WHILE HOLDING CTRL, and don’t let go until you see a popup from Microsoft Word.
- Select “Yes” from the popup to launch Microsoft Word in Safe Mode. Clicking “No” will launch it as normal.
Both methods above also work for opening other Microsoft Office applications in safe mode with a slight variation to match the app (such as using excel /safe for the first method).
7. Whitelist Microsoft Office From Your Security
Microsoft Word (and Office) can run even if it gets blocked by your system. However, if they are running, certain features will become unavailable, such as the spell-checker. Whitelisting Office will fix any issues related to this, and it can be done through these steps:
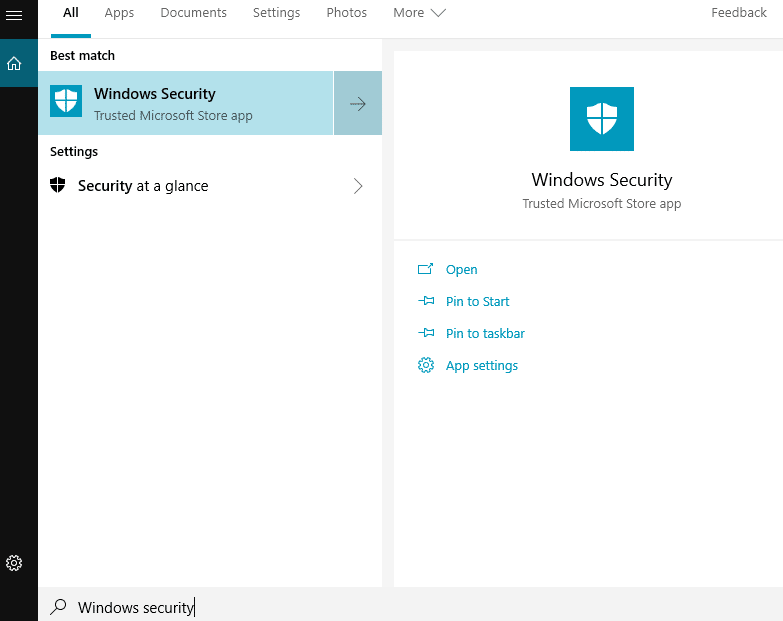
- Open “Windows Security” or something similar to that feature/function in your System.
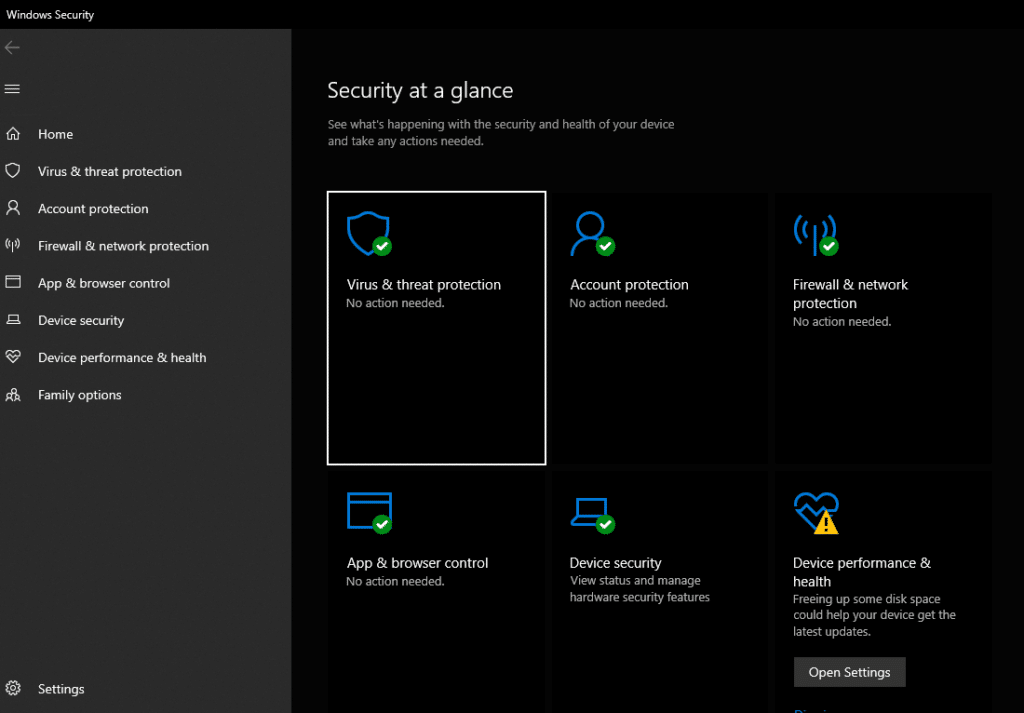
- Select “Virus & Threat Detection” from the Action list or in the left-side pane of the Windows Security window.
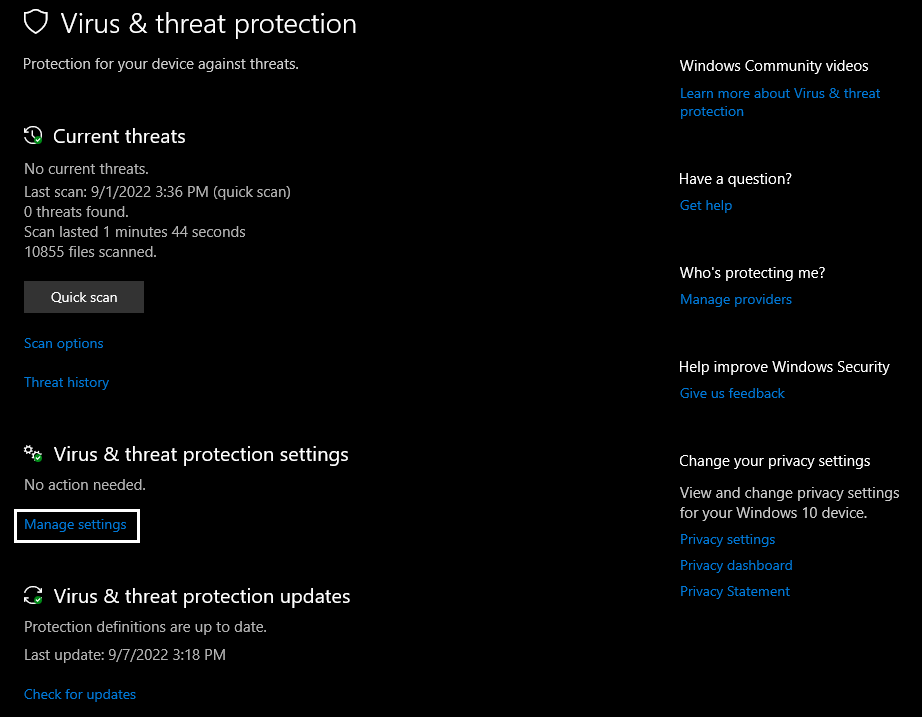
- Click on “Manage Settings” found below “Virus & Threat Protection Settings” in the Virus & Threat Protection window.
- Scroll down until you find the “Exclusions” category in the window. Click on “Add or Remove Exclusions” underneath the category.

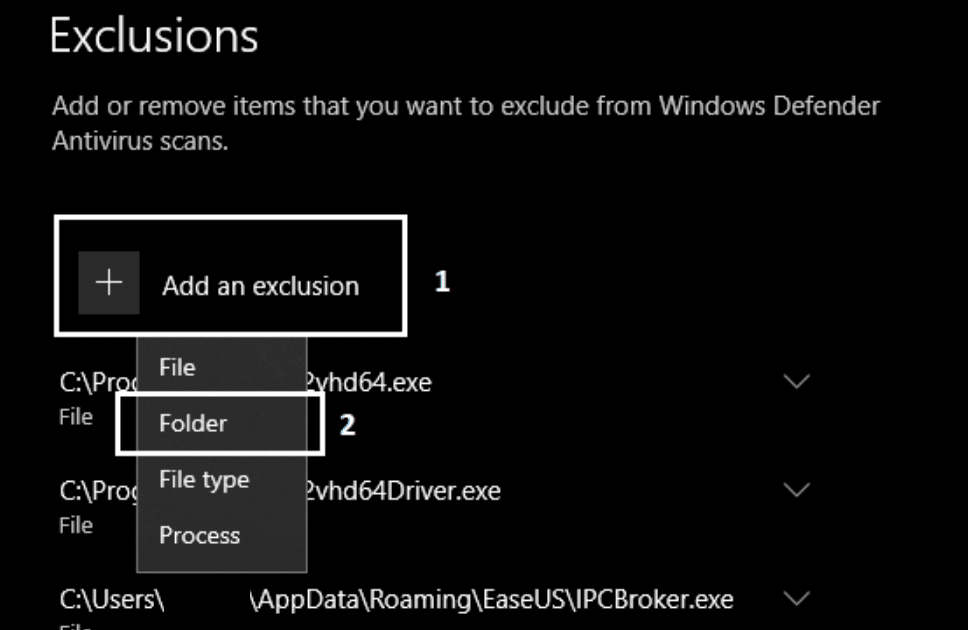
- Click on “Add an Exclusion”➕ and then select the “Folder”📁 option in the succeeding menu that appears.
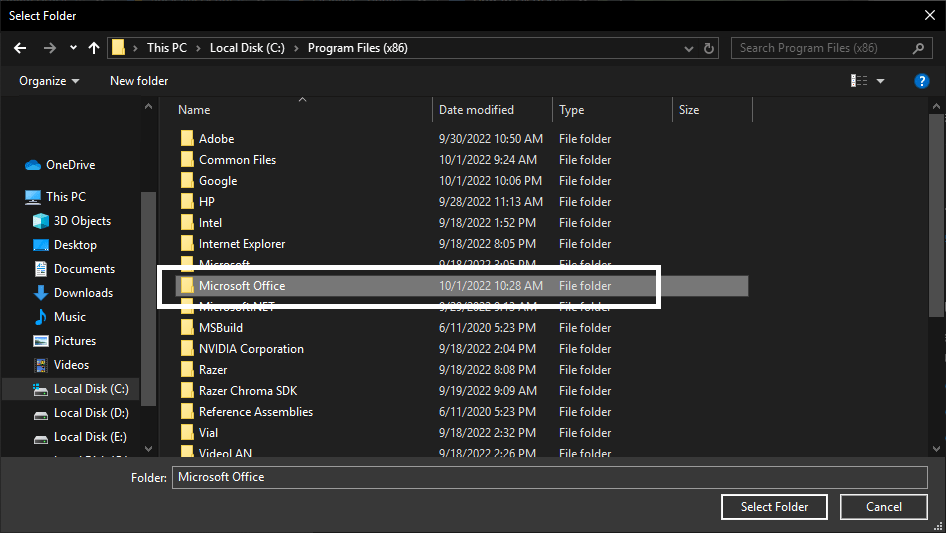
- In the popup window, please navigate to the folder where you have Microsoft Office and its files installed. The default installation location should be in “C:\Program Files (x86)\Microsoft Office”. “Program Files” can be used to replace “Program Files (x86)” if the option isn’t available.
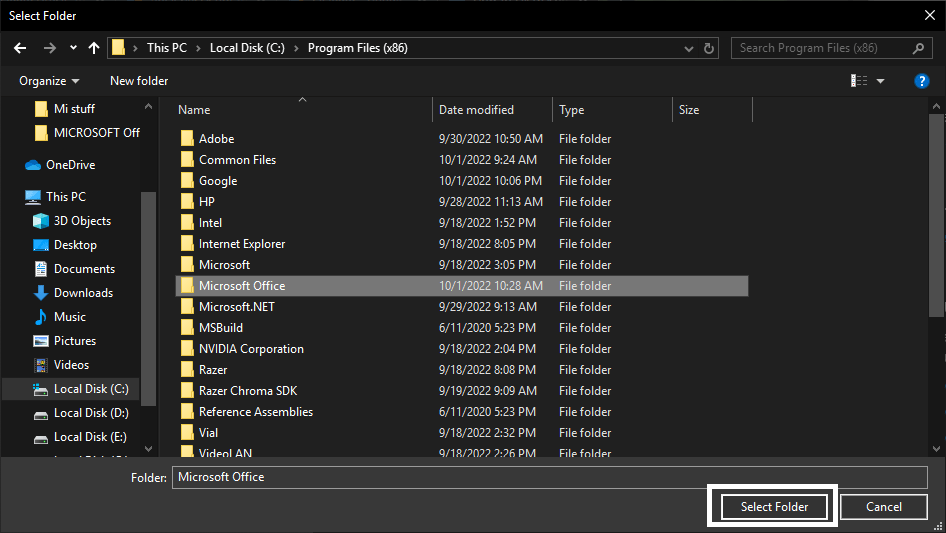
- Click on “Select Folder” after selecting the folder.
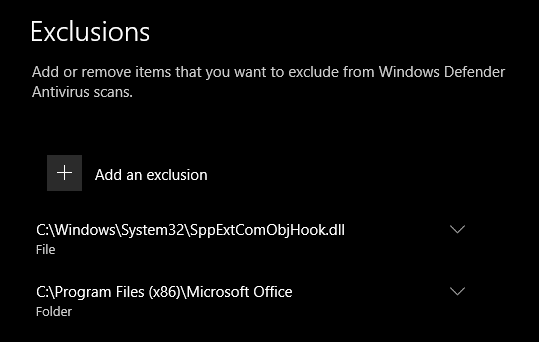
- The folder path you selected for Microsoft office will appear on the Exclusions list in the previous window. Once you confirm that it’s here, you can close the window.
After finishing all the steps above, we recommend that you restart your computer before launching Microsoft Word to ensure that Windows will adequately apply the changes and whitelist not only Microsoft Word but also the entire Microsoft Office apps.
8. Modify Your Computer’s Registry
Your registry is what holds all the software and its respective features that are installed on your computer. Your spell checker might not be working in Microsoft Word due to an incorrect value in your registry that you would need to fix manually.
This might seem complicated at a glance, but we have broken the steps down to make it easier to follow. Here’s where you can start:
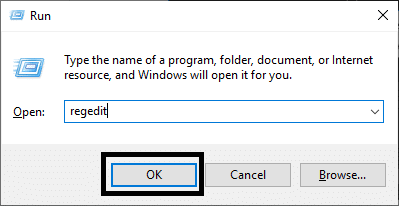
- Open the “Run” Command by either searching it or pressing Windows Key+R on your keyboard.

- Type “regedit” in the Run Command window and press “OK.” Continue with any app permissions that you might prompt.
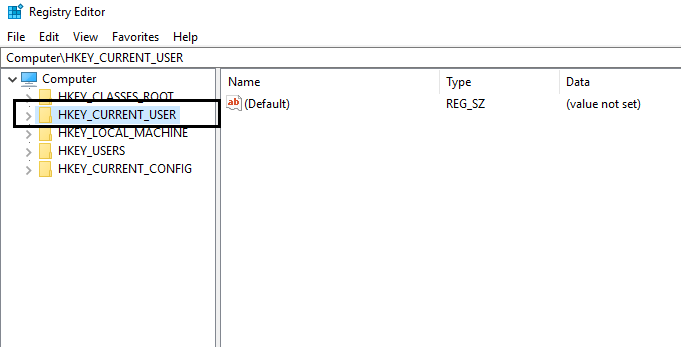
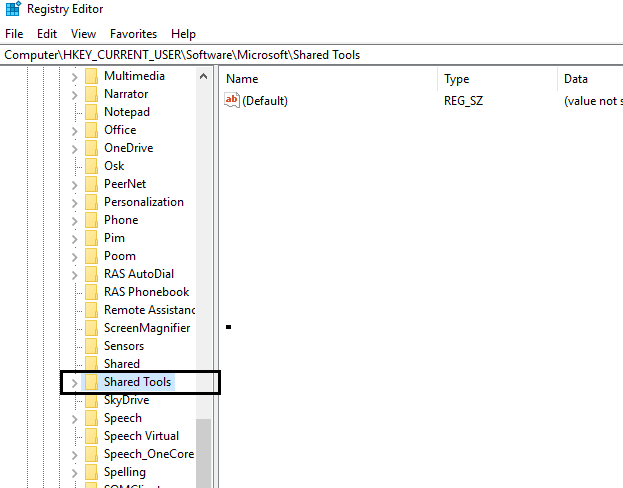
- Select the “HK_CURRENT_USER” folder and expand it.
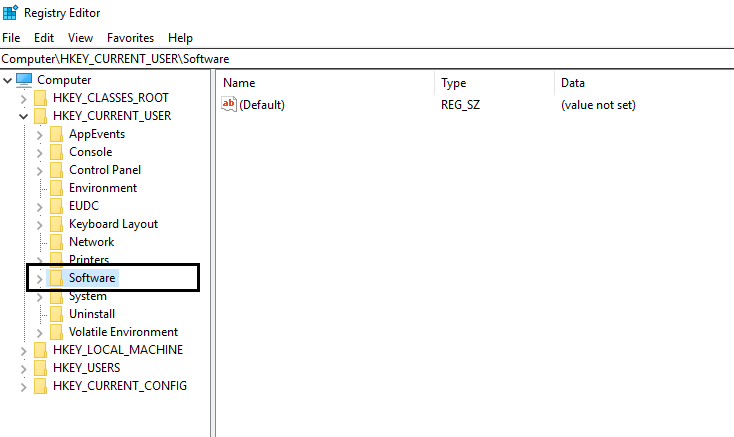
- Underneath the “HK_Current_USER” folder, find “Software” and expand it like before.
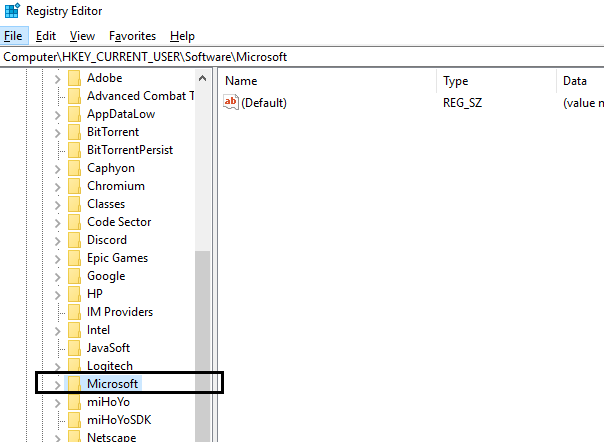
- Underneath the “Software” folder are different apps installed on your PC. Look for “Microsoft” from among them and select it.
- In the “Microsoft” folder, look for the “Shared Tools” folder and open it like before.
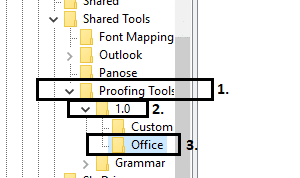
- Continuing from the previous step, select “Proofing Tools” then “1.0” and finally, “Office”.
- Click on “WordSpellingOptions” from the Regedit menu on the right.
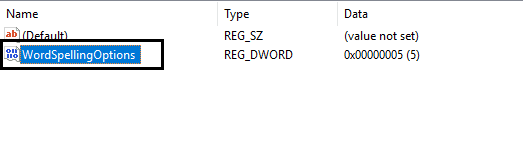
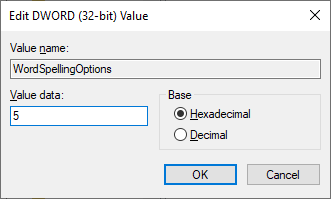
- In the Edit window, set the Value data to “5” and the base to “Hexadecimal”. This is the default option for Microsoft Office.
- Right-click your “1.0” folder and select “Rename” from the options.
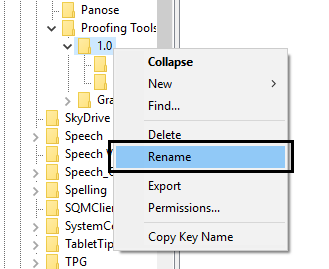
- Rename the folder to “1PRV.0” and then exit your Register Editor.
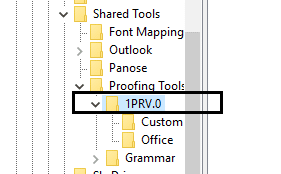
After following the steps above, you can relaunch your Microsoft Word after a quick reboot. If you are still experiencing problems with your spell checker, you can follow the steps to access the same folder and rename “1PRV.0” back to “1.0”.
For anyone curious, the entire file path you need to access in your Registry Editor is: “HKEY_CURRENT_USER\Software\Microsoft\Shared Tools\Proofing Tools\1.0”
Conclusion
Anyone who has used Microsoft Word at any point can agree with the simplicity and versatility offered by this word-processing software compared to similar apps. Many are familiar with the layout of Microsoft Word and the application’s ease of use with the number of features you have at your disposal.
The spell checker is an integral feature of Microsoft Word as it shaves off a good chunk of time when working with the application. It makes proofreading significantly easier while taking care of our little mistakes when writing down anything. We understand how frustrating it can get for those who rely on the feature, which is why we prepared this guide.
The 5 reasons and 8 fixes we have researched and prepared are geared toward helping you solve any issues you might encounter while using your spell checker when it’s not working correctly so you can get back into writing without any inconvenience. Always take your time when solving these kinds of issues, as you can make the situation more difficult if you rush into it.
Let us know down below 👇 in the comments:
- Is this guide helpful and informative with Microsoft Word’s Spell Checker?
- Which of the following fixes worked best for you and your problem?
- Any additional fixes we missed and can try out to add to this list?
- What do you like the most about Microsoft Word compared to other Word Processing Apps and Software?
Please don’t be shy to share this article with any friend, family member, or co-worker you find is having difficulties with their spell checker feature in Microsoft Word not working as expected.