Find that your Microsoft Outlook email notifications aren’t working or showing up on your macOS or Windows PC?
Following the popularization of the Internet 🌐, emailing has become an important way of communication for Internet users 📧. As the world around us becomes increasingly digitized 📱, workplaces, schools, hospitals, and government agencies alike are starting to use email as an official tool for communication due to it being cheap and efficient. 💸
Outlook is Microsoft’s email client application, which is part of their digital ecosystem 
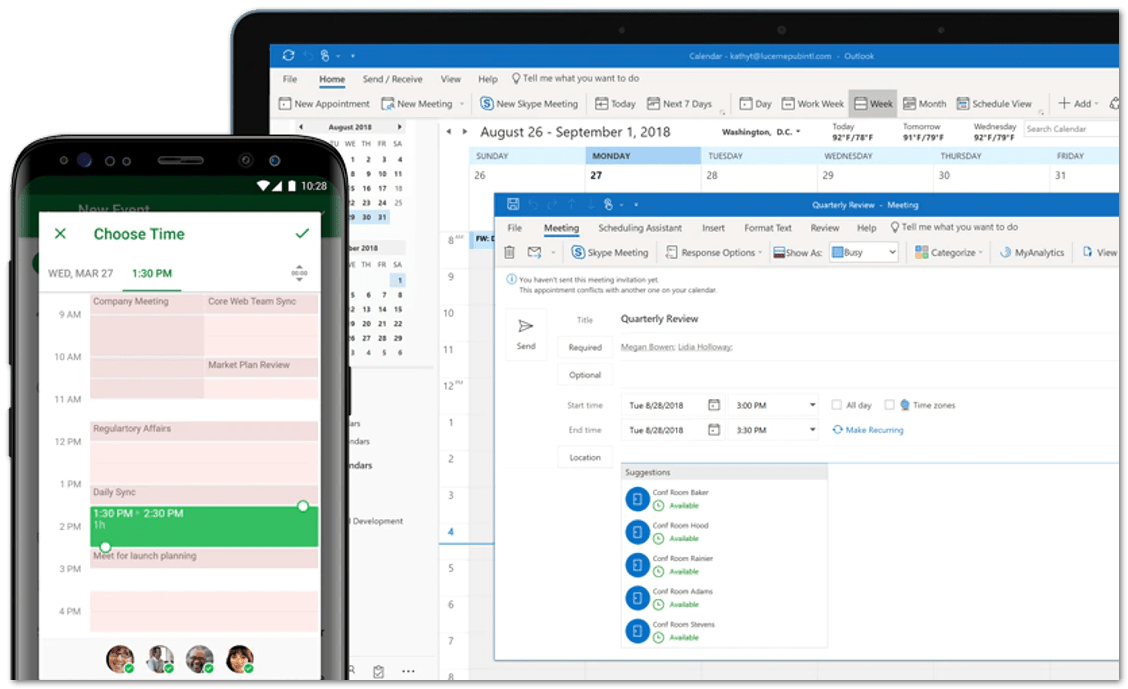
Additionally, Outlook’s intelligent notifications system is truly a fan favourite, which alerts you for important emails in your Focused Inbox only. Hence, allowing you to avoid all the random spam or less priority emails you may get in your Others Inbox.
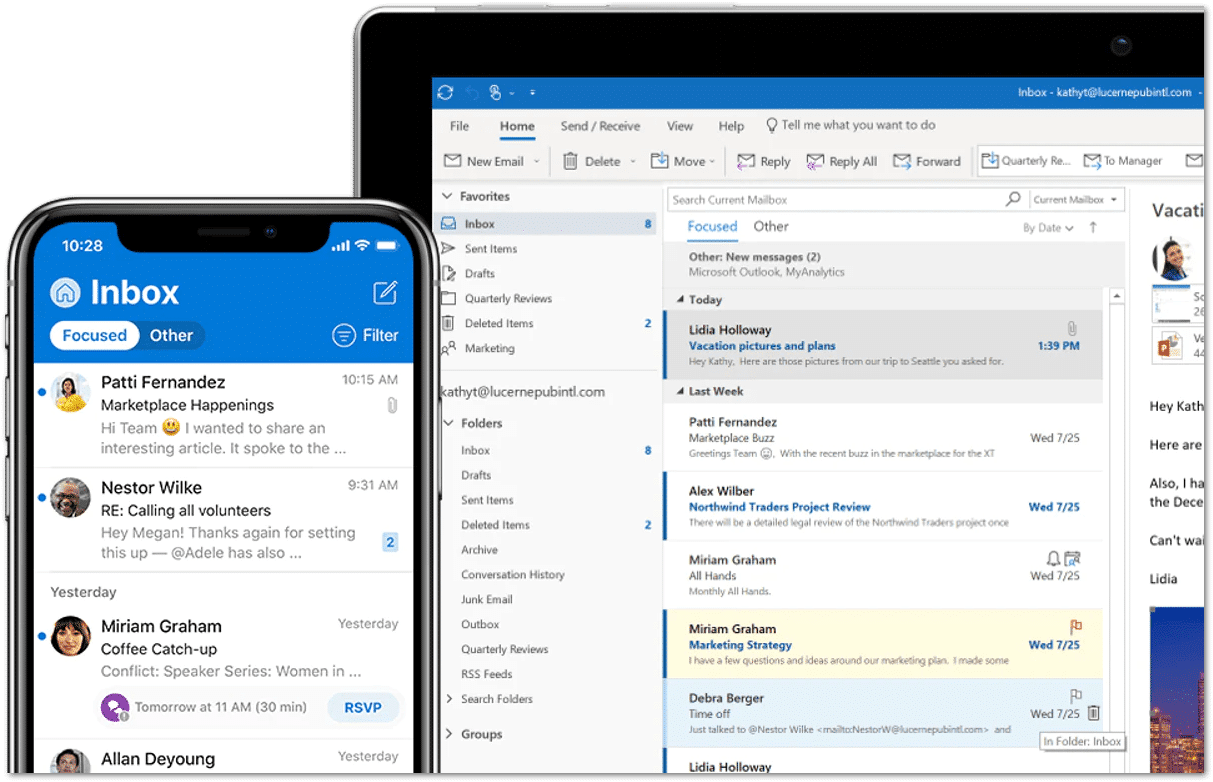
Overall, this notifications feature can be extremely helpful, especially if you’re voiding off all distractions and grinding away at your workstation. 💻
However, at times, users tend to find that they’re not receiving any email notifications from the Outlook application on their desktop. Thus, this is understandably frustrating as nobody wants to miss out on any important emails. 😫
On that note, here are 9 fixes for when your Microsoft Outlook notifications are not working on Windows 10 or macOS! 😤
Note: The steps and pictures in this guide cater to the Microsoft Outlook app or website accessible through your macOS or Windows 10 PC. If you’re missing out on Outlook mobile notifications for Android or iOS, we recommend checking out our guide here.
With that settled, let’s jump in!
Table of Contents
- Restart Your PC
- Configure the Notifications Settings in the Outlook App
- Enable the Notifications Settings on Your Computer
- Turn Off Focus Assist
- Turn Off Battery Saver
- Update the Microsoft Office Apps
- Move Important Emails to the Focused Inbox
- Enable Outlook Notifications on the Web Browser
- Use Outlook Rules to Create Custom Notifications
1. Restart Your PC
Suppose that you just found out that you’ve received an email in Outlook, but you haven’t received any notifications. Don’t freak out 😱. It’s likely a temporary glitch due to an intermittent network hiccup that’s causing the problem.
Fortunately, the remedy to this is pretty simple: Restart your computer.
While this simple fix is often overlooked, it can help us quickly identify a false alarm and save a lot of time down the road.
Therefore, the following are steps to restart your PC, depending on its particular OS:
For Windows
- First, click the Windows icon at the bottom left corner.
- Then from the Start menu, click the Power button.
- Finally, choose Restart.

For macOS
- The easiest way to prompt a restart is, click the Apple Menu, situated at the top left corner of the screen.
- Then, from the drop-down, select Restart.
- Finally, at the subsequent message asking “Are you sure you want to restart?”, click Restart.

Otherwise, if you haven’t been receiving email notifications for some time, you can check out the fixes below for solutions and workarounds for this issue!
2. Configure the Notifications Settings in the Outlook App
Logically, the first place we would want to check is the Notification settings ⚙️ in the Outlook App. For this, Outlook provides a large number of settings to allow users to customize how their emails are managed in Outlook.
Hence, the average user may find this maze of menus and submenus confusing to navigate through. 😵
Therefore, through the following steps, we’ll guide you through step-by-step to configure the email notification settings on the Outlook desktop app:
- First, open the Outlook desktop app.
- Next, click on File at the upper left.

- After that, select Options.
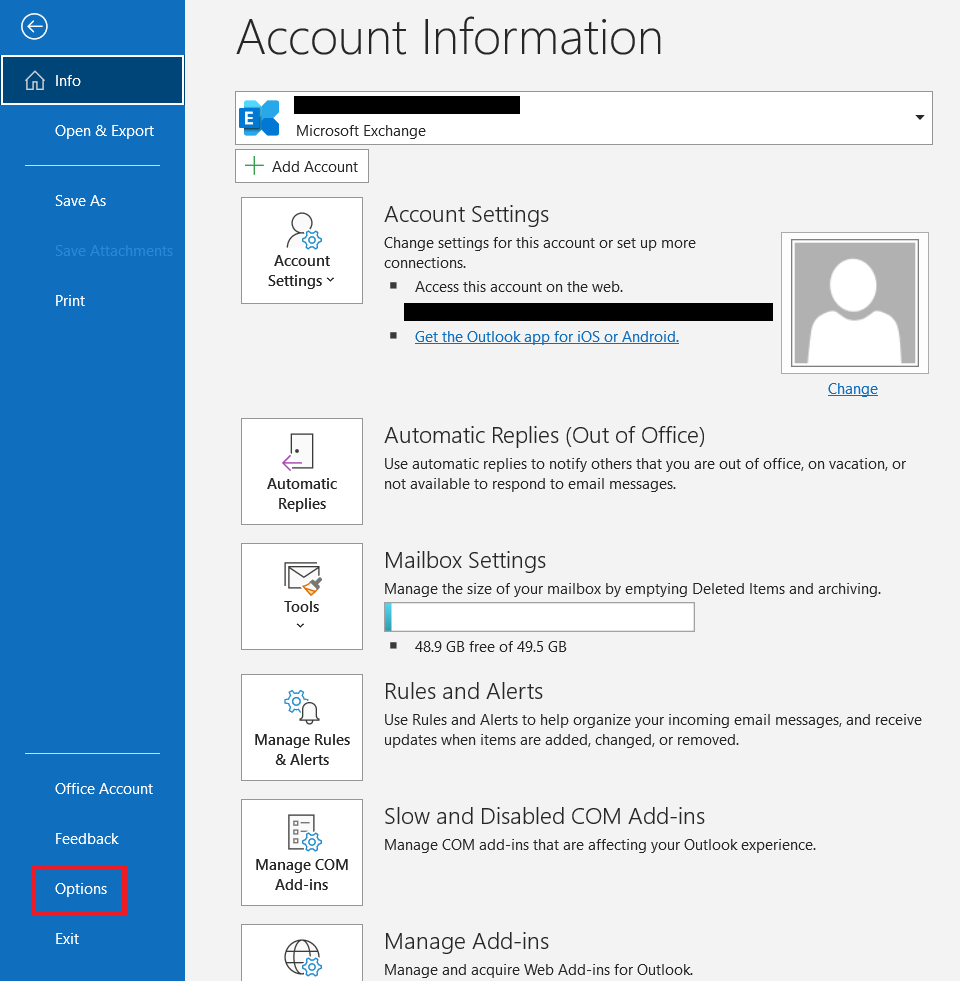
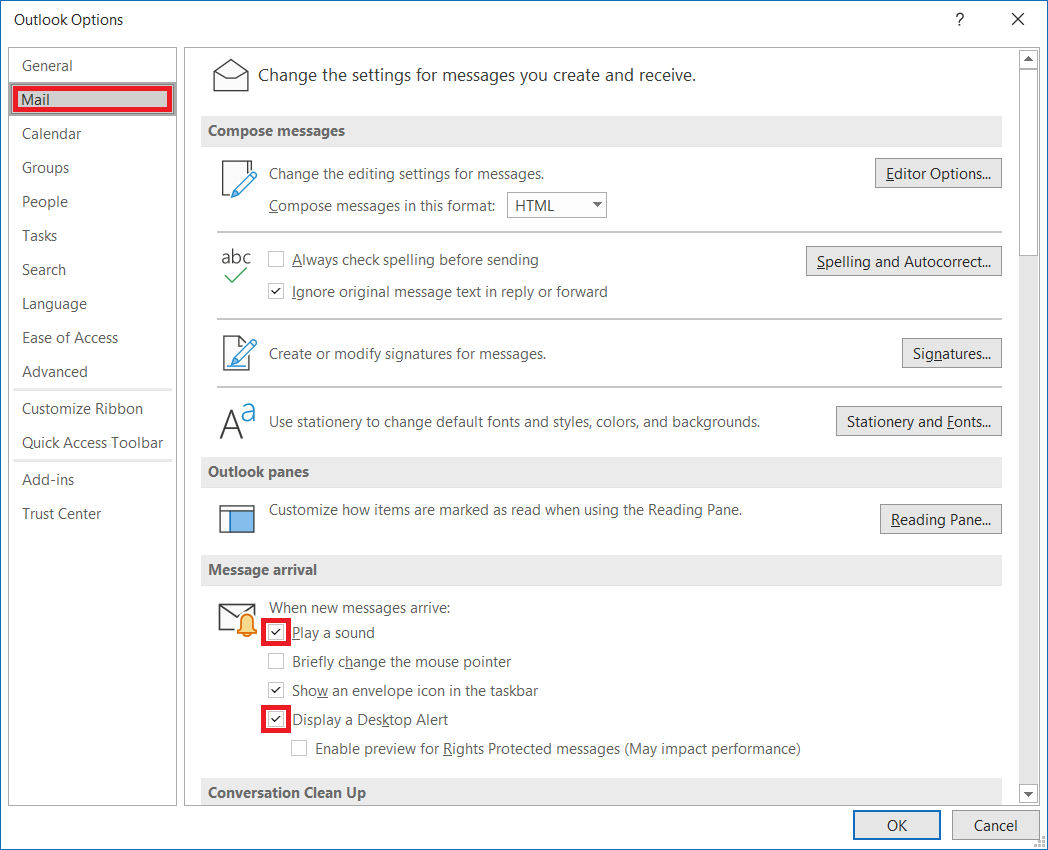
- In the pop-up window, select Mail from the left pane.
- Finally, ensure that both Play a Sound and Display a Desktop Alert are checked.
- Lastly, click OK.
3. Enable the Notifications Settings on Your Computer
Another possible cause for this problem is that notifications for Outlook have been disabled on your PC’s system settings. In this case, all push notifications sent by Outlook will be blocked by your PC’s push notification system, due to the misconfigured settings.
Hence, this minor setting could be the culprit behind your Outlook notifications not working or showing up on your PC.
To solve this, we’ll need to check the notifications settings on your computer:
For Windows
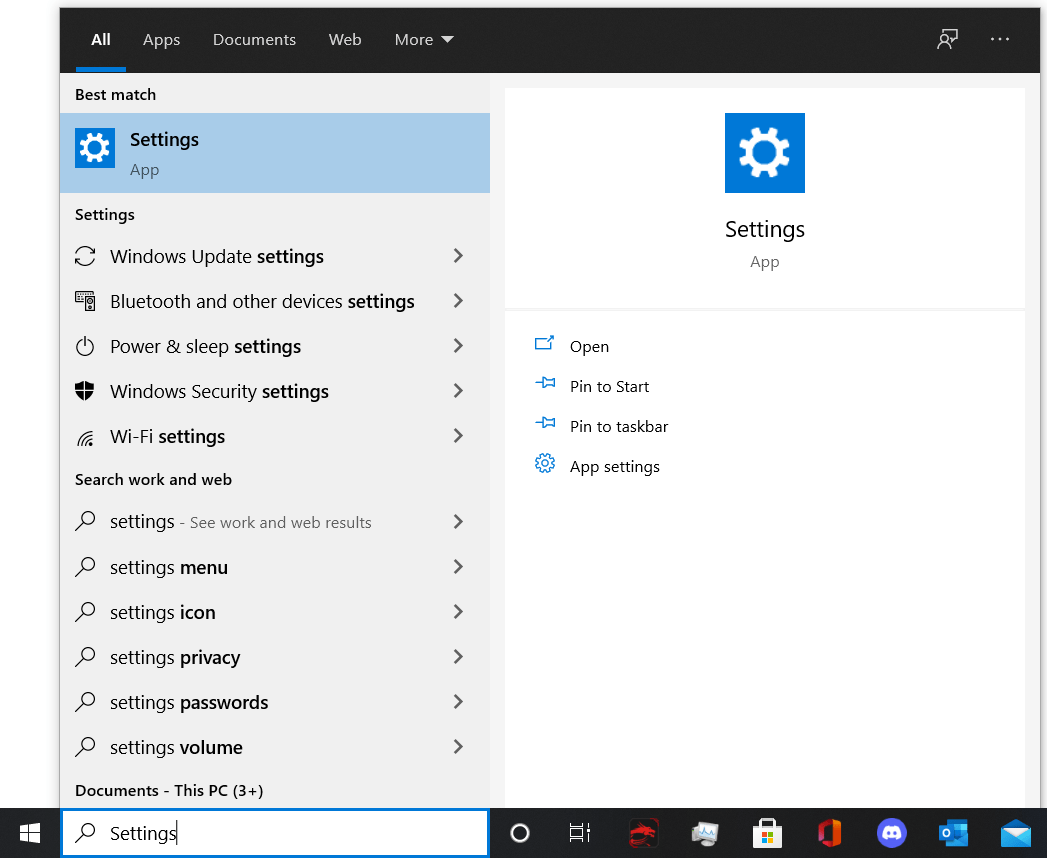
- First, open the Settings ⚙️ app. To do this, type “Settings” in the search bar on the bottom-left corner of your screen and Open it.
Alternatively, you can use the keyboard shortcut Windows key 
- Next, select System.

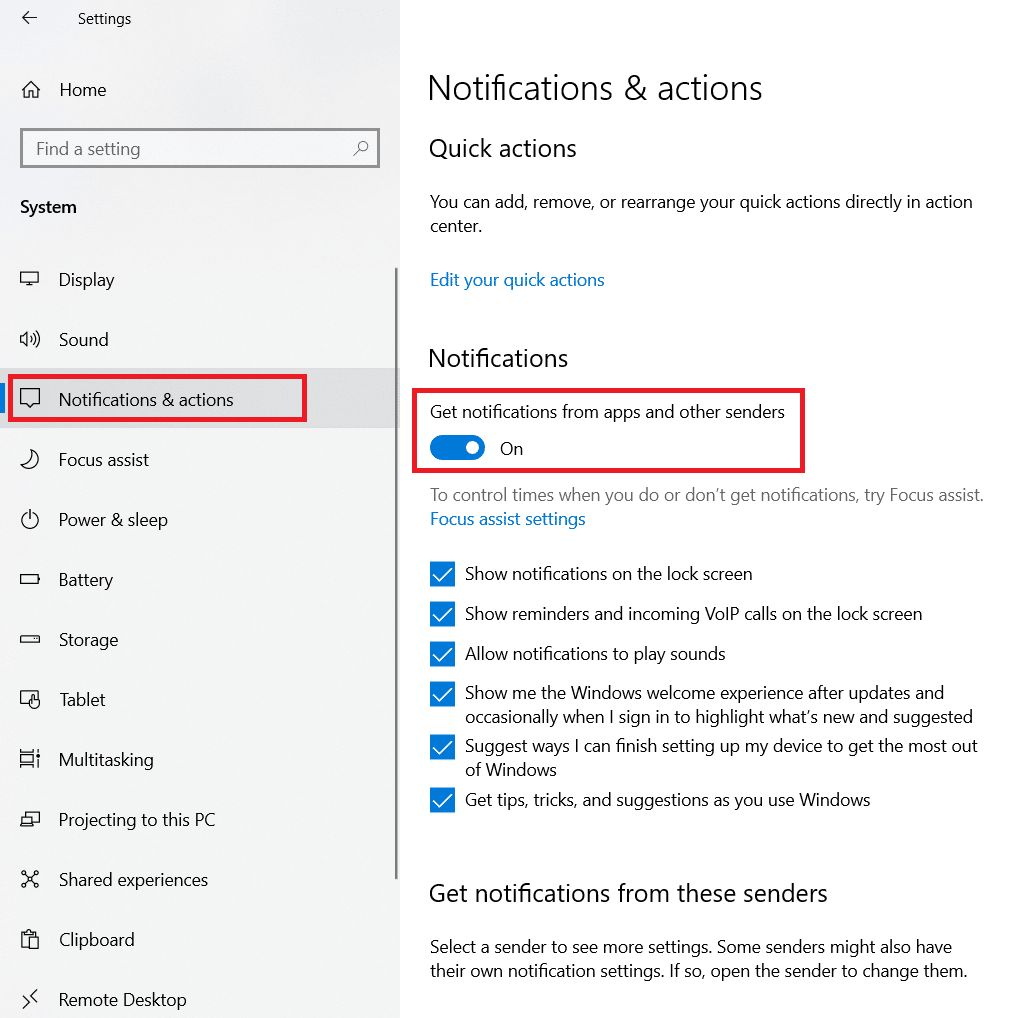
- After that, go to Notifications and Actions on the left side menu. Here, make sure that the Get notifications from apps and other senders setting is turned on.
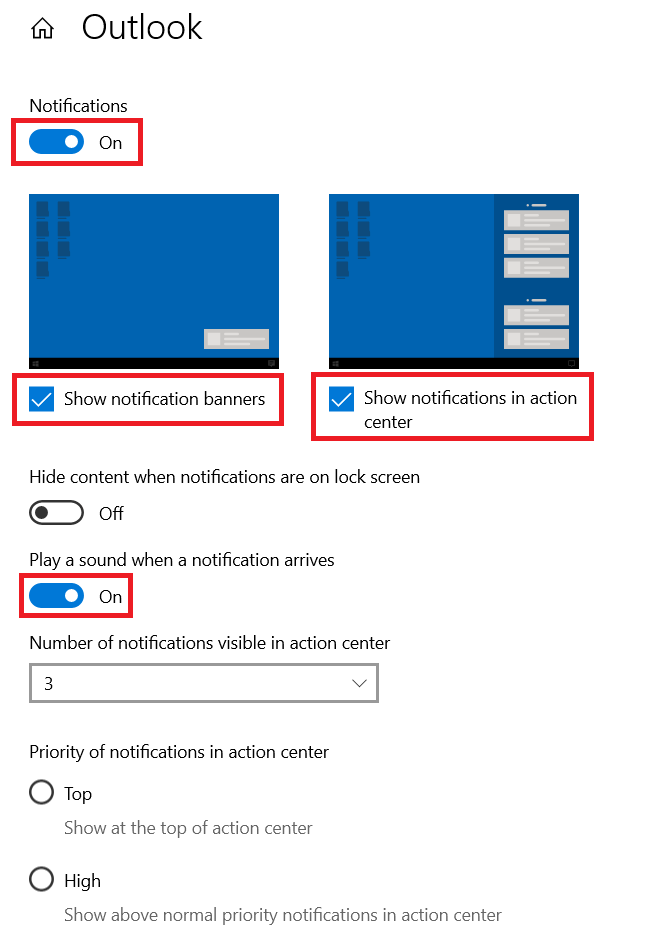
- After that, scroll down to Get notifications from these senders, and find Outlook among the list of applications. Then turn on the switch next to it.
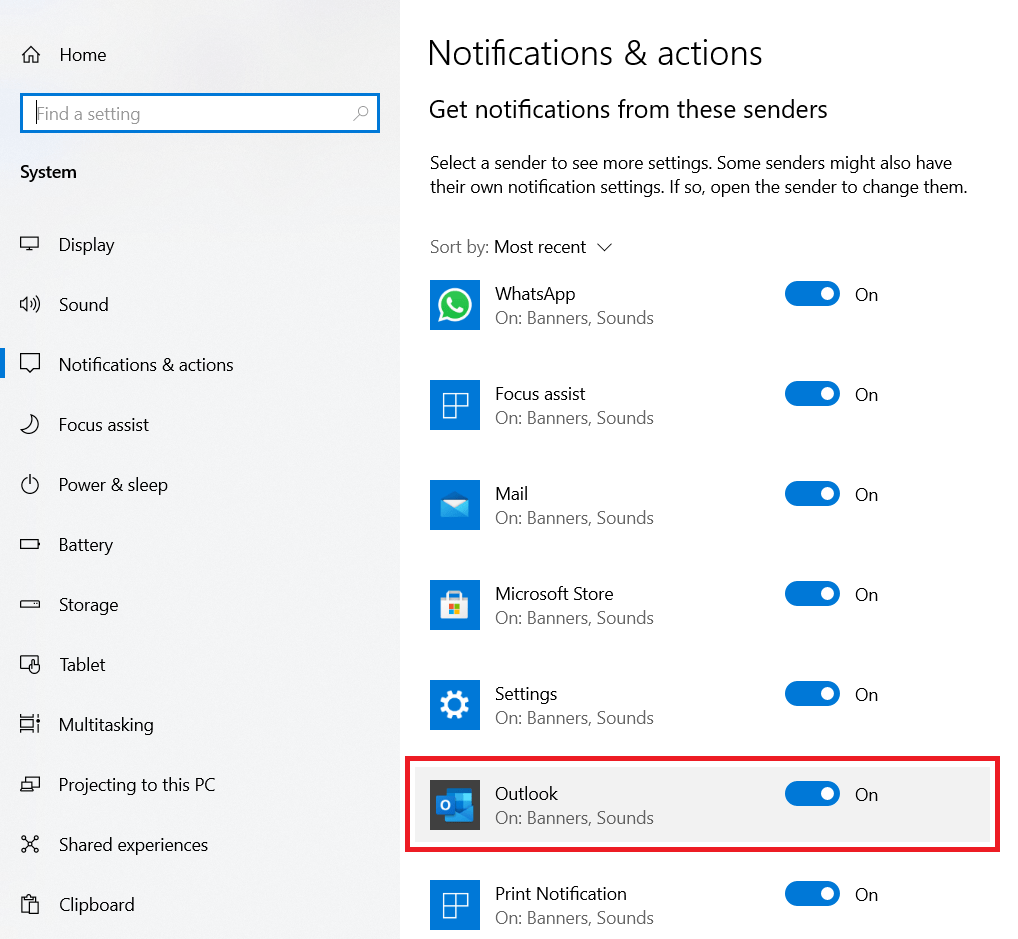
- Finally, make sure that Notifications is switched on for Outlook and the appropriate notifications settings such as Show notification banners, Show notifications in action center, and Play a sound when a notification arrives are enabled as well.
For macOS
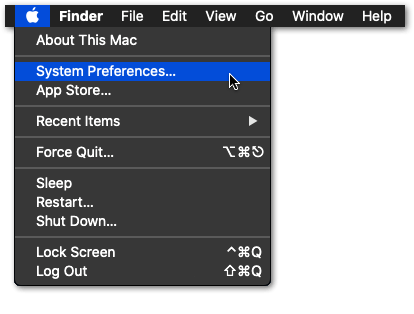
- First, click on the apple icon on the top-left corner of the menu bar.
- Next, select System Preferences.
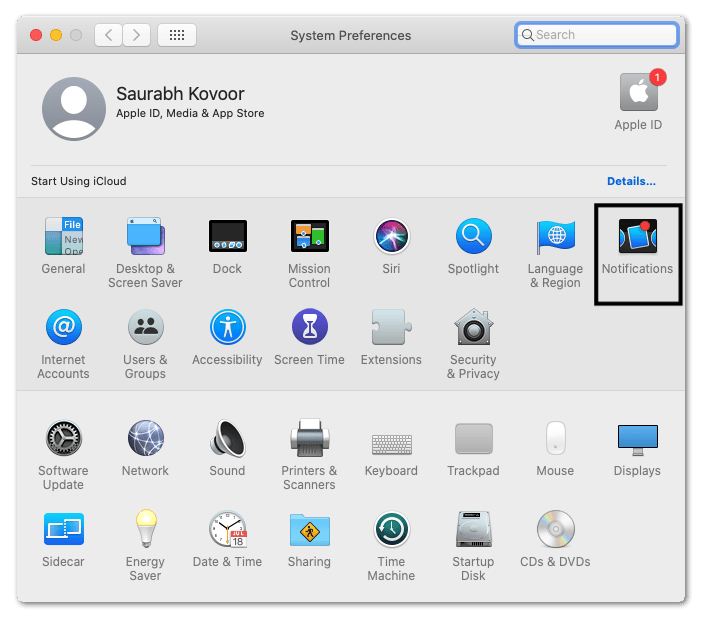
- After that, select Notifications.
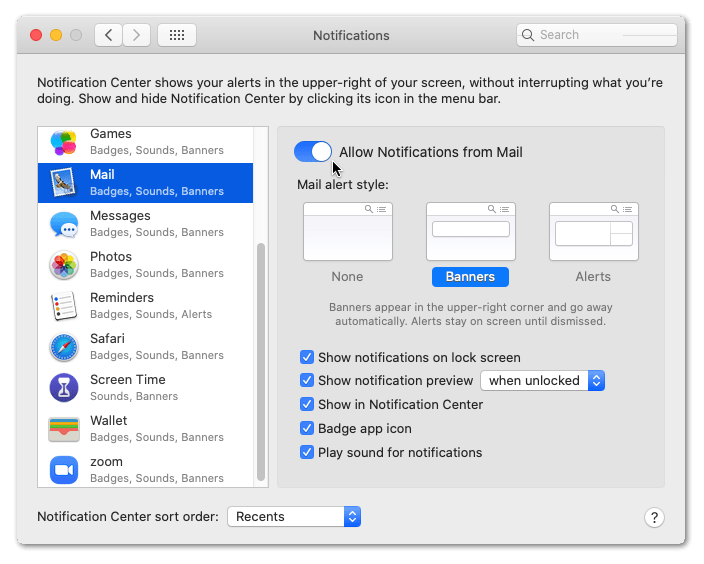
- Then, there’s a list of applications on the left-hand column of the window. Here, select Outlook from the list.
- Finally, make sure that Allow Notifications from Outlook is switched on. You can also check the additional options for notifications for further customization.
4. Turn Off Focus Assist
Focus assist (also known as quiet hours 😴) is a feature in Windows 10 that’ll disable incoming notifications for users who want to stay focused on a particular task. 🔥
By default, Focus assist turns on automatically when the user is duplicating a display, playing a video game, or using an application in full-screen mode.
Hence, we’ll guide you through checking and disabling this “Do not Disturb” feature on your Windows 10 or macOS device:
For Windows 10
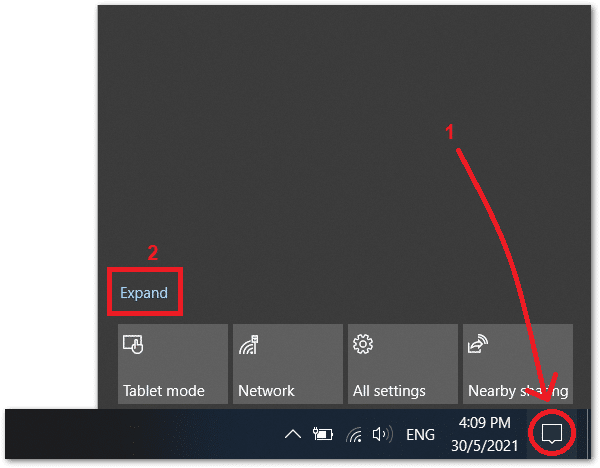
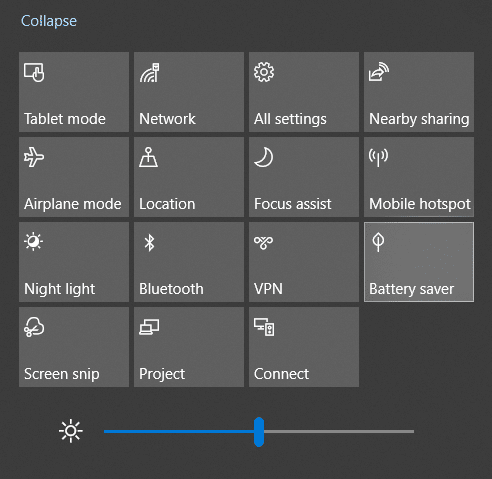
You can quickly check if the Focus assist feature is turned on or not by opening the Action Center on the taskbar.
- For this, click the chat bubble icon 💬 on the bottom-right corner of the taskbar.
- Then, click on Expand.
- Finally, make sure that Focus assist is turned off. (i.e., not highlighted in blue)
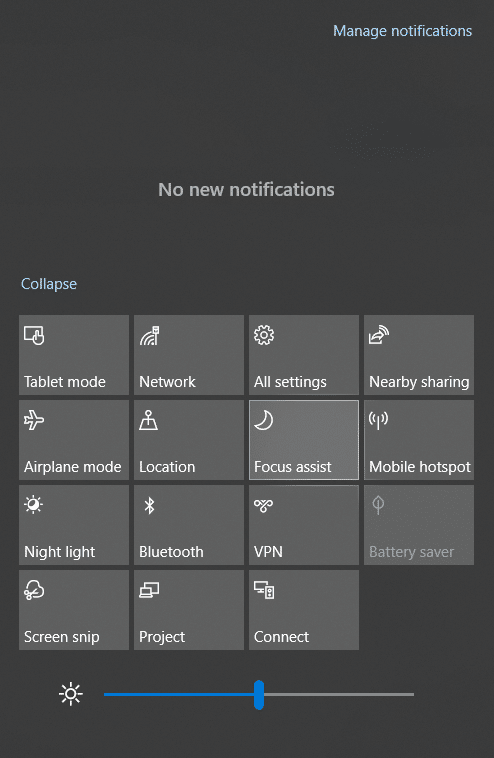
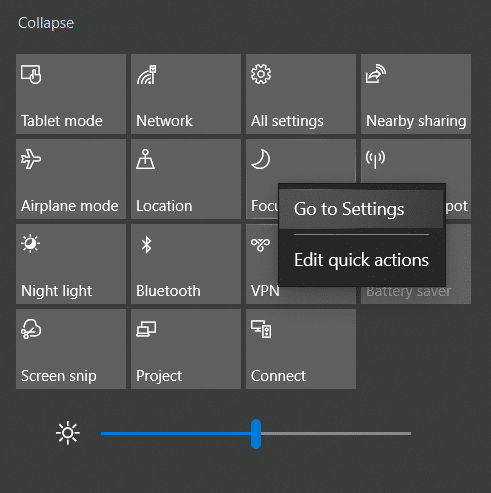
- Moving on, you can further customize the Focus assist feature by right-clicking Focus assist and selecting Go to Settings.
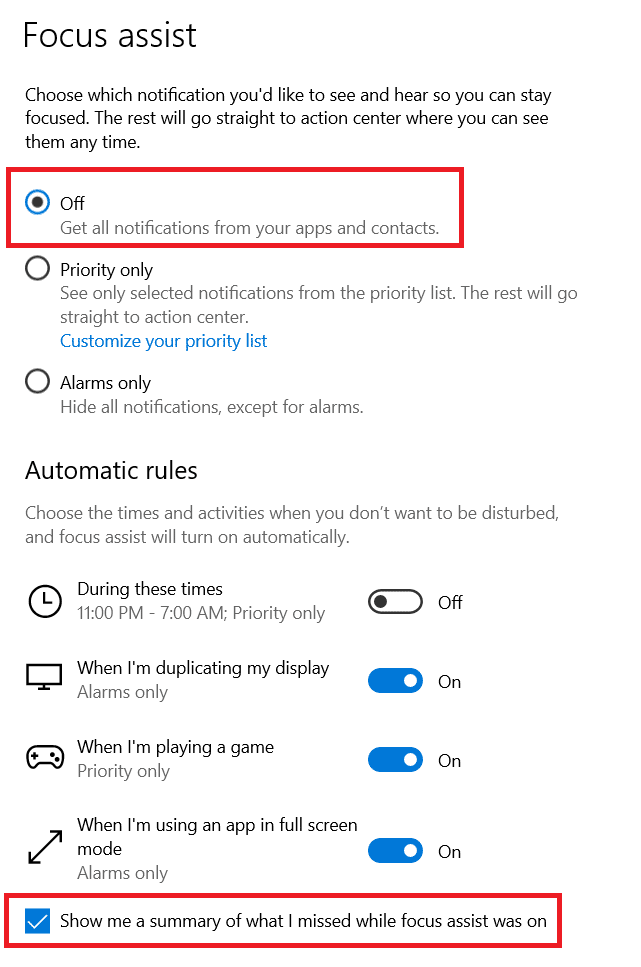
- In the Settings, make sure Focus assist is in the Off mode.
- Additionally, we recommend checking the Show me a summary option at the bottom of the menu.
For macOS
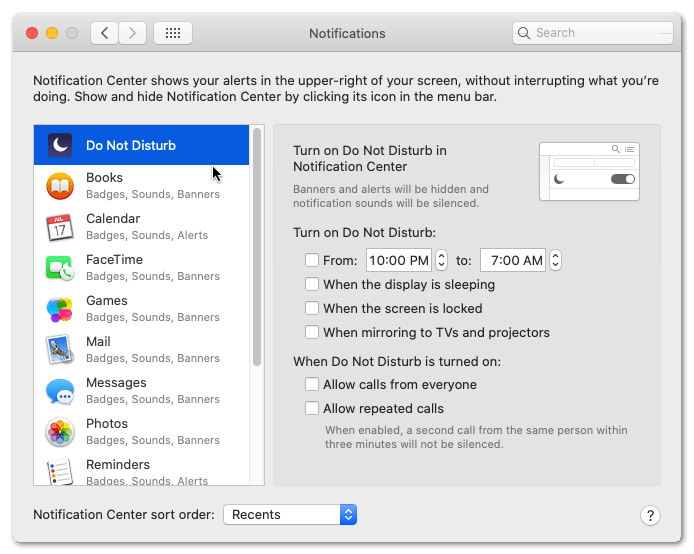
The equivalent of Focus assist on macOS is the Do Not Disturb feature, which can be accessed by following these steps:
- First, click on the apple icon on the top-left corner of the menu bar.
- Next, select System Preferences.

- After that, select Notifications.

- Then, select Do Not Disturb.
- Finally, make sure that Do Not Disturb is switched off.
5. Turn Off Battery Saver
Similar to Focus assist, the Battery saver is a Windows 10 feature, most commonly found in laptops 💻. Thus, like before, it’s another setting you need to be wary of, as it can interfere and result in your Outlook app notifications not working.
For desktop computer users 🖥️, the Battery saver option is most likely disabled already or greyed out in the Action Center.
As the name suggests, the feature is mainly used to conserve power or battery use on your laptop by dimming the screens and reducing the resource usage of background applications.
Therefore, this means that you’ll most likely not receive notifications if Battery saver mode is enabled. 🔋
So, to disable the Battery Saver mode on your PC:
For Windows
By default, battery saver mode activates automatically when your laptop has a low battery. Therefore, you can try plugging your laptop into a power source and this feature will be turned off. 🔌
Alternatively, you can check if Battery saver mode is enabled through the Action Center:
- First, click on the chat bubble icon 💬 on the bottom-right corner of the taskbar.
- Then, click on Expand.

- Finally, make sure that Battery saver is turned off. (i.e., not highlighted in blue)
For macOS
- First, click on the Apple menu
- Next, select System Preferences.

- After that, click on Battery or Energy Saver.
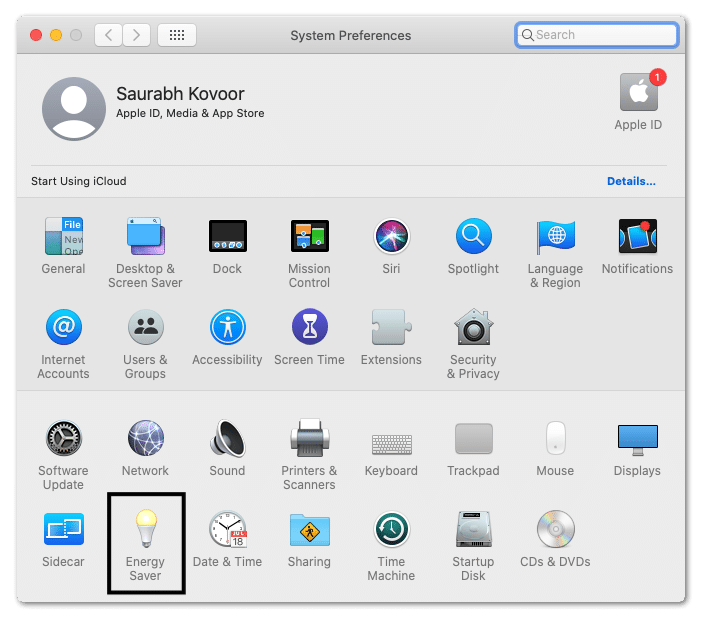
- In the configurations menu, you’ll be able to choose between different sets of options depending on whether your Mac is plugged in.
6. Update the Microsoft Office Apps
Outdated software may cause all sorts of problems for the user, and the same goes for Outlook. Maybe you’ve missed some of the automatic updates and the outdated version of Outlook is resulting in your Outlook notifications not working. 📥
In this case, updating these Microsoft Office apps to the most recent version has a good chance of fixing it.
Therefore, to update the Microsoft Office Apps along with Outlook, simply follow these steps:
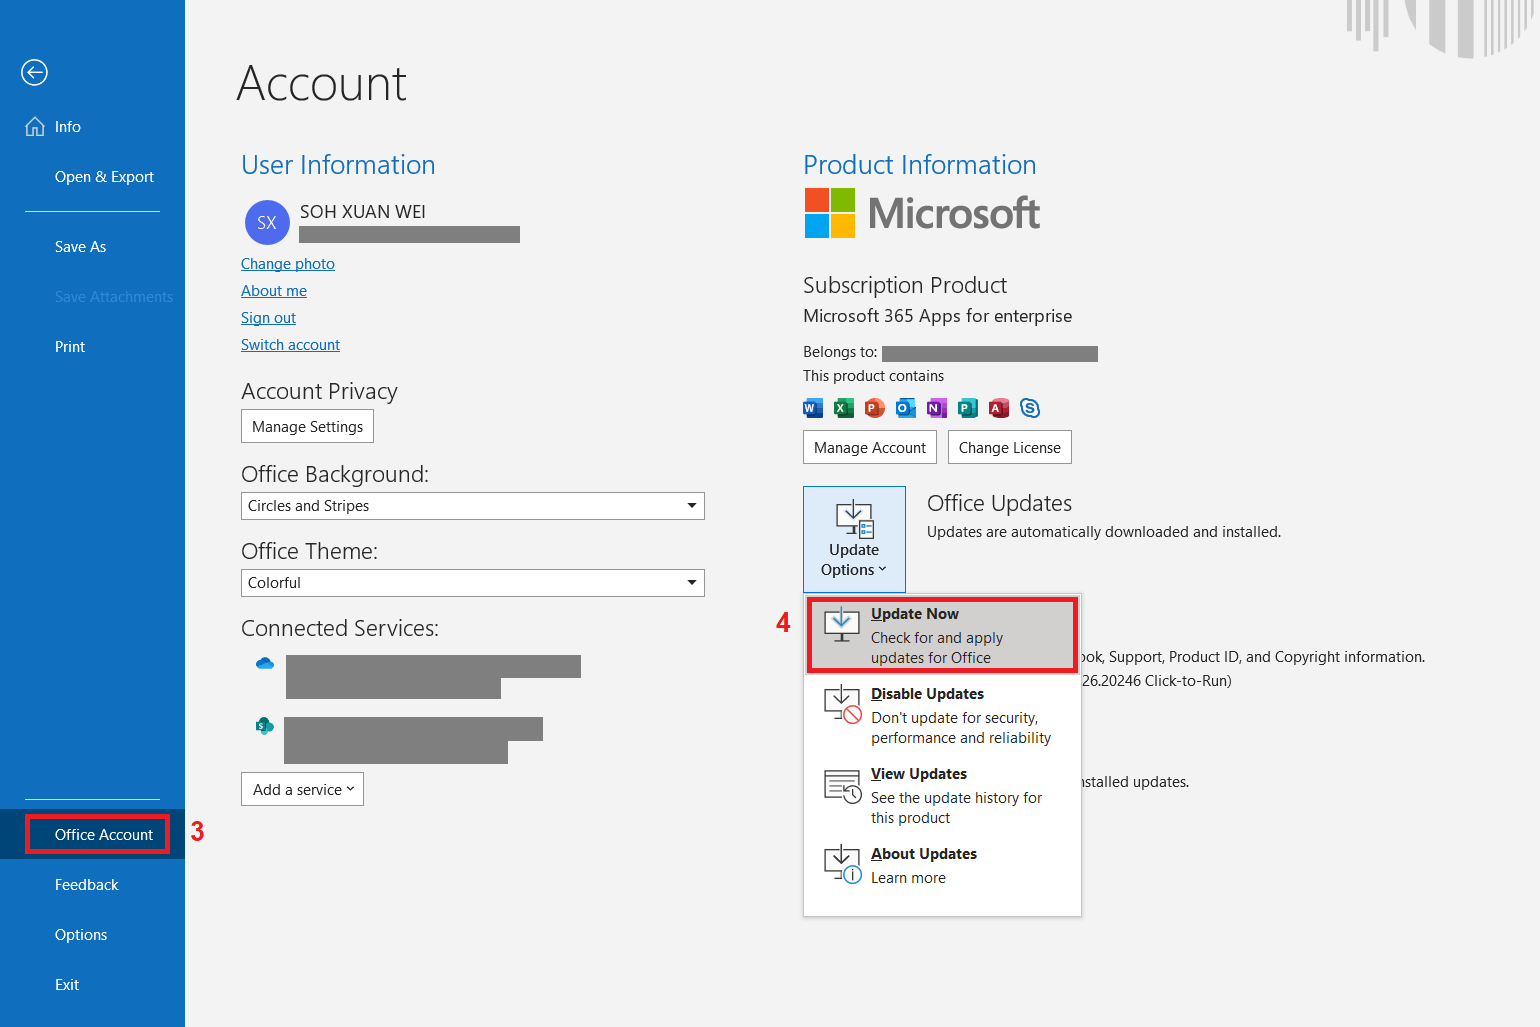
- First, open the Outlook application.
- Next, click on File.

- After that, select Office Account in the bottom-left column of the menu.
- Finally, click Update Options, and select Update Now to start downloading the updates for Microsoft Office apps.
7. Move Important Emails to the Focused Inbox
The Focused Inbox feature in the Outlook app helps users to organize email traffic in the inbox. It achieves this by putting important emails in the Focused inbox and putting less important emails in the Other inbox. 📬
Hence, the Focused inbox feature determines the priority of emails by analyzing the users’ response to the emails received 📋. If too many emails are left unread, then future emails from that sender will likely be placed into the Other inbox. This may be troublesome to some users as important emails can sometimes be moved to the Other inbox.
Therefore, perhaps you notice that you aren’t receiving email notifications for emails from a particular sender. In that case, make sure that emails from that sender are moved to the focused inbox. 📩
Here’s how to view your Focused Inbox and Other Inbox:
- First, open the Outlook desktop application.
- On the topmost tab, select View.
- Under Focused Inbox, make sure that Show Focused Inbox is enabled.

- You can now switch between your Focused inbox and Other inbox through the tabs on top of the second column.

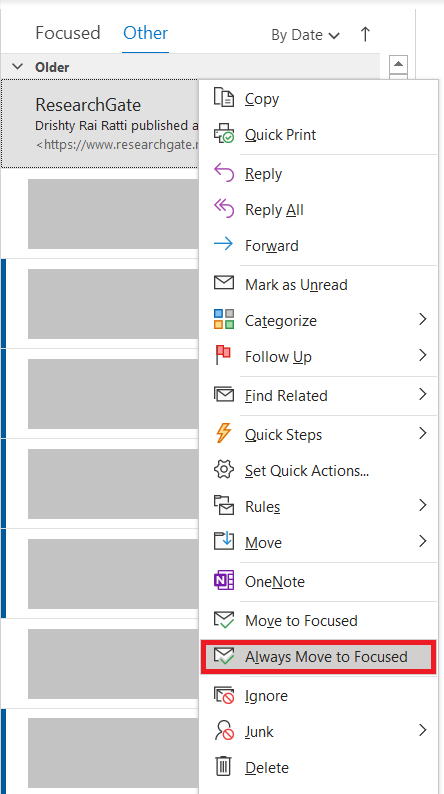
Moving on, here’s how to move future emails, from a particular sender, from the Other Inbox to the Focused Inbox:
- First, select the Other tab on top of the second column. (see previous image)
- Next, select the email that you want to move to the Focused inbox.
- Then, right-click that email, and select Always Move to Focused. From now on, all the emails from the sender will be placed in the focused inbox.
8. Enable Outlook Notifications on the Web Browser
While this method doesn’t directly address the issue at hand, it has proven to be an effective workaround 👍 for users who have notification issues with the Outlook desktop app.
Simply speaking, you can turn on notifications for the web browser version of Outlook, and receive notifications from the browser instead.
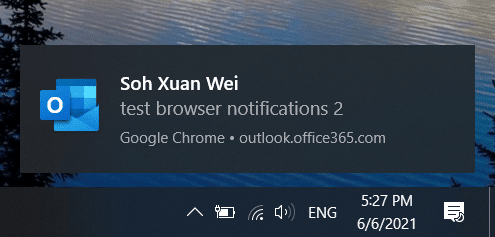
The picture below shows a desktop notification for an incoming email on Outlook, sent by Google Chrome:
However, there’s a downside to this method. ☹️ You cannot receive notifications if the browser isn’t running.
Therefore, you’ll need to open the browser and leave it running in the background in order to use this method.
With that said, here’s how to enable browser notifications for Outlook:
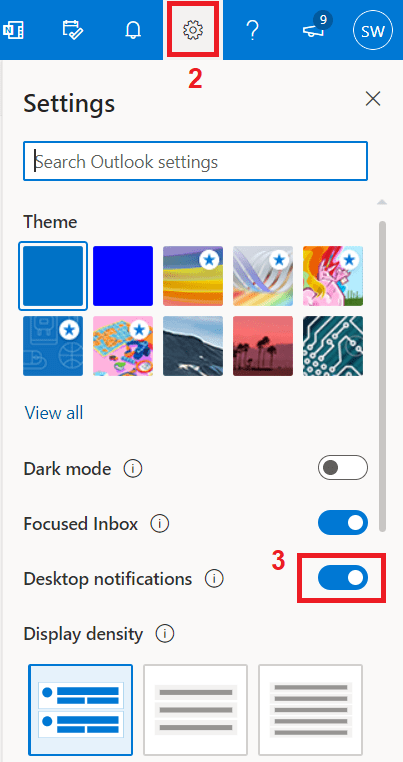
- First, open the browser application for Outlook by visiting outlook.office365.com.
- On the top-right corner of the webpage, click the Cog icon ⚙️ to bring up the Settings.
- Finally, turn on Desktop Notifications.
Next, we’ll need to enable notifications from the browser settings.
For starters, straight after turning on the Desktop notifications switch, your browser may prompt you with a message, saying the Outlook website wants to “Show Notifications”. Here, click Allow.
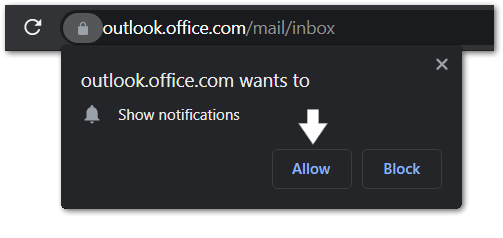
Alternatively, you may have to manually enable permissions for the Outlook website to send browser notifications.
So, the following are steps for different web browsers you might be using:
For Google Chrome and Microsoft Edge
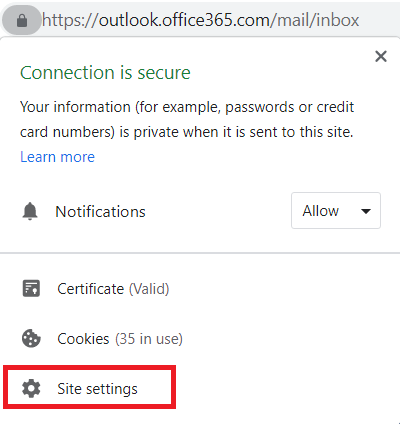
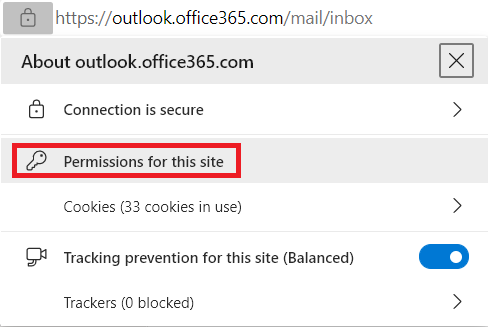
- First, click the Lock icon 🔒 to the left of the site address.
- Next, select Site settings.
- After that, choose Permissions for this site.
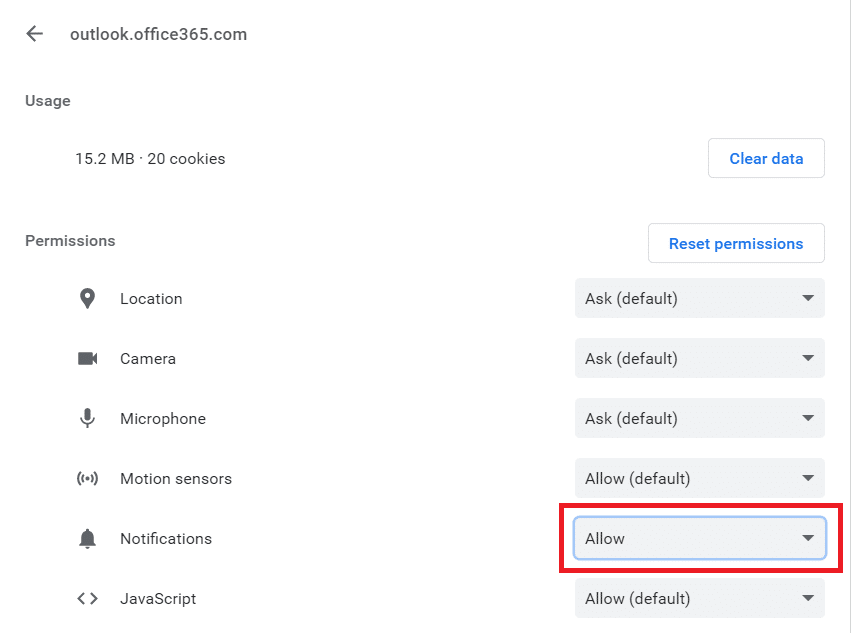
- From the list of site settings, select 🔔 Notifications and set to Allow.
For Mozilla Firefox
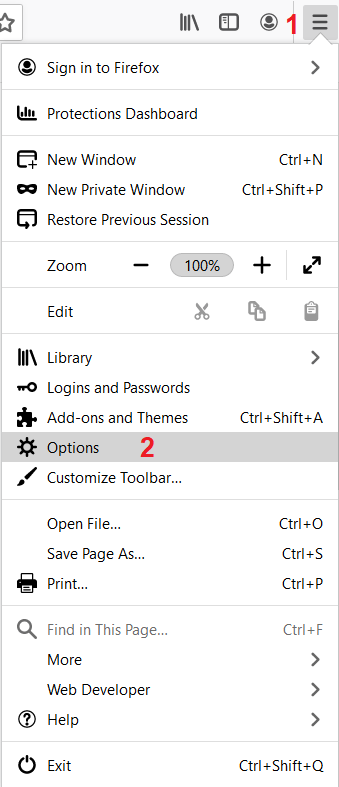
- First, click the Hamburger menu icon (三) on the top-right corner of the browser.
- Next, click on ⚙️ Options.
- After that, from the left column, click on Privacy and Security.
- Then, scroll down to Permissions, and click on Notifications’ Settings.
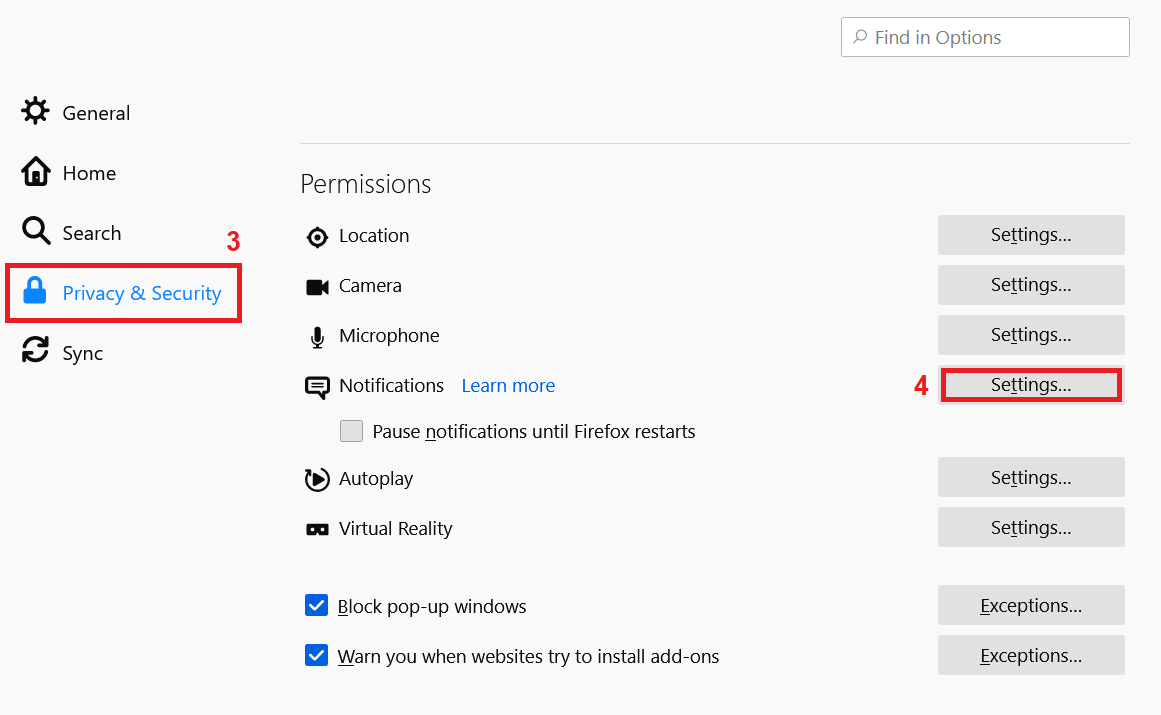
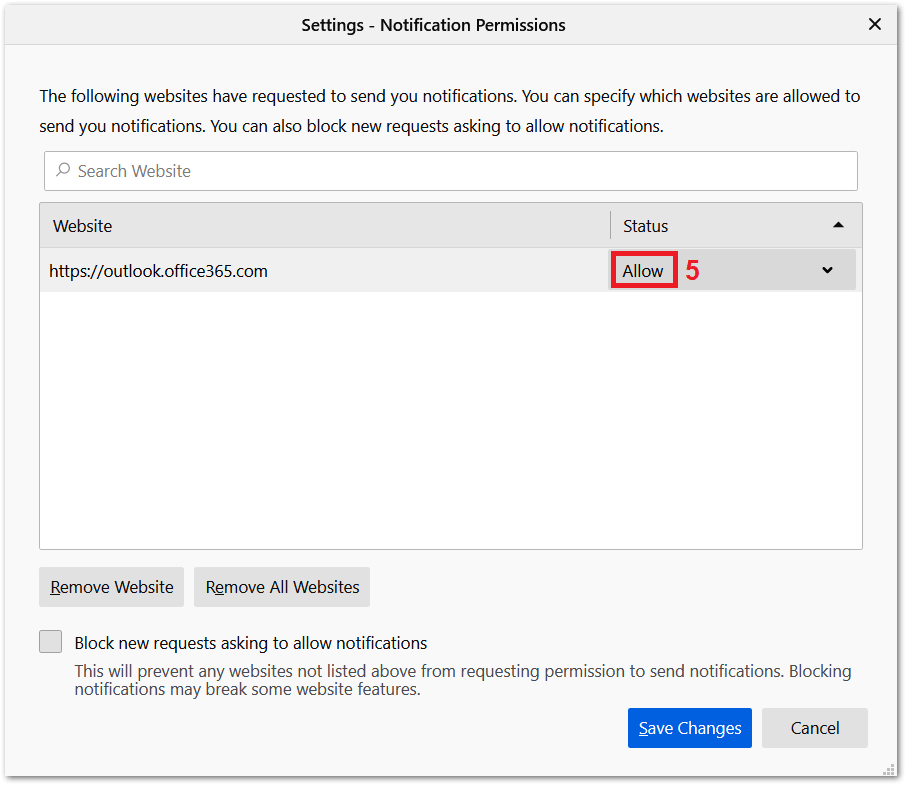
- Finally, on the pop-up window, look for “https://outlook.office365.com” and make sure that notifications are set to Allow.
For Safari (macOS)
- First, launch the Safari browser.
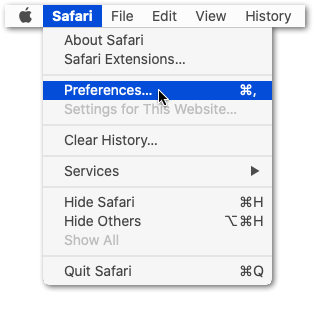
- Then, select Safari from the menu bar and choose Preferences from the drop-down.
- After that, switch to the Websites tab within the Preferences popup window.
- Then, choose Notifications from the left pane.
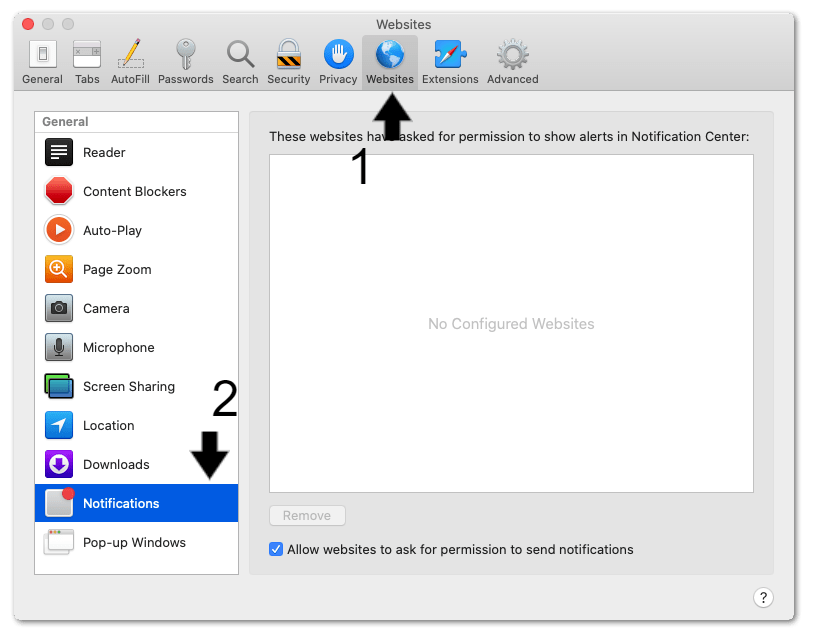
- Next, change the notification permission for Outlook from Deny to Allow.
- (Optional) Enable the checkbox — Allow websites to ask for permission to send notifications.
9. Use Outlook Rules to Create Custom Notifications
Similar to the previous method, this workaround provides a non-direct solution to the problem. 🤔
Outlook rules is a powerful feature that provides huge customization potential for the user. It allows users to create rules which dictate how different types of emails will be processed. 📧
We’ll simply be using Outlook rules to assign special notification sounds 🎵 to incoming emails. Therefore, it’s especially the perfect fix for when the Outlook notifications sound isn’t working.
So, to configure your Outlook rules:
- First, open the Outlook Desktop Application.
- Next, click on Rules, and select Create Rule…

- For our current task, we only need to check the following 2 options: Sent to me only and Play a selected sound. However, feel free to try out the other settings and customize it to your needs.
- Finally, click on OK to create the rule.
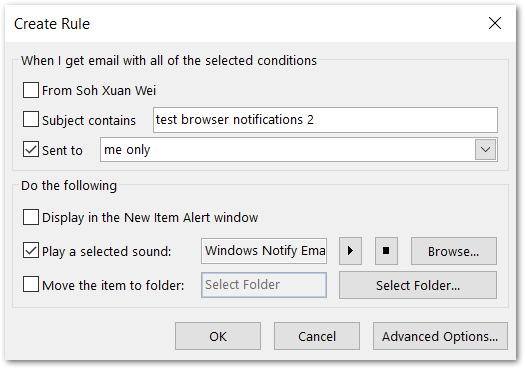
Now that the rule has been added, a notification sound will be played whenever a new email reaches the inbox.
Conclusion
To sum up, email notifications may be annoying, but it’s even irritating to miss an important email. 👿
Therefore, we hope that the 9 solutions listed in this guide have helped you fix Outlook notifications that aren’t working on your Windows 10 or macOS device.
Hopefully, you never have to miss an important email ever again! 😎
Also, do remember to test your Outlook email notifications after applying each fix ✉️. For this, you can set up a dummy email account to send yourself emails to check if the notifications for the messages are correctly pushed.
If you find that Microsoft Outlook email notifications aren’t working on your mobile devices, such as Android or iOS, we recommend checking this guide of ours.
Finally, let us know in the comments: 👇
- Are you encountering similar Outlook notification issues on your desktop?
- Have another helpful fix that we might’ve missed out on?
- What other email-related problems are you facing?
Feel free to share this post with others whose Outlook desktop notifications aren’t working. 👼
