Is your Google Meet microphone not working? Are you also having issues with the app’s audio and sound?
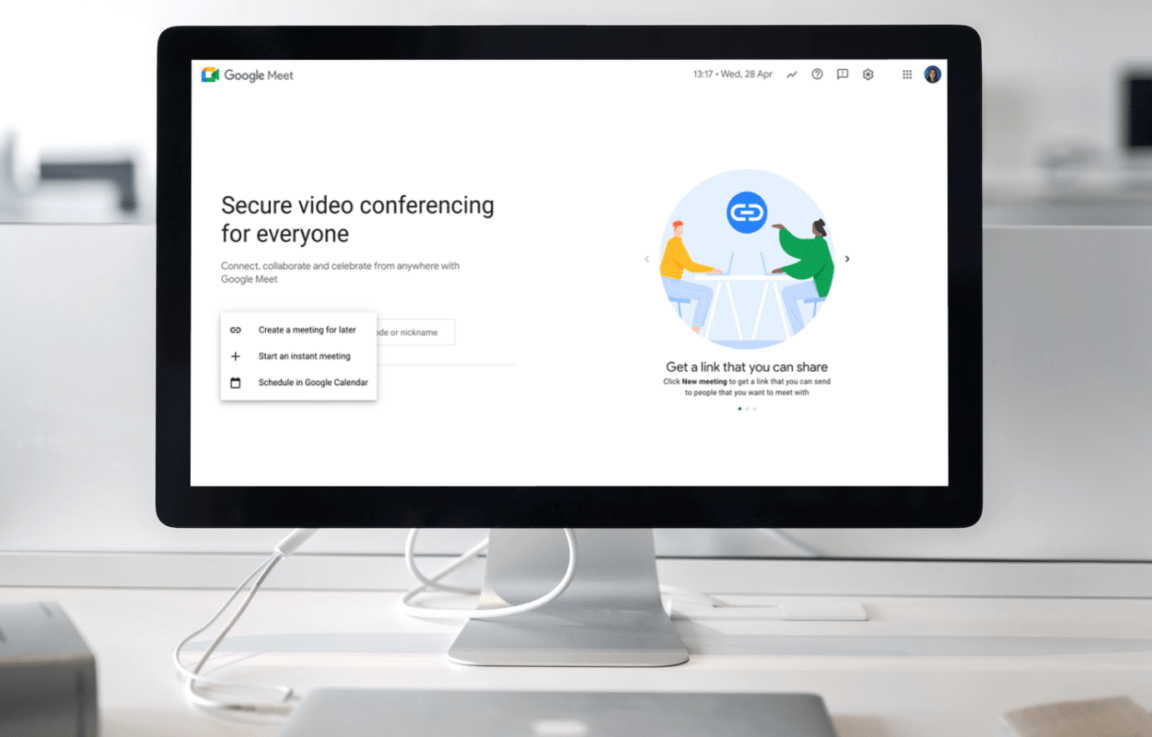
For most of us, Google Meet is a go-to application to host and attend meetings as it has all the essential features. Most of the time, Google Meet works without a hitch and lets us partake in group meetings without issues. But sometimes, it fails horribly and starts getting sound 🔈 and microphone 🎙️ issues, which forces us to leave the meeting calls in progress. 😫
According to the affected users, attendees in the meeting can’t hear them even if the microphone is enabled and unmuted. Due to this, they are eagerly searching for ways to overcome this issue so that other users can listen to them. You aren’t alone if you’re also using Google Meet and facing these audio issues. 😶
Thankfully, we have some solutions to provide instant relief from these annoying issues with Google Meet. Here in this article, we’ve shared more than 15 tried and tested solutions 🛠️ that can resolve the Google Meet’s microphone not working issue.
Let’s get started! 🙂
Note: The solutions mentioned in this guide apply to all devices where the Google Meet app and website are accessible, such as Android, iOS, Windows (Google Chrome), and macOS (Safari). Please try them carefully.
If you need steps for fixing when Microsoft Teams microphone or audio isn’t working, for additional ideas and fixes, do check out our other complete guide for that here.
What Causes the Google Meet Microphone, Audio, or Sound Not Working Issues?
Here are some of the most common reasons behind the ill-functioning of Google Meet’s microphone and speakers function ⬇️:
- A Microphone or Speaker Isn’t Selected (Fix 6)
- Microphone Usage Is Not Permitted (Fix 7)
- Incorrect Audio Input Device Being Selected (Fix 9)
- Low Microphone Volume Levels (Fix 10)
- Corrupted Google Meet App & Browser Cache (Fix 16 & Fix 17)
- Bugs in the Google Meet App (Fix 18)
Let’s read ahead and check some troubleshooting fixes to resolve the microphone not working issue in Google Meet.
18 Possible Fixes for Google Meet Microphone, Audio, or Sound Not Working
Before moving to the complex fixes, we’ll share some quick solutions that can also fix these issues with Google Meet.
First, we’ll advise restarting the browser and device 🔄 in which you’re facing these issues. Secondly, many users have said that FaceTime can also clash with the Google Meet app, so ensure FaceTime isn’t running 🚫 in the background.
Once all these simple workarounds are implemented ✅, if nothing worked out, you can move ahead and try the below-mentioned fixes ⬇️.
1. Unmute Yourself in Google Meet
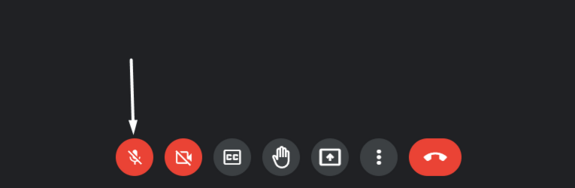
Sometimes, we (intentionally or accidentally) mute the mic and wonder why others can’t hear us. In some cases, it’s also found that the mic automatically gets muted when five or more people join the video meeting. Thus, we suggest ensuring that your mic is unmuted 🎙️ so that other members can listen to your voice correctly.
If you see a red colored microphone icon with a slash 🚫, the microphone is disabled. You can turn on the mic by clicking on the microphone icon 🎙️ until the slash fades.
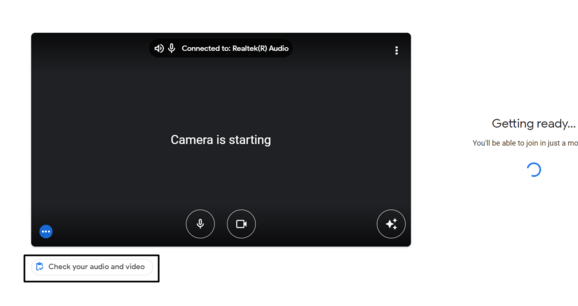
2. Check the Audio Before a Meeting
Sometimes, we couldn’t hear anyone’s voice from the default audio device after joining the meeting. This is why Google Meet lets users check the audio and video settings before joining a meeting to be sure about the playback settings.
You can click on Check Your Audio and Video and select the preferred audio device for mic and speakers, such as headphones 🎧.
3. Sign Out and Sign Back In Again
One of the most straightforward solutions to overcome this Google Meet microphone not working issue is to log out and sign in again on the Google Meet app and site. Doing this will refresh the account 🔄 and eliminate all the problems ❌ with the Google account.
Below are the steps to check the entire process in simple steps:
For Desktop Users (Windows & macOS)
- To start, open the Google Meet website in your browser and click on the Profile icon at the top-right corner of the tab.

- Click on Sign out of all accounts to remove the selected and other Google accounts from the browser.
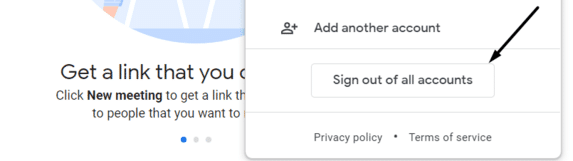
After doing this, all the Google accounts will be removed from the browser. Now, log in to Google Meet again, join a meeting, and check if the microphone is working perfectly again.
For Mobile Users (Android & iOS)
- Firstly, open the Google Meet app on your smartphone (📱) and tap on the Profile icon at the top right corner of the display.

- Next, tap on Manage accounts on this device to view all the signed-in Google accounts on your device.
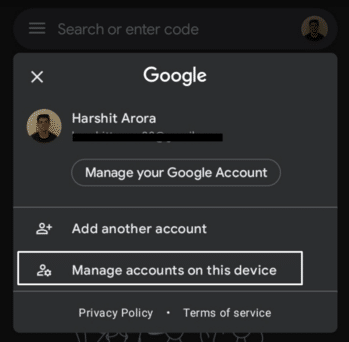
- Lastly, tap on the Remove account option underneath the account you want to remove from your device.
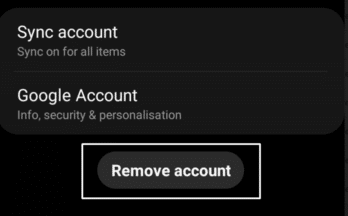
After deleting the selected Google account, log in again with the same Google account, join a meeting and review if the microphone and speakers are working correctly.
4. Force Close the Google Meet App
One of the most common solutions to this issue with the Google Meet app is to force close the app and restart it 🔄. This solution can solve all issues with the app, like constant freezing, lagging, and crashing. In simple terms, doing this terminates all the current operations of the app 🚫 and sets them back to a fresh state.
Here are the steps to force close the Google Meet app:
For Mobile Users (Android & iOS)
For Android
- First, open the Settings app (⚙️) and move to the Applications tab to view all the apps installed on your smartphone.
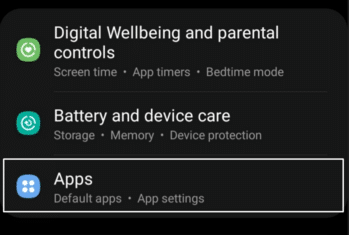
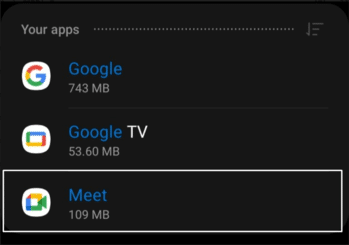
- Next, search for the Meet app in the Applications tab and tap on it to open the properties section.
- Then, tap on the Force stop option (🚫) to stop all the existing operations of the Google Meet application.
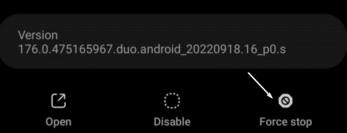
That’s it! Once the process mentioned above is implemented correctly, open the Google Meet app again and check if the issue you faced earlier during the meetings is resolved or still exists.
For iPhone
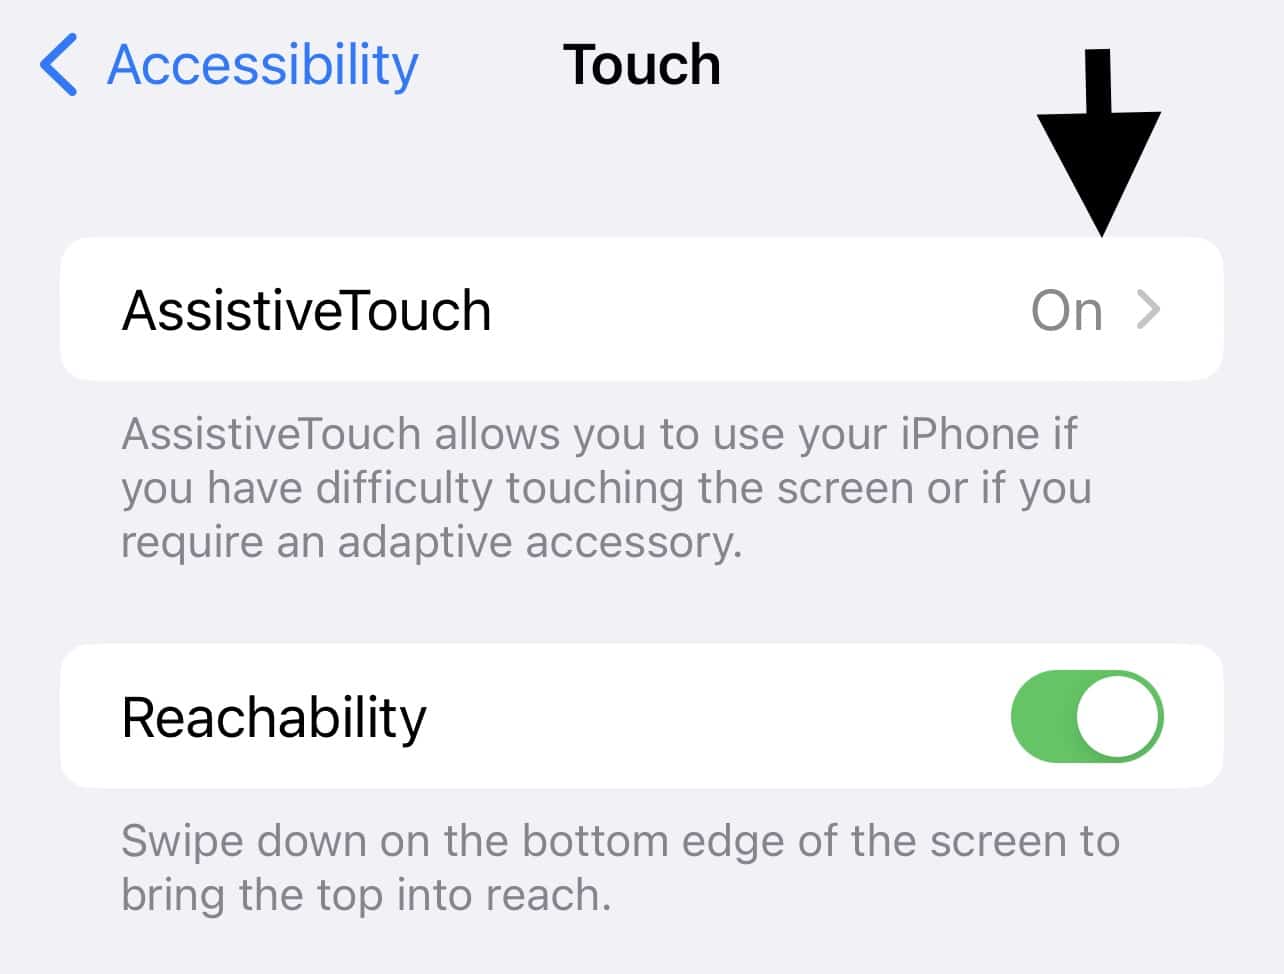
Note: To force close apps on iOS, you must first enable the Assistive Touch option. So, allow it, revisit, and implement the below-mentioned steps.
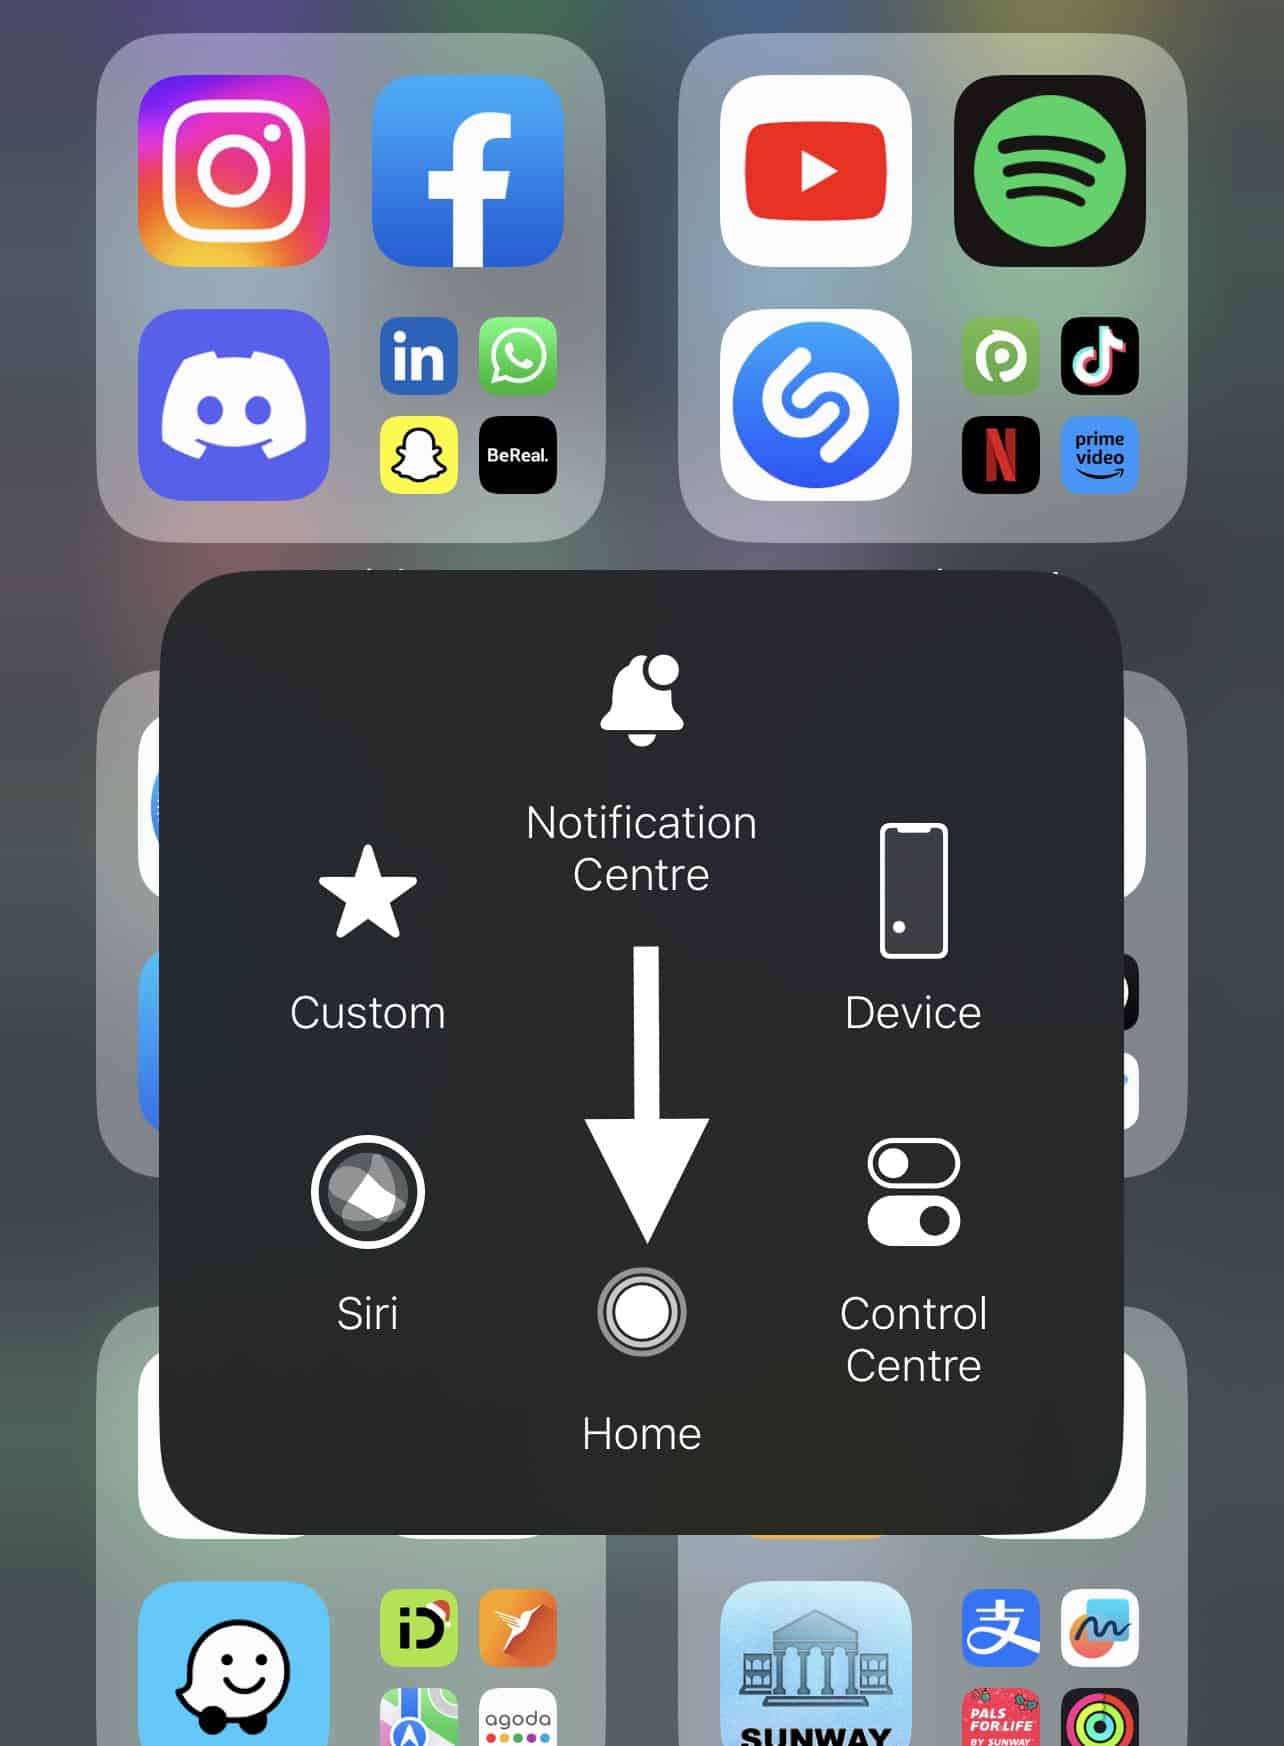
- To start, press the volume up button (🔊) and the volume down button (🔉). Once done, press the power on/off button for two seconds.

- Once the Power off dialog appears, tap Assistive Touch and hold the Home button (🏠) for two seconds until the Lock screen appears.
Now, unlock the phone and open the Google Meet app from the Recent Applications tab. You’ll see the app is starting from scratch. If this also doesn’t fix the issues with the Google Meet app, continue following the other fixes in the list.
5. Set the Current Device As Your Microphone in Google Meet
Google Meet lets us change the default microphone and speaker settings according to our choices. It could be possible that you haven’t selected the correct audio device 🔊, which could be the reason for this issue. In that case, we suggest re-checking the microphone and speakers settings and selecting a suitable audio device.
Below are the steps to change the microphone and speakers settings in Google Meet:
For Desktop Users (Windows & macOS)
- First, open the Google Chrome Browser on your PC, enter meet.google.com in the search bar, and press the Enter key to open the Google Meet site.

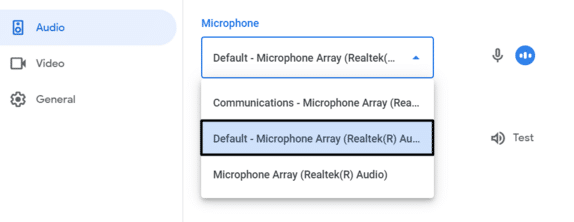
- Now, click on the Gear icon (⚙️) at the top-right corner of the tab to move to the Settings of Google Meet.

- After that, click on the Microphone dropdown and select an audio device with a functional microphone, such as headphones. Otherwise, choose the system’s default microphone to speak in meetings.
- Last, click on the Speakers dropdown and select the right speaker device you want to hear audio from. You can choose the device you selected when choosing the microphone, assuming you use the same pair of headphones for microphone and speaker purposes.
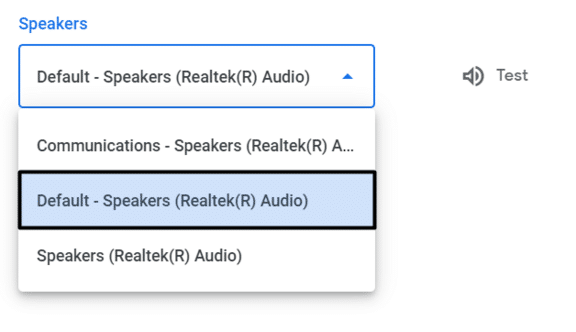
Now, exit the settings section and try joining a meeting or creating a new one and inviting a few friends to join. Once done, ensure the microphone and speakers’ functions are functioning properly.
6. Provide Microphone Access to the Browser & Google Meet App
It could be possible that the Google Meet app and the default browser cannot access the microphone. Thus, you must ensure that the Google Meet app has access to the microphone. Else, it would become impossible to partake in meetings.
In this case, we suggest following the mentioned process to ensure all the required permissions are given to the browser and Google Meet app:
For Desktop Users (Windows & macOS)
For Windows
- First, open the Settings app (⚙️) on your system and navigate to the Privacy & security section (🛡️) from the left sidebar.
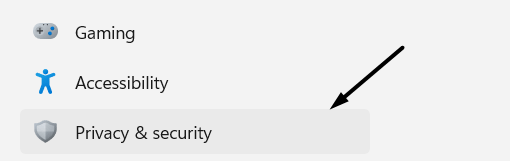
- Next, search for Microphone (🎙️) in App Permissions and click on it to get a list of all the apps that have access to the microphone.
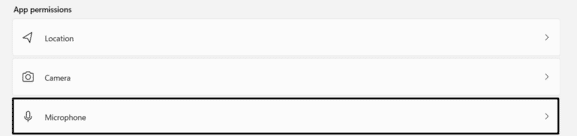
- Now, ensure that the Microphone access toggle (🔛) is enabled so other applications and features can use the microphone when needed.

- Then, ensure the Let apps access your microphone and Let desktop apps access your microphone toggle (🔛) is enabled.


For Mac
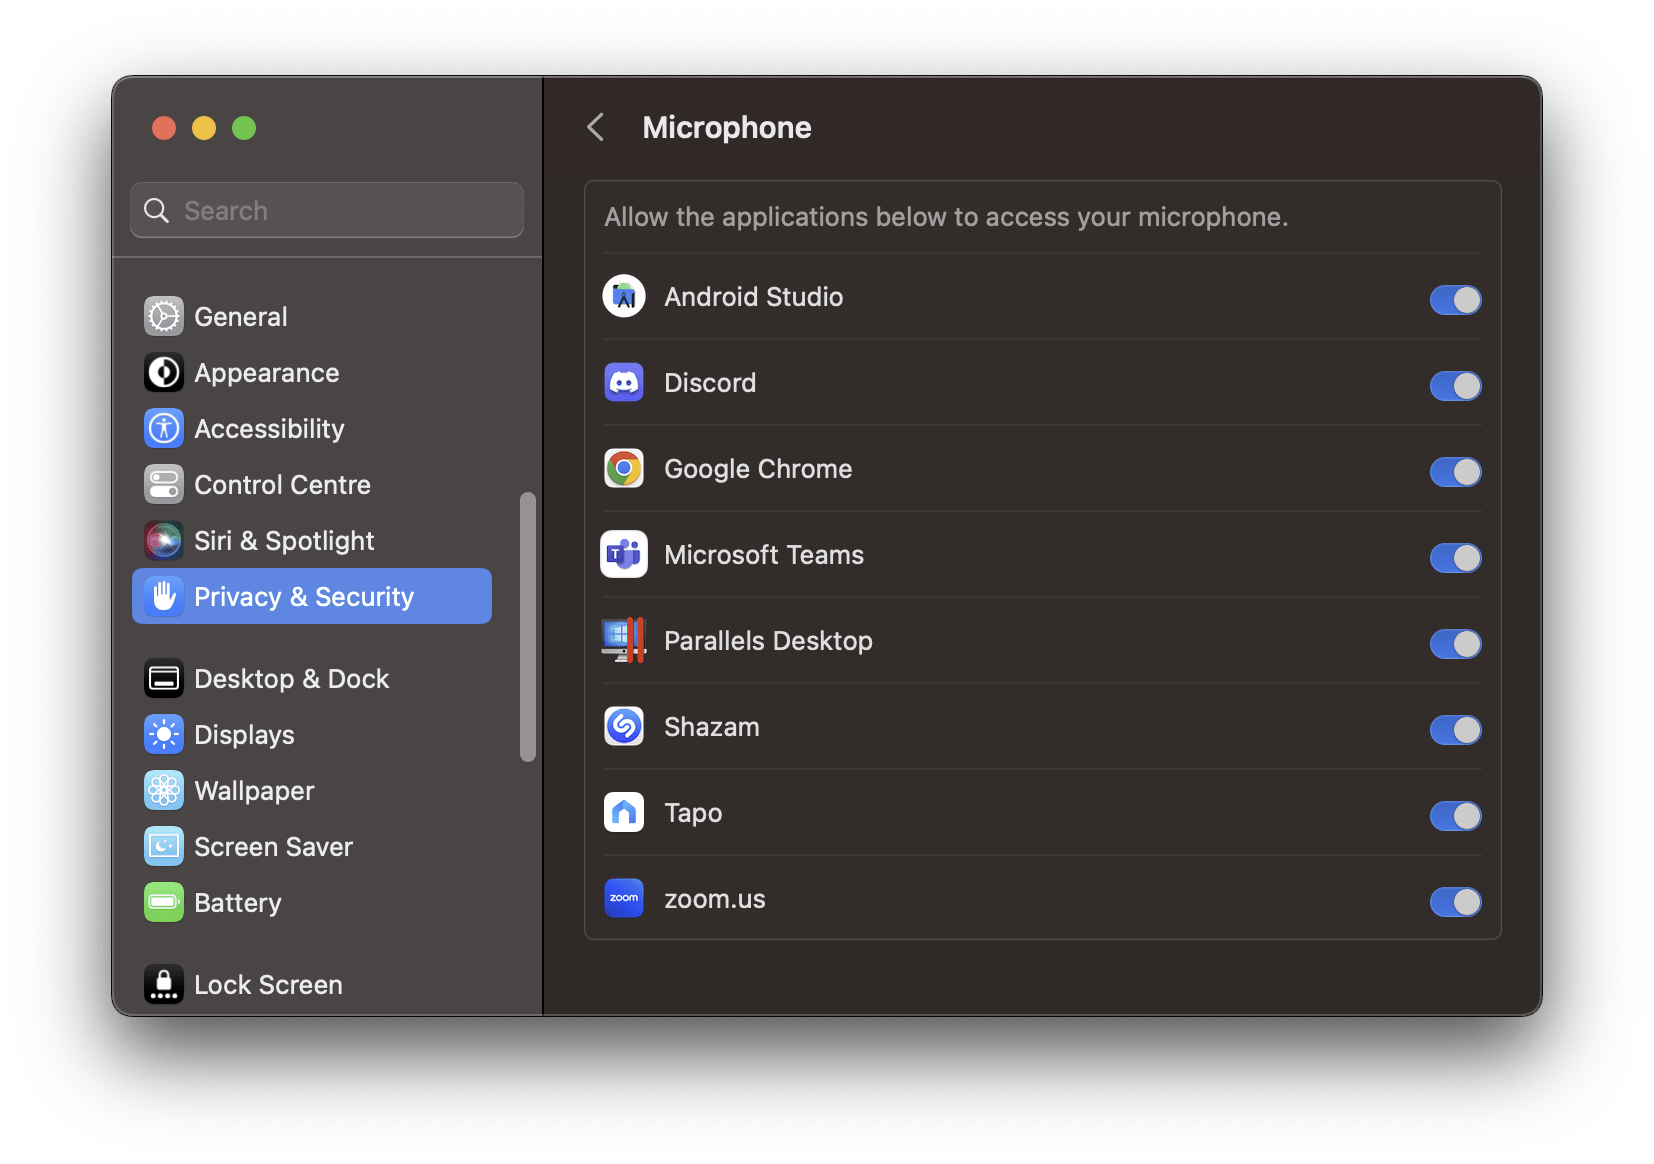
- To start, open the System Preferences settings and head to the Security & Privacy tab to access the privacy-related settings.
- Next, navigate to the Privacy sub-section in the Security & Privacy section and select the Microphone (🎙️) category.
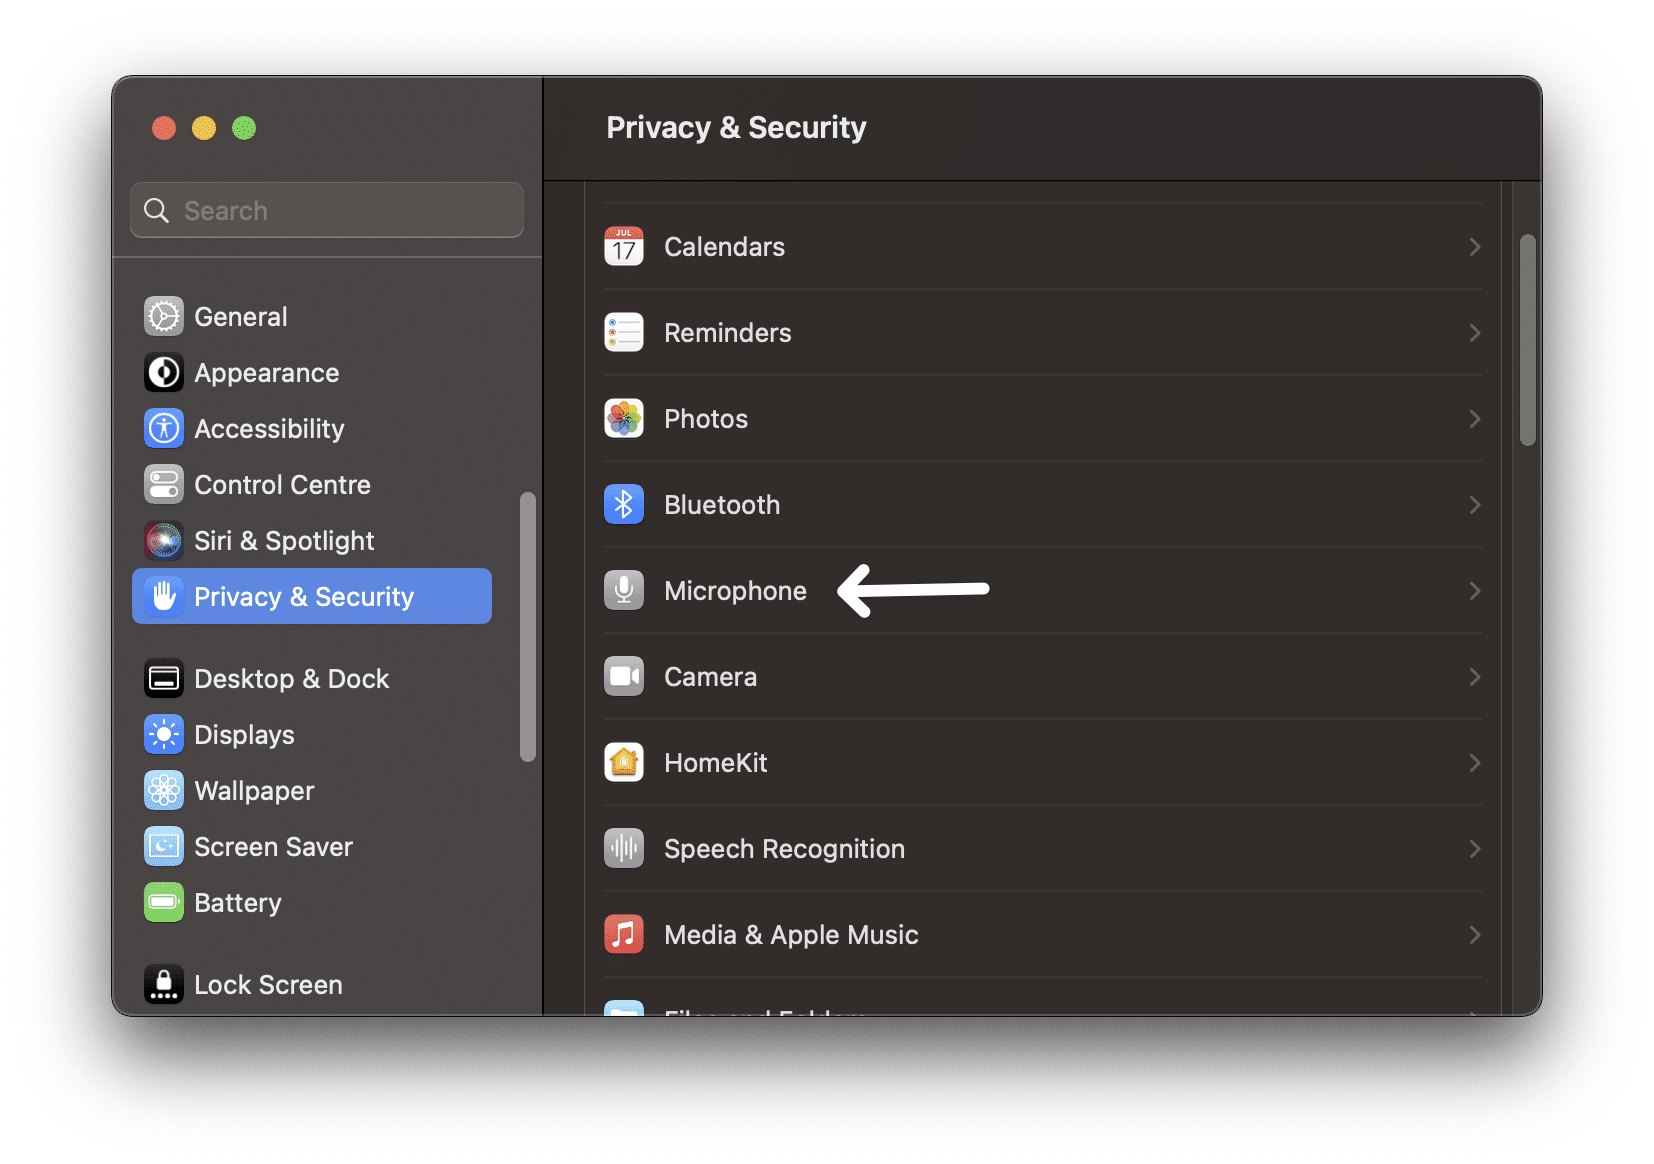
- In the end, ensure the browser you’re using to access Google Meet is checked (✅) under the Microphone section. For instance, if you’re using Google Chrome, ensure it’s checked.
For Mobile Users (Android & iOS)
For Android
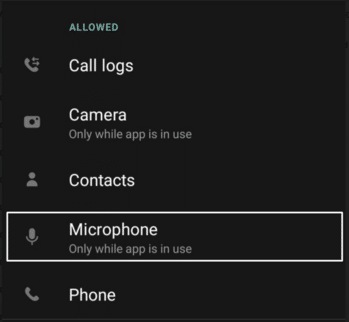
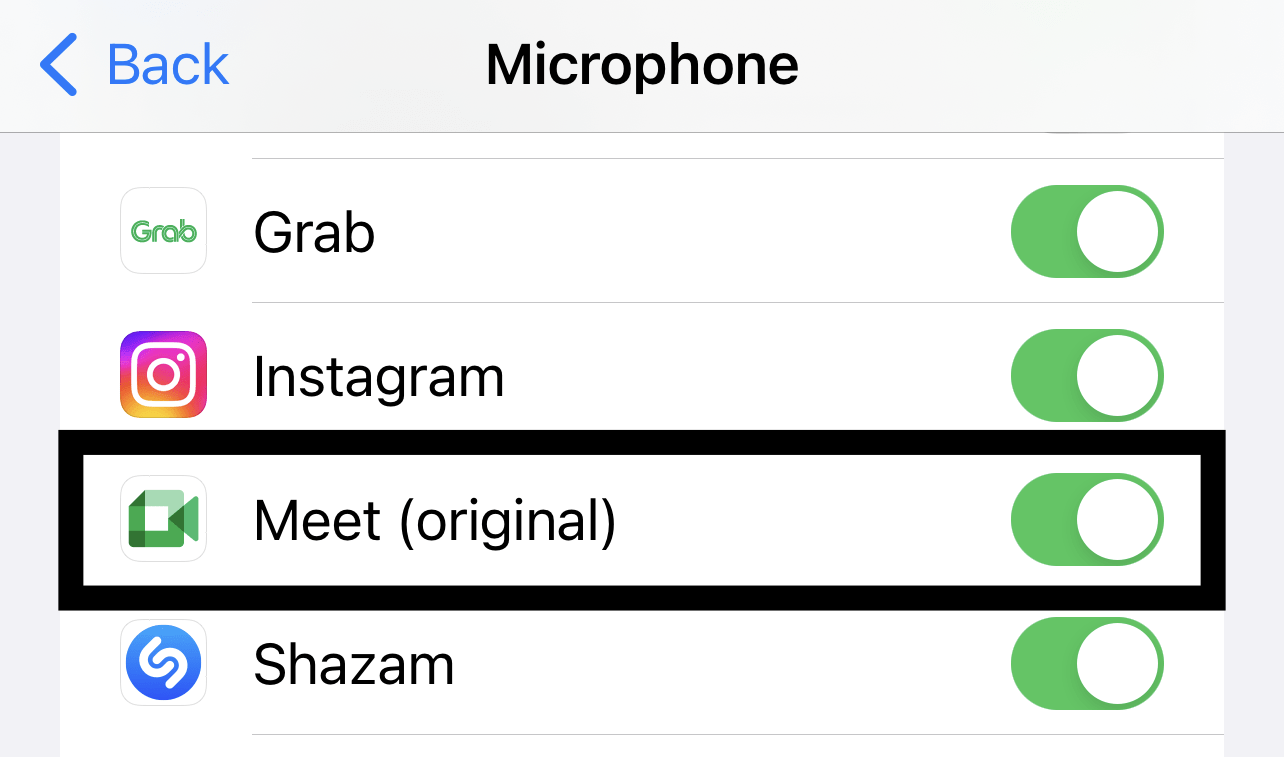
- Open the Settings app (⚙️) on your Android smartphone, move to the Applications section, and search for the Meet app.
- Afterward, head to the Permissions section of the Google Meet app and ensure Microphone (🎙️) usage is allowed. If it isn’t enabled, tap on the Microphone and select the Allow only while using the app option.
For iPhone
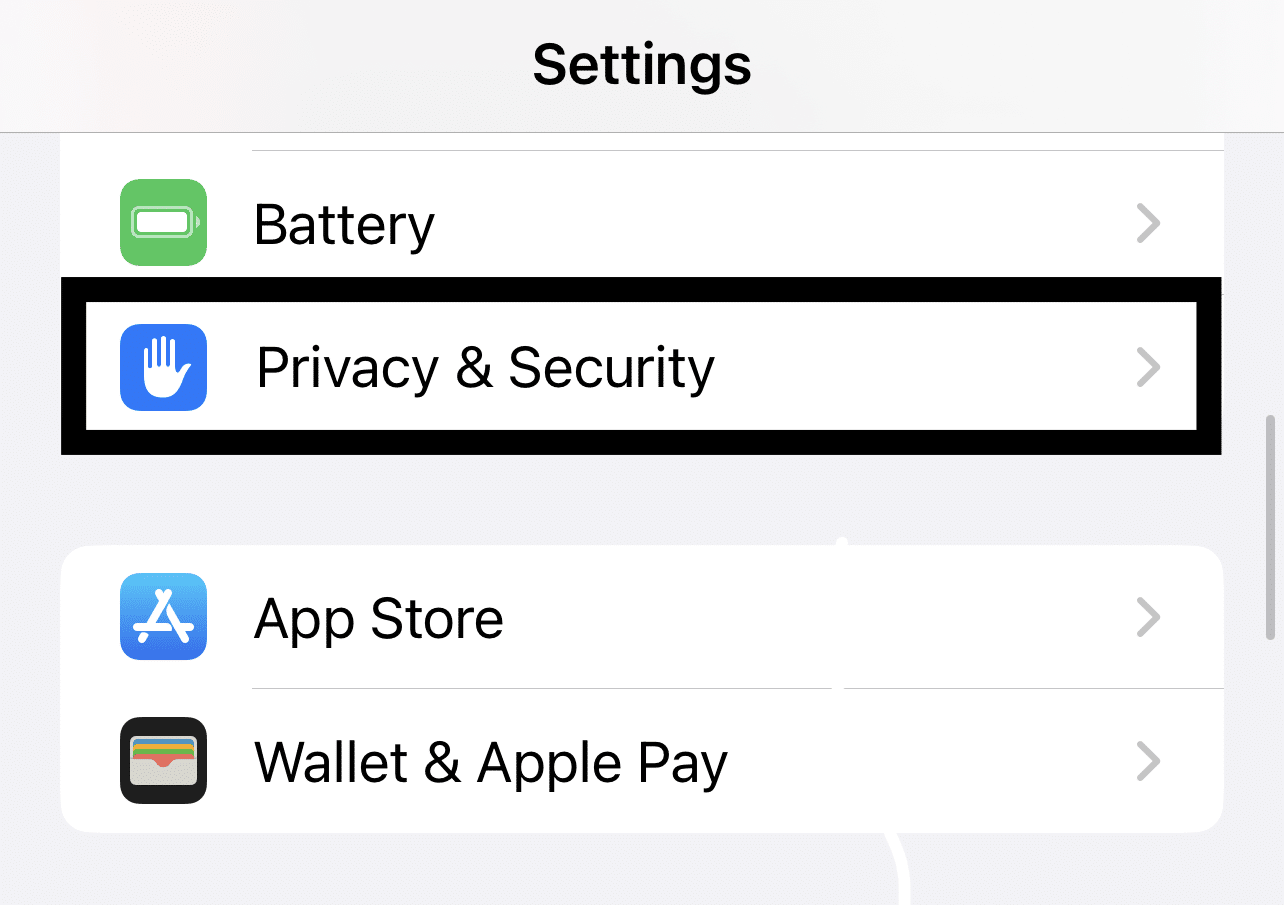
- First, open the Settings app (⚙️) on your iPhone and head to the Privacy & Security section to see all types of permissions given to the apps.
- Next, please search for the Microphone in the Privacy & Security section and tap on it to see all the apps that have access to the microphone.
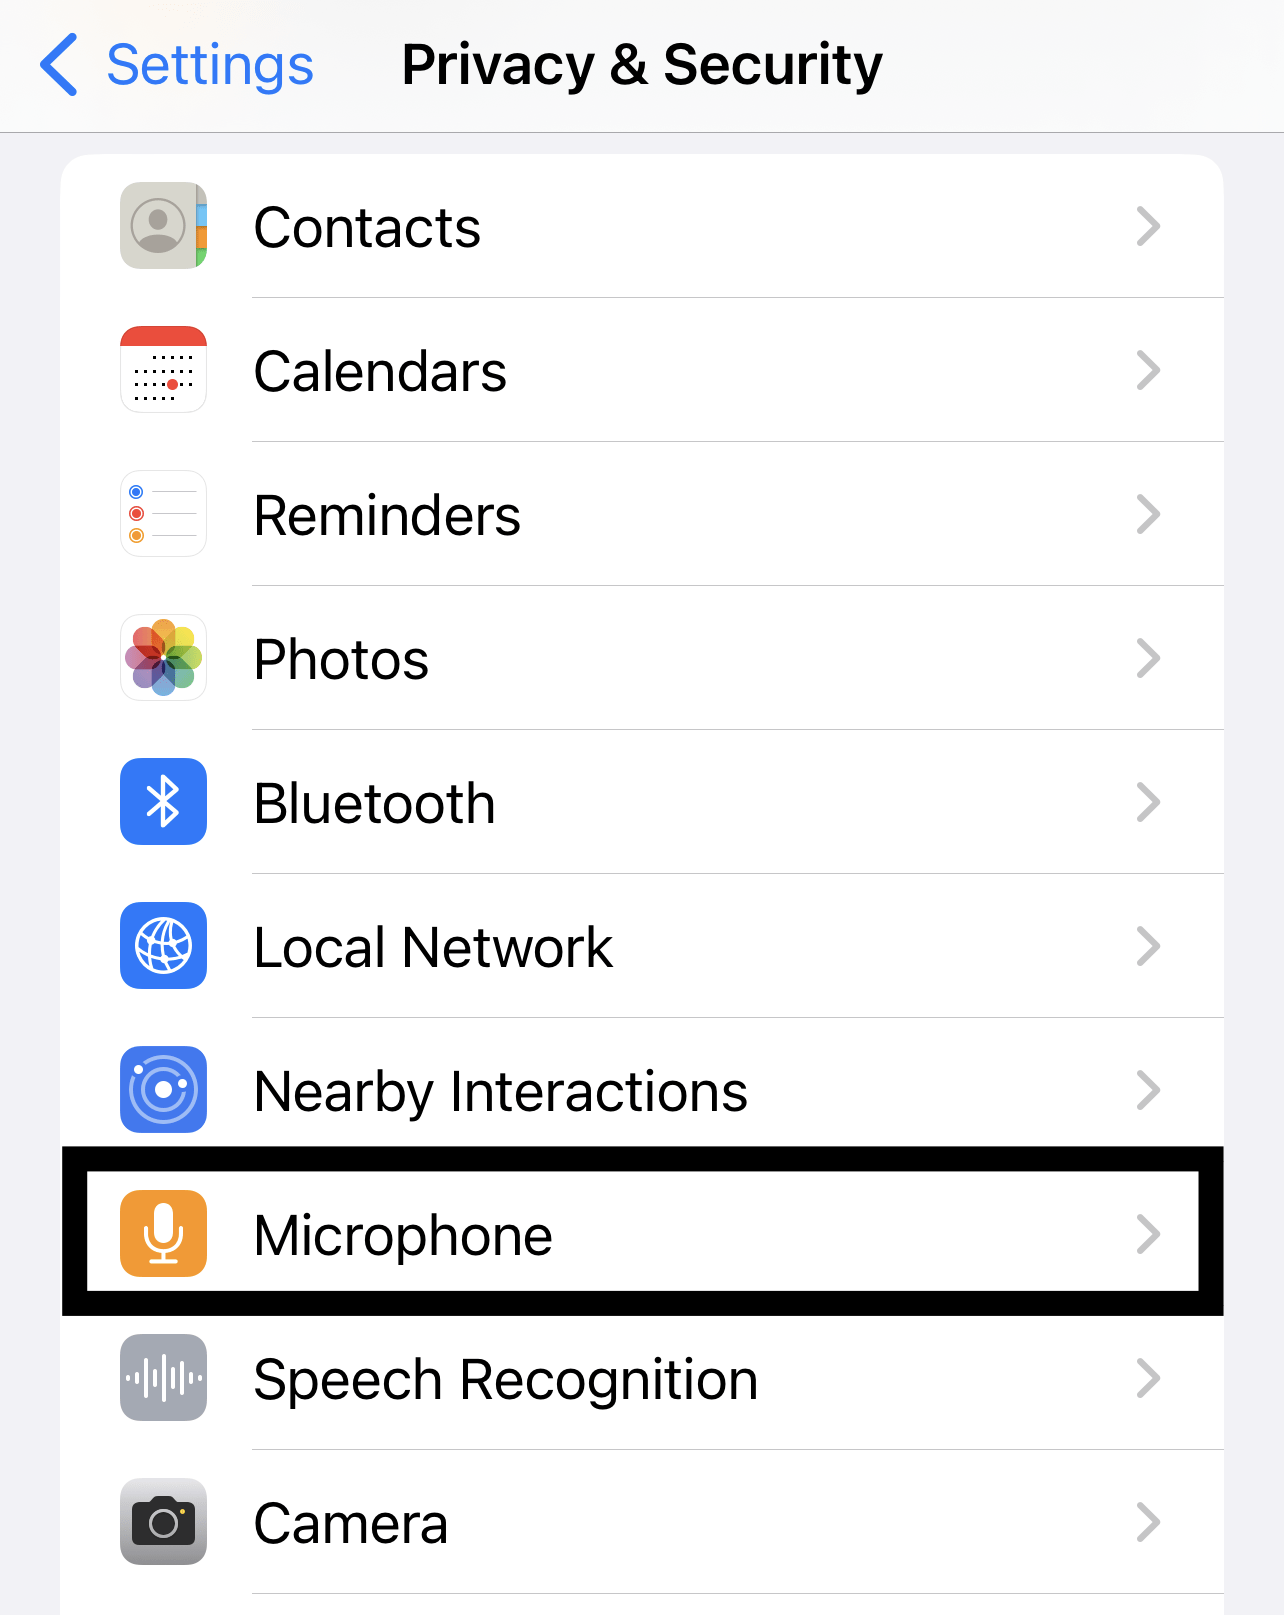
- Next, ensure the toggle (🔛) beside the Google Meet app is enabled, which means the microphone permission is already given to the app.
You can now use the Google Meet app on your smartphone and PC with microphone access provided. In case the issue still exists, check other solutions on the list.
7. Allow Microphone Access to the Google Meet Website
Sometimes, the browser automatically rejects the permission when Google Meet requests permission to access the system’s microphone. But, it’s essential to accept those permissions to use the microphone to speak in meetings. Otherwise, Google Meet won’t let you turn on the microphone during the sessions.
In that case, we suggest re-checking that the microphone usage permission is given to the Google Meet site. So, here are the steps to check the same with ease:
For Desktop Users (Windows & macOS)
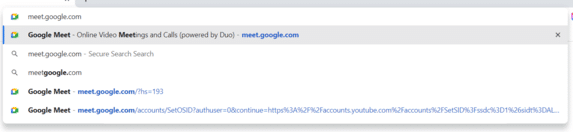
- Firstly, open the Google Chrome Browser on your system, enter meet.google.com, and press Enter to navigate to Google Meet.
- Once the website is opened, click on the padlock-shaped icon (🔒) in the search bar and click on Site settings (⚙️).
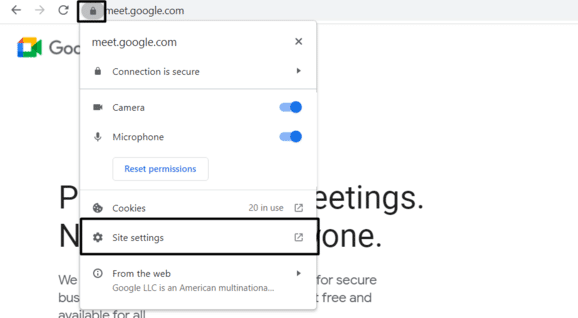
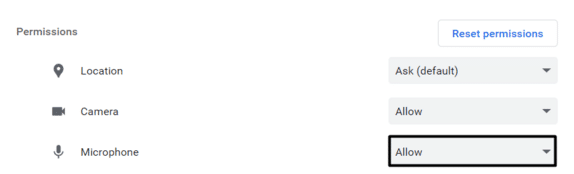
- Ensure the Microphone option (🎙️) is set to Allow in the Site settings (⚙️) section. If this isn’t the same, select Allow (✅) from the given options.
For Mac
- To start, move to the System Preferences section, and click on the Security & Privacy icon to change the permissions.
- Now, click on the Privacy option to get the panel having a list of different permissions, such as Microphone, Location, Storage, and Camera.
- Next, head to the Microphone section (🎙️) from the left sidebar and side-by-side open the Google Meet site on the browser.
- Then, go back to the Microphone section and click on the Lock icon (🔒) at the bottom left corner of the tab.
- In the end, click on Allow beside meet.google.com to allow the website to use the system’s microphone without such issues.
You can now check the Google Meet website to see if the issue is resolved.
8. Set Current Peripheral Device As Default Device
If you’ve attached multiple audio and sound devices to your system, it could be possible that your preferred device isn’t set as the default audio device to capture audio. In that case, we suggest selecting the preferred device as the default audio 🔊 so the system can use that particular device as a microphone and speakers.
It’s pretty simple to do this, and the below-mentioned steps demonstrate the same:
For Desktop Users (Windows & macOS)
For Windows
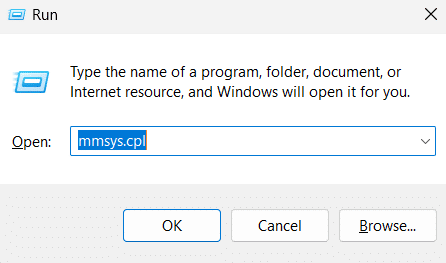
- First, open the Run dialog using the Windows + R keyboard combination, type mmsys.cpl, and click OK.
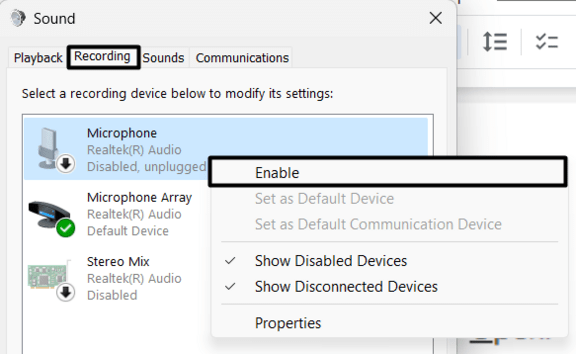
- Once the Sound settings are opened, move to the Recording tab and right-click on the Microphone. Now, make sure the microphone is enabled or whatever device you’re using as the microphone is enabled.
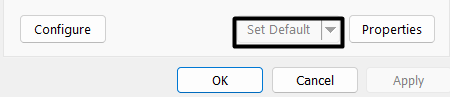
- Now, select the audio device and click on the Set as default option to set the selected device as default for capturing audio.
- Next, right-click on the microphone, and select the Properties option from the menu to open the Microphone Properties section.
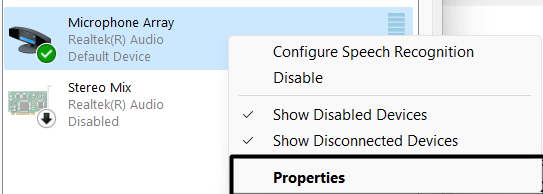
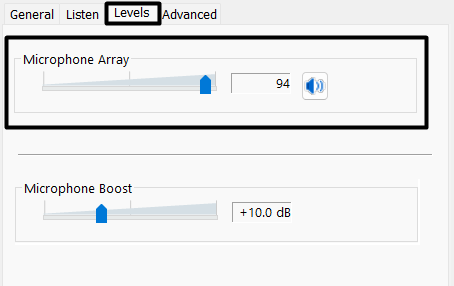
- In the Microphone Properties section, head to the Levels tab and ensure the audio level of the Microphone is between 90% to 100%. Drag the slider (🔛) under the Microphone to the maximum input level.
For Mac
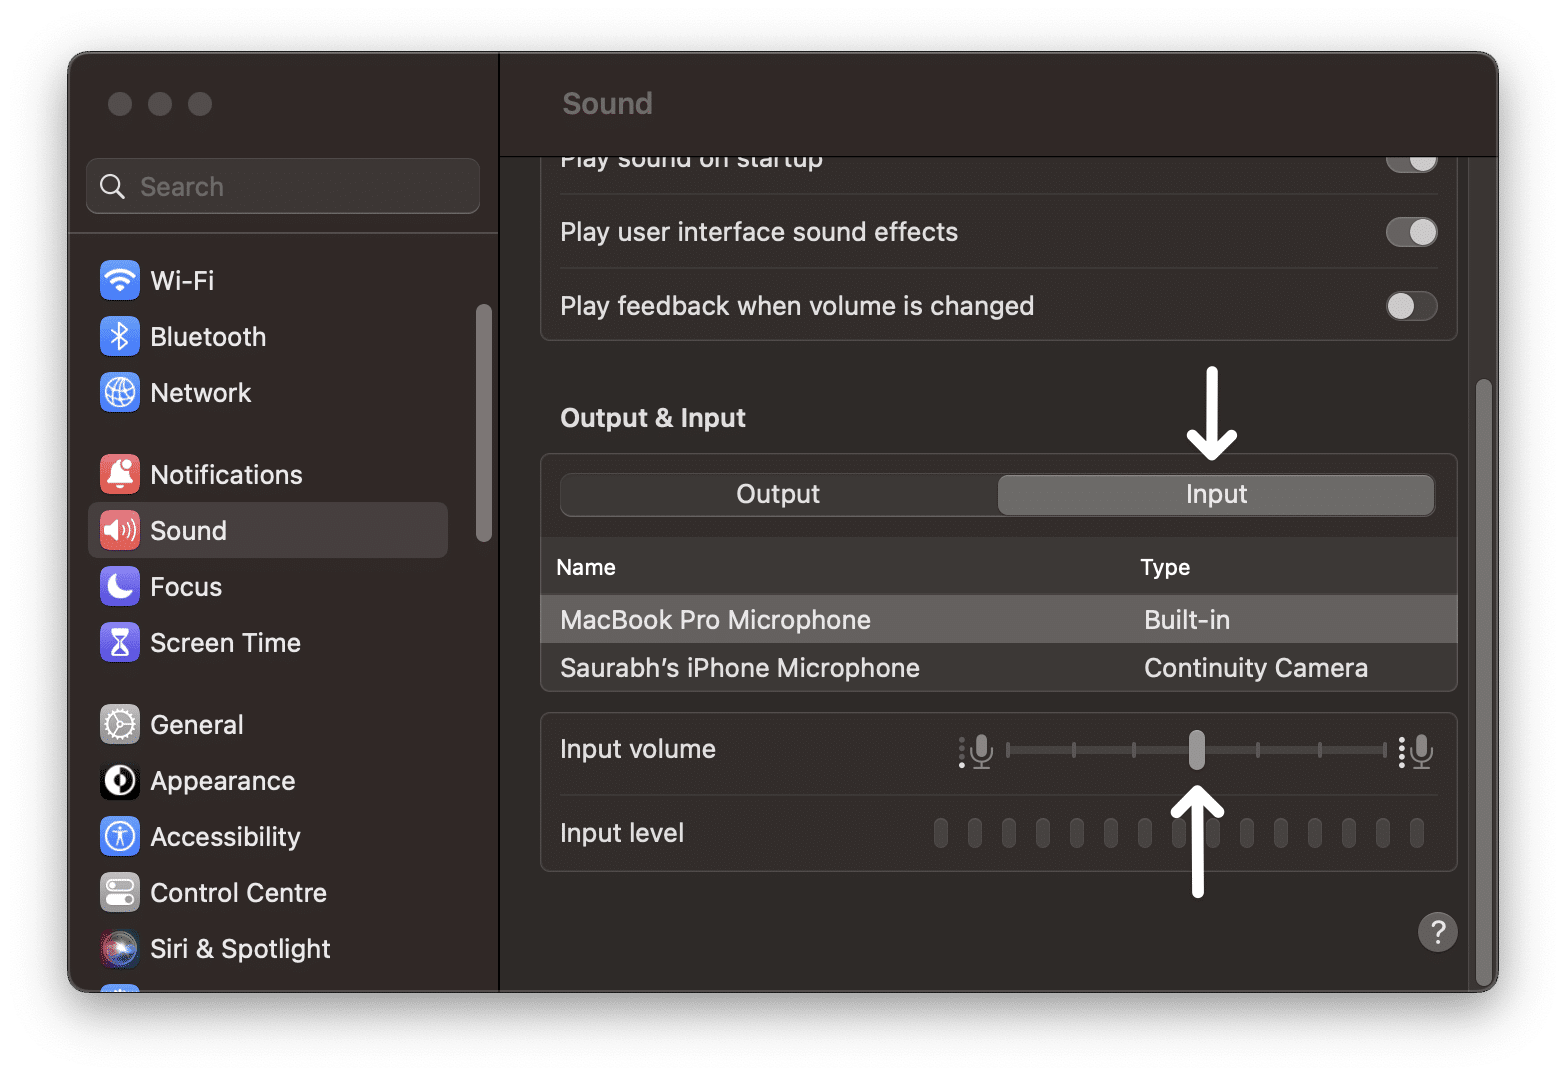
- So the first step is to move to the System Preferences section from the Apple menu and head to the Sounds tab.
- Move to the Input tab to adjust the input level and select the peripheral device of which you want to change the input audio.
- Lastly, drag the slider (🔛) under Settings for the selected device and increase it to the highest input level.
Now, open the Google Meet app again and check if you can use the microphone and speakers in Google Meet without such issues.
9. Run the Windows Recording Audio & Playing Audio Troubleshooters
Windows has some troubleshooting tools to find and fix issues with the system’s speakers and microphone. You can use the Recording Audio tool to find microphone-related issues. On the other hand, you can use the Playing Audio tool to find and sort speaker-related issues.
Below is the entire process of using these troubleshooting tools in a few simple steps:
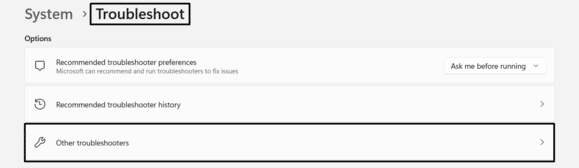
- Open the Settings app (⚙️) on your Windows PC to fix speaker-related issues using the Windows + I shortcut key.
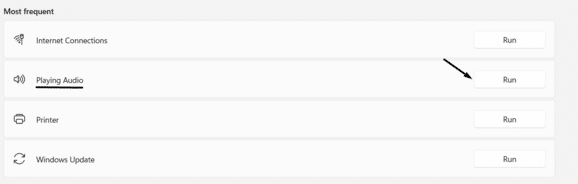
- Move to the Troubleshoot section from the System menu and the Other troubleshooters (🛠️) section.

- Next, search for Playing audio (🔊) in the Most frequent section on the Other troubleshooter screen.
- In the end, click on Run next to Playing Audio and select the audio with which you’re having issues.
After selecting the audio device, the system will start searching for issues with the chosen audio device. If the scanner finds out that a particular tool is causing the problem, it’ll suggest you disable it and leave the decision to you whether you want to turn it off or not.
If the microphone has an issue, search for the Recording Audio troubleshooter in the Other troubleshooters section. Now, click on Run next to it to launch the tool and follow the on-screen instructions to find the issue and fix for the same.

If the troubleshooter finds issues, it’ll automatically fix them or ask you to restore them by following simple steps. Once the recommended suggestions are made, check the issue’s status.
10. Prevent Other Apps From Using the Microphone
Mac allows multiple apps and extensions to use the microphone simultaneously, sometimes leading to issues like these. Due to this, applications like Google Meet don’t get to use the microphone. In this case, we recommend commanding all the apps to stop using the microphone immediately by executing a simple command.
Here are the exact steps to release the microphone on Mac:
- Start by opening the Terminal app on your Mac from the Utilities section and execute the below-mentioned command in the Terminal app:
sudo killall coreaudiod
- On the next screen, enter your Mac’s login password to proceed further and instantly stop applications from the microphone.
11. Disable Audio Enhancements
Windows has a cool feature called Audio Enhancements which improves the microphone quality by tweaking the system’s audio settings. Some users have found this feature interfering with the Microsoft Teams app and causing similar issues. So, this could be the same with Google Meet, and we need to find it with some simple troubleshooting.
You can disable the Audio Enhancements option and observe if this fixes the issue. Below are the steps to disable Audio Enhancements in Windows 11:
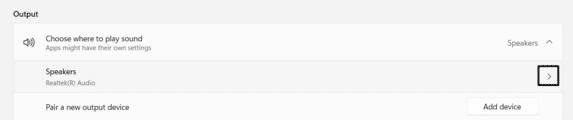
- Firstly, open the Settings app on your Windows PC and move to the Sound section from the System menu.

- Now, click on the connected speakers in the Output device section to expand and open the properties section.
- Once the Properties section is opened, search for Audio Enhancements (🎙️) in the Output settings section.
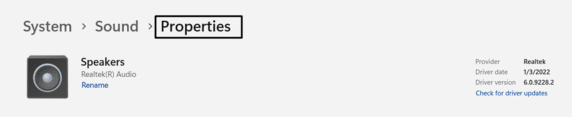
- At last, ensure the Audio Enhancements option is set to Off. If it’s selected to Device Default Effects, select Off from the dropdown.

Reopen the Google Meet website 🌐, and create a new meeting. Then, invite a few friends to join the meeting and test the mic to check if it’s working properly.
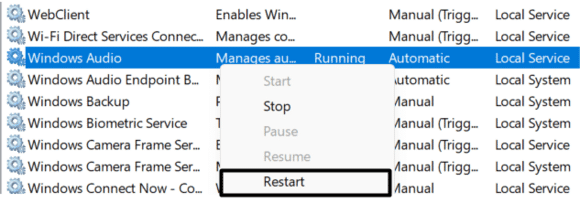
12. Restart Windows Audio Service
Windows Audio is an essential component that manages all the audio devices 🔊 on your computer. If this audio service stops functioning, this will also make the audio devices non-functional. Thus, it could be possible that the Windows Audio service isn’t functioning properly ❌ and causing this issue. You can make this function work again by simply restarting it from the Services Manager.
Here are the steps to restart the Windows Audio service in Windows 11:
- So the first step is to open the Run dialog by using the Windows + R shortcut key and type services.msc to open the Services Manager.
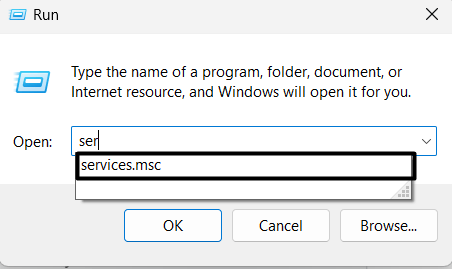
- Next, please search for the Windows Audio service, right-click on it, and then select the Restart option from the context menu.
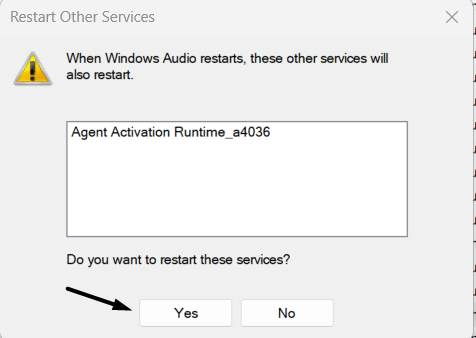
- Click Yes to restart the Windows Audio and Agent Activation Runtime Service.
The issues with the Google Meet service must be resolved now. You can check the same by creating a random meeting.
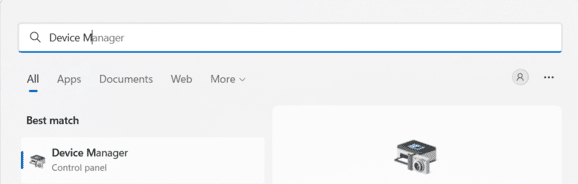
13. Update Your Audio Inputs & Outputs Drivers
Windows audio drivers also play an essential role in connecting the system with audio devices, such as headphones. These drivers also receive regular updates to ensure they remain compatible with the system. Thus, you can try updating the system’s audio drivers to ensure they don’t have any compatibility issues and bugs.
Below are the steps to update audio inputs and outputs drivers in Windows 11:
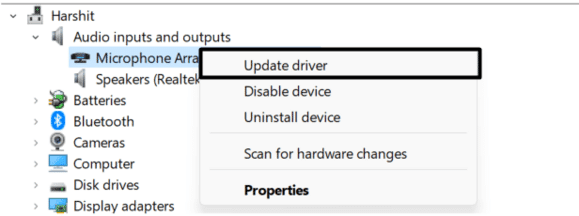
- First, click the Magnifying glass icon (🔍) in the taskbar to open the Windows Search Box and type Device Manager.
- Search for Audio inputs and outputs drivers (🔎) in Device Manager and double-click on it to view all the audio drivers integrated into the system.
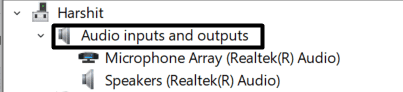
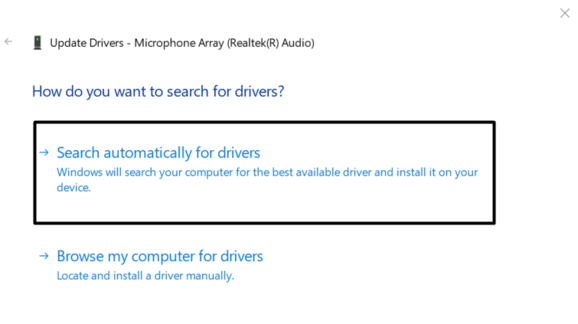
- Now, select the audio driver in the Audio inputs and outputs drivers section, right-click on it, and choose Update driver from the menu.
- On the next screen, click on Search automatically for drivers (🔎) and let the system scan for updates for the selected audio driver.
Once the audio inputs and output drivers are updated, open the Google Meet website and check the issue’s status.
14. Clear Google Meet App Cache & Data
If you’re facing these issues with the Google Meet app on your smartphone, we suggest clearing the Google Meet app cache 🗑️ without even batting an eye for a second. Let’s do the same by following the below-mentioned steps:
For Mobile Users (Android & iOS)
For Android
- To start, open the Settings app (⚙️) on your smartphone and navigate to the Applications section.
- Next, search for the Meet app in the Applications tab and tap on it to move to the properties section.
- Now, navigate to the Storage usage section of the Meet app and tap on Clear cache to remove the temporary data.

For iPhone
- Firstly, open the Settings app (⚙️) on your iPhone, locate the Google Meet app, and tap on it to open the app-related settings.
- Then, enable the Clear app cache on the next launch toggle (🔛) to clear the cache after launching the app.
- Once the toggle is enabled, open the Google Meet app on your iPhone, and the cache will be cleared instantly.
Once done, reopen the Google Meet app and try using the microphone feature again to check whether other users can hear you.
15. Flush the Browser’s Cache
Like apps, browsers also use a cache that stores some temporary information about the websites, which helps them access the same website in the future in less time. However, it’s necessary to clear those cache files before they fill up and clash with other website functions.
You can follow the below-mentioned steps to remove the browser cache:
For Desktop Users
For Windows (Google Chrome)
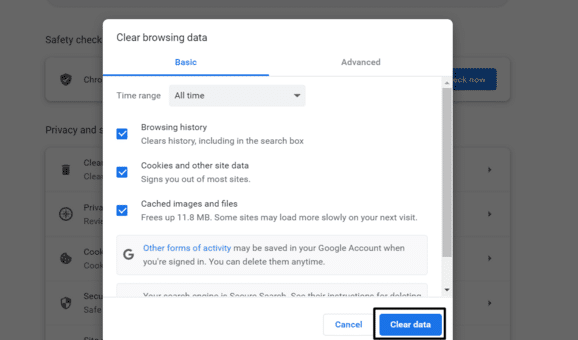
- Firstly, open the Google Chrome Browser on the system and move to the History section to clear the cache.
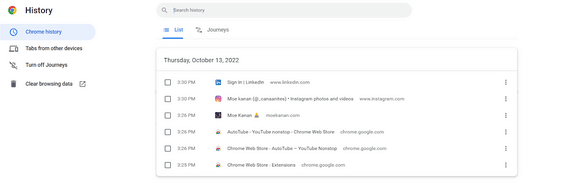
- Now, head to the Clear browsing data section from the navigation pane and check all the boxes.
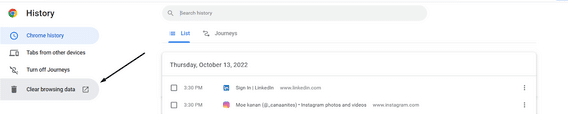
- Lastly, click on Clear data to delete cache data immediately.
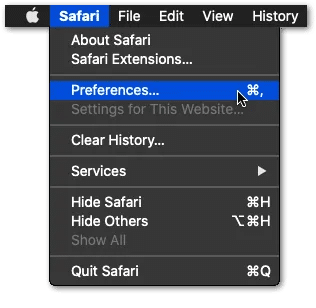
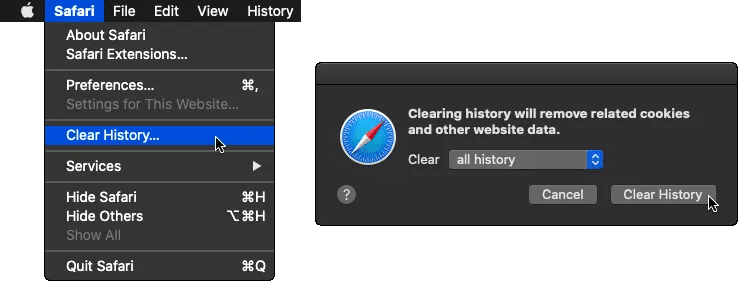
For macOS (Safari)
- First, with Safari launched, from the Menu Bar, click Safari and select “Preferences…”
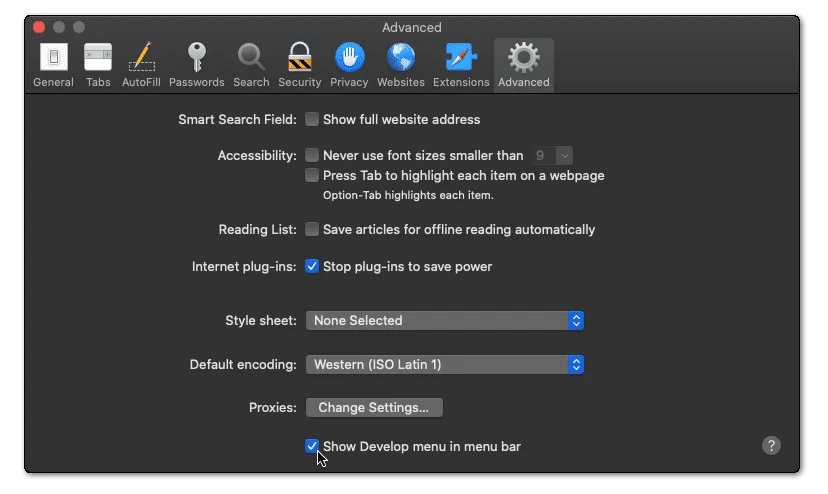
- At the following window, choose Advanced from the top bar, and tick the box next to “Show Develop menu in bar.”
- Subsequently, from the Menu Bar, click Develop, and select Empty Caches.
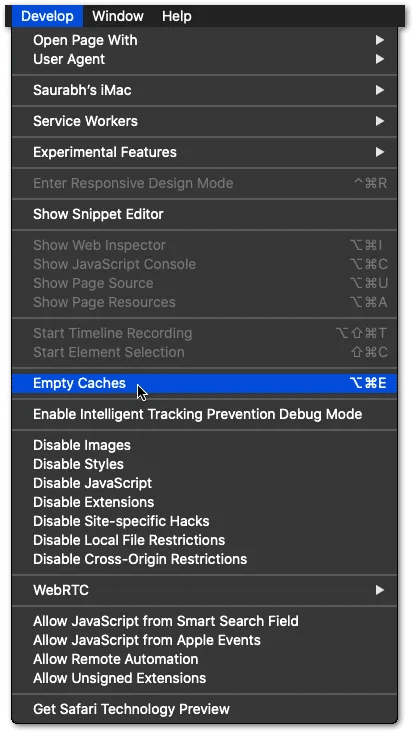
- After that, you can clear your search history and even more Site Data and Cookies. To do this, from the Menu Bar, click Safari, and choose “Clear History…”.
- Lastly, click Clear History at the following window.
Once you’ve cleared the browser cache, open Google Meet, and check the status of the microphone issue with Google Meet.
16. Update the Google Meet App
It could be possible that the Google Meet app has some bugs, which is why you’re facing these issues. In that case, we suggest updating the Google Meet app from the native app store and testing if this resolves the problem.
Follow the below-mentioned steps to check the process:
For Mobile Users (Android & iOS)
For Android
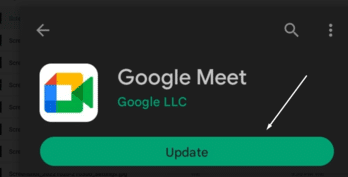
- To begin with, open the Play Store app on your smartphone (📱) and search for the Google Meet app to update it.

- Now, select the Google Meet app from the search results (🔎) and tap on Update underneath the Google Meet app to start updating the app.
For iPhone
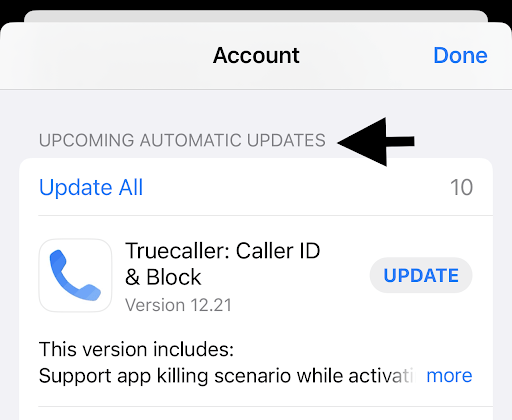
- First, launch the Apple App Store, and tap on the Profile icon at the top of the screen to open the updates section.
- Look for the Google Meet app in the Upcoming Automatic Updates section and tap on Update.
That’s it!
17. Update Your Device’s System Software and Firmware
Sometimes, issues exist with the system, which can only be eliminated by updating the system software. Doing this will ensure all the problems with the software have been destroyed and it’s bug-free now. So, here are the steps to update your device in simple steps:
For Mobile Users (Android & iOS)
For Android
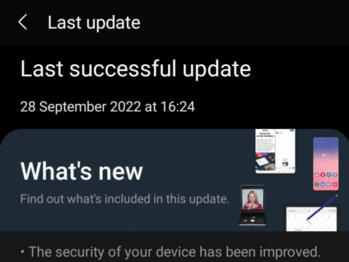
- To start, open your smartphone’s Settings app (⚙️) and head to the Software update section.
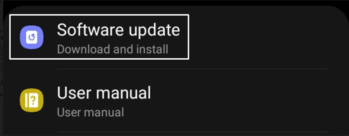
- In the Software update section, check for new updates and install them by clicking on Install now.
For iPhone
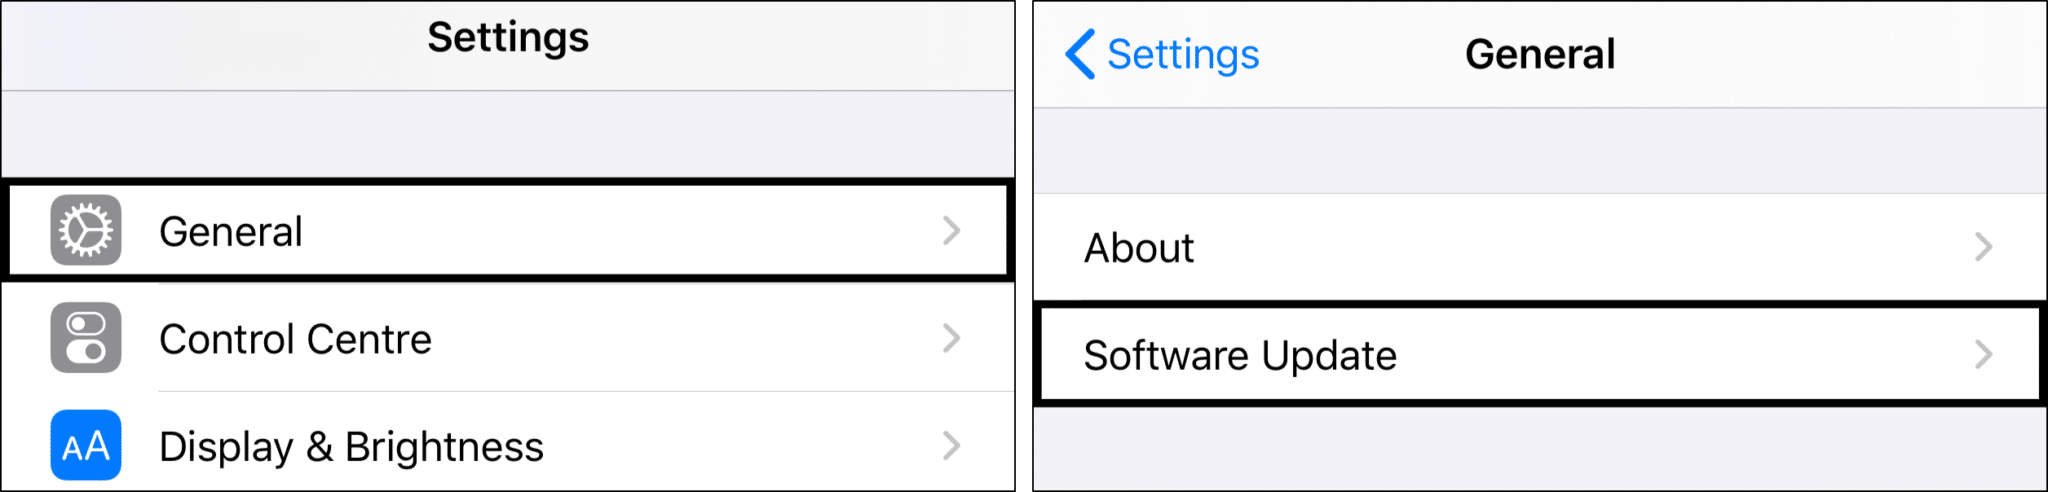
- Launch the Settings app (⚙️) on your iPhone and move to the General section.
- Move to the Software update section, where you’ll see all the latest updates.
- In the end, tap on Download and Install to install the pending updates.
18. Uninstall & Reinstall the Google Meet App
As a last resort, when nothing works, reinstalling the app always works out and resolves the issues. So, we suggest reinstalling the Google Meet app from the native app store after uninstalling the current version from the device.
Below are the exact steps to reinstall the Google Meet app:
For Mobile Users (Android & iOS)
Note: Please make sure to uninstall the existing Google Meet app from the device before reinstalling the app from the native app store.

For Android
- To begin with, open the Play Store app on your smartphone and search for the Google Meet app to reinstall it.
- Next, select the Google Meet app from the results and tap Install to start installing the app on the current device.
For iPhone
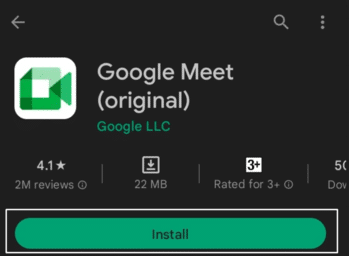
- First, open the Apple App Store and search for the Google Meet app.
- Now, tap the Get button to install the Google Meet app on your iPhone.
- Lastly, open the Google Meet app and check the issue’s status.
That’s it!
Conclusion
Google Meet comes with an excellent set of features. But at the same time, it also has so many annoying bugs that it never let us participate in the meetings peacefully. Many users currently face issues while using the microphone function in Google Meet.
Fortunately, in this article, we mentioned 18 tried and tested solutions 🛠️ to overcome this Google Meet microphone not working issue quickly. We hope these troubleshooting fixes relieve these irritating issues with the Google Meet app and website.
As a side note, share your experience with this article by answering some easy questions below.
- Did we help you fix the Google Meet microphone not working issue? 🙂
- Did this issue occur after updating or reinstalling the Google Meet app?
- Which of the mentioned solutions were easy to implement and solved the issue? 🤔
- Lastly, do you have any additional solutions to help other readers efficiently resolve these issues?
Frequently Asked Questions About Google Meet Microphone, Audio, or Sound Not Working
How Do I Enable the Microphone on Google Meet?
To enable the microphone in Google Meet (Fix 2), search for the red-colored microphone icon with a slash in the bottom menu bar and tap on it.
Why Can No One Hear Me in Google Meet?
It could be possible that the microphone is muted, and you aren’t aware of that. But if that’s not the case, we suggest setting the preferred peripheral device (Fix 8) connected to the system as the default audio device.
Why Is My Google Meet Microphone Not Working?
According to us, there could be several reasons behind the ill-functioning microphone in Google Meet. But one of the most common reasons could be the existing corrupted cache files (Fix 14).
How Do I Test My Microphone on Google Meet?
You can click the Check your audio and video option on the joining screen and select the device (Fix 2) you want to use for audio and speaker purposes.