What’s the simplest way for a Windows user to use the latest macOS Catalina for free? Two words. Virtual Machine. Then how do you install macOS Catalina on Virtualbox if you’re on Windows? This guide makes it as straightforward as possible.
That’s right folks with a Virtual Machine you can indulge in all the Mac perks from the comforts of your Windows PC. The best part is, you won’t need to dish out about $2000!, to buy a Macbook to try out these features. These would otherwise be features Windows users could only dream of.
From coding IOS apps with Xcode to trying out other mac-exclusive apps such as Final Cut Pro, Apple Logic Pro and the Affinity apps. It’s a good idea to peek over the wall to Apple’s ecosystem and see their latest macOS.
However, keep in mind, the speed of the virtual machine does not match an actual Mac’s. Hence this may affect your experience in demanding apps like Final Cut Pro. Thus, use a virtual machine to test out what it’s like to use a mac and whether the whole OS suits your needs before purchasing one. Especially if you want the full, smooth and rapid interface, you’ll eventually need to switch to using an actual mac.
Nonetheless, with a Virtual Machine, you can test out the latest macOS firmwares. As of the time of posting, that’d be the much-hyped macOS 10.15 Catalina, Apple announced at WWDC 2019.
To install the virtual machine of macOS Catalina, we went with the widely-used VirtualBox application, which is free to use. Therefore, to make it simple, this guide demonstrates step-by-step how you can install macOS 10.15 Catalina on VirtualBox on your Windows PC.
Table of Contents
Step 1: Download the Required Files
Step 2: Install VirtualBox Manager
Step 3: Install VirtualBox Extension Pack
Step 5: Edit the Virtual Machine Settings
Step 6: Apply Codes in the Command Prompt(CMD)
Step 7: Installing the MacOS Catalina Virtual Machine on Virtualbox
Bonus: How to Fix the Screen Resolution of macOS Catalina in Virtual Box?
What is VirtualBox?
VirtualBox is a virtualization tool enabling you to run any type of operating system (OS) on your PC. The best part of VirtualBox is that it’s entirely FREE to download and open-source. So you can boot it on Windows and Linux PCs and Apple Macs.
Minimum Requirements to Run VirtualBox on Windows
In order to run VirtualBox smoothly, your Windows PC should:
- Be able to store around 100GB of the OS files. The VirtualBox app on its own doesn’t occupy a significant amount of internal storage, that is only about 100MB.
- Have a minimum of 4GB of RAM.
- A dual-core processor.
If your PC fills these few criteria, let’s dive into the steps to install macOS Catalina on VirtualBox.
7 Steps to Install macOS Catalina on VirtualBox on Windows
Step 1: Download the Required Files
Just like any “journey”, firstly, you’ll need to scavenge for the necessities (Or in this case, essential files) that you need for the steps leading up to booting your virtual Mac. Luckily, these files are easy to obtain, and we’ve gathered most of the files, and linked them as well.
- Virtualbox along with its Extension Pack
To download the VirtualBox installation file, go to the VirtualBox Downloads page. Here, click on your PC’s OS, which in this case click the “Windows hosts” tab.
Subsequently, you’ll need to download the extension pack listed there as well. So, click on the “All supported platforms” tab to download it. This file is essential to recognize your mouse and keyboard inputs within the virtual machine.

- A copy of macOS Catalina VirtualBox Image File
The easiest way to get the image file is through a quick Google Search. Just make sure to search with the term “macOS Catalina Image File VirtualBox”, and there should be plenty of viable options. The image file is in the vmdk format (Virtual Machine Disk).
Although possible, creating your own macOS Catalina image file can be rather tedious and challenging. Especially if you don’t have a mac with you, as the process requires a mac to create the image file. However, if you’re up for the challenge, and have access to a mac, you can find guides online.
- Code for VirtualBox
This code is crucial in preventing error messages from popping up. Plus, it ensures macOS Catalina to boots up smoothly with no halts. Later on, we’ll demonstrate how you’ll need to input this code using the Command Prompt(CMD). You can click here, to view and download the TXT file of the Code for VirtualBox.
- macOS Catalina Screen Resolution Code
Through the input of this code, you can view the macOS Catalina in full-screen and at higher resolution. This will certainly give you a greater overall user and viewing experience. Towards the end of the guide, we’ll navigate how you can increase the macOS Catalina screen resolution. To view and download the screen resolution code click here.
- Winrar or 7zip installed
Lastly you’ll need a zip archiver to extract the macOS Catalina image file. So, if WinRAR hasn’t already been pre-installed on your PC, you should consider installing it. For this, we would recommend installing either WinRAR or 7-Zip, which are both free to use options.
Step 2: Install VirtualBox Manager
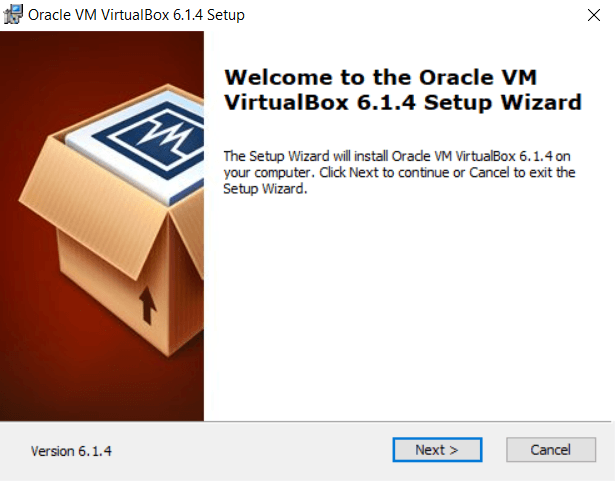
After you’ve downloaded the VirtualBox installation file, you’ll need to proceed to run it on your Windows PC.
- Firstly, open File Explorer and navigate to the VirtualBox installation file, double-click on it, and hit Run.

- After that, the following installation steps are straightforward to navigate through, simply hit Next when prompted.
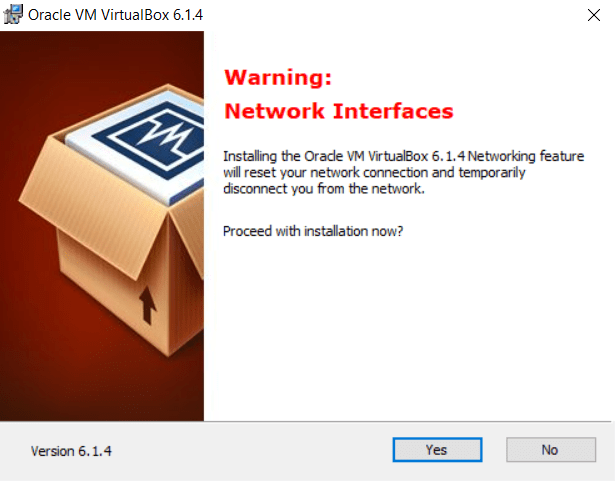
- At this Warning message, click on “Yes”.
- Next, you’ll need to click Install at the following prompts and install the device software.
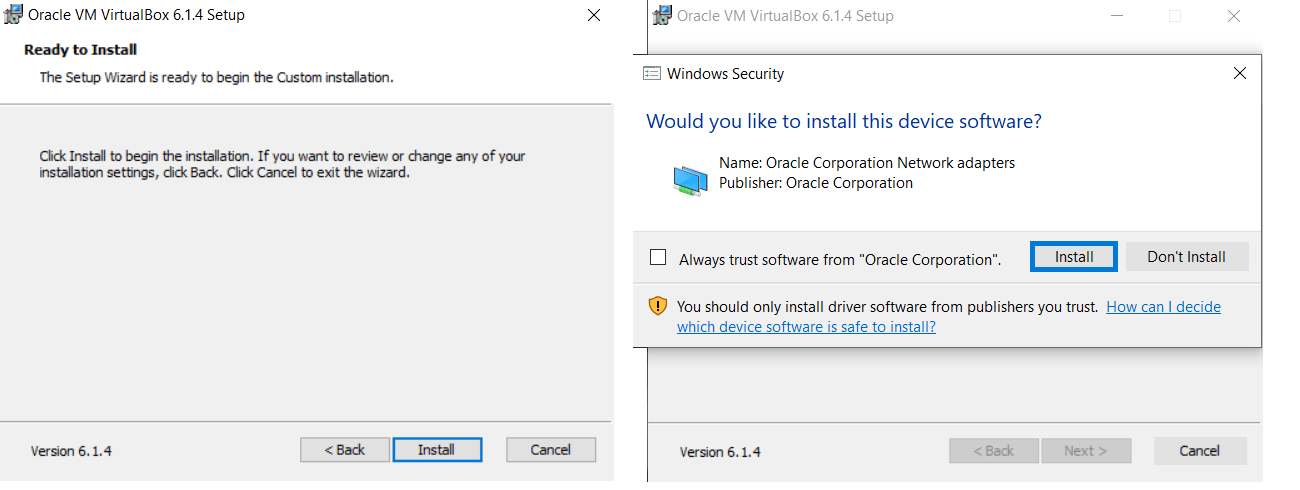
- Finally, click Finish at the last installation step.

Step 3: Install VirtualBox Extension Pack
Now, Installing the extension pack is a cakewalk that only involves a few steps but is definitely vital. Doing this ensures that you can interact with the virtual machine smoothly.
- From your File Explorer, navigate to the VirtualBox Extension Pack file you downloaded, and open it.
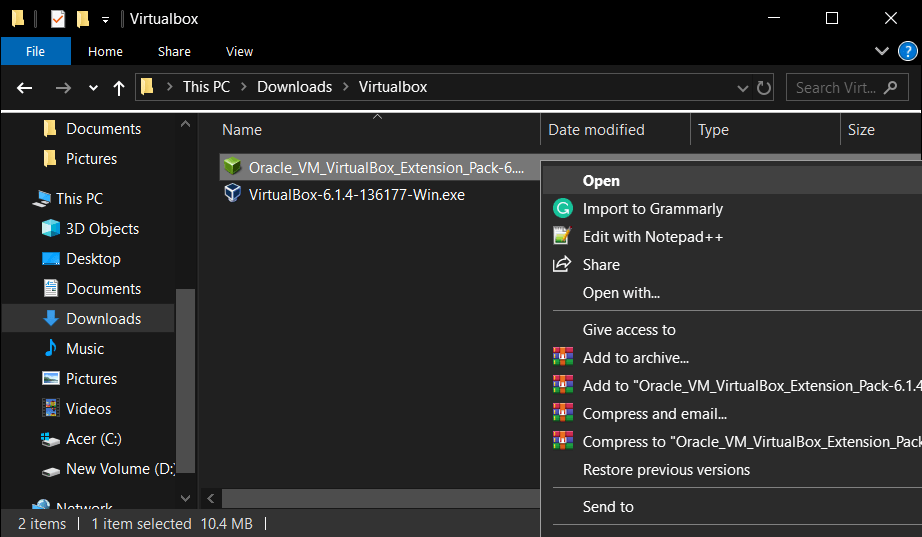
- Then, you’ll be prompted with a question from the VirtualBox app, asking for permission to install the file. Hence, click Install.

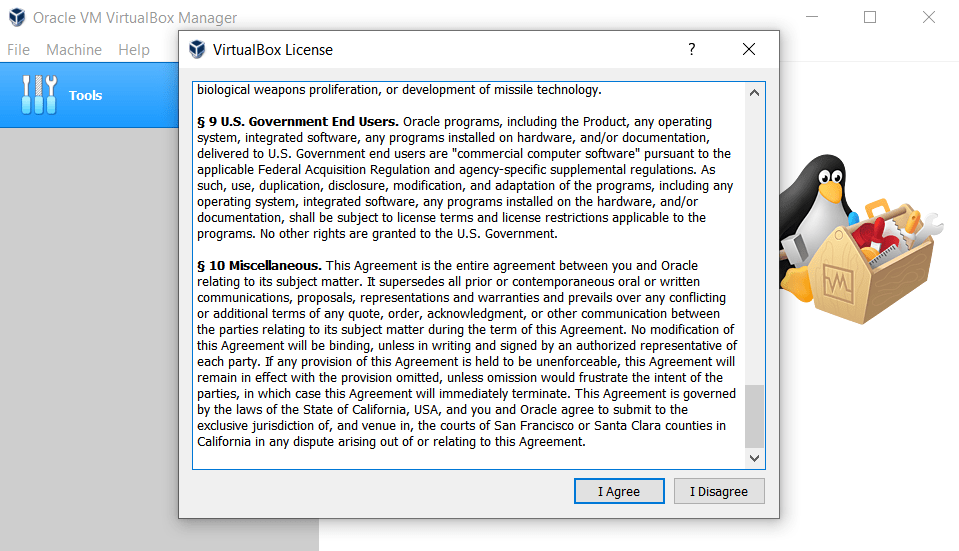
- Next, you’ll be prompted with the VirtualBox license, to which click “I Agree”.
And that’s the easiest way to install an extension pack on VirtualBox. Finally, you should receive a message stating “the extension pack was installed successfully”, marking the installation process completed.

Step 4: Extract the macOS Catalina VirtualBox Image File using WinRAR and Create a New Virtual Machine
Now comes the time to utilize the large image file you’ve downloaded earlier to install it as a virtual machine. If you haven’t already installed a zip archiver, head over to the WinRAR website to download the WinRAR software, then install it.
- Firstly, open File Explorer, navigate to the zip file of the image file, right-click on it and select one of the Extract options. The extraction should only take about 3 minutes.

- After that, open the VirtualBox application, then click New from the top list.

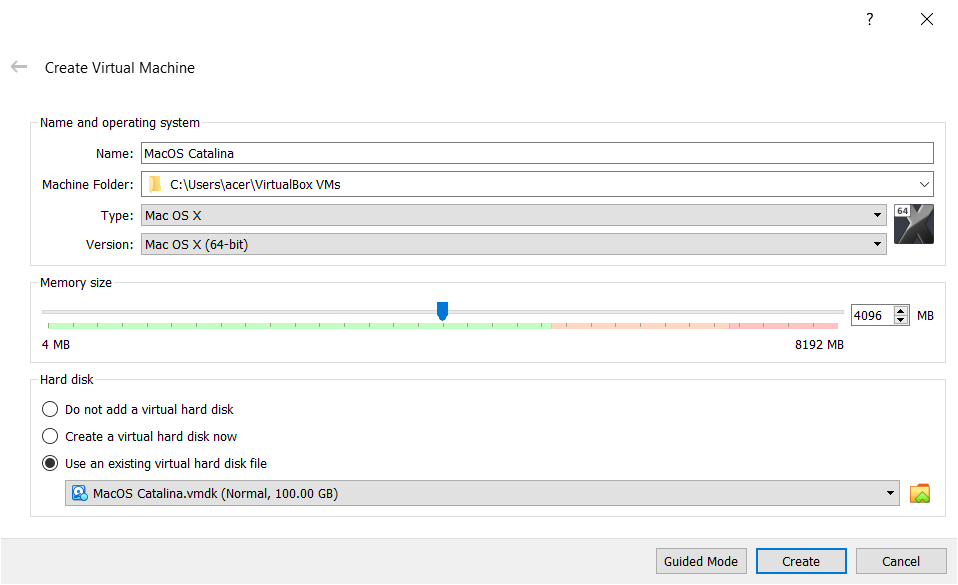
- At the pop-up page, select Expert Mode at the bottom, to view more details of the virtual machine.

- Subsequently, type in a name for your virtual machine beside Name. We suggest typing the name of the OS you’re installing, so it’s easily identifiable. Hence, we went with “MacOS Catalina”. Take note of the name as you’ll need it for the later steps.
Set the Memory size to at least half of your computer’s. For us, that’d be 4096MB.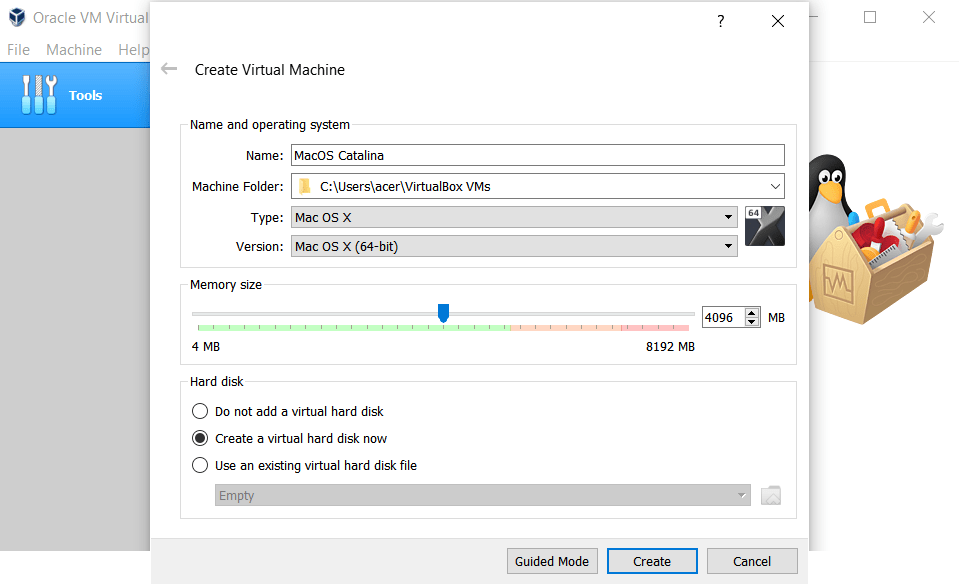
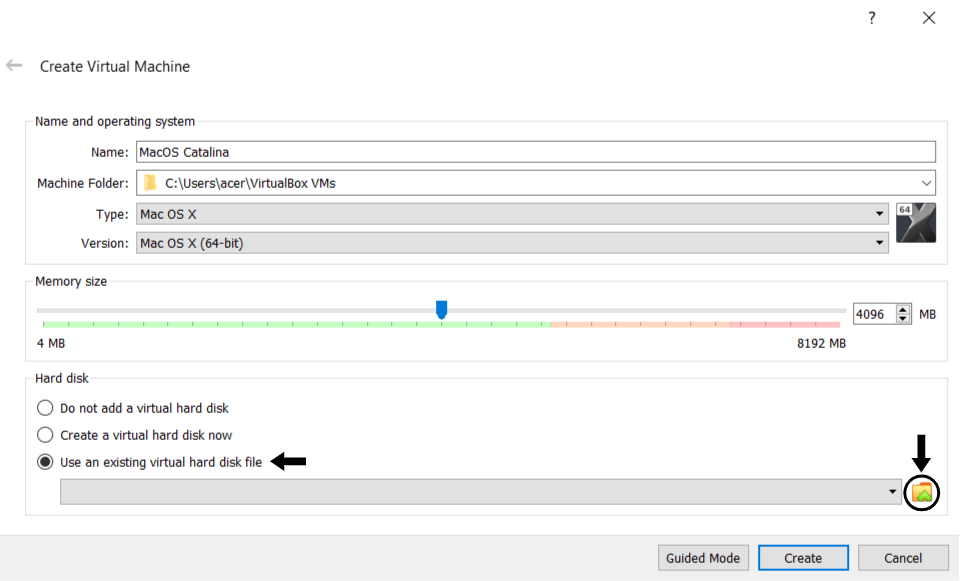
- Under Hard disk, select “use an existing virtual hard disk file”, and click the file icon to the right of it.
- Now, at the Hard Disk Selector page, click on Add to browse through your files. Then, navigate to the extracted image file, select it, and click Open at the bottom right corner.

- Wait a few seconds till you see the image file name appear on the list, then while it’s selected click Choose.

- Finally, click Create at the bottom right corner.
Just like that you’ve successfully created the virtual machine of macOS Catalina on VirtualBox. However, hold your horses, as the virtual machine is not entirely usable just yet without performing the following steps.
Step 5: Edit the Virtual Machine Settings
Now to increase the performance of the virtual machine for it to be optimal to use, we’re going to do some minor tweaking to the virtual machine settings. This involves determining how much of your PC’s power you’re delegating for the virtual machine to operate. This is yet another crucial step to install macOS Catalina on VirtualBox optimally.
- Open the VirtualBox application, then click Settings on the top list.

- After that, select System from the left sidebar, and under Motherboard and Boot Order, untick Floppy.

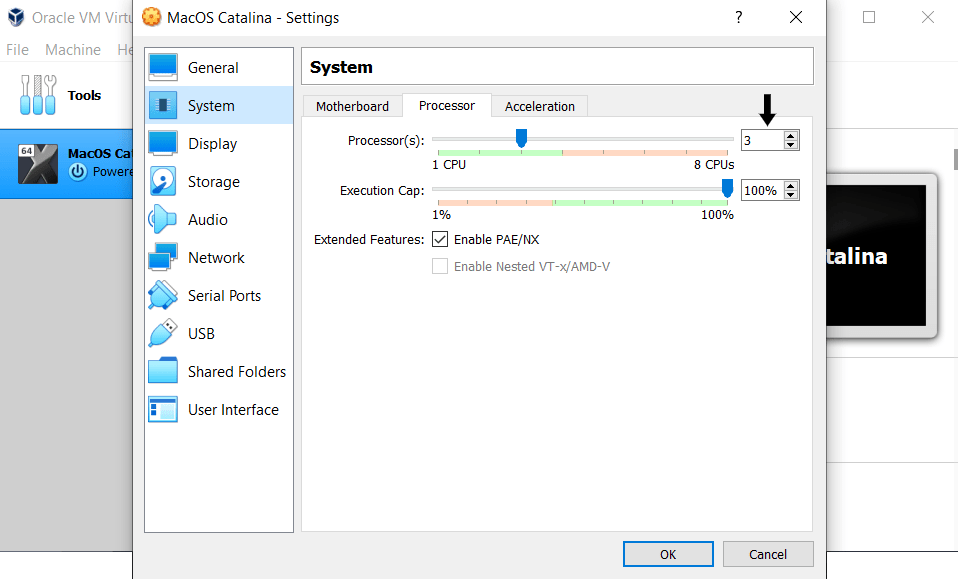
- Next, select Processor from the top list, and change the No. of Processors to 2 or more. Increasing the number of processors will improve the performance of your virtual machine.
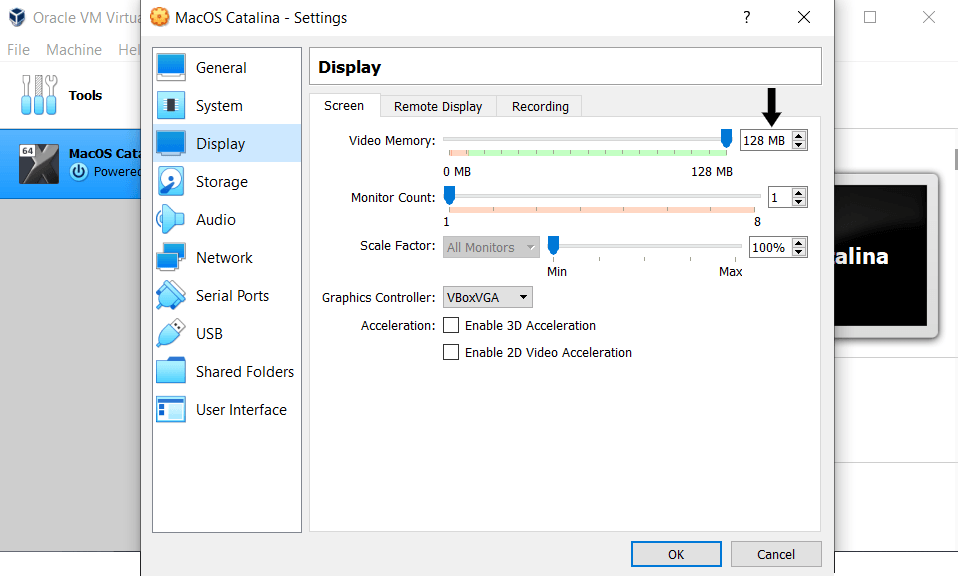
- Following that, select Display from the left sidebar, and under Screen, set the Video Memory at maximum. For us it’s 128MB.
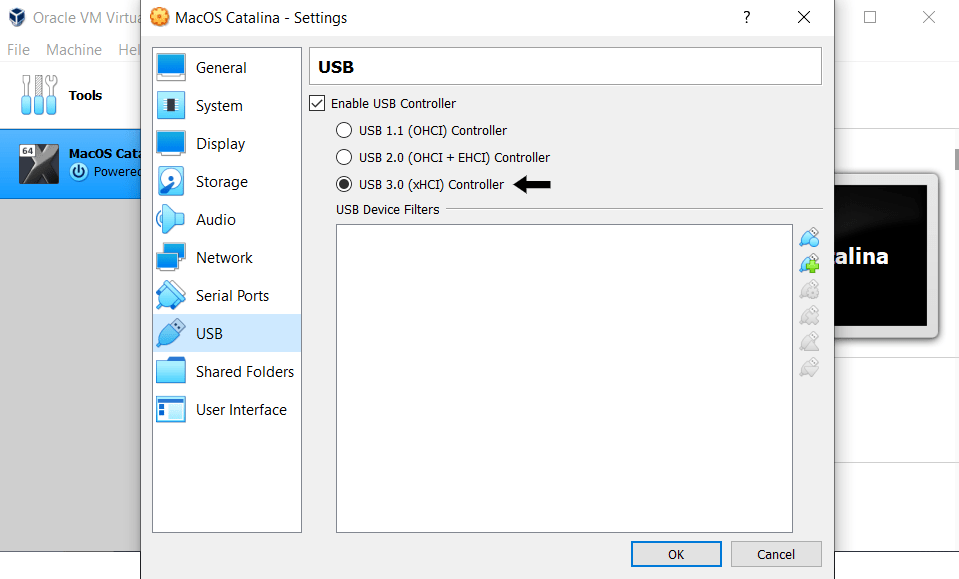
- Finally, select USB from the left sidebar, and choose “USB 3.0 (xHCI) controller” from the list.
Step 6: Apply Codes in the Command Prompt(CMD)
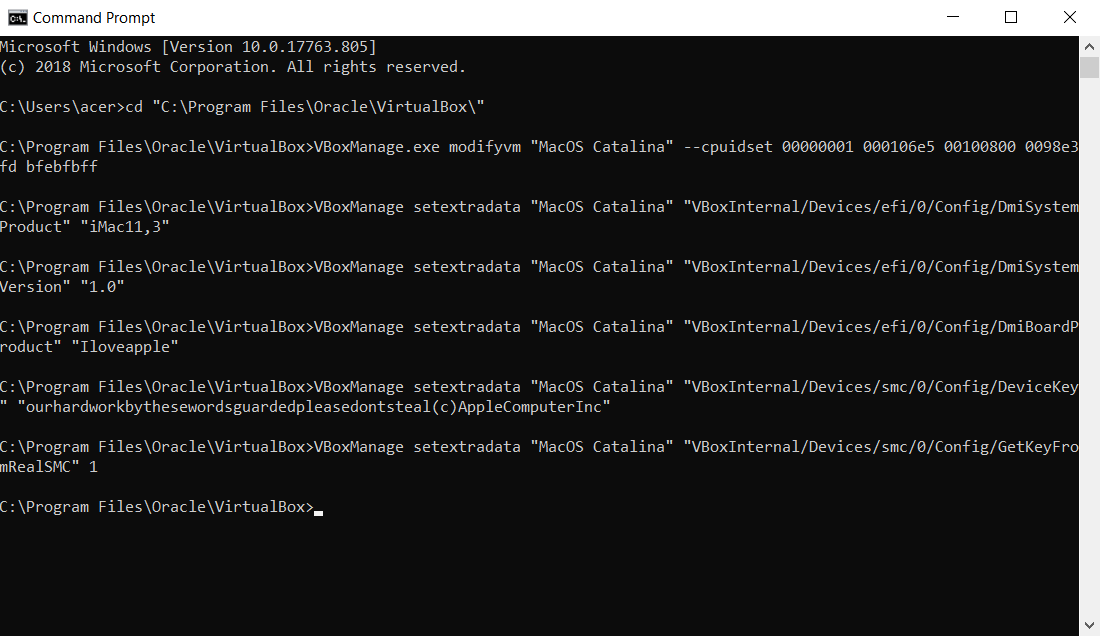
For the virtual machine to boot up smoothly without any error messages popping up, you need to input a few commands. For this step, you’ll need the code for Virtualbox and the name of your virtual machine that you’ve set at the beginning.
cd "C:\Program Files\Oracle\VirtualBox\"

VBoxManage.exe modifyvm "Your VM Name" --cpuidset 00000001 000106e5 00100800 0098e3fd bfebfbff

VBoxManage setextradata "Your VM Name" "VBoxInternal/Devices/efi/0/Config/DmiSystemProduct" "iMac11,3"

VBoxManage setextradata "Your VM Name" "VBoxInternal/Devices/efi/0/Config/DmiSystemVersion" "1.0"

VBoxManage setextradata "Your VM Name" "VBoxInternal/Devices/efi/0/Config/DmiBoardProduct" "Iloveapple"

VBoxManage setextradata "Your VM Name" "VBoxInternal/Devices/smc/0/Config/DeviceKey" "ourhardworkbythesewordsguardedpleasedontsteal(c)AppleComputerInc"

VBoxManage setextradata "Your VM Name" "VBoxInternal/Devices/smc/0/Config/GetKeyFromRealSMC" 1
Before continuing with the steps, ensure that you’ve exited the VirtualBox application completely:
To do this, on VirtualBox select File from the top bar, and in the drop-down click Exit. A simpler route would be to press the Ctrl and Q key.
Merely closing the app by clicking X at the upper right corner won’t do the trick, as the app will still be running in the background.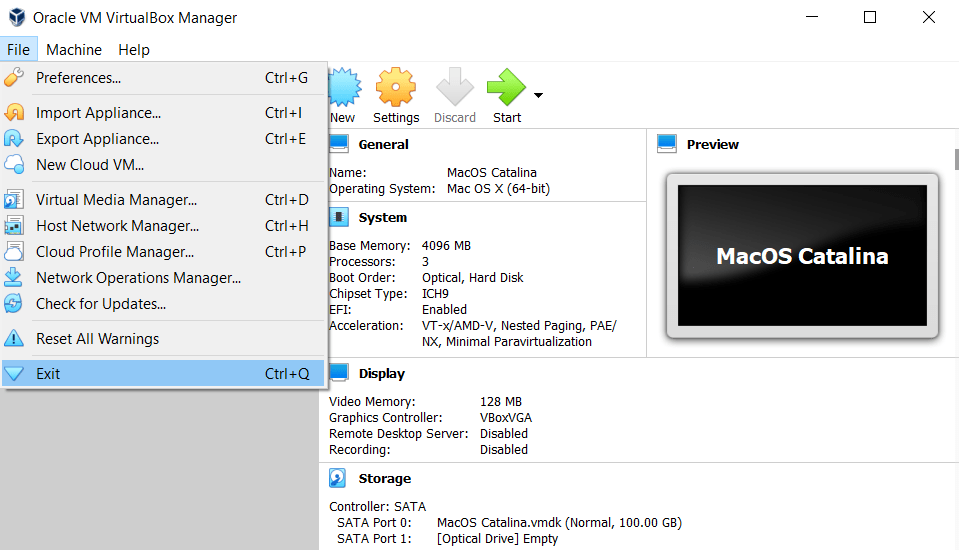
- Firstly, either download the code for VirtualBox as a TXT file by clicking here, or you can copy the code from above.
- Then, open the code in Notepad.

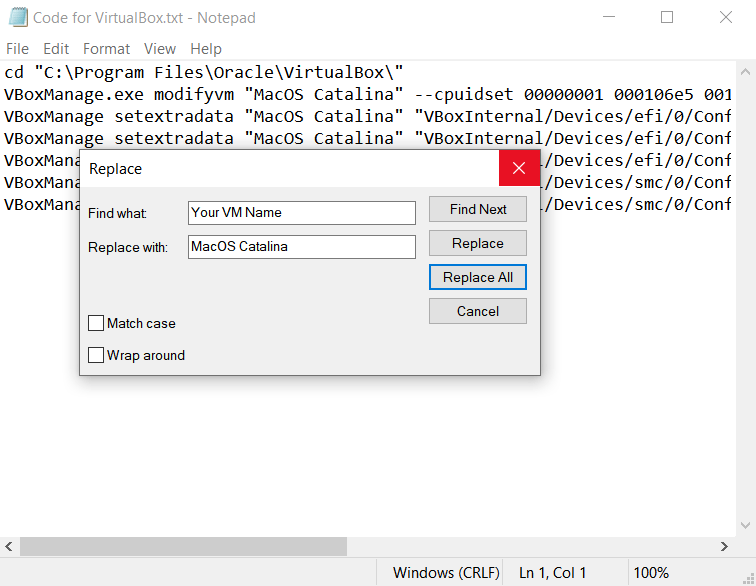
- Next, on the top bar, select Edit, then click Replace or just press the Ctrl and H key.

- At the Replace page, beside Find What, type in “Your VM Name”, and beside Replace With, type in the name of your virtual machine you’ve set earlier. For instance, our’s is “MacOS Catalina”.
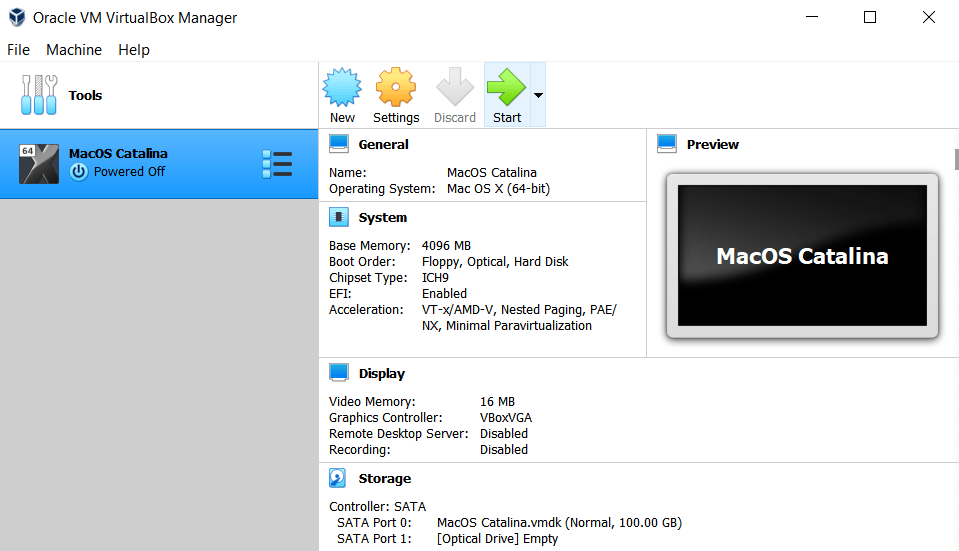
To check the name of your virtual machine, just open the VirtualBox application, and under General, you should see the name. Click on the name, and then you’ll be able to copy it.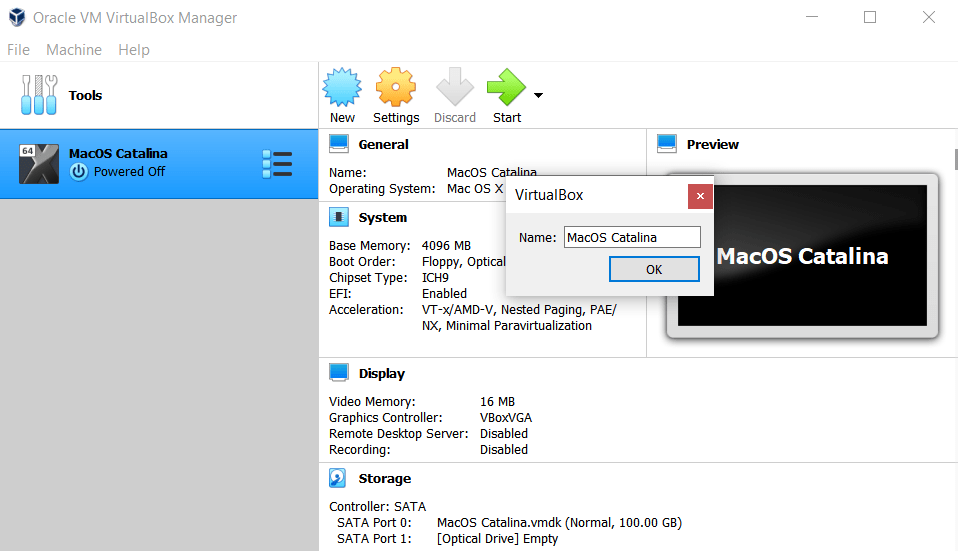
- After that, click Replace All, and Notepad automatically does all the replacing on the code. Now, the code is edited and ready to be applied at the Command Prompt.
- Hence, open Command Prompt(CMD), then copy and paste the first line of the code to the Command Prompt, and press Enter.
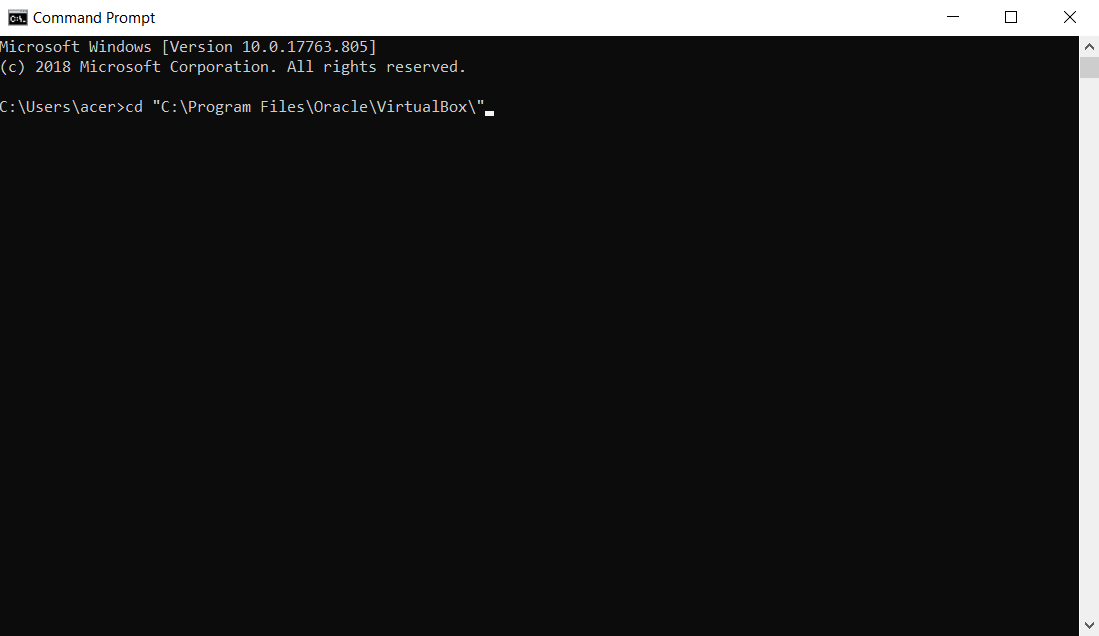
- Following that, you can copy and paste the remaining lines of code, and press Enter. Now, you can close the Command Prompt by typing and entering exit or by clicking X at the upper right corner.
Just like that, the codes will be successfully applied. Now, you shouldn’t face any significant errors during the following steps that include, booting up the virtual machine.
Step 7: Installing the MacOS Catalina Virtual Machine on Virtualbox
At long last, this is the final step before your virtual machine of macOS 10.15 Catalina is fully functional. Unfortunately, this step takes a while but fret not as the VirtualBox application takes care of all the heavy-lifting, while you can kick back and play the waiting game.
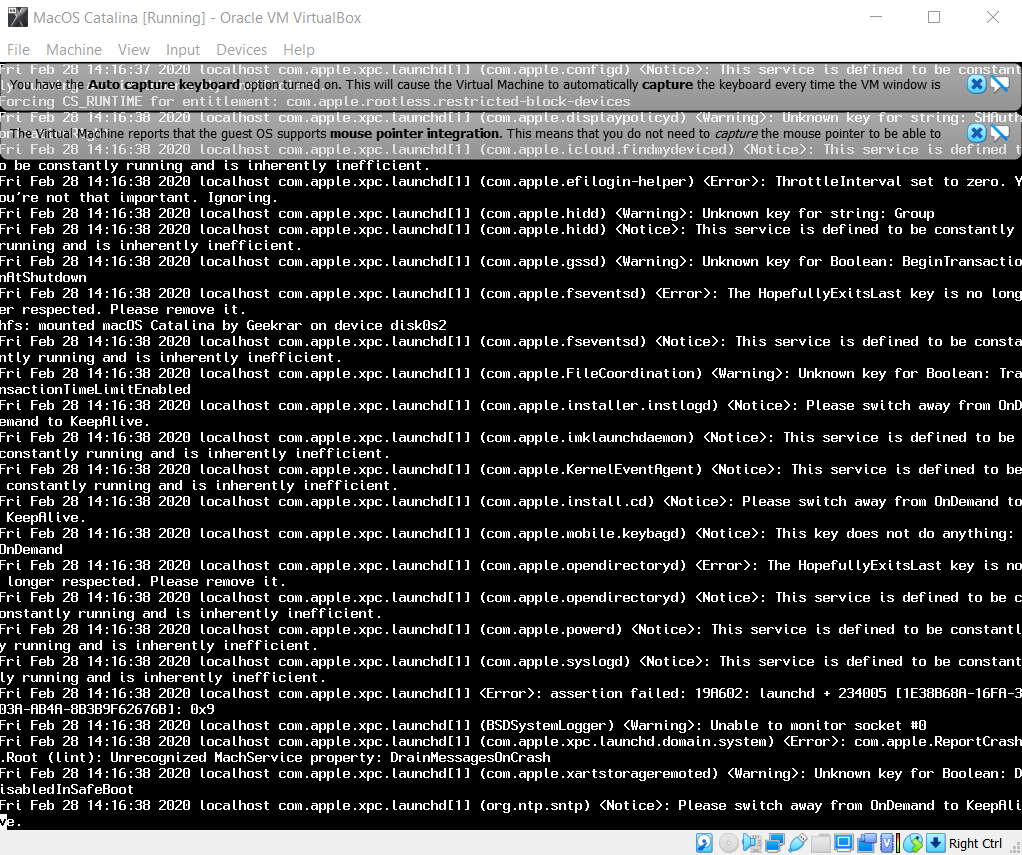
- Firstly, open the VirtualBox application, then click Start.
- Now, you’ll see a black screen with a bunch of code being generated, don’t panic, as this is just the VirtualBox application installing macOS Catalina. You’ll see this black screen continuously generating code for about 10 minutes, so don’t worry if it isn’t moving.
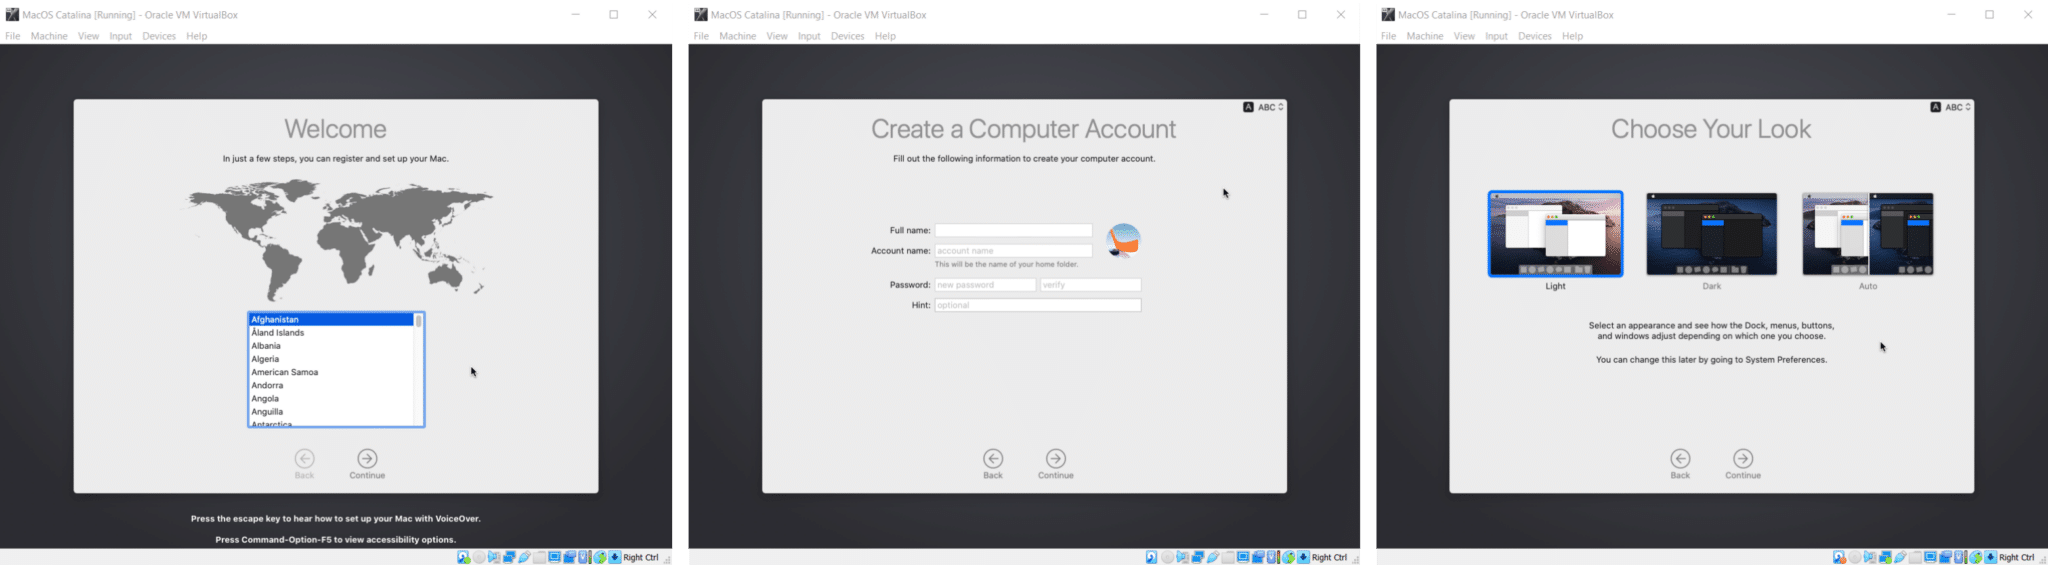
- Then, once you see this page, this is a clear sign that the installation process is bound to be successful, and you shouldn’t run into any major problems from here on out. However, it’ll take another 20 minutes, followed by another bunch of code on a black screen before the installation is completed entirely. So, it should be done by the time you finish watching an episode of your favorite sitcom.

- Next, all that’s left is to follow through with the standard setting up of your Mac, which is really straightforward. Therefore, take your time setting your nationality, preferred languages, theme, and creating a computer account to name a few customizations. Just click Continue after each step of setting up.
And that’s it. You can pat yourself on the back as you’ve successfully installed macOS 10.15 Catalina on your Windows PC. Simple, wasn’t it?

How to Fix the Screen Resolution of macOS Catalina in VirtualBox?
Since you managed to get this far, we have a bonus tip to increase the resolution of the virtual machine of macOS Catalina. From your first experience booting up macOS Catalina, you may have noticed that you cannot view the virtual machine in full-screen mode. Therefore, fret not, as there’s a simple fix enabling you to view the macOS Catalina with no distractions from your old Windows OS, for a more immersive experience.
To do this you’re only going to need the macOS Catalina Screen Resolution Code, such as the one below.
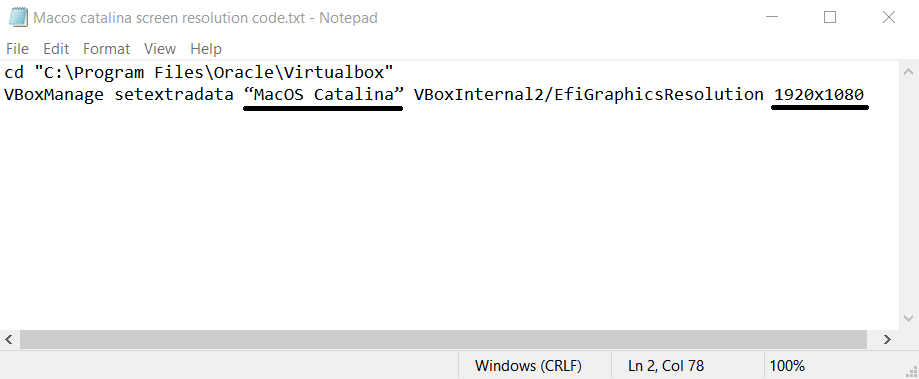
cd "C:\Program Files\Oracle\Virtualbox"

VBoxManage setextradata “Your Virtual Machine Name” VBoxInternal2/EfiGraphicsResolution X
Just like earlier, you’ll need to completely close the virtual machine and VirtualBox application before changing the screen resolution.
Firstly, to close the virtual machine, either press the right Ctrl and Q key or select File from the top bar and click Close… on the drop-down. Then, choose “Power off the machine” and click OK. 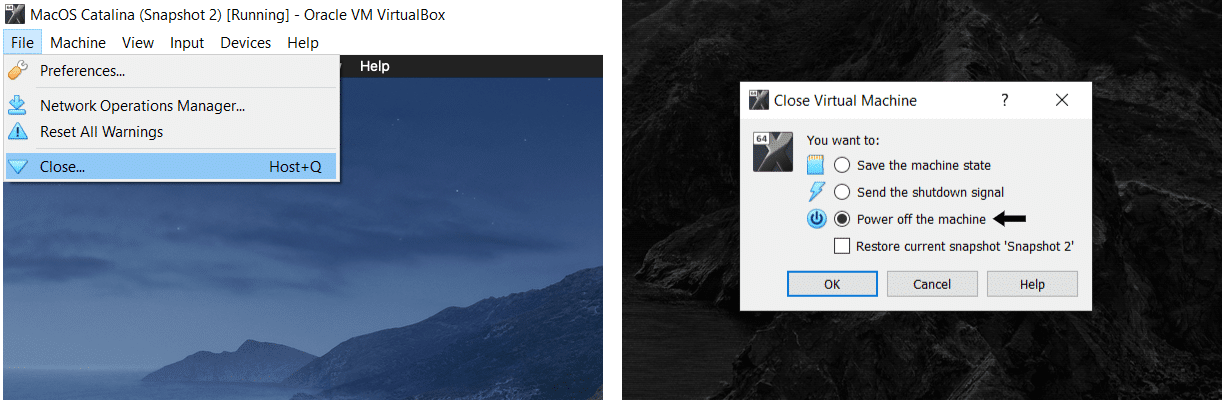
To close the VirtualBox, as stated before, just press the Ctrl and Q key.
Or
Select File from the top menu, and from the drop-down click Exit.
Following that, simply keep up with the following steps.
- Open the macOS Catalina Screen Resolution Code on Notepad, then replace “Your Virtual Name” to the name of your virtual machine just like before. For instance, we changed the code to “MacOS Catalina”.
Again, to view the name of your virtual machine, open the VirtualBox application. Under General and Name, you should see the name of your virtual machine.
- After that, replace X with the aspect ratio or resolution you desire for your virtual machine. We recommend changing it to 1920×1080 for a clear full-screen user experience.
- Then, open the Command Prompt (CMD), then copy and paste the first line of the code, and press Enter.

- Next, copy and paste the remaining edited line of code to the Command Prompt and press Enter.

- Finally, close the Command Prompt by typing and entering exit or click X at the upper right corner.

After that, the command should automatically take effect. Thus, the next time you start up your virtual machine, it will have a higher resolution and occupy a larger portion of your screen.
Time to Catch a Glimpse of Catalina…
And you’re set. Those are the steps to install macOS Catalina on VirtualBox on your Windows PC explained as straightforward as possible.
Whenever you want to boot up your own virtual Mac, just open the VirtualBox app, and your virtual machine will appear at the top of the list. Then, you only need to click Start to initiate.
Pro-tip, to enter and exit full-screen mode on your virtual machine, simply press the right Ctrl and F key while the virtual machine is running.
Plus, this is by far the easiest way for you to test out the latest macOS without spending an extra dime. On that note, why not give macOS Catalina a try and see if it fits your bill. Nevertheless, don’t expect virtual machines to replace the need for macs altogether. Instead, use it as a trial or a tester before you get hold of an actual mac which will provide you with way more performance and better overall quality.
We sincerely hope you’ve found this guide to be of good use. Hit us up if you have any questions regarding this and we’ll try our best to assist. And as always do share this guide with someone whom you think should try out macOS 10.15 Catalina.
Simply just wished to stress I am just happy that i happened in your web site.
Thanks very beneficial. Will certainly share site with my good friends.