Can’t find the Ethernet connection in your Mac’s network settings or find that the ethernet connection isn’t working, showing up or that there’s no Internet? 🤔
When utilizing an Ethernet cable, connecting your Mac to the internet is simple because the cable provides a dependable and secure connection. But, if the Ethernet connection on your mac is not working, or if there is no internet connection, it might be a frustrating experience.
However, this could be due to a variety of difficulties, including a defective cable, wrong network settings, or hardware failure. If this is the case, you must troubleshoot the connection to find the source of the problem. Due to mac thunderbolt ethernet not working, you can have a significant impact on your internet consumption and should be fixed as soon as possible to ensure you can stay connected.
If your Mac’s Ethernet connection or thunderbolt Ethernet is not working, you may be frustrated and unsure of how to fix it. Fortunately, there are various viable solutions that can assist you in resolving the issue and returning your Mac to service. This guide will walk you through diagnosing your Mac’s Ethernet connection that is not working as expected and configuring your internet connection for maximum performance.
So, without further ado, let’s delve into the topic and go over it in depth! 👇
Why is My Mac Ethernet Connection Not Working?
1. Check for Hardware Issues
If your internet connection isn’t working, the first thing you should do is look for any hardware problems. This entails inspecting the Ethernet wire for tears and ensuring that all connections are properly plugged in. You should also ensure that your modem and router are both turned on and operational. (Fix 1, 2, 3, 4, and 6)
2. Reset Your Mac Network Settings
If a hardware problem is not the cause of the connection problem, you can try resetting your Mac’s network settings. This may be accomplished by navigating to System Preferences. You should try to renew DHCP Lease in the window. (Fix 5 and 13)
3. Check Your DHCP Settings
If you’ve reset your network settings and the problem still exists, you should look into your DHCP settings. This displays your current DHCP settings, and you can compare these settings to the ones provided by your network provider. (Fix 13)
4. Reset Your Router and Modem
If your DHCP settings are correct, reboot your router and modem. This can be accomplished by disconnecting both devices, waiting a few seconds, and then plugging them back in. This will clear the settings and may resolve any connectivity issues. (Fix 6)
5. Disable Any Firewalls or Antivirus Software
If you have any firewalls or antivirus software installed on your Mac, try disabling them to see if it resolves the connection problem. If it does, try configuring the software to operate with your network settings. (Fix 16 and 17)
6. Issue With Mac
If the Mac itself fails, the Ethernet connection on the Mac may fail as well. Examine Mac’s settings, restart it, and ensure that the Ethernet port is not restricted. (Fix 6 )
18 Fixes For Mac Ethernet Connection Not Working
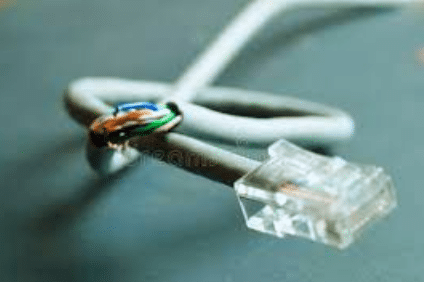
1. Check Whether the Cable Has Any Signs of Damage
Looking for signs of damage on the cable is a critical step in resolving ethernet, not connected, Mac issues. These wires may become damaged with time, resulting in an unstable connection or a total lack of connectivity. By physically analyzing the cable for evidence of damage, it is possible to establish whether a new cable is required to restore proper connectivity.
Frayed or split outer insulation, exposed wire strands, and bent or broken metal connectors are all indicators of a damaged Ethernet cable. If any of these signs appear, the cable should be replaced. It’s also critical to make sure the wire is firmly attached to both the Mac and the router or modem.
2. Plug Out the Ethernet Cable and Re-Plug In
Plugging out the Ethernet cable and replugging is a simple troubleshooting procedure used to resolve the MacBook ethernet adapter not working. This procedure entails detaching and reconnecting the Ethernet wire from the Mac. This will reset the connection and eliminate any signal irregularities that may be causing internet connection problems.
Also, it can be used to reset the IP address, which is useful if the Mac is unable to connect to a network or specific websites are not loading.
- First, unplug the Ethernet cable from the Mac before beginning this procedure.
- Then, wait about 10 seconds after unplugging it before connecting it back in.
- Finally, once plugged in, the Mac will attempt to connect to the network automatically.
3. Plug the Cable Into Another Computer
By isolating the problem from the cable or the machine, plugging the cable into another computer to test the issue can assist in fixing the MacBook ethernet adapter not working issues. If the cable works on the second computer, the problem is with the Mac.
Hence if the cable does not function on the other computer, the problem is most likely with the cable itself, and a replacement should be ordered.
Therefore, locate another computer with an ethernet connection that is linked to the internet to test the cable. Connect the ethernet cable to the second computer’s ethernet port and power it on. If the other computer cannot connect to the internet, the problem is most likely with the ethernet cable, which should be replaced.
4. Insert the Ethernet Cable into a Different Port
If the port you were initially using is damaged or not functioning properly, inserting the ethernet cable into a different port can help to remedy a Mac ethernet connection problem. If the port is not operational, the Mac will be unable to connect to the network or the Internet. By plugging the ethernet cable into a new port, you can potentially re-establish the connection by bypassing the damaged port.
Another option is that the port you were using was malfunctioning and could not send data at a fast enough rate. As a result, the connection may be slow or sporadic. Inserting the ethernet connection into a different port may assist in remedying this issue because the new port may be faster at transferring data.
5. Inspect the Network Settings
Inspecting network settings can assist in resolving Mac won’t connect to ethernet problem since it allows users to examine network connection settings to find the source of the problem. This can be accomplished by opening the Network pane in System Preferences, selecting the Ethernet tab, and then reviewing the connection settings.
Steps to Inspect Network Settings
- Begin by selecting the “Apple menu” from the home screen of your Macbook.
- Next, select “System Preferences”.
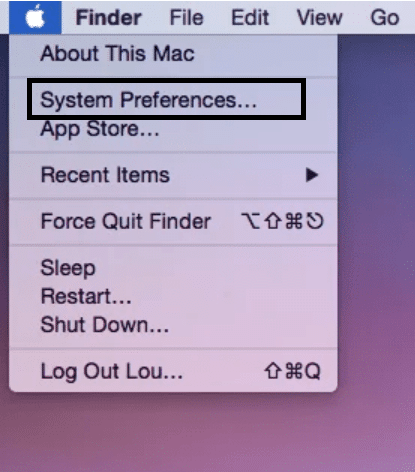
- Then select “Network”.
- A list of network services will appear on the left side of the screen.
- Choose “Ethernet”.
- Click the Add icon if you don’t see this option.
- Input the ethernet connection parameters.
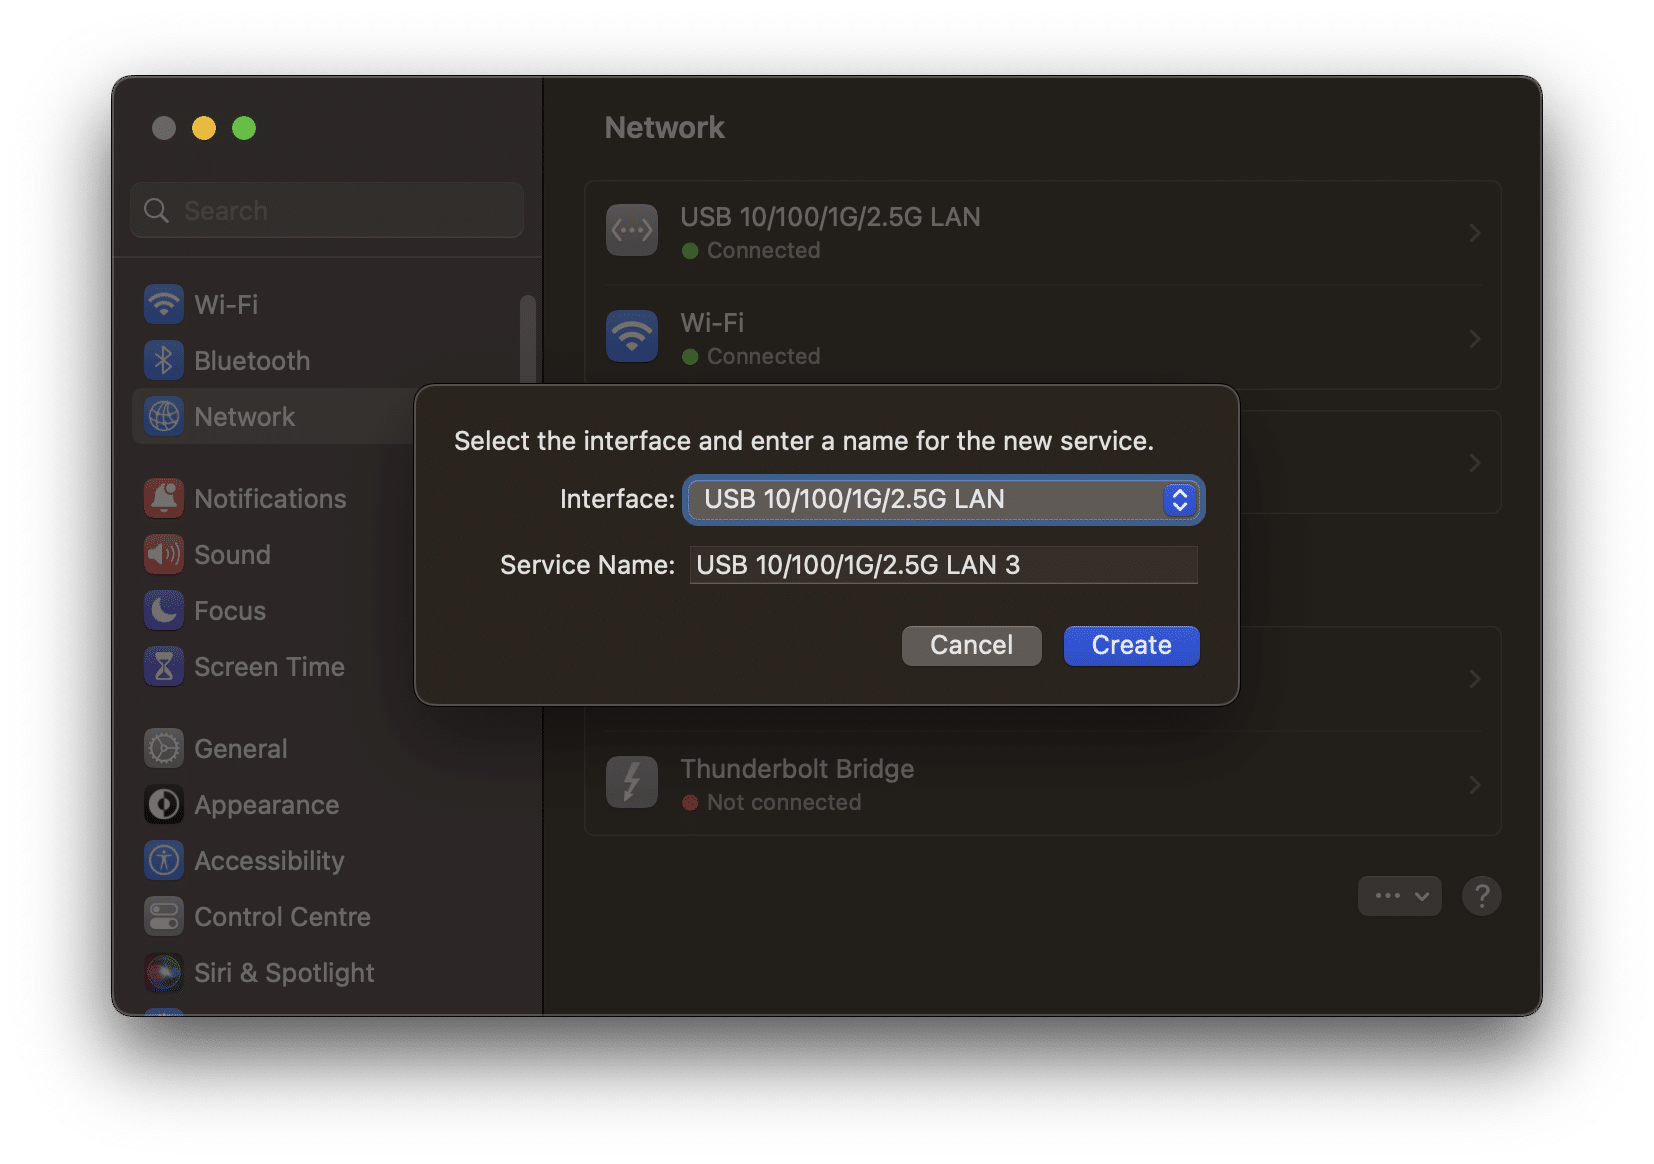
This is how the pane would look on older versions of macOS:
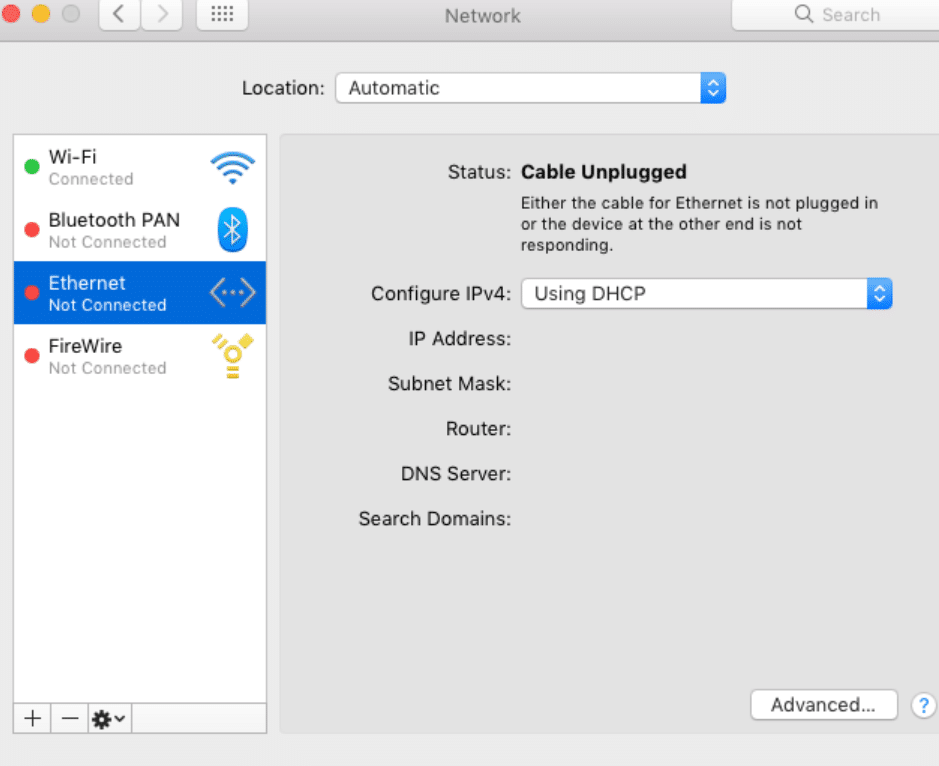
The service is operational and connected if the Ethernet status indicates “Connected” with a green dot. It eliminates any issues with the Ethernet connection itself. To avoid misconfigurations, try uninstalling and re-adding the Ethernet service.
If the Ethernet status is “Cable Unplugged”, this means that either the cable is not connected or the router is not responding. Clean the Ethernet port, or remove and re-add Ethernet from the Network preferences window.
If the Ethernet is not connected and marked with a yellow dot, your Mac may have misidentified its IP address. Attempt to renew the DHCP lease.
6. Reboot the Modem and Mac
To begin, rebooting can reconnect the modem to the network, allowing it to build a stronger connection with your Mac. It can also assist in clearing up any transient network issues, such as faulty data packets or other brief faults that may be impeding a successful connection.
Lastly, resetting the network settings on your Mac will allow you to correctly recognize and respond to the network, resolving any conflicts that may be impeding a successful connection.
Steps to Reboot Modem and Mac
- To begin, shut down your Mac.
- Then, disconnect your router’s power supply.
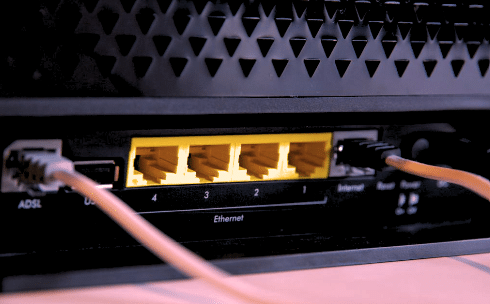
- Wait 30 seconds before proceeding.
- After that, reconnect the power to your router and wait for the power light to steady.
- Also, restart your Mac.
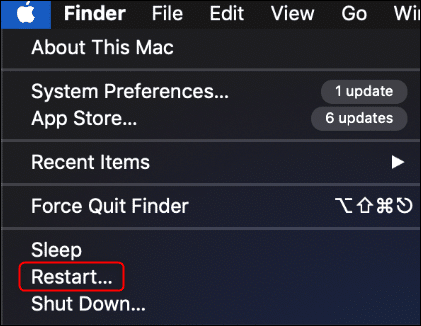
If your Mac has an Ethernet connection but no internet, proceed to the next patch.
7. Reboot Ethernet With Terminal
By resetting the Ethernet adapter, you can resolve the MacBook ethernet adapter not working
issue. To reset the Ethernet adapter, use the Terminal app to execute a command that turns off and then turns on the adapter. This will reset the connection and may aid in the resolution of any connection issues.
Steps to Rebook Ethernet With Terminal
- To begin, launch the Terminal application from the Applications folder or use Spotlight.
- Once the Terminal software has been launched, enter the following command:
down sudo ifconfig en0- Enter a password if it is required.
- This command disables the Ethernet adapter. Enter the command once it has been entered. The Ethernet connection should be disabled within a few moments.
- To restart the Ethernet adapter, enter the following command:
ifconfig en0 up sudo This command activates the Ethernet adapter. Enter the command, and once it has been entered, after a few moments, re-enable the Ethernet connection. The connection should now be operational.
Note: en0 should be replaced with the name of your wired network interface.
8. Delete and Re-Add the Ethernet Service
Removing and then re-adding the Ethernet service resets the network connection and allows your Mac to rebuild the connection to the network, overall assisting you in resolving your Mac won’t connect to ethernet issue.
Steps to Delete and Re-Add Ethernet Services
- To begin, make sure your ethernet wire is hooked into your Macbook. Check to see if the modem is also operational.
- Then, on your Macbook, navigate to the Apple menu.
- Choose “System Preferences”.
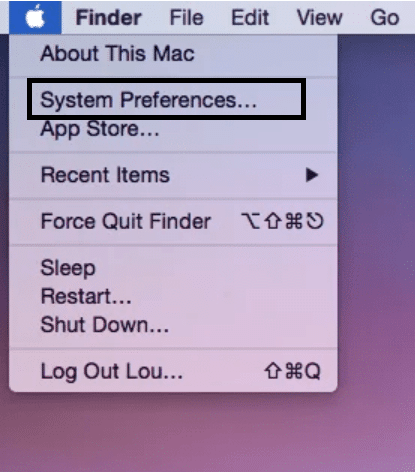
- Then, select “Network”. A list of network services can be seen on the right side.
- Choose “Ethernet”. Then, at the bottom of the list, click the Minus button.
- To confirm the action, click Apply.
- Return to the list and select “Bluetooth PAN”. Choose the “Advanced” option.
- Then, select the “Renew DHCP Lease” option. Choose OK and then Apply.
- Restart your Mac.
- Return to “Network” once your device has been turned back on.
- Choose the Add option. Click the dropdown option in the pop-up window. Choose “Ethernet”. Then press the Create and Apply buttons.
- Finally, allow your Mac to connect to the internet automatically.
9. Update the Kernel Extension
Numerous Mac users reported being unable to connect through ethernet. However, the problem did not affect Wi-Fi or other types of wireless connectivity.
Do you have the same experience? Your Mac’s kernel version could be at blame. Apple suggests that you check what software is installed on your machine.
The kernel version that is causing the ethernet problem is 3.28.1. If you notice this on your Mac, you must update it to 3.28.2.
If you can still connect to a Wi-Fi source, you can resolve the problem with a single Terminal command. Here’s how to go about it:
- First, launch Terminal.
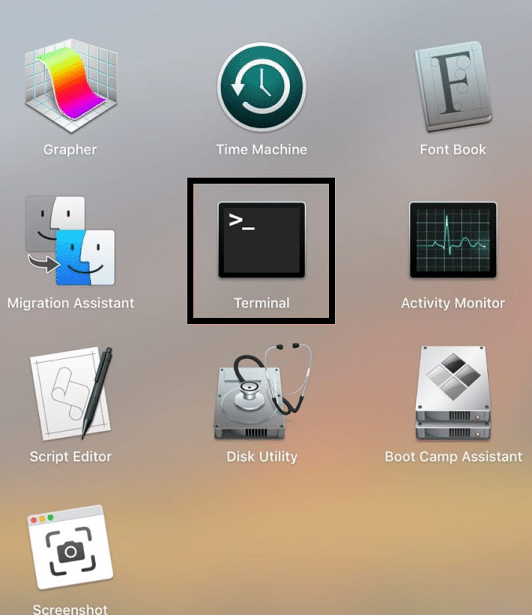
- Then enter the following command:
sudo softwareupdate -background - The terminal should be closed. After that, restart your Macbook.
If no Wi-Fi network is available, proceed with the following procedures to upgrade your kernel version:
- Begin by powering down your Mac.
- Press and hold the Power button. Then, simultaneously press the Command and R keys.
- The Apple logo will be displayed on the screen. Your Mac will enter Recovery Mode in a few seconds.
- Then enter your password. This will bring up the “macOS Utilities window”.
- Choose “Disk Utility”. Then, choose your drive. Your drive’s default name is Macintosh HD. But, if you move or rename it, you will see a new name.
- If the drive name is grey, “FileVault” protects it. Choose File. Next, from the Disk Utility, select Unlock. Finally, type in your FileVault password.
- After that, select File, and in Disk Utility, mount your drive by clicking “Mount”.
- Disk Utility should be closed.
- You’ll be returned to the macOS Utilities window. Look at the top menu bar and select “Utilities” this time. Choose “Terminal” from the dropdown options.
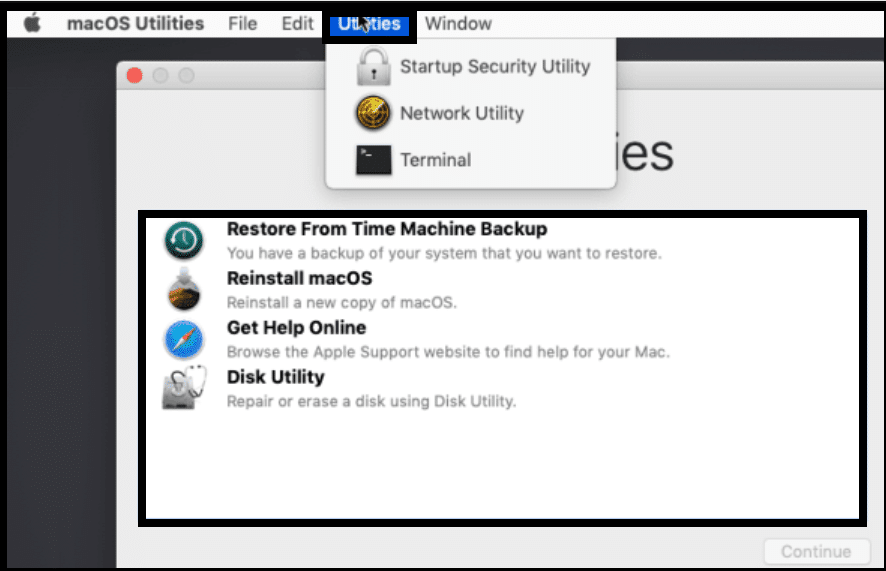
- Enter the following one-line command:
rm -rf "/Volumes/Macintosh HD/System/Library/Extensions/AppleKext ExcludeList.kext" - Leave the Terminal.
- Next, from the Apple “menu”, choose Restart.
- Your ethernet connection should now be operational. Go to the internet.
- After that, go to “Terminal”.
- Enter the following command: sudo softwareupdate -background. Enter your password.
This procedure ensures that your Mac’s kernel has been updated to version 3.28.2.
10. Assign Static IP
Assigning a static IP address to a Mac can assist in resolving Ethernet connection issues. Its purpose is to prevent IP address conflicts and to ensure that the device is always connected to the same IP address.
Before assigning an IP address to a Mac, make sure it is not already in use by another device on the same network. This may cause connectivity problems. The user should also check that the subnet mask and default gateway are properly configured.
Steps to Assign Static IP to a Mac
- Choose “System Preferences” by clicking on the Apple logo in the upper left corner.
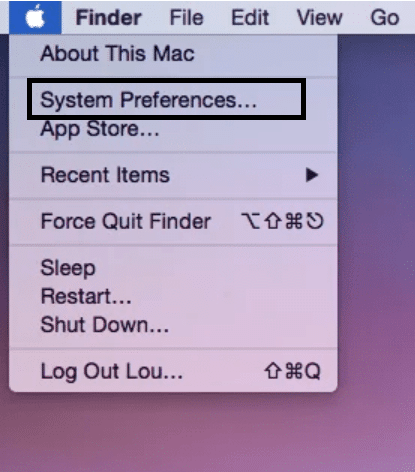
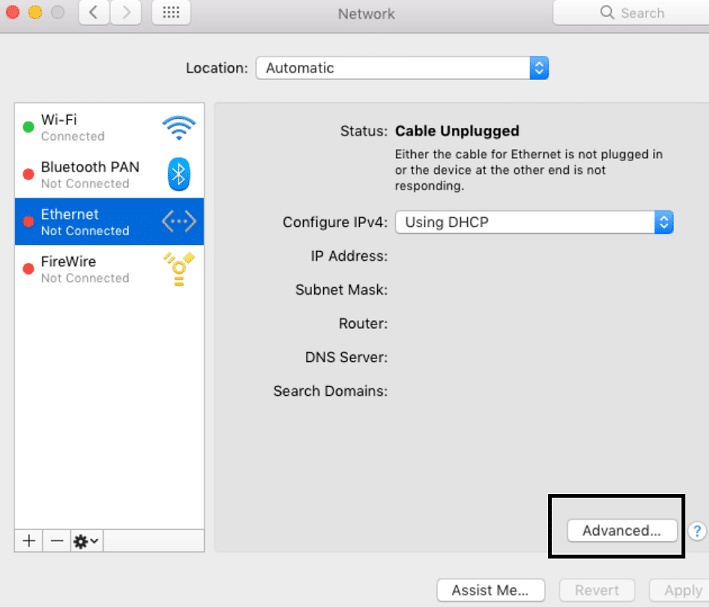
- Next, pick “Network”, Ethernet from the left-hand side, and “Advanced”.
- Now, select Manually from the Configure IPv4 menu and input the address in the IPv4 Address field.
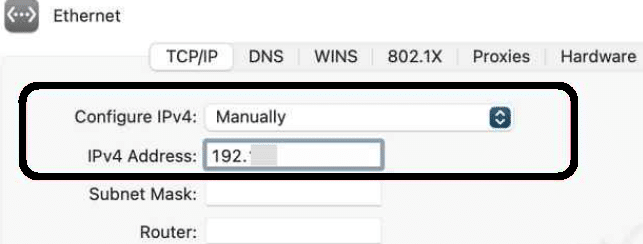
Try to see if it resolves the USB-C Ethernet Adapter not working on the Mac issue.
11. Disable AVB/EAV Mode
Disabling AVB/EAV mode is a method for troubleshooting network connectivity difficulties on Mac systems. This procedure can assist in the repair of a Mac Thunderbolt ethernet not working. When AVB/EAV mode is activated, it provides a more dependable internet connection but may cause issues with specific networks.
Disabling AVB/EAV mode can assist in resolving these issues and providing a more dependable connection.
Steps to Disable AVB / EAV Mode
- First, choose “System Preferences” by clicking on the Apple logo in the upper left corner.
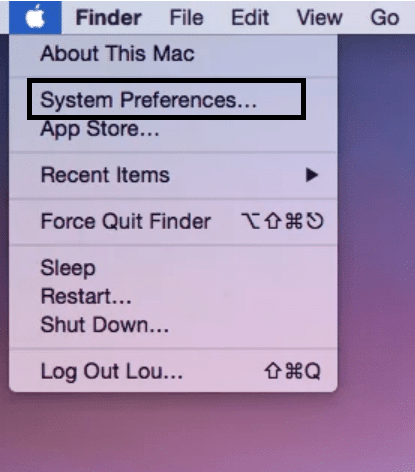
- Next, pick “Network”, Ethernet from the left-hand side, and “Advanced”.
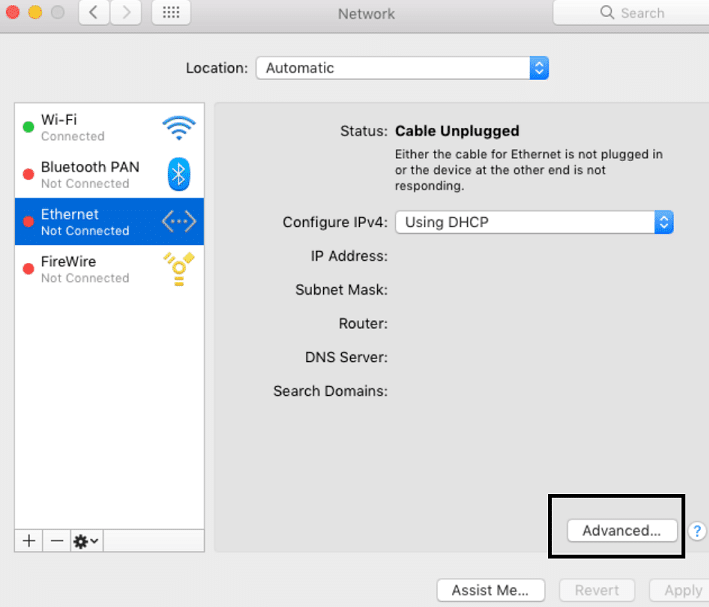
- Choose Manually next to Configure and uncheck AVB/EAV Mode on the Hardware tab.
Try to see if it resolves the USB-C Ethernet Adapter not working on the Mac issue.
12. Change Your Mac’s DNS
Domain Name System Is a system that converts domain names (for example, www.word.com) into IP addresses (i.e., 192.168.1.1). If your Mac Ethernet connection is not working, is not visible, or you have no Internet access, adjusting your Mac’s DNS settings may help you remedy the problem.
When you change the DNS on your Mac, you’re effectively changing the address that your Mac uses to look up web page addresses. This can assist in ensuring that your Mac is using the most up-to-date DNS addresses, allowing your Mac to obtain the most current information from the web.
Steps to Change Your Mac’s DNS
- First, go to “System Preferences” and select “Network”.
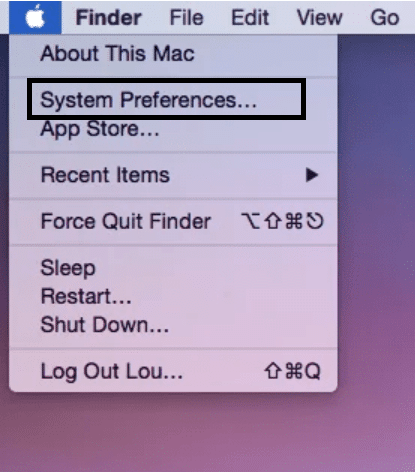
- Then choose the Ethernet connection for which you want to update the DNS.
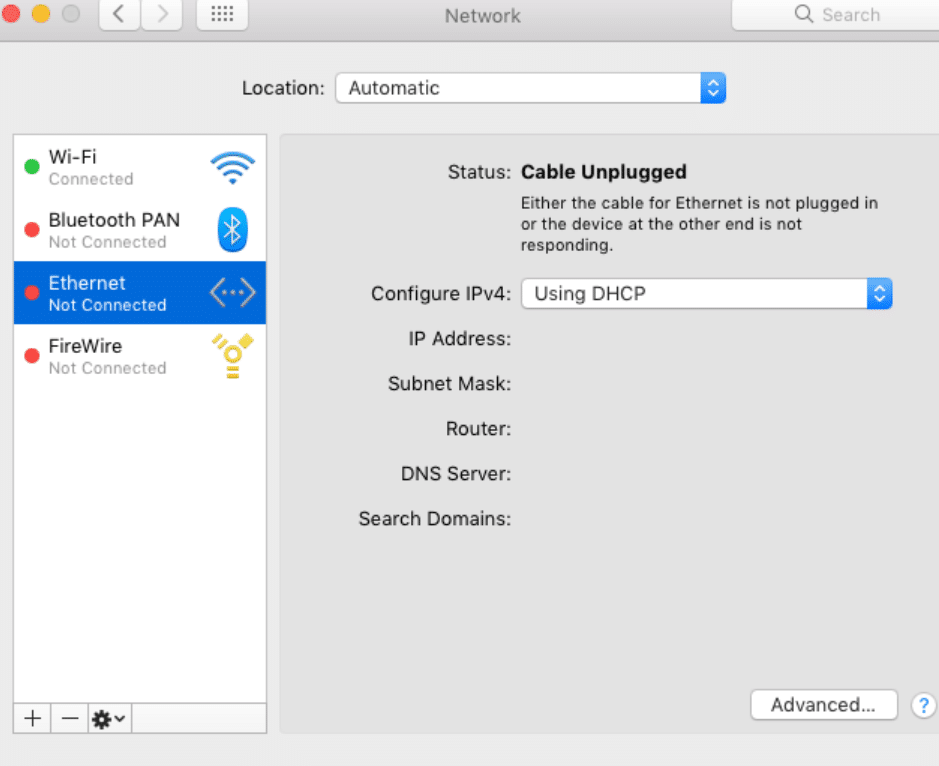
- After that, click the “Advanced” button. Choose the DNS tab in the Advanced window.
- Finally, you should be able to input the new DNS addresses.
- After entering the updated DNS addresses, click OK, then Apply.
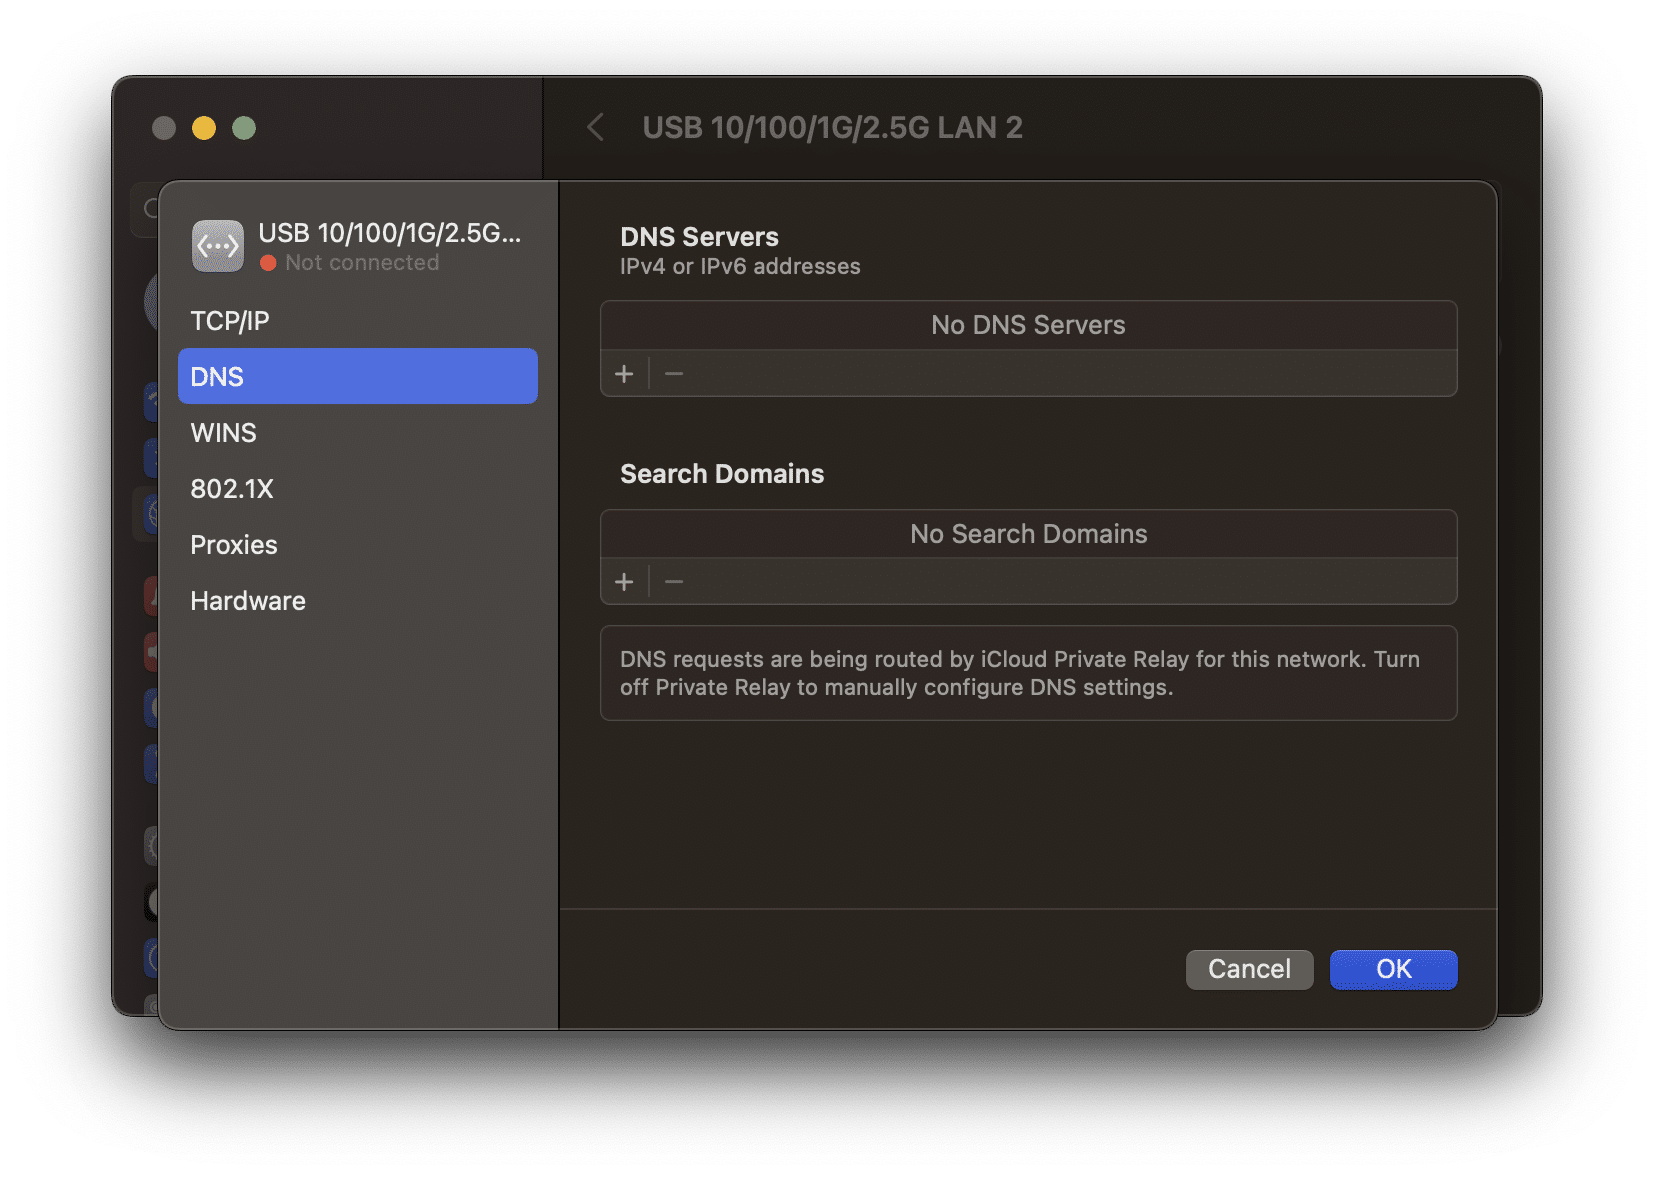
The new DNS addresses should now be used by your Mac. Check to see if this solves your Ethernet connection problem. If not, try different DNS addresses or go back to the original DNS addresses.
13. Renew the DHCP Lease
If your Mac ethernet connection isn’t working or isn’t connected to the internet, the DHCP lease may have expired. DHCP (Dynamic Host Configuration Protocol) is an IP (Internet Protocol) protocol that is used to automatically assign IP addresses to networked devices.
When a device connects to a network via DHCP, the DHCP server assigns it a unique IP address. This IP address is only valid for a set period of time, after which the device’s connection to the network is lost. This is referred to as the DHCP lease ending.
To remedy the issue of your Mac Ethernet connection not being able to connect to the internet, you can manually renew the DHCP lease. This will assign a new IP address to the device and allow it to reconnect to the network.
Steps to Renew DHCP Lease
- First, choose “System Preferences” by clicking on the Apple logo in the upper left corner.
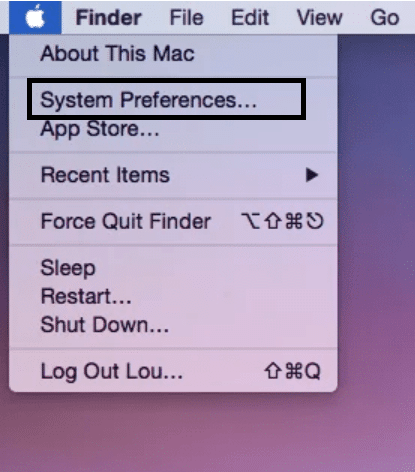
- Next, pick “Network”, Ethernet from the left-hand side, and “Advanced”.
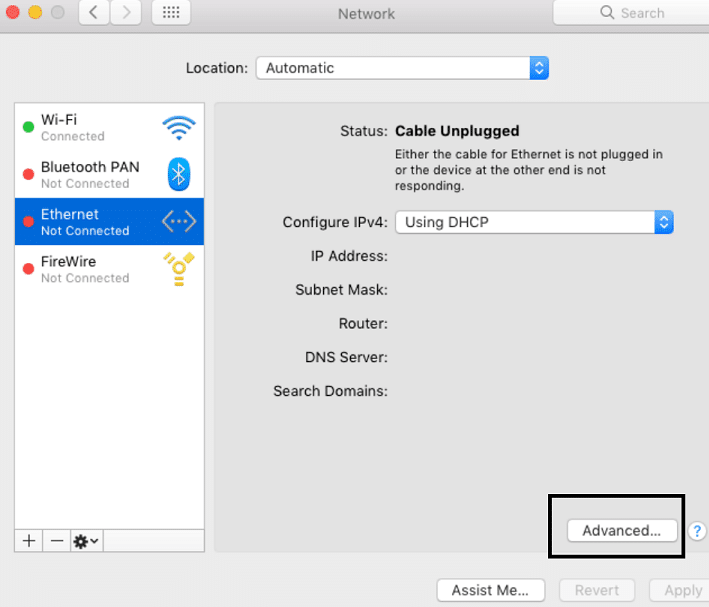
- Then select “TCP/IP”.
- Tap on Renew DHCP Lease after opening the TCP/IP tab.
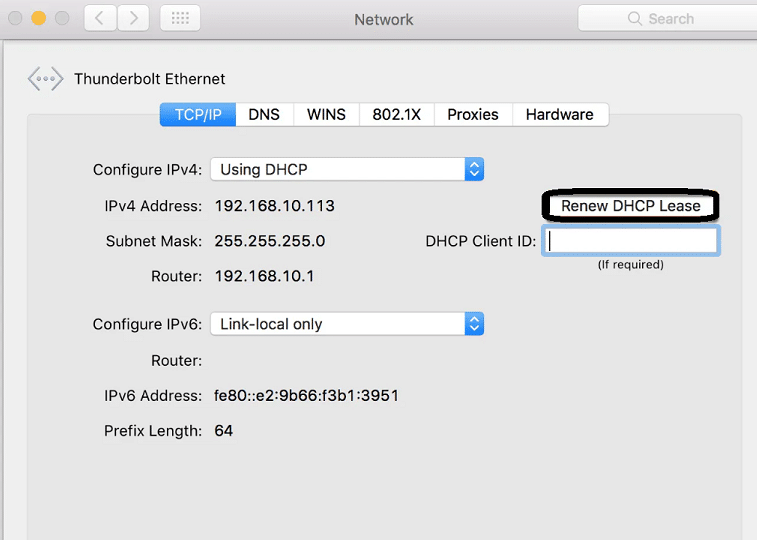
- A notification will appear explaining that “renewing the DHCP lease will result in the loss of any unsaved changes.” Check that you’ve saved any documents, close any open apps safely, and then click “Apply”.
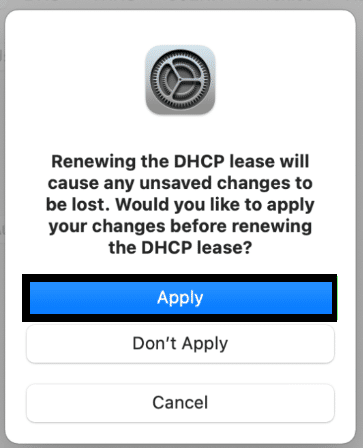
You should now see that the adapter is connected!
14. Run Wireless Diagnostics on Your Mac
The Wireless Diagnostics tool cannot resolve the issue, but it can examine your Wi-Fi and present you with a list of issues, information, and options to resolve it.
Steps to Run Wireless Diagnostics on Your Mac
- Close all apps. To accomplish this, right-click an open program icon in the Dock and select Quit.
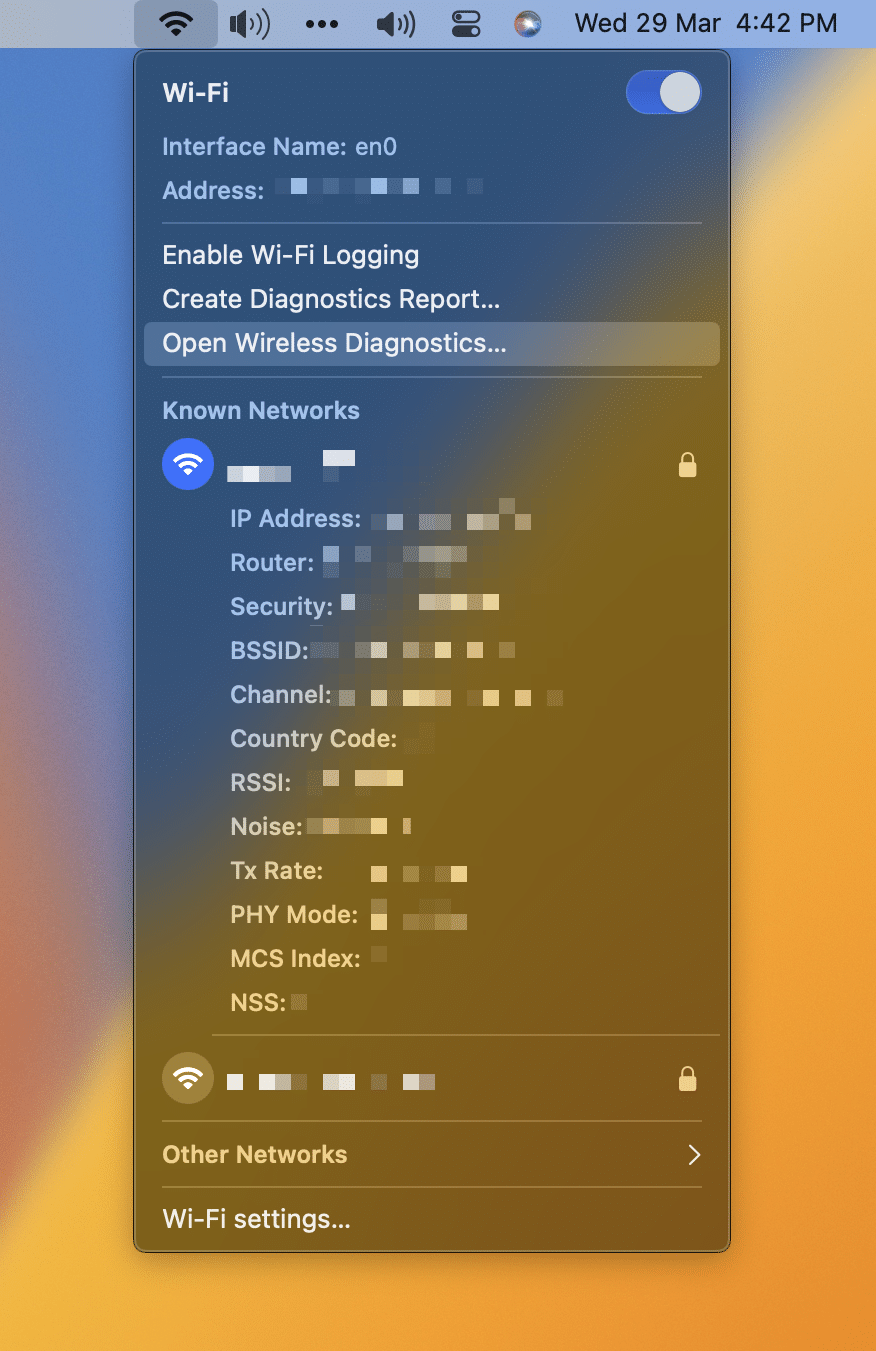
- Hold down the Option key while selecting the Wi-Fi icon from the top menu bar.
- Open “Wireless Diagnostics” and follow the on-screen instructions.
15. Reset Your Mac’s Network Preferences
By resetting all network-related settings to their factory defaults, you can resolve your Mac ethernet connection not working, not showing, or having no internet difficulties. This can aid in the resolution of any issues caused by erroneous settings, such as incorrect IP addresses, DNS settings, or proxy settings.
Also, resetting your network preferences will also clear any saved Wi-Fi networks, requiring you to re-enter your Wi-Fi network credentials to reconnect to your Wi-Fi network.
Steps to Reset Your Mac’s Network Preferences
- You should be on your Mac’s desktop. The term “Finder” should appear next to the Apple icon.
- Navigate to Macbook from the top menu bar.
- Click your drive name (Macintosh HD).
- Then go to the “Library”.
- After that, go to “Preferences” and select “SystemConfiguration”.
- Delete the network plist files from here.
- Lastly, connect Ethernet and restart your Mac.
16. Boot into Safe Mode
By disabling non-essential services and apps that may be interfering with the network connection, booting into Safe mode can assist in resolving the Mac Ethernet connection not working, displaying, or having no internet issues. When you enter Safe mode, only the essential kernel extensions and the default set of fonts are loaded, allowing the network to connect without interruption.
Also, it can aid in determining the cause of the problem by removing any third-party apps or services that may be causing connection issues.
You can try to connect to the internet once the machine is in Safe Mode. If the connection is successful, it is likely that one of the disabled third-party services or programs is causing the problem. To resolve the issue, try to locate the program or service and uninstall it from the Computer.
Following are the steps to restart the Mac in safe mode:
Steps to Book Mac into Safe Mode
M1 Mac
- First, switch off your M1 Mac, then for 10 seconds, continue to hold the Power button when the Mac powers up. When Mac’s startup screen opens, press and hold the Power button while selecting the Startup disc.
- In safe mode, hold the Shift key down while clicking Continue. After releasing the Shift key, log in to your Mac.
Intel-powered Mac:
- First, switch off your Mac by going to the Apple “menu” and selecting Restart. And then wait for your Mac to shut down totally.
- Switch on your Macbook and instantly hold down the Shift key.
- Hold the Shift key down until the login screen appears.
- Lastly, Login.
Apple Silicon
- First, shut down your Macbook.
- Then, hold the power button down until the startup window choice shows.
- Next, choose your startup disc.
- And hold down the Shift key and select Continue in Safe Mode, then release it.
- Lastly, Login.
17. Update The OS
Updating the operating system can give new drivers and software required for the Mac to connect to the internet. For example, the operating system may have a new version of the Ethernet driver required to connect the Mac to the network. Also, the operating system may contain new versions of software required to set up the network settings.
Also, updating the operating system can aid in the resolution of any bugs or security issues that may be causing the connection issues. Any flaws and security issues that exist in the current version can be fixed by updating the OS and allowing the Mac to connect to the internet.
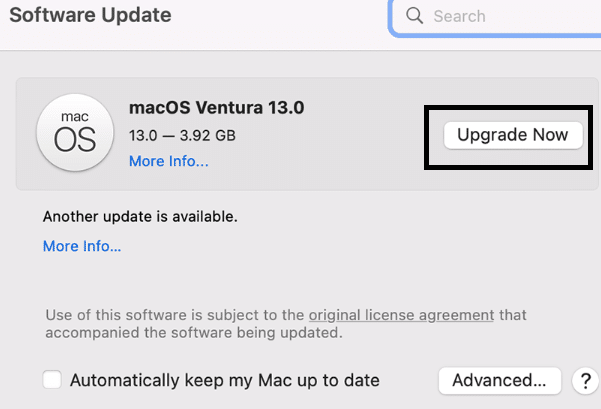
Steps to Update Your Mac OS
- First, choose “System Settings” or “System Preferences” from the Apple menu in the upper right corner of your screen.
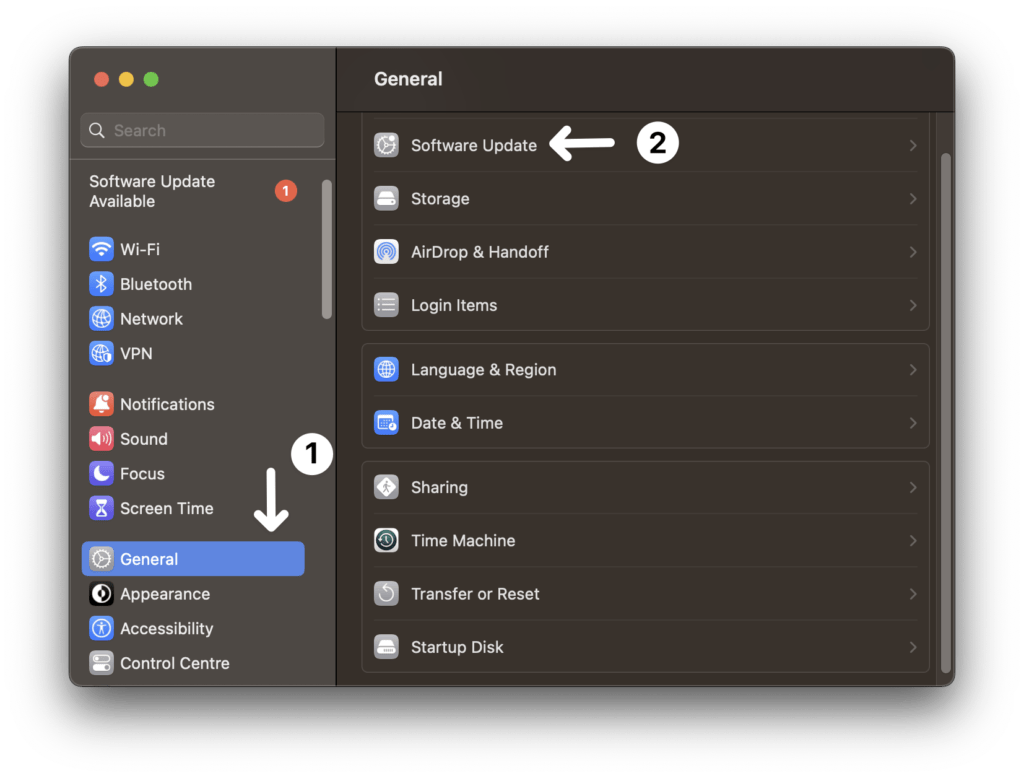
- If you choose “System Settings” on the left side of the window, click “General”.
- Next, on the right, click “Software Update”. Else, if you selected “System Preferences”, click “Software Update” in the window.
- Lastly, if there are pending software updates, click the “upgrade” button.
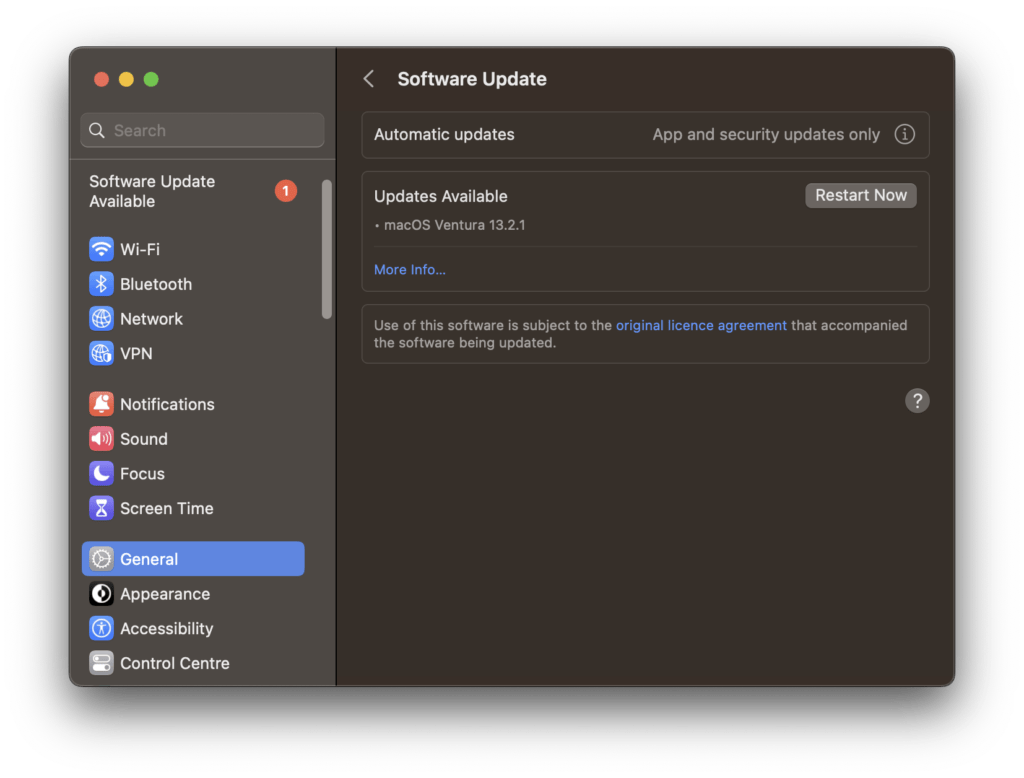
- Finally, suppose if Software Update reports that your Mac is up to date. Software Update displays only software that is compatible with your Mac.
18. Contact Apple support
The last step, if none of the above solutions solves your problem, is to contact Apple Support. Apple’s customer service and support team can be reached through the Apple Support website, phone, or email.
Once you have contacted Apple, explain the issue and provide all details possible about the error. Apple will need to know the exact error message you are receiving, what type of device you are using, and what steps you have already taken to try to resolve the issue.
Contacting Apple Help is an excellent initial step towards fixing Mac won’t connect to Ethernet. Apple Support will ask you to run a few diagnostic tests to determine the problem before providing potential solutions. They may recommend resetting the router, inspecting the Ethernet cable, or updating the router firmware, depending on the problem. They may also recommend that you change the network settings to match the Ethernet connection or troubleshoot the network connection.
If the problem is more complicated, Apple Support may recommend running a hardware test to rule out any hardware failure. If the problem is not fixed by following these steps, Apple Support may recommend arranging a meeting with an Apple Authorized Service Provider to investigate further.
Ultimately, reaching out to Apple is the best way to resolve the “Mac Ethernet Connection Not Working”. Apple’s customer service and support team are trained to help you resolve the issue.
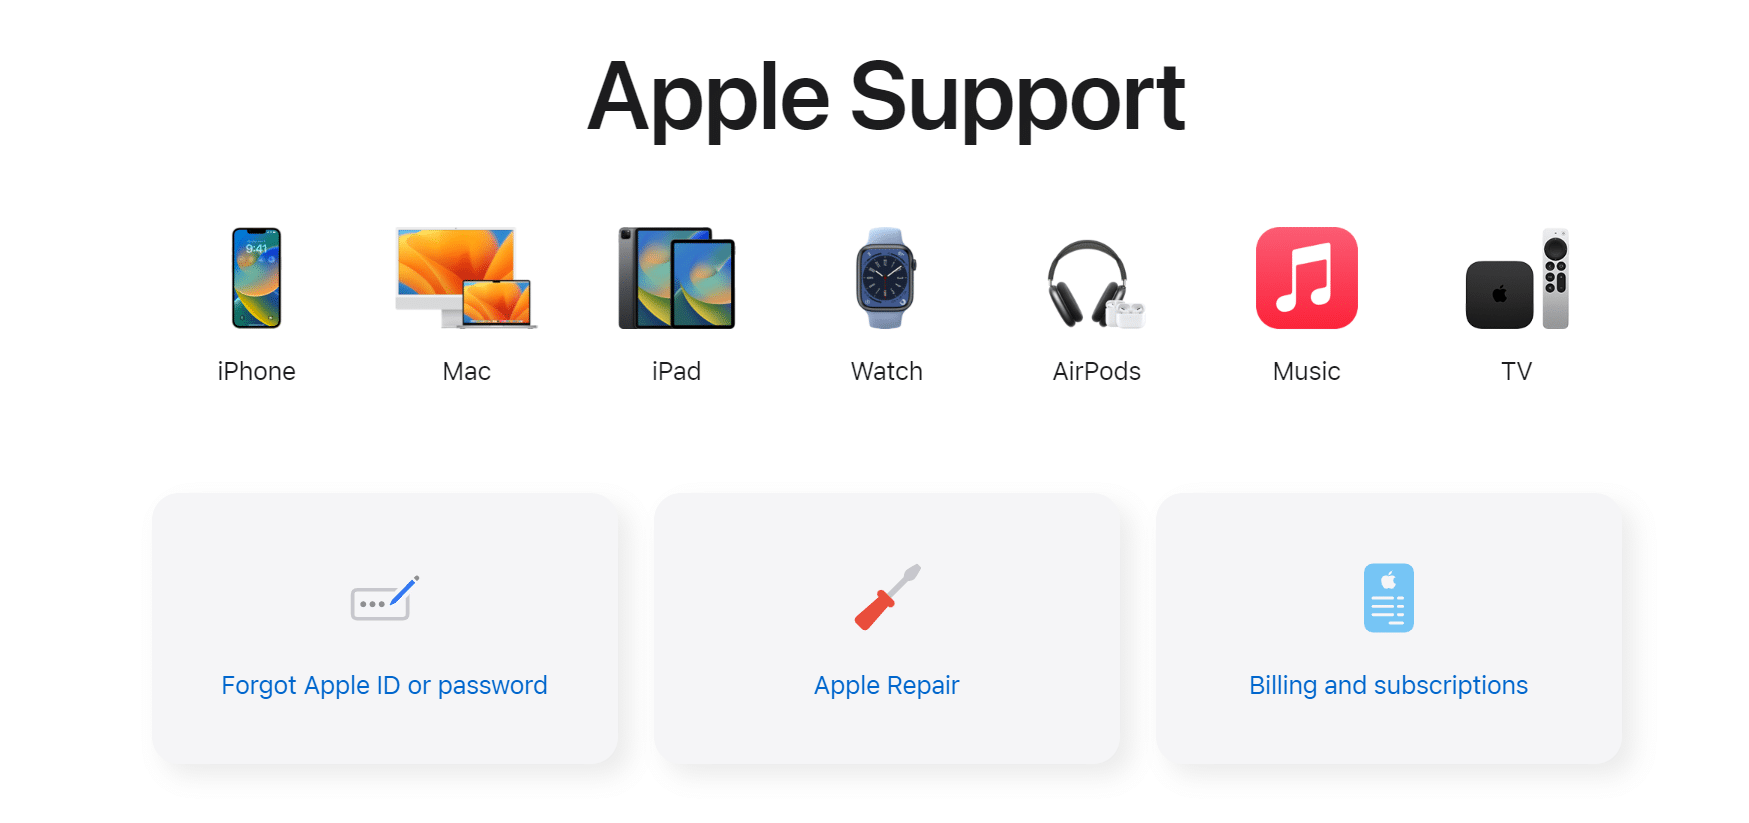
Here are a few ways to reach out to Apple Support to resolve your Mac ethernet issue:
1. Visit the Apple Website
Go to the Apple website and find the “Support” section. You can search for solutions to your problem or browse through the FAQs. Otherwise, you can click here to visit the Apple Get Support page. From there, to reach out to Apple Support regarding this Apple TV audio problem:
- First, be sure to sign in to be able to contact the support staff.
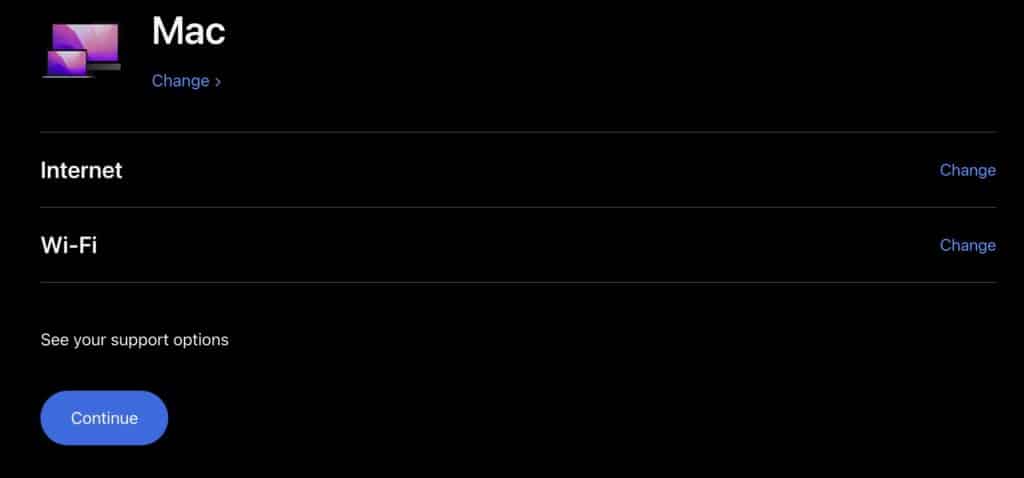
- From there, select Choose a product.

- After that select Apple TV as you’re looking to troubleshoot an Apple TV problem.

- Next, select or type a topic that best reflects the audio issue you’re encountering with your Apple TV device and click Continue.
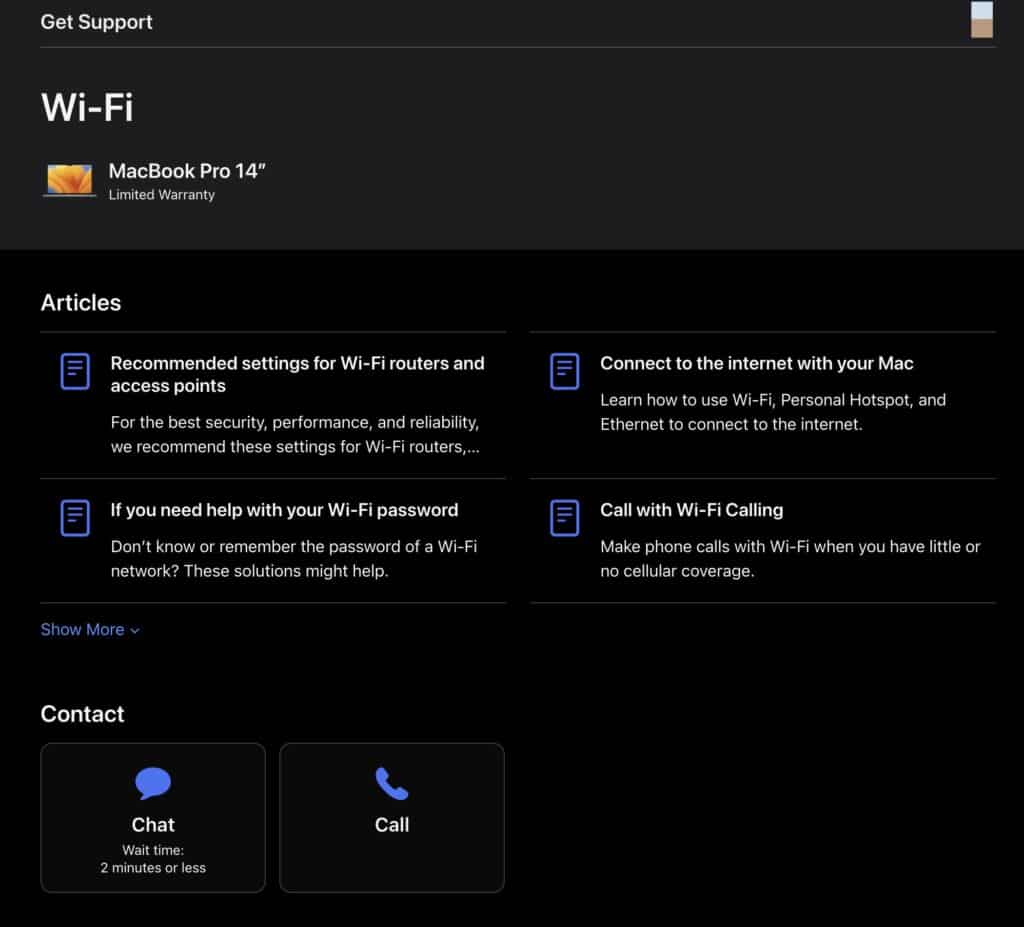
- After that, you can choose any of the next possible course of actions you can take to confront this problem, such as to bring it for report at an AASP (Apple Authorized Service Provider) or to contact them through Live Chat or Phone Call.
2. Use the Apple Support App
Download the Apple Support app on your iPhone, iPad, or iPod touch, and use it to find solutions, schedule a repair, or chat with a support specialist.

3. Contact Apple Support by Phone
You can call Apple Support at 1-800-APL-CARE (1-800-275-2273) to speak with a support specialist.
4. Visit an Apple Store
Find an Apple Store near you and make a reservation to speak with a support specialist. You can also make an appointment for repair.
5. Contact Apple Support Through Social Media
You can reach out to Apple Support via their social media pages, such as Twitter or Facebook, and wait for a response from their team.
When you contact Apple Support, be sure to have your mac’s serial number ready. They can find the serial number on the back of the device or by going to Settings > General > About. Also, describe your problem in detail; provide them with the steps you have taken before reaching out to them.
Conclusion
The solution to the Mac ethernet connection not working is to troubleshoot the network settings, check the connections, and restart the Mac. If the problem persists, a more thorough examination may be required, and calling a competent technician can assist in determining the reason and providing a remedy. Macbook Thunderbolt ethernet not working can be addressed with the appropriate steps and attention to detail.
If you’ve found this article helpful, don’t forget to share it.

