
Thinking about deleting your Kwai account permanently but ain’t got a clue where to start? Or do you find that you cannot delete your Kwai account?
If you didn’t know already, Kwai is a widely-used Chinese video-sharing app, kind of like a competitor to TikTok. The platform is believed to have a staggering 200 MILLION daily active users in the world😮. Hence, it’s indeed a great platform to gain a following and a new audience for you to tap into.
Nonetheless, the platform may not pique everyone’s interest. Other times, you may not find the success or large follower base you were hoping for on Kwai. You might even be more attracted to using its more successful adversary, TikTok. Needless to say, you may have your many reasons to move on from using Kwai.
But before you uninstall Kwai, we strongly suggest deleting all your traces and personal data from the platform first. Keep in mind, the platform does possess your email address, account password, videos and maybe even your phone number. Deleting your account ensures the security of your information. Hence, giving you peace of mind that your uploaded data isn’t prone to any security breaches👨💻.
The simplest way to do this is by deleting your Kwai account completely. Therefore, to do this, we have compiled the following 8 quick steps. These steps are almost identical whether you’re using Kwai on an iPhone, iPad or Android.
On another note, many people (including us) have tried deleting their Kwai account but was stopped by the “Sorry, the requested address was not found!” error.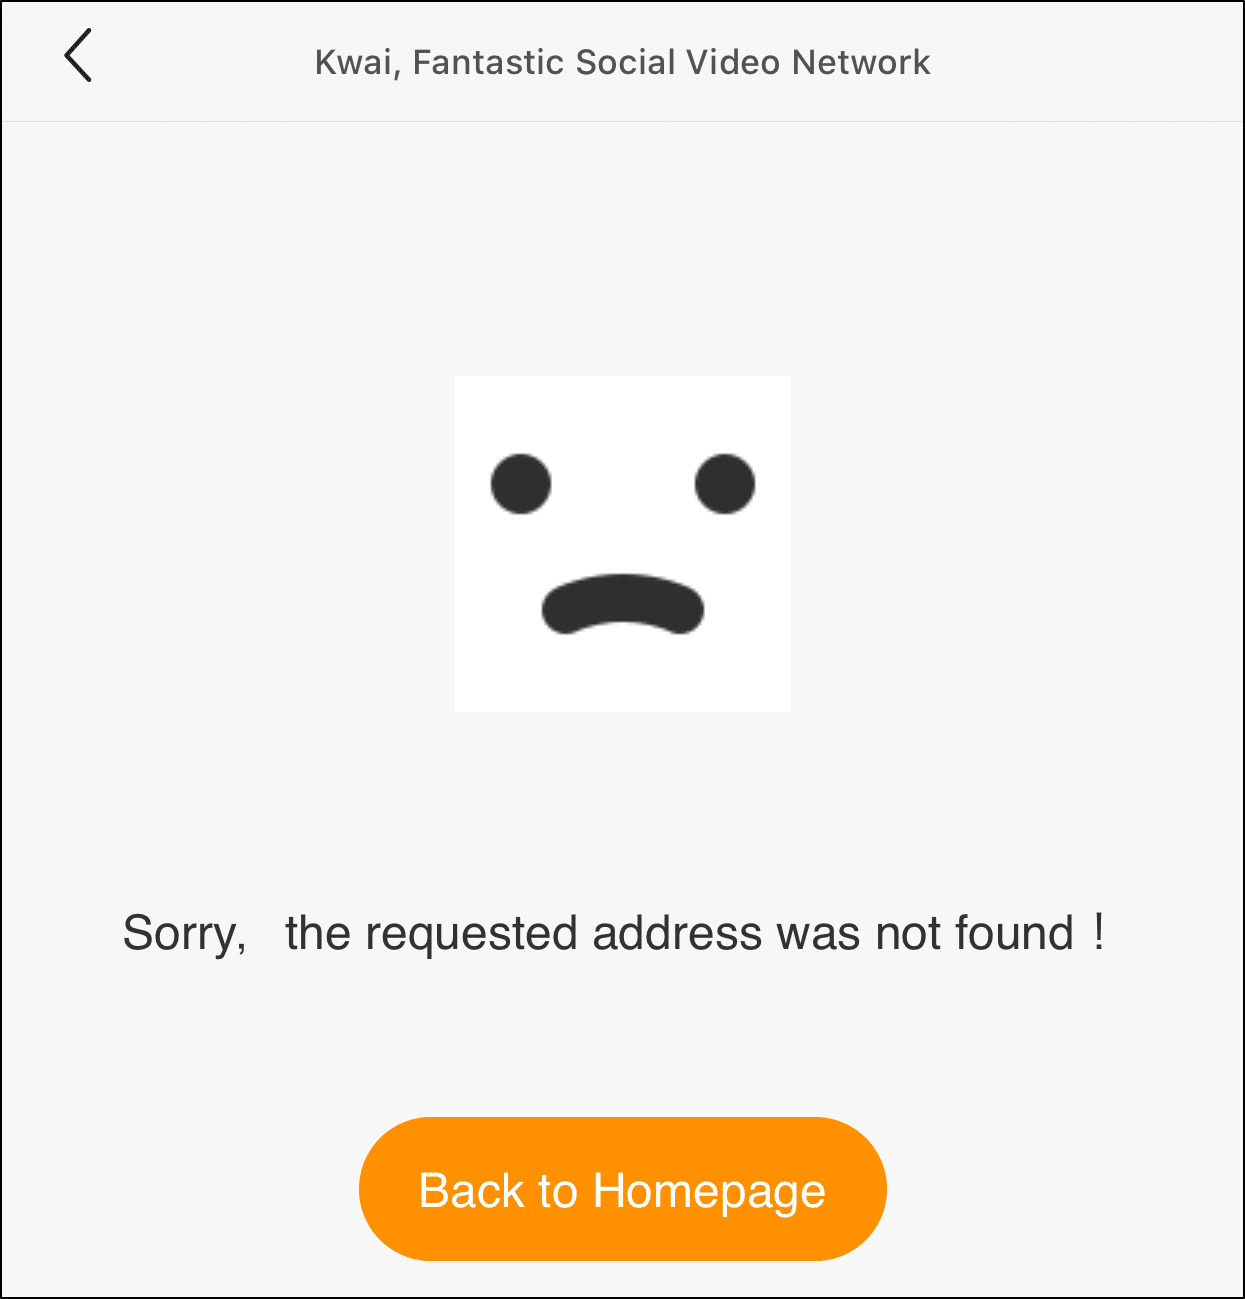
Thus, you can skip ahead to the steps for when you can’t delete your Kwai account.
Table of Contents
8 Steps to Delete Your Kwai Account Permanently
What to do if You Cannot Delete Your Kwai Account?
8 Steps to Delete Your Kwai Account Permanently
Before you proceed with these steps, on the Kwai app, ensure that you’re logged in to the right account you want to delete. Besides that, if there are any videos you uploaded that you wish to keep, be sure to download or save them before deleting your account.
That being said, the following is the most straightforward route to deleting your Kwai account:
- Firstly, open the Kwai app, and select the Mine or Profile tab at the bottom right.
- Next, tap the Settings icon ⚙️ at the upper left to open the Settings menu.

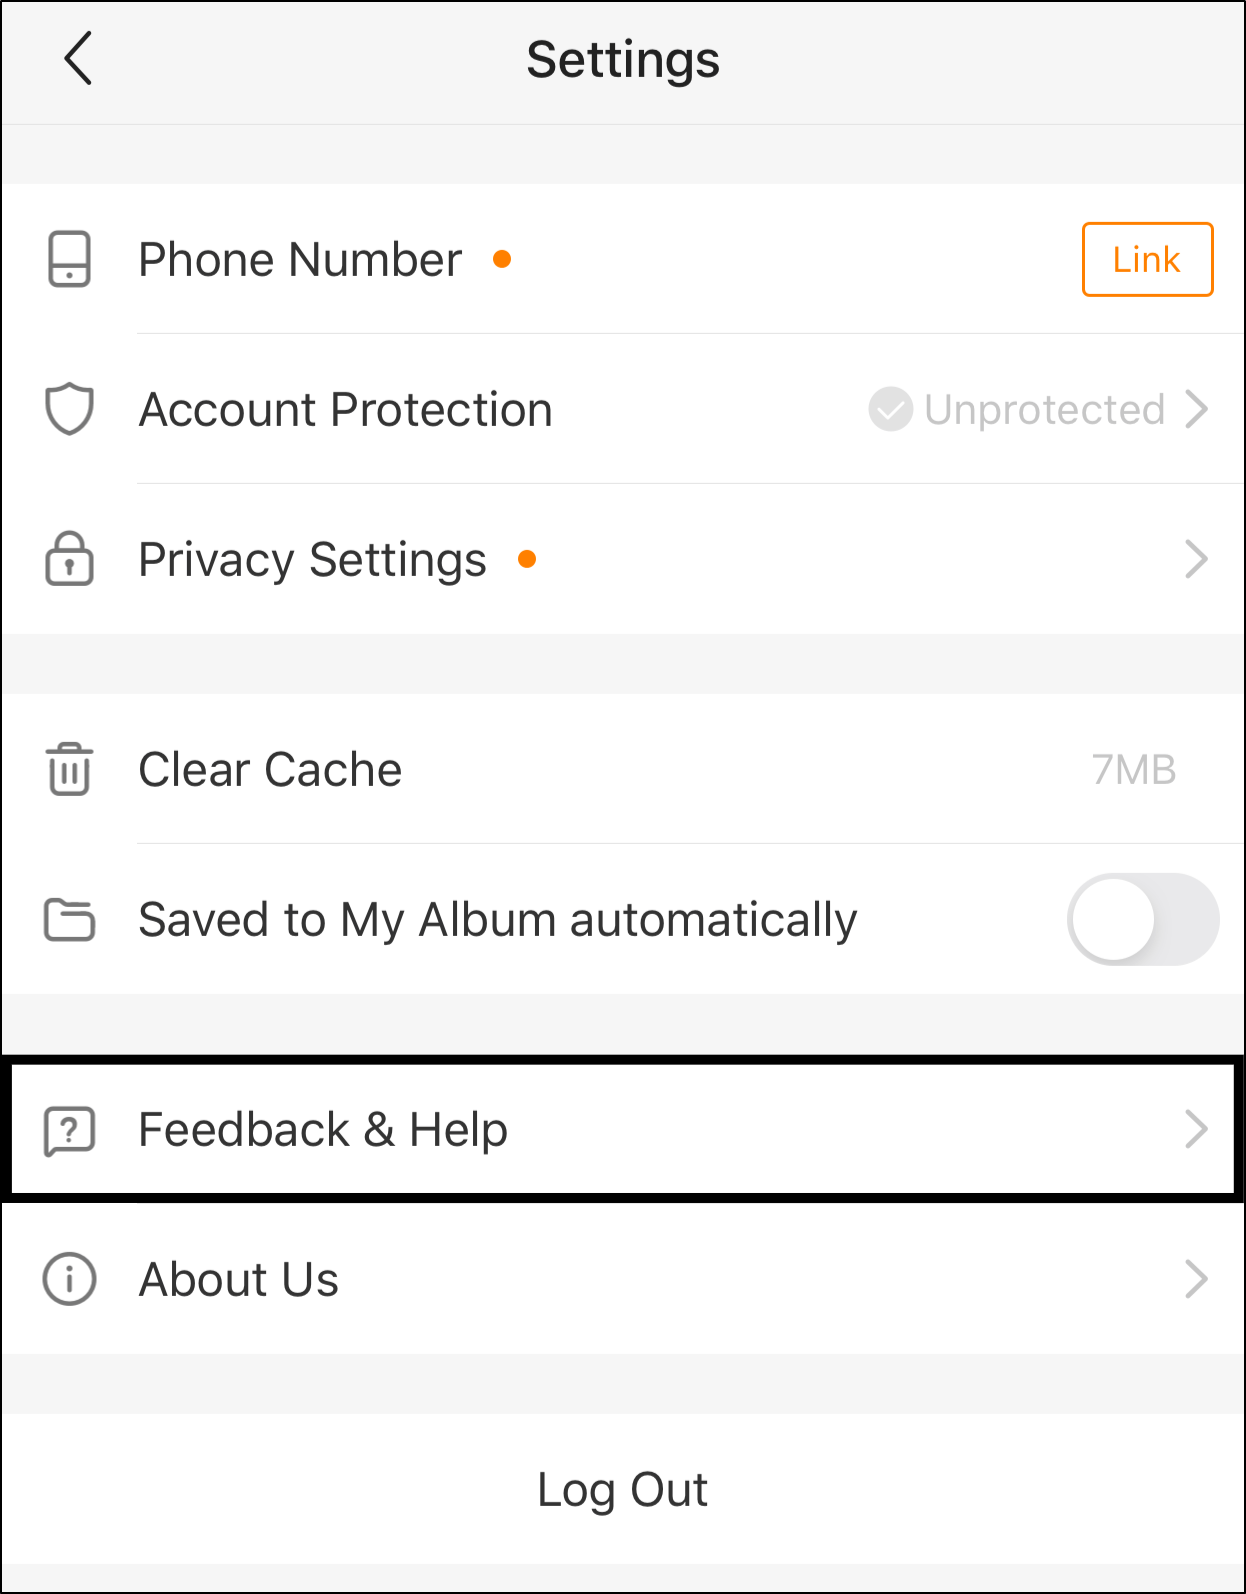
- At the Settings menu, select Feedback & Help.
- After that, tap the Report a Problem button at the bottom.

- Then, tap Delete My Account at the bottom.

- Following that, choose 1 of the reasons for deleting your account and tap Delete My Account. If you select the Something else option, write a brief description of your reason.

- At the subsequent pop-up message, tap Got it.

- Lastly, choose I’m Sure at the final “Are you sure?” pop-up message.

And poof! That’s all it takes to make your Kwai account disappear. Once you’ve completed these steps, you should be brought to the Kwai app’s login page. Finally, feel free to uninstall the Kwai app from your device.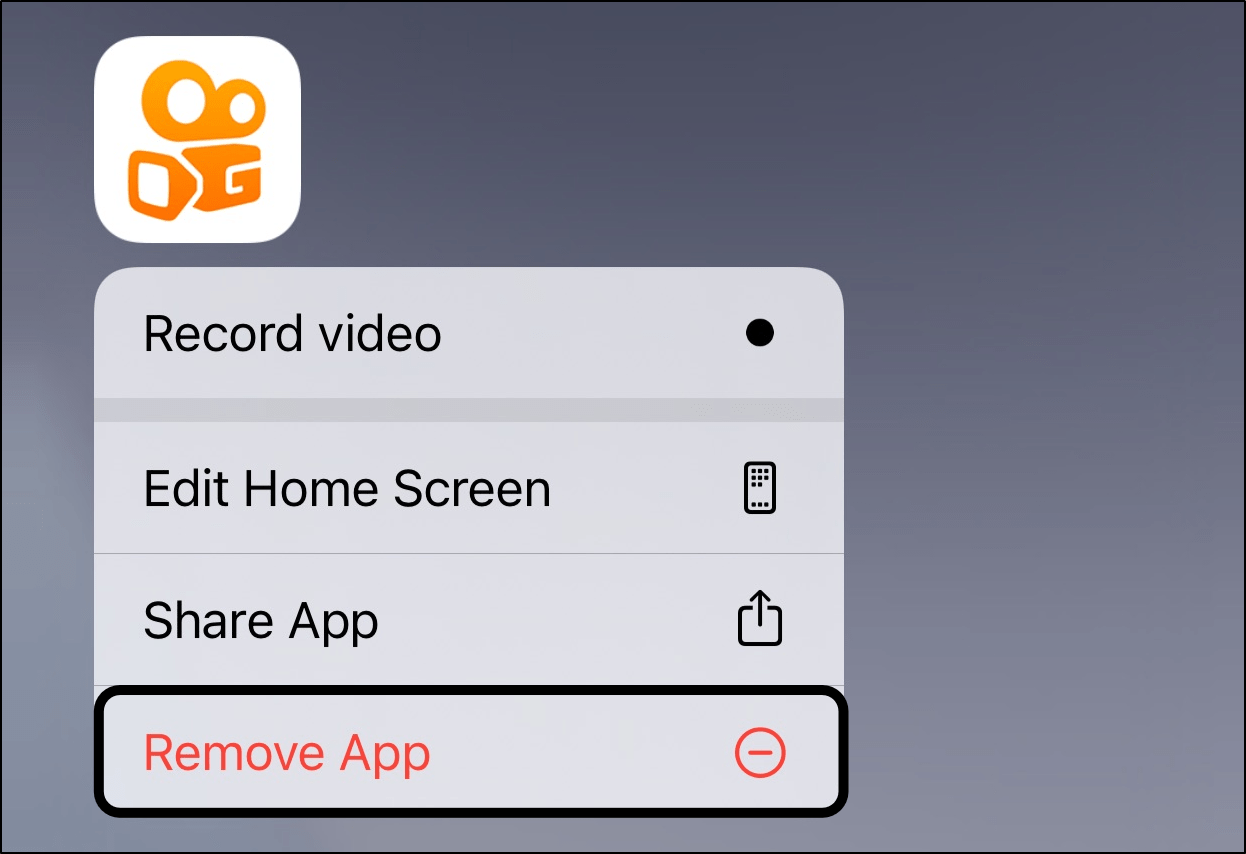
Reminder, make sure you don’t log in to this Kwai account for the next 72 hours or so. This is to ensure that the account is completely deleted. If you want to recover your Kwai account, simply sign in to the same account within the 72 hours.
What to do if You Cannot Delete Your Kwai Account?
So you’re in the middle of deleting your Kwai account, only to be stopped by this pesky error stating “Sorry, the requested address was not found!”. We were prompted with this error page after performing Step 5.
Logically, the next step would be retrying the steps above, but you find this infuriating page just keeps popping up😡. Worry no more as we’ve found the following 3 steps to be somewhat helpful if you can’t delete your Kwai account:
1. Restart the Kwai app, and try again
Your first step when spotting this error message should be restarting the Kwai app and then following the steps above to delete your account again. We believe an internal app bug may be the culprit behind this error page showing up. Thus, through this step, you’re essentially starting a new session with the Kwai app, one without any interfering bugs or errors.
To restart the Kwai app, simply exit the app, and remove it from your Recent Apps. Then, reopen the app just like usual.
2. Use the Kwai app on a different device
Additionally, you may find that performing the same steps from above but on a different device to successfully delete your Kwai account. There may be an issue with using Kwai on your phone that’s resulting in this error page.
Therefore, just borrow your bud’s, brother’s or even your mom’s phone, and simply go through the same steps to deleting your Kwai account. Although, you may need to install the Kwai app temporarily on their phone. An alternative route would be to use Bluestacks or another emulator like Android Studio.
Make sure that you log in and delete your own account to prevent any unwanted accidents😅.
3. Report the problem to the Kwai Support Team
If the previous 2 steps didn’t work out, this could mean there’s something wrong on your account’s side preventing you from deleting. That being said, your only other option is to raise the issue with the Kwai Support Team if they can manually delete your account from behind the scenes. This would be the ideal method as they can spot any account-related issues.
To contact the Kwai Support Team, it involves the same steps as before. Firstly, select the Mine/Profile tab from the bottom bar, tap Settings⚙️, Feedback & Help, and Report a Problem. Here, write a brief description of your error and that you wish to delete your Kwai account.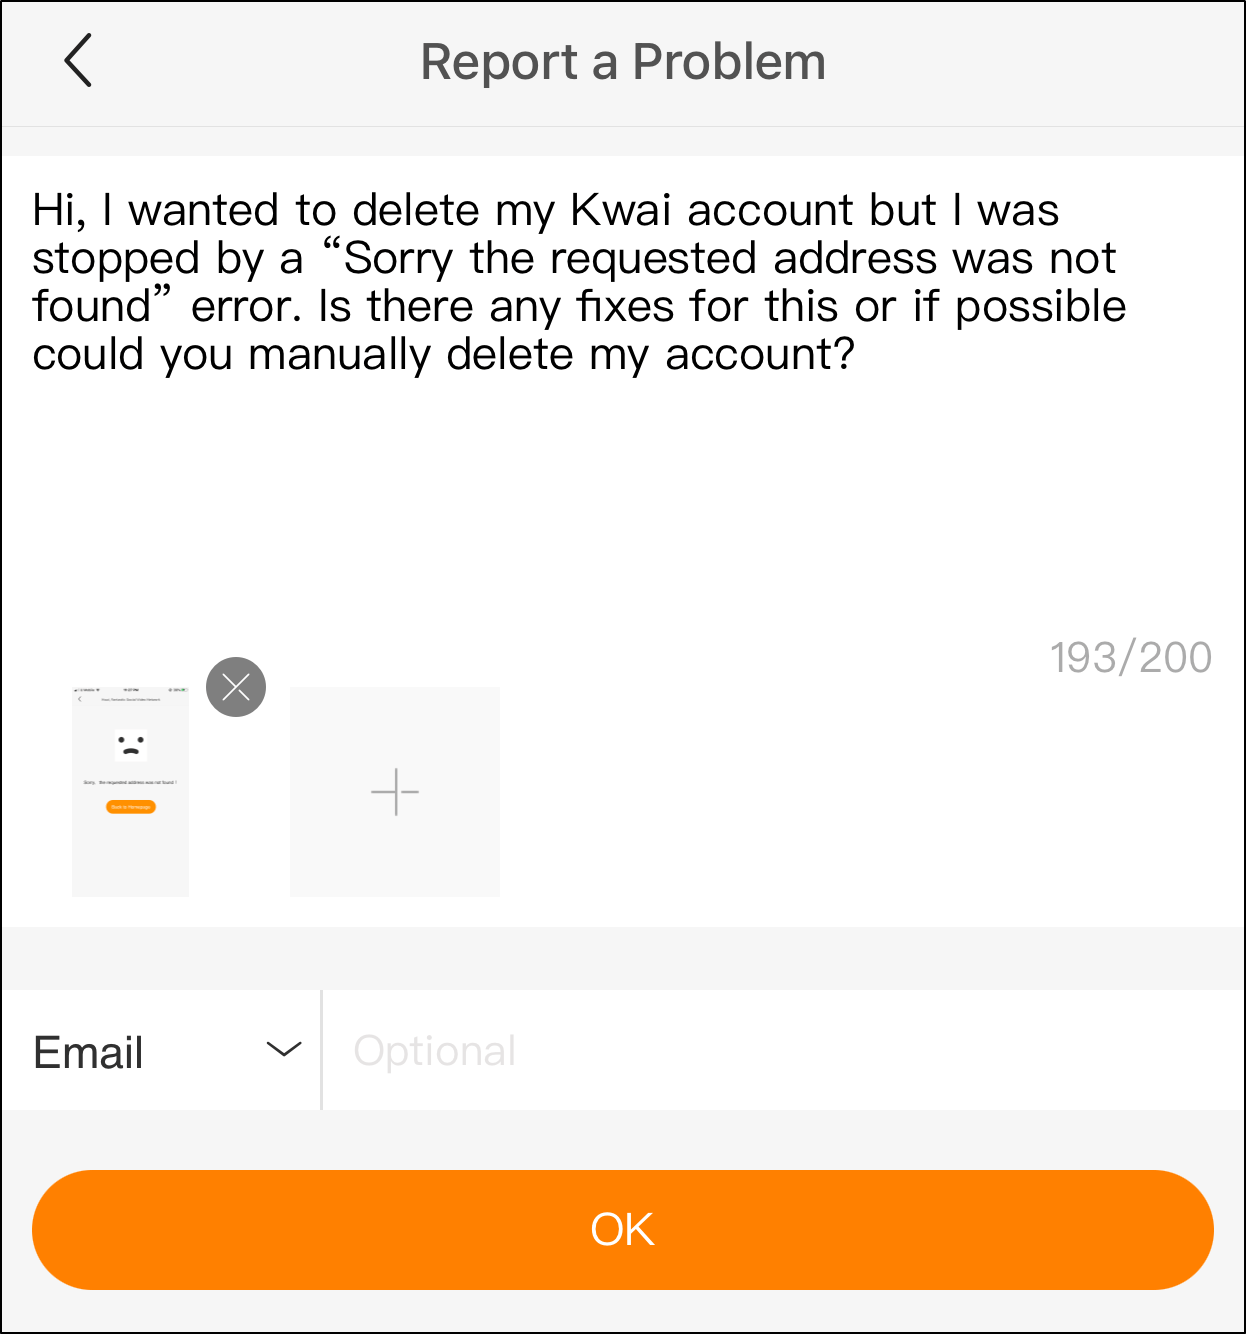
After that, you can add a screenshot of the error page as well. Additionally, by adding your email, you can be notified when Kwai responds to your issue.
Finally, tap OK.
Now, all there’s left is to wait for the good people at Kwai to get back to you.
Conclusion
To sum up, by following the 8 steps above, deleting your Kwai account should be a cakewalk. Did you face the same error page in the middle of it? No worries, it’s a fairly common issue, and even we were wracking our brains for workarounds to this error page. Therefore, we’ve also compiled the steps you should take if you find that you cannot delete your Kwai account.
That wraps up our complete guide of everything you should know when deleting your Kwai account.
Are you also a Kwai user looking to delete your account? Did you face any issues like ours while deleting your account? Do share in the comments.
We sincerely hope that you’ve found the steps in this guide useful. Feel free to share this guide with your bud who wants to delete their Kwai account😀.