Find that the Discord screen share feature is not working or showing for some odd reason, or do you find the screen share to be stuck on the black or grey screen?
Discord is undoubtedly among the best collaboration platforms out there, especially with its superior screen share functionality allowing multiple users to share their screen simultaneously.
Nonetheless, it’s yet another Discord feature that’s not free from errors either. So if you find there to be issues that you face whether with your own screen share or viewing someone else’s broadcast, note that these are fairly common problems.
Personally, we’ve seen some screen shares in Discord that crashes frequently and gets stuck on the black or grey screen. Other times, the screen share on Discord may experience lagging, delays, and very high latencies. In worse cases, even the Discord screen share audio may not be working well either. Overall, these errors just leave an appealing viewing experience for other users.
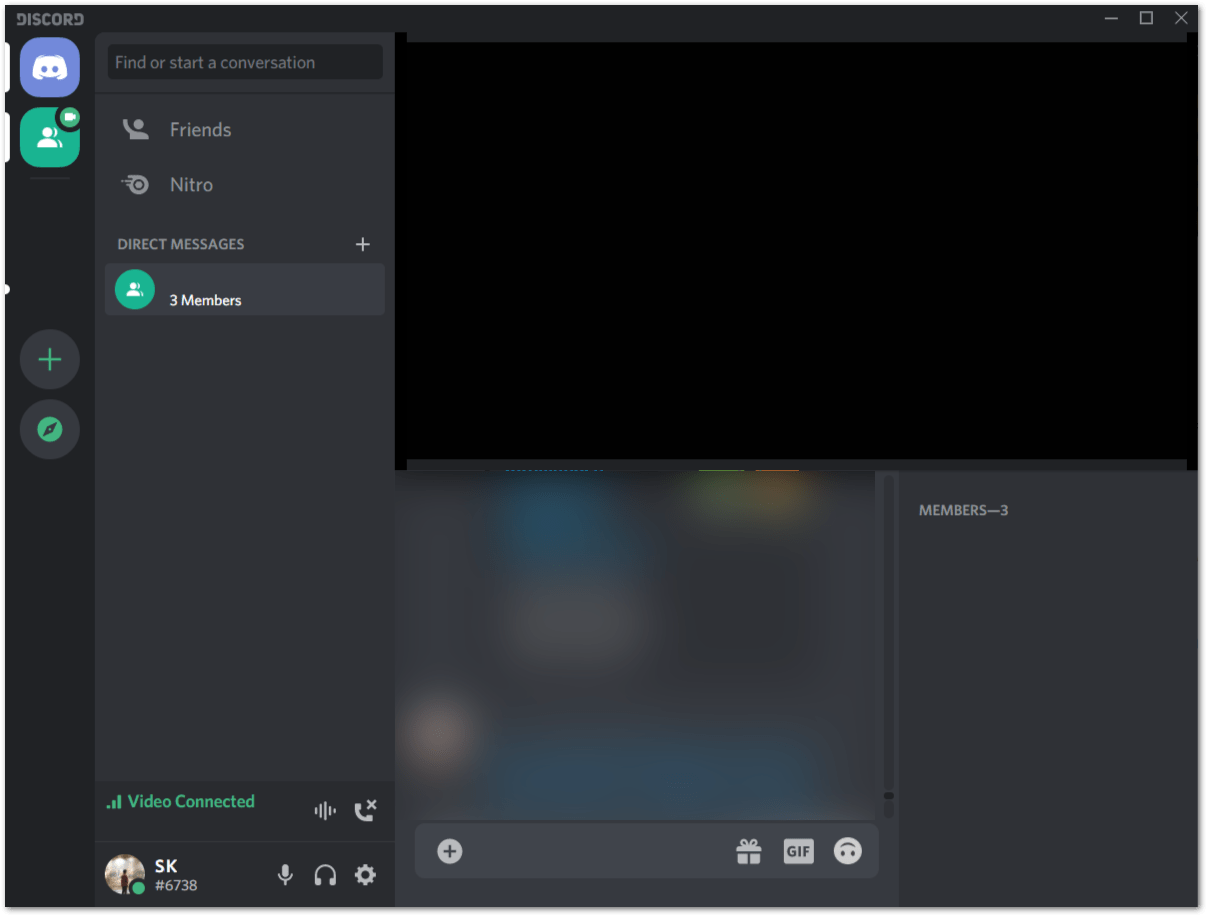
In light of that, we’ve curated this guide of 15 easy-to-follow solutions to combat these “Discord screen share with a black screen” issue in minutes.
Additionally, do note that certain websites or web apps restrict you from broadcasting the window, so your screen share will be blackened. Usually, You’ll face this issue with streaming apps trying to prevent copyright infringements, such as Disney+, Hulu, or Netflix. Hence, the viewers will only see a black screen throughout the screen share.
With that out of the way, let’s jump right into the steps.
Why is My Discord Screen Share Not Working or Showing a Black Screen?
There are several potential reasons why your Discord screen share might not be working or showing a black screen, which include a poor or unstable internet connection, incorrectly configured Discord settings, insufficient screen sharing permissions granted or graphic card and GPU driver issues:
1. Poor Internet Connection
The screen sharing function in Discord may not work properly if your internet connection is erratic or poor (Fix 13).
2. Inadequate Discord Settings
Verify that screen sharing is not disabled in your Discord settings. By accessing your user settings and choosing the “Appearance” option, you may verify this. Make sure that the “Hardware Acceleration” option is selected under the “Advanced” section (Fix 4).
3. Insufficient Screen Sharing Permissions
Ensure that Discord has access to your screen. On a Mac, select “System Preferences” > “Security & Privacy” > “Screen Recording” to view your screen sharing rights. Go to “Settings” > “Privacy” > “Screen Sharing” on a Windows computer to view your screen sharing rights.
4. Graphics Driver or Graphics Card Issues
Problems with your graphics driver or graphics card can possibly be the root of the black screen issue. Check for problems with your graphics card and try updating your graphics driver (Fix 6 & 7).
15 Fixes for the Discord Screen Share Black Screen Error or When It’s Not Working
1. Restart Both the Discord Client and the Application to Share
If this is your first time facing this Discord screen-sharing issue, this step should be your first go-to. A simple reboot of both apps begins a new session and ensures that the apps load properly. Hence, for this step, you’ll have to restart both the Discord client and the application you’re sharing, since you’re uncertain which app is the cause.
Firstly, we’ll suggest performing a simple refresh of the Discord Client. To do this, select the Discord window, and simply press the Ctrl and R key (For Windows) or the ⌘ and R key (For macOS).
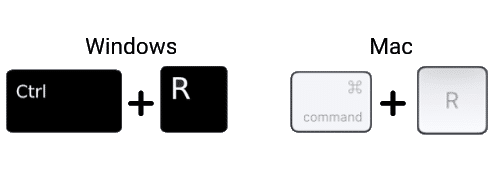
Now you should see the Discord Window turn blank and grey for a while, and then it’ll finish reloading within seconds.
Secondly, you can do a more thorough restart of both the Discord client and game application by completely ending the tasks before reopening them. Note that merely pressing the X button at the top-right corner of the window wouldn’t close the applications entirely. The apps will still be running in the background. Hence, the easiest way to “kill” the tasks is through the Task Manager before attempting to reboot the apps.
Thus, for this step, start by right-clicking the taskbar, select Task Manager, and under the processes, select Discord, then click the End task button.

After that, do the exact same for the application you’re sharing as well.
Once the processes have been ended, now you can try opening both applications again. It may be advised that you do a simple restart of your PC after ending the tasks to see a more significant effect. Sometimes simply restarting your device can fix issues with Discord screen sharing.
2. Ensure the Game is Added on Discord
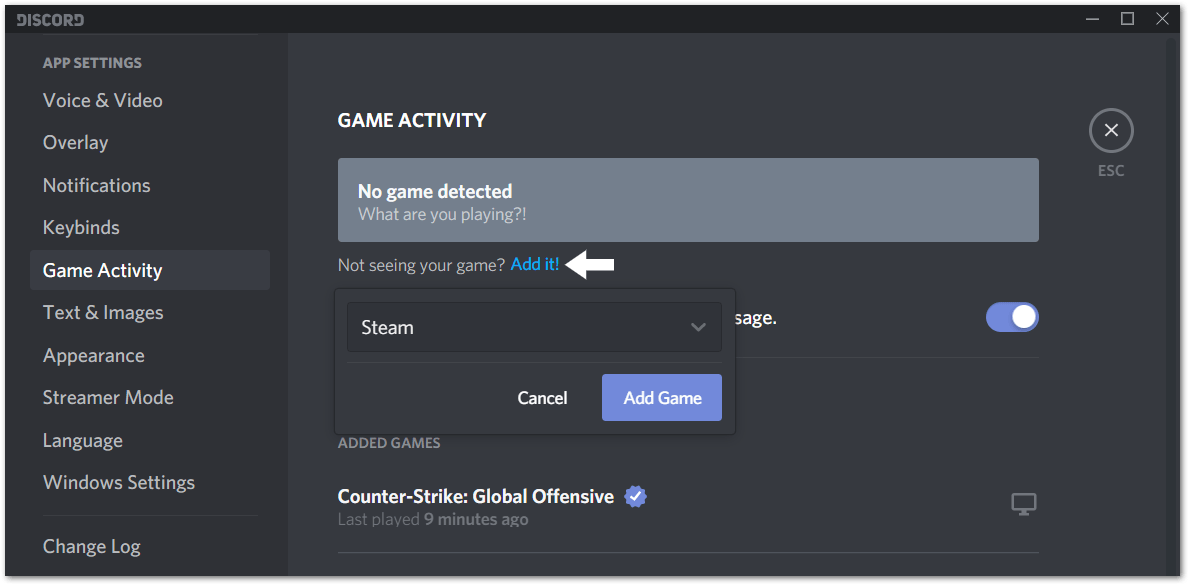
If you’re facing trouble sharing a particular game or even an application, you should ensure that it is added under the Game Activity settings. Usually, when you run the game, it should appear in this list on Discord. However, if it doesn’t, no worries, you can manually add it easily. This step has been seen to be the fix in a number of cases, so it doesn’t hurt to try it out.
For this, firstly, open the game/application you wish to share and the Discord client. Then, from the Discord client, click the Settings icon to open the User Settings menu.

Next from the left pane, under App Settings, choose Game Activity. Following that, click the “Add it!” button then click the “Select…” box and select an app from the drop-down that you wish to share.
3. Open the Discord Client and the Application to Share as an Administrator
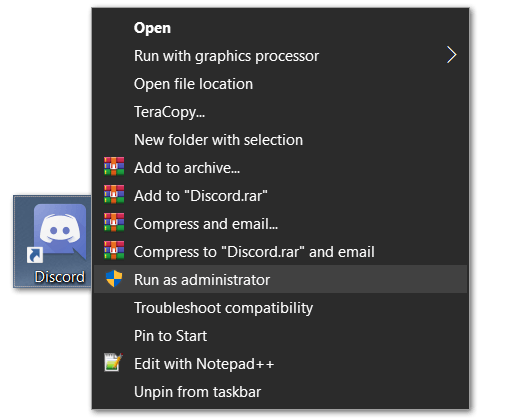
Both apps must be launched or run as admin so that the apps have permissions to the necessary resources on your computer. This action is especially useful when you’re screen sharing on Discord since you’re using various resources simultaneously, such as screen capture, microphone, and even video memory.
Before proceeding with this step, ensure that you’ve completely closed both the Discord client and the other application. You can follow Step 1 if you need a rough guide on ending the tasks.
For this step, right-click the Discord application and simply select Run as administrator and choose Yes at the subsequent “Allow this app to make changes to your device?” system message. After that, do the same with the other application that you’re sharing as well.
Running Steam Games as an Administrator
If you wish to stream a Steam game on Discord it may be tricky to launch it as an administrator since there’s no direct button available. However, the following steps will show how to launch your Steam games as an administrator every time:
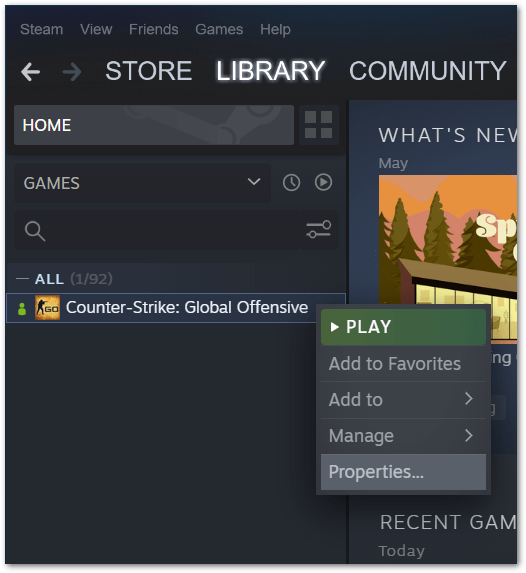
- Firstly, from the Steam Client, choose Library from the top menu. Then, right-click the game you wish to stream, from the list of games you have on the left, and select “Properties…” from the drop-down.
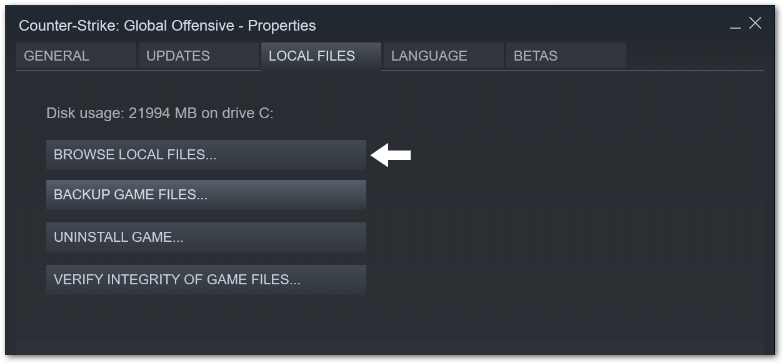
- At the subsequent Properties window, select Local Files from the top menu, and click the “Browse Local Files…” button.
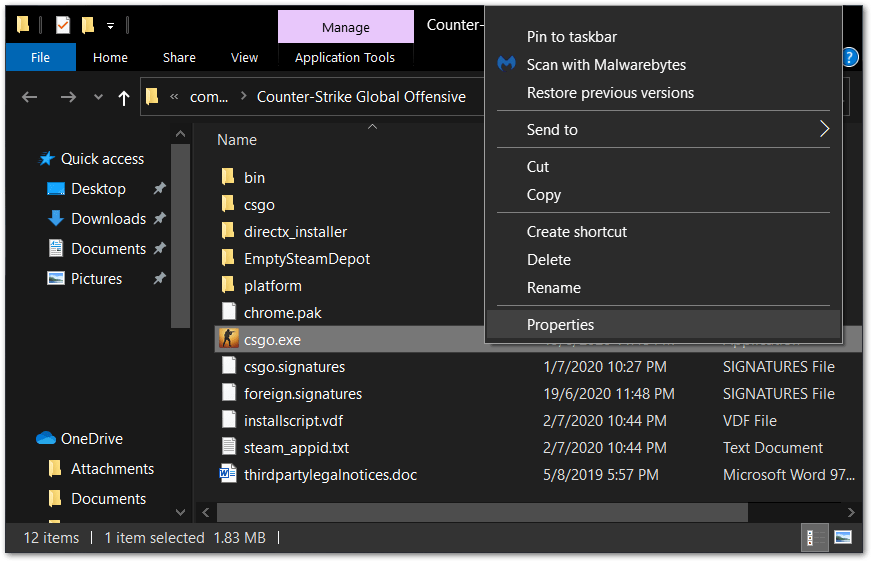
- Here, you should see your game application, so select it, then right-click the app and choose Properties.
- Here, choose Compatibility from the top menu, and under Settings, tick the box next to “Run this program as an administrator”, click Apply, and finally click OK.
With that done, the next time you launch that game application from Steam, it will be opened as an administrator.
4. Turn Off and On the “Hardware Acceleration” Setting
As stated in the settings menu, the Hardware Acceleration setting improves the Discord client performance by utilizing your PC’s GPU and not relying solely on the CPU. However, especially if you’re using an older PC with a sub-par or integrated GPU, your PC may not be able to simultaneously handle both apps (i.e., the Discord client and the app you’re sharing). Hence, there may be interference caused on both apps due to an increase in video memory usage.
With that said, the following steps will demonstrate how to turn the Hardware Acceleration settings of the Discord client Off and On.
To do this, firstly click the Settings icon to reach the User Settings menu. 
After that, on the left pane, under App Settings, choose Appearance, and under Advanced, turn off the switch next to Hardware Acceleration. Subsequently, at the Change Hardware Acceleration message, click OK to allow the changes. You’ll then be prompted to restart the Discord Client.

With Hardware Acceleration turned off, be sure to check if your screen share is running smoothly again. Conversely, if the Hardware Acceleration setting was initially switched off, try turning it on instead.
5. Switch Off the “Use our latest technology” Setting
This is yet another setting that can potentially cause the “Discord screen share not working” issue as it closely relates to screen sharing. We believe this setting will increase hardware requirements for the Discord client. Plus, screen sharing is a feature that is dependent on various resources of your computer. Especially considering you’re running two programs simultaneously.
We suggest giving this step a shot since it proved to be effective for others facing similar issues with screen sharing on Discord. On that note, the steps below show how to navigate to these settings to turn them off.
Just like before, click the Settings icon to access the User Settings menu. After that, from the left sidebar, under App Settings, select Voice & Video. Finally, under Voice Diagnostics, turn off the switch next to “Use our latest technologies to capture your screen”.

6. Update the GPU Drivers on Your PC
As said before, screen sharing on Discord is a notable resource-hungry process. Thus, outdated GPU drivers may result in poorer screen sharing quality, gameplay, and more frame rate drops. Keeping the GPU drivers updated will ensure they’re optimized to improve performance and provide better display support for your applications, including Discord. Windows Central has a great guide on updating GPU drivers, which you can visit here.
Besides that, below are 2 methods we suggest to update your PC’s graphics drivers to its latest versions, arranged from easiest to most difficult.
Method 1: Updating GPU Drivers through the Device Manager
The first method we recommend trying is updating through the Device Manager settings. To do this, right-click the Start menu at the bottom left and select Device Manager. Subsequently, under Display adapters, right-click the GPU drivers available, and select Update driver.

After that select, “Search automatically for updated driver software”, so your PC can begin searching online for any available updates. If there are updates available, it will immediately start downloading and installing it.
Finally, repeat the same steps for your other GPU drivers on the list as well.
Method 2: Updating GPU Drivers through Windows Updates
For the second method, you can update your GPU drivers by checking for Windows Updates. For this, open the Start menu, then search and open Windows Update settings. After that, click the Check for updates button to begin searching for the latest updates for your PC’s drivers.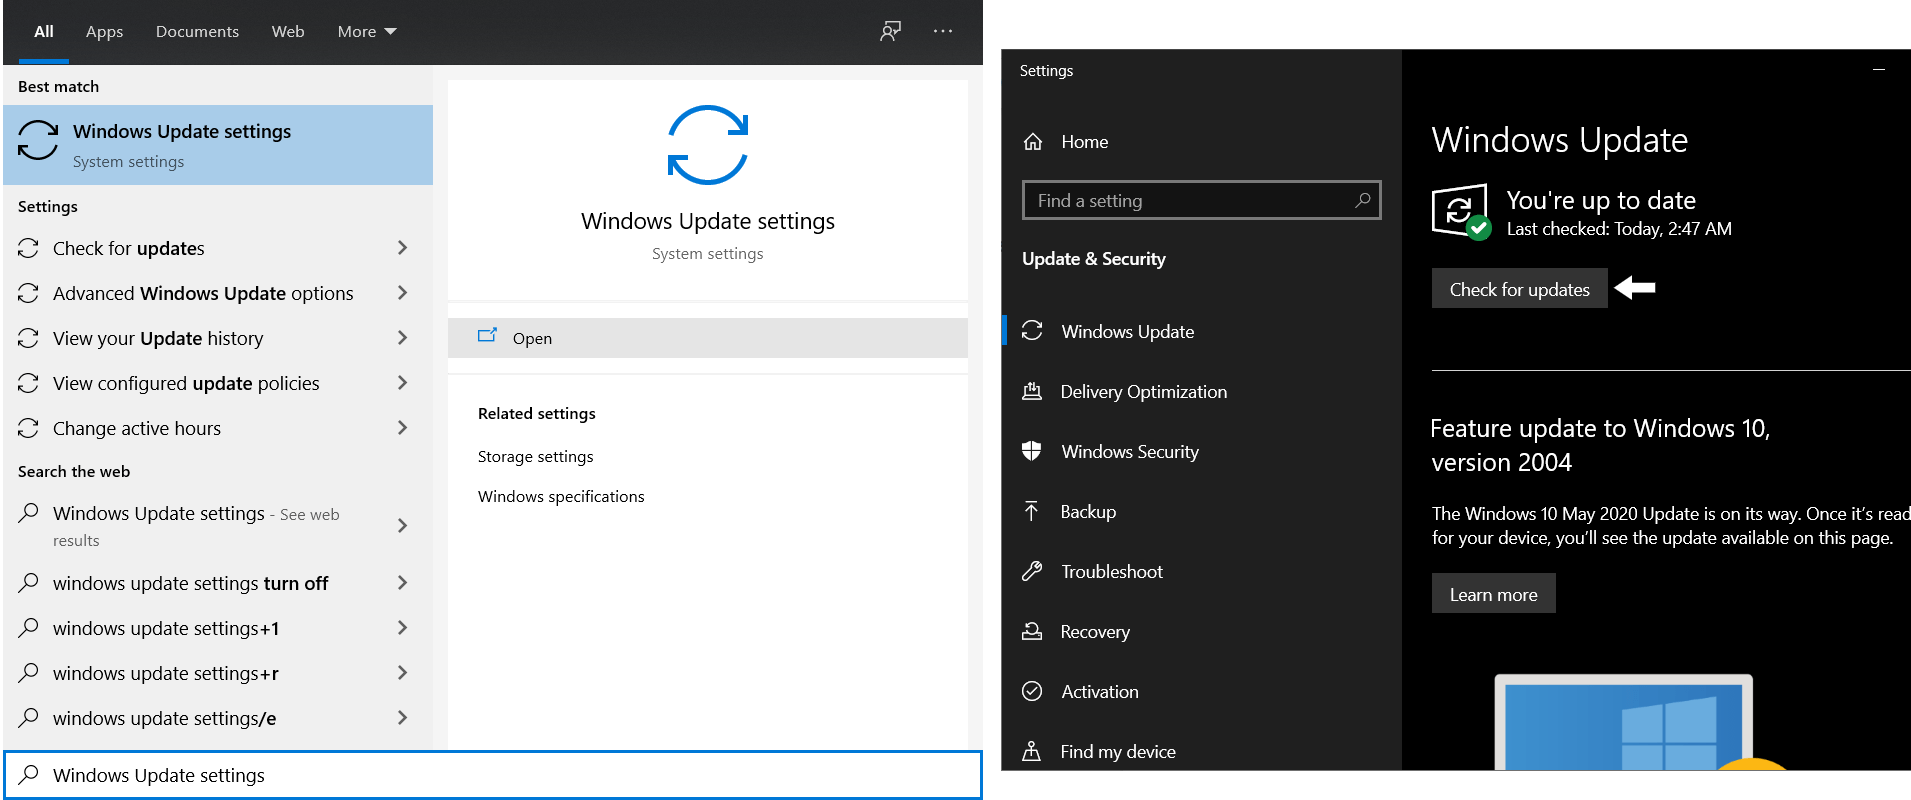
If there are updates available, click the Download button, and the new updates will be installed on your PC. Subsequently, you’ll be prompted to restart your PC.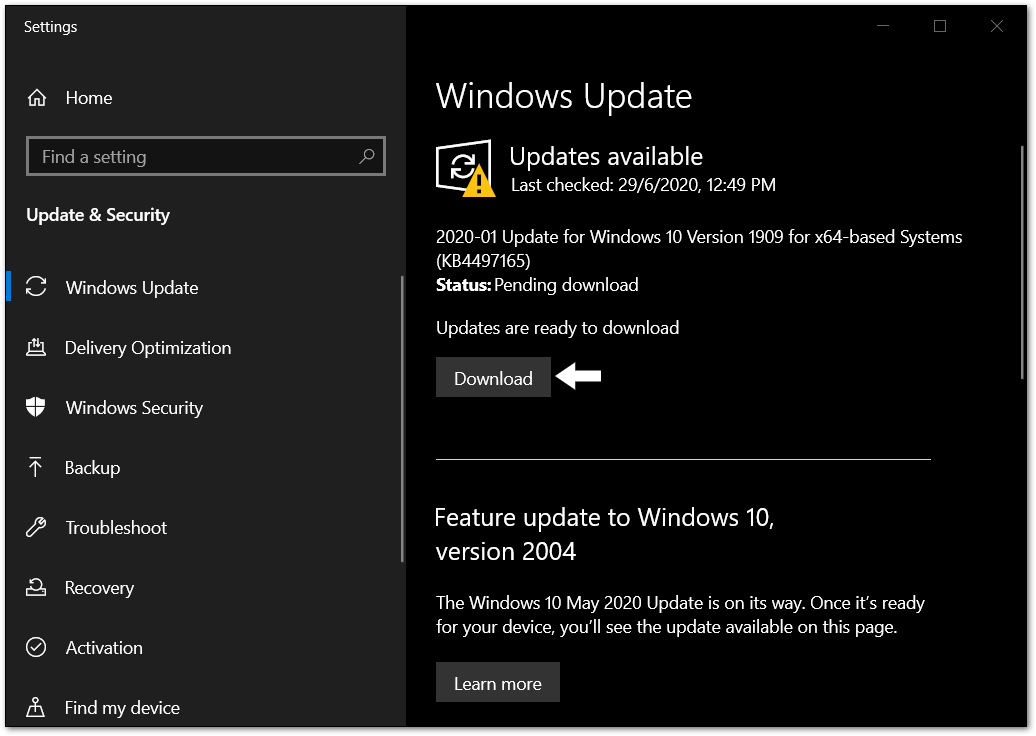
Through this step, you can get back any missing drivers crucial to your PC’s and applications’ performance, including Discord.
And those are the two best ways that we recommend to update your PC’s GPU drivers. If you don’t find any updates for your GPU even after months of no automatic updates, try manually searching for graphics drivers updates. Of course, this method might be a little more tedious and time-consuming, so we suggest sticking to the previous two steps.
To manually search for GPU driver updates, you’ll need to find the GPU model for your PC through the System Information. After that, head over to the official site of your GPU manufacturer to search for updates for your specific GPU model. The following are links to the GPU driver download pages, which you can visit according to your GPU model.
7. Check for Graphics Card Issues
If you are using a dedicated graphics card (e.g. NVIDIA, AMD), make sure it is functioning properly. You can check for issues with your graphics card by running a diagnostic tool or by checking for error messages in your device’s event log.
By following these steps (Fix 6 and 7), you should be able to identify and fix issues with your graphics driver or graphics card that may be causing the black screen issue during Discord screen sharing.
8. Update the Audio Drivers on Your PC
Aside from GPU drivers, it’s also crucial to update your PC’s audio drivers to confront “Discord screen share no audio” issues. If your PC’s sound drivers aren’t running the latest updates, do expect to see some bugs that may interfere with your screen share on Discord. This step is similar to the previous since this step mainly involves searching for essential PC driver updates and installing them.
Having said that, the following are the 2 methods we recommend to update the audio drivers on your PC.
Method 1: Checking for Audio Driver Updates through the Device Manager
To start off, like before, right-click the Windows button or the Start menu at the bottom left and choose Device Manager. Here, under Sound, video and game controllers, you’ll need to check for each sound device’s updates. For this, right-click the audio device and select Update Driver.

After that, choose Search automatically for updated driver software to begin searching online for any pending updates.
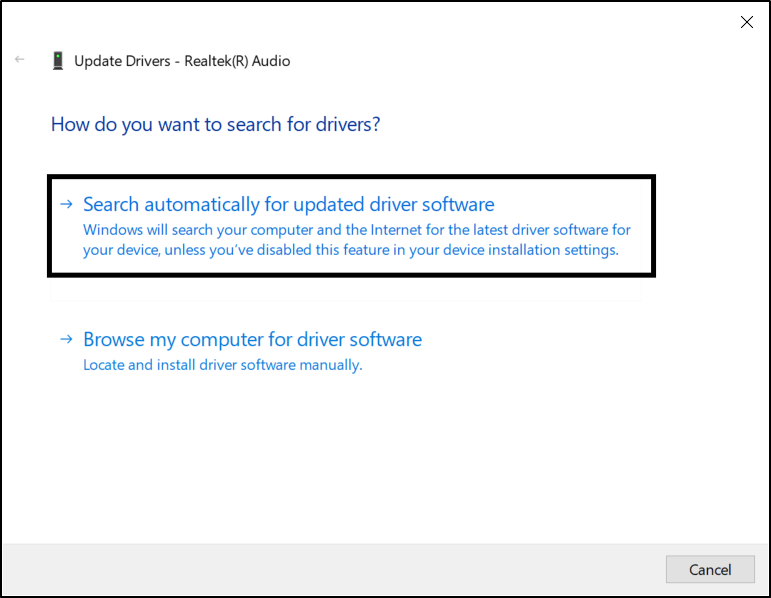
If there is an update available, the update will be automatically downloaded and installed for your audio device within minutes. Following that, the system will prompt you to restart your PC, so click Yes, and let your PC perform a simple restart.

This final step is to thoroughly apply the updated files for the audio drivers. Repeat the steps for the other sound devices under that list as well
Method 2: Manually download Audio Driver Updates from the Manufacturer Website
As mentioned earlier, manually finding for updates may be too difficult, hence your safest bet would be to stick with Method 1. Nonetheless, we recommend this step as an alternative if the previous step came to no avail.
To do this step, you’ll need to visit your PC or the driver manufacturer’s website. From there, look for the audio driver download page. You’ll most likely be able to find it through a simple Google search. For example, if you’re using an Acer PC or a PC with a Realtek speaker, visit the corresponding site and download the audio driver file. This file should be in the .exe file format, so installing it is as simple as opening the file and clicking Next a couple of times.
And just like that, the audio drivers’ software on your PC should be kept up-to-date and will perform better than ever. Along with that, similar to Step 6, ensure that you’re performing regular Windows Updates as well to ensure the necessary drivers are kept well-optimized.
9. Reset the Voice Settings of the Discord Client
In some cases, restoring the Voice settings to its default or original is the appropriate fix for discord screen share problems, especially the no audio issue. Only after a while users may notice issues with their screen share as changes have progressively been made to the voice settings. These altered settings may interfere with your Discord screen share resulting in unwanted problems.
That being said, the following steps will demonstrate how you should reset the Discord application’s voice settings.
To do this, click the Settings icon to access the User Settings. Next, from the left pane, under App Settings, select Voice & Video, scroll all the way down and click Reset Voice Settings, and click Okay at the next message.

10. Try Streaming a Different Window and Changing the Screen Share Settings
Essentially with this step, we’re suggesting to simply play around with the screen share settings by switching between windows and modes. We ain’t entirely sure behind the reasoning behind why this works, but it sure did come to the rescue for many users. We believe this step fixes the issue if the screen share was not started correctly due to some background configuration errors.
Additionally, we suggest temporarily lowering the quality of your stream through the screen share settings, and seeing if that fixes the issue. Doing this will reduce the bandwidth requirement for your screen share, so you can stream with lesser crashes and interruptions.
To access the available screen share settings, click the arrow icon on the screen button at the bottom of your screen share.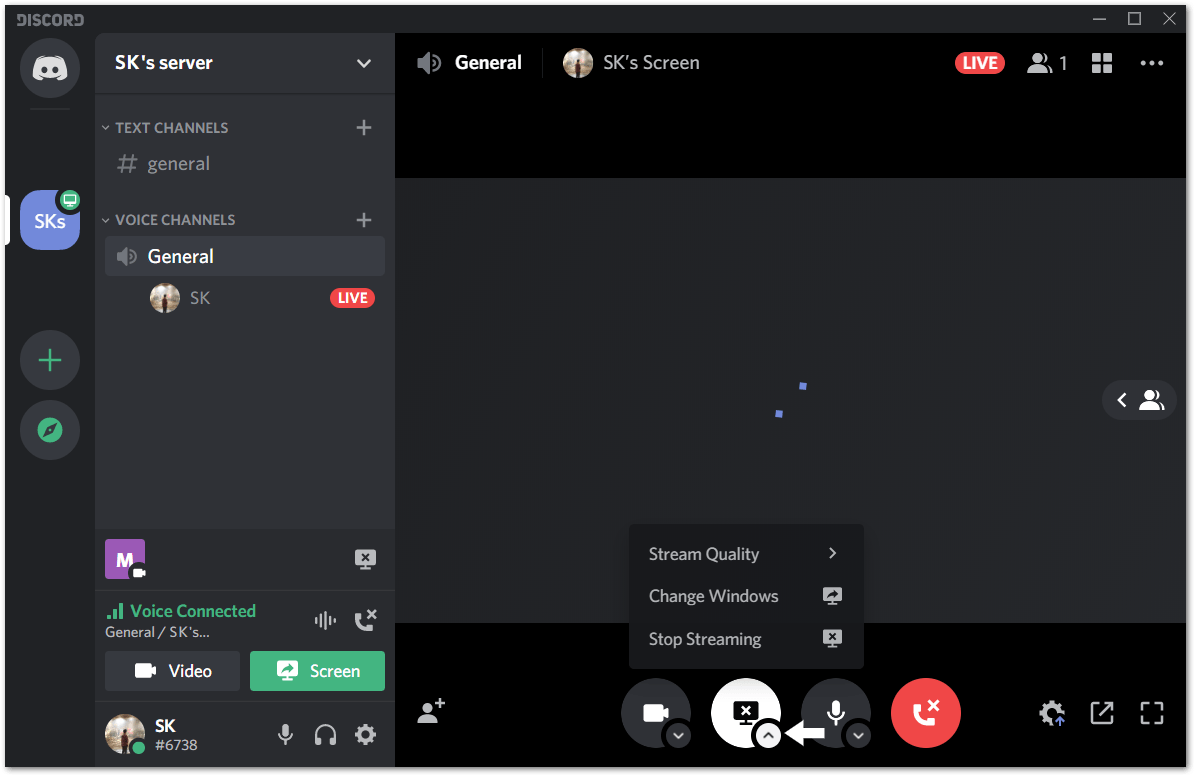
From here, to switch windows, click Change Windows, then under Applications choose any of the available applications, and click Go Live to begin streaming it.
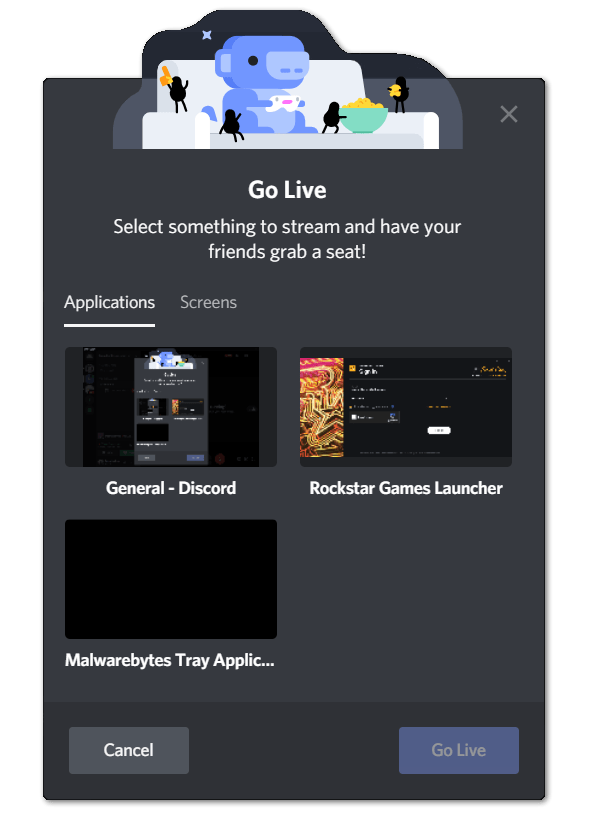
After doing that, you can switch back to the screen you initially wanted to share, and see if you’re able to share again without any “black screen” issues.
Moving on, to change the quality of your stream, from the screen share settings, this time, hover over Stream Quality and choose a lower Frame Rate and Resolution.
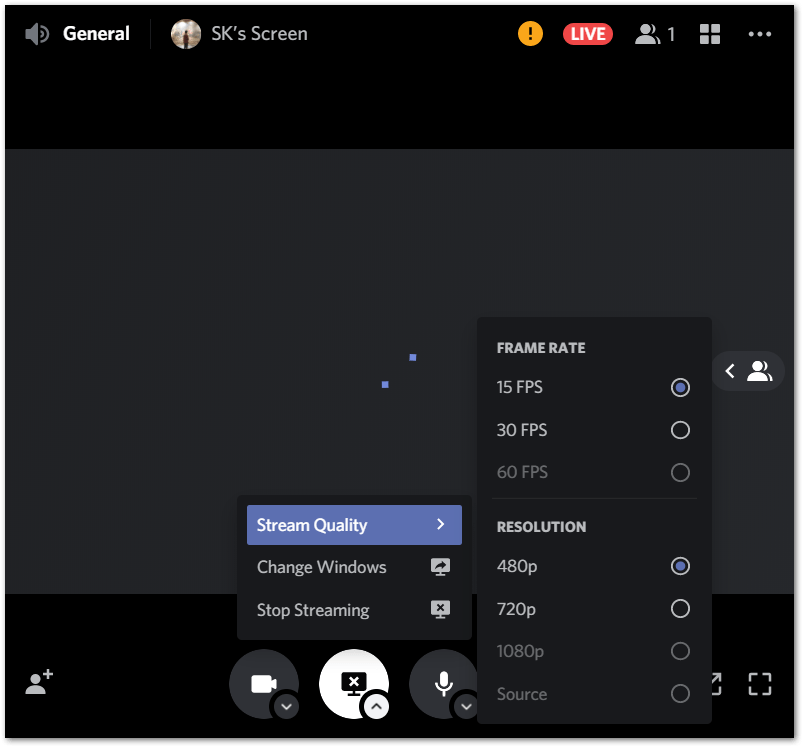
If the screen share returns to functionality, feel free to head back and increase the stream quality.
11. Launch the Application/Game You’re Streaming in Windowed Mode
For you to be able to screen share an application or game on Discord, it cannot be running in full-screen mode. Therefore, it’s crucial to run your game in “Windowed mode” instead, to combat these “Discord screen share with a black screen” issues. This problem is mostly for screen sharing games since most games are in full-screen mode by default. In future, we hope Discord will incorporate the streaming full-screen games functionality. Luckily for now, many games give you the option to run the games in windowed mode.
For this, just head over to your Game’s Settings menu, and you can usually find this setting under Display/Video settings or a Display mode setting. You can choose to run the app in full-screen windowed or borderless windowed, as long as it isn’t full-screen only.

Alternatively, you can ensure the app opens in windowed mode by editing the App Properties. For this, right-click the application and select Properties. Next, at the Properties window, choose Shortcut from the top bar, and next to Target, enter a space and then -window or -w at the end of the text. Once done, click Apply and OK to save the changes.

With your application running in windowed mode, go ahead and check if you’re able to screen share these apps again.
12. Disabling Conflicting Third-Party Background Apps with Task Manager
Having several processes running in the background can interfere with your Discord screen share. These unnecessary apps can eat up your RAM and result in lesser memory allocated for the Discord app. This, on top of Discord’s high CPU and memory usage, can cause unwanted crashes and disturbances with the app and your screen share.
Plus, it’s difficult to determine which app, in particular, results in these issues with your screen share. Although, we believe apps that occupy a sizable memory and CPU portion are the real culprits. On that note, we suggest ending or “killing” certain tasks that may be interfering with the Discord app.
For this, open the Task Manager by right-clicking the taskbar and selecting Task Manager. After that, under Processes, see which app occupies the highest Memory/RAM and CPU, select it, and click End Task.
To identify the apps easier, you can arrange the processes in descending order of memory/CPU usage. Avoid ending any important background tasks such as your Antivirus software.
After performing this step, we recommend restarting the Discord client app, as stated in step 1. Once the app’s opened up, be sure to check if your screen share is up and running again.
13. Check Your Internet Connection
For this step it’s important to ensure that you have a stable internet connection. It’s important to check your internet connection when experiencing issues with Discord screen sharing because a stable and fast internet connection is necessary for the feature to work properly. If your internet connection is slow or unstable, it may cause issues with screen sharing, including a black screen.
By checking your internet connection and making sure it is stable and fast, you can eliminate this as a potential cause of the black screen issue during Discord screen sharing. This can save you time and effort in troubleshooting the issue, and ensure that screen sharing is able to function properly.
In that case, we recommend checking the internet connection speed to check if it’s the real culprit behind this issue. You can check the internet speed with the Ookla Speedtest tool.

If the internet speed is slow and the Shorts section can’t even load properly, we suggest contacting your internet service provider (ISP) 📞 to troubleshoot the connection and enhance the speed. Resetting the router would also be a great option to overcome this situation, as it’ll reset the DNS settings to default and refresh the connection 🔄.
14. Reinstall the Discord Client on Your PC
We always recommend this step towards the end of our Discord guides as it can effectively resolve various technical problems with Discord, including screen share issues. Basically, we start off by uninstalling the Discord Client, then we delete all the remaining app data and roaming files. After this, we head over to the Discord site to download a new copy of the installation file and begin installing the client.
Remember to completely close the Discord client before proceeding with the steps below to uninstall it.
- For starters, open the Run prompt by pressing the Windows and R key together, then next to Open, type appwiz.cpl, and press OK.
- Subsequently, from the list of programs, look for Discord, right-click it and choose Uninstall.
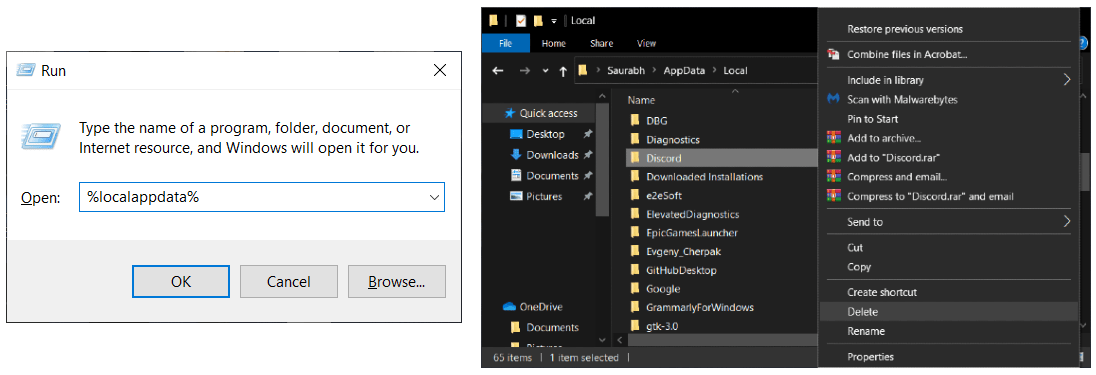
- Following that, you’ll need to delete all traces of the Discord client from your PC. To do this, open the Run prompt (Windows + R key), this time, type in %appdata% and click OK. Then, from the list of folders, delete Discord.
- Next, open the Run prompt (Windows + R key) once more, enter %localappdata%, click OK and from the list of folders, delete Discord.
- Finally, head over to the Discord official website or click here, and from there, download a new copy of the installation file. Afterwards, running the installation file and installing it is as simple as clicking Next a few times.
With that done, your PC should have a clean new copy of the Discord client. Be sure to open the app to allow the client to update its files with brand new data, and later sign in to your same Discord account. Now, you can check to see if you’re still facing the Discord screen share with a black screen issue.
15. Contact Discord Support
Lastly, if this “Discord screen share black screen” error just doesn’t go away, your last resort will be to raise the issue to Discord themselves. Although they may take a while to respond to you, you can get fixes that are more fitting for your situation from Discord’s technical team. Besides that, from our experience, Discord answered our queries within a day or two.
On that note, there are two ways we recommend to get in touch with Discord Support. Usually, the second method which involves submitting a request is a better means of contacting Discord, and you’ll obtain a more comprehensive response.
The first way we’ll suggest is to submit the issue within the screen share settings. From your screen share on the Discord application, click the Settings icon to access the Stream Settings.
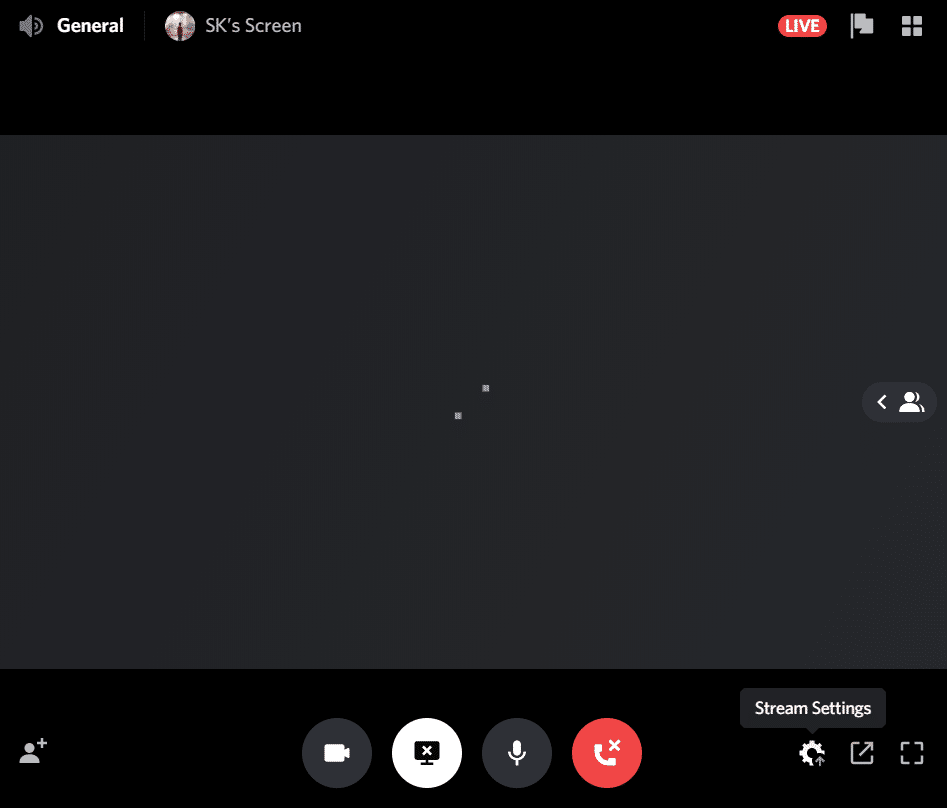
At the next window, click Report a problem with your stream. Next, click the box under Streaming Issue, then from the drop-down choose the error that best describes your issue and click Submit.
If you still haven’t gotten any reply, we’ll suggest moving onto submitting a request. For this step, visit the Discord Support site or click here. Next, choose Help & Safety at the first message box. On the next page, under Type of Question, we suggest choosing Other Technical Issue. Following that, you’ll need to provide some essential info, such as your email, platform, and a brief description of the Discord screen share black screen error. Once done, simply click Submit.
For both steps, be sure to check your email inbox that’s linked to your Discord account from time to time for any responses. Do expect a short waiting period of about 1-2 days.
Conclusion
In a nutshell, this is our take on fixing a Discord screen share session that is not working overall. Whether you have a Discord screen share with a black screen, frequent crashes, or even no audio issues, we pieced together these 15 fixes to combat these errors. After each step, do a test run by turning on the screen share to see if the issues remain.
Lastly, feel free to share in the comments if you have an alternative fix to this pesky Discord screen share issue. Also, we would love to hear if any of the steps above worked out for you.
Share this post with your bud whose screen share on Discord keeps crashing, has a black screen, or has no audio.

