Do you ever find your LinkedIn notifications not working or showing up correctly after repeatedly trying to refresh the app or website?
LinkedIn is found to be the world’s largest professional platform among its competitors, with over 756 million users from more than 200 countries! 😲 You could use LinkedIn to connect with workplace colleagues, learn skills that could benefit your professional career or find the perfect job opportunity for yourself.
LinkedIn can be accessed from a mobile phone, desktop or the LinkedIn Lite Android mobile app. A completed LinkedIn profile can help you to showcase your unique professional story and what makes you stand out from other candidates who applied for the job.
However, despite serving many users, the app still has its occasional flaws. In this case, every now and then, people have reported problems with LinkedIn’s notification system. Are you one of the victims who fall into this category?
If you’re facing this issue as well and looking for a good fix, you’ve come to the right place! 🎉
Every notification missed could be a potential job opportunity for you. A few of the reported problems that users have faced with LinkedIn include job update notifications not working, the message notifications not appearing or the job alerts notification not functioning.
Fret not, we’ve prepared this complete guide with 15 fixes to try whenever you find LinkedIn’s notifications system isn’t working like how you pictured it to be. 😄
Note: This guide provides fixes and screenshots from the LinkedIn website or mobile app. Specific devices where the website/app can be found are Windows, macOS, Android, iPhone and iPad.
Table of Contents
15 Fixes for LinkedIn Notifications Not Working or Showing
- Check the LinkedIn Server Status
- Turn Off and On the LinkedIn Notifications Settings
- Manage Updates for LinkedIn Notifications
- Troubleshoot LinkedIn Email Notifications
- Receive Job Alerts in LinkedIn
- Troubleshoot LinkedIn Mobile Push Notifications on Android
- Troubleshoot LinkedIn Mobile Push Notifications on iOS
- More Troubleshooting Steps for the LinkedIn App on Mobile Devices
- Enable Notifications on Profile Changes
- Log Out and Log Back In to Your LinkedIn Account
- Use a Different Web Browser to Access LinkedIn
- Clear the Web Browser Cache and Cookies
- Find Answers on LinkedIn’s Help Center
- Find Answers on LinkedIn’s Help Forum
- Contact LinkedIn About the Issue
15 Fixes for LinkedIn Notifications Not Working or Showing
1. Check the LinkedIn Server Status
We can find answers from reputable sources to see if LinkedIn is experiencing problems. Before jumping into any conclusions that the problem has something to do with your device, we need to first ensure the problem is not happening from LinkedIn’s end. Thus, this could be an ongoing server-side issue that’s affecting a large number of users.
Here are two ways we could confirm this:
Through LinkedIn’s Official Support Page on Twitter, @LinkedInHelp
LinkedIn has a verified customer support account on Twitter called @LinkedInHelp. This account caters to answering any questions or problems that users experience with LinkedIn.

If there are many similar tweets regarding LinkedIn crashing or working incorrectly, the Twitter account may post an up-to-date tweet to notify users that the problem is being addressed by the technical team 🛠️. This can help save you hours of frustration trying to solve an issue with LinkedIn when it’s actually a problem on their end.
Check LinkedIn’s Server Status on Downdetector
Downdetector is a popular and convenient website that allows a user to view the status of web services and social networks. The website collects a number of status reports from reliable sources to provide users with real-time updates on any server crash or service interruptions.
That being said, to view the current status of LinkedIn, navigate to the DownDetector page.
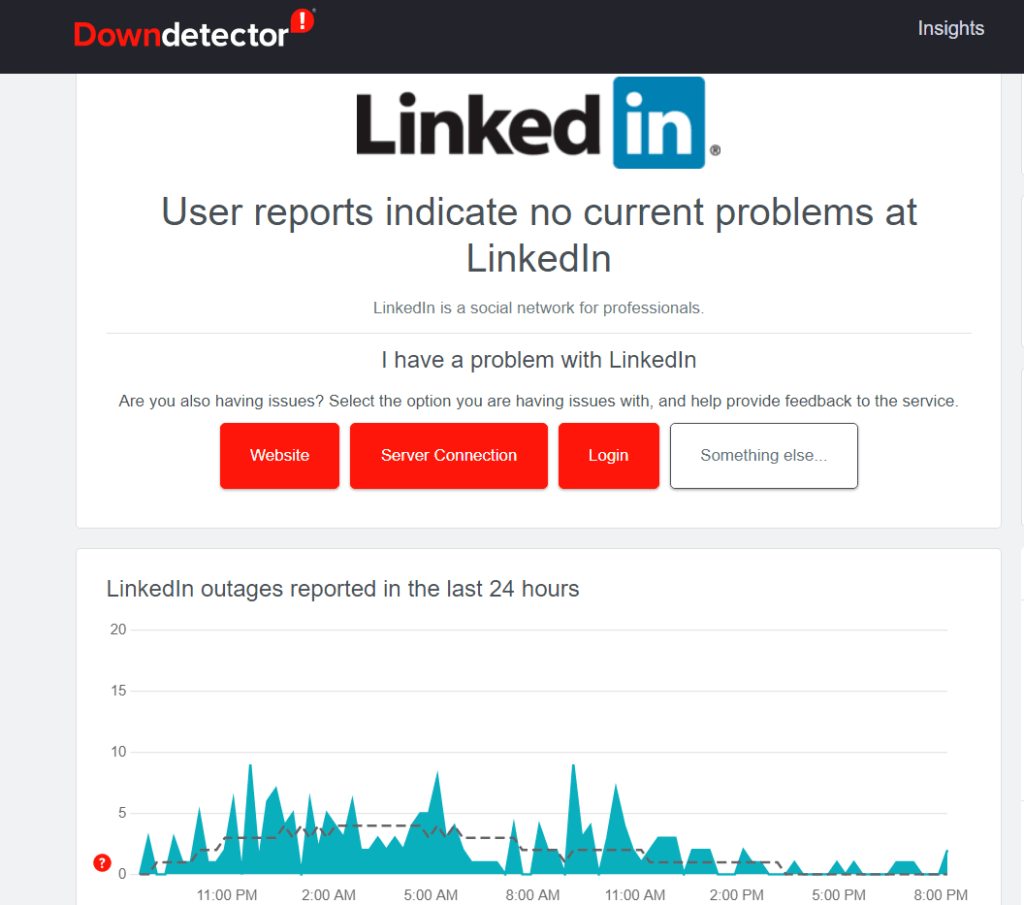
There are two ways we can determine whether LinkedIn is currently having a problem. If there is a green bar labeled as ‘No problems at LinkedIn’, there is nothing wrong from their side. However, if there’s a red bar labeled as ‘Problems at LinkedIn’, there could be a service interruption or server outage.
2. Turn Off and On the LinkedIn Notifications Settings
If you’ve performed the above step and do not find the problem to fall on LinkedIn’s end, we can now safely assume that the problem is occurring on your device.
LinkedIn provides notifications regarding yourself, your connections and your activity. For example, you can receive alerts about your posts, job opportunities, and updates from people you connect with.
So, you can customize how you want your notification to appear in three different ways:
- To appear only in the LinkedIn app, categorized under the My Network, Messaging and Notifications tabs.
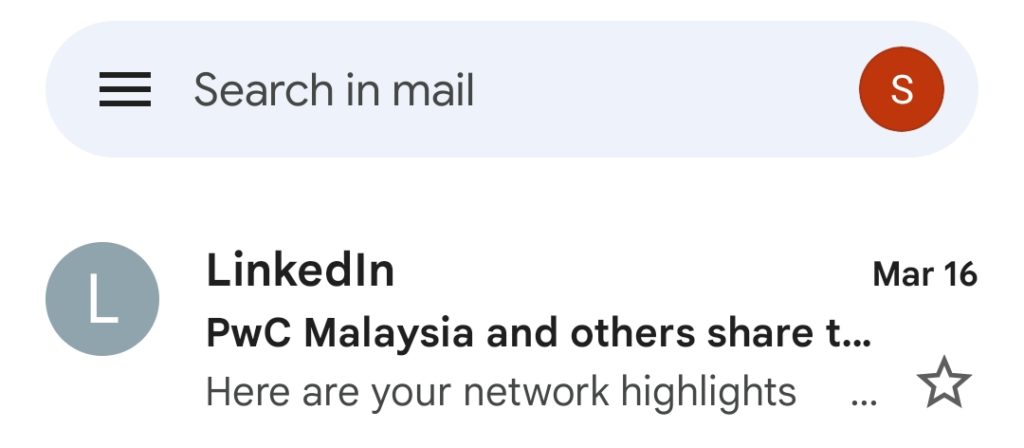
- For notifications to be sent to your primary email address.
- To receive push notifications on your mobile device.
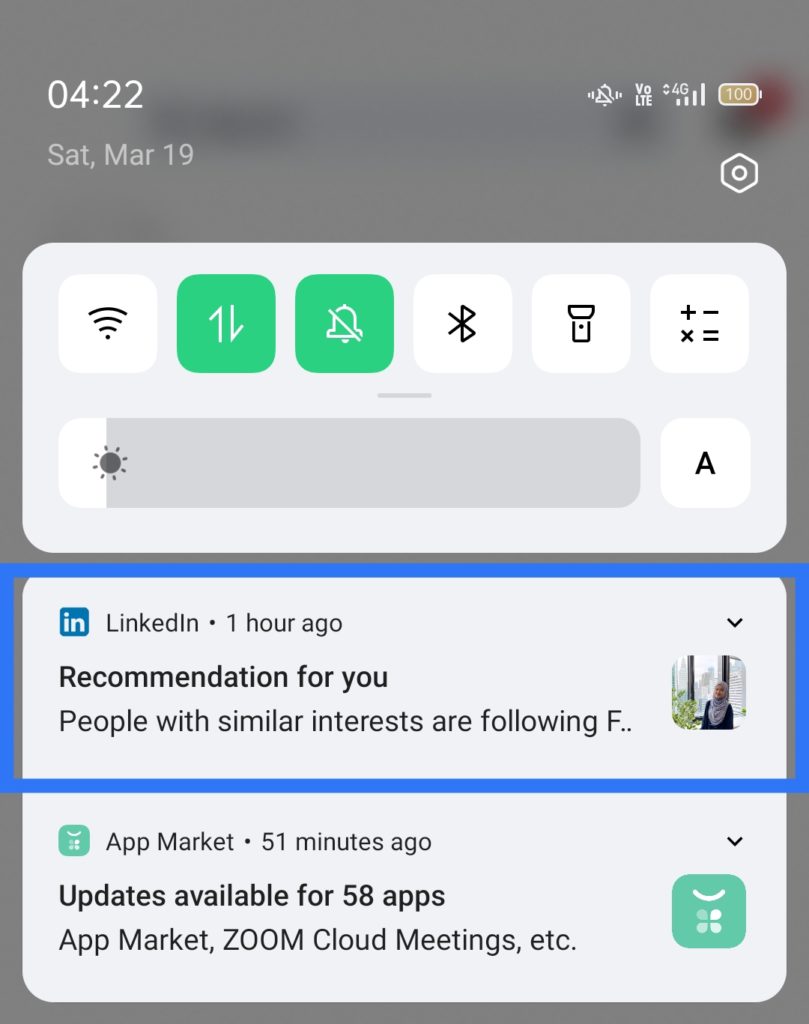
Besides allowing users to pick how they want their notifications to be delivered to them, LinkedIn has also taken the extra mile to give us the freedom in managing our notifications for several categories such as:
- Invitation and messages
- Jobs and opportunities
- Activities in your network
- Activities that involve you
- News and articles
- Offers and tips from LinkedIn
- Event updates
Steps to Configure LinkedIn Notification Settings
For Desktop (Windows & macOS)
The following steps were done using Google Chrome. If you find yourself using a different web browser, the steps will be similar:
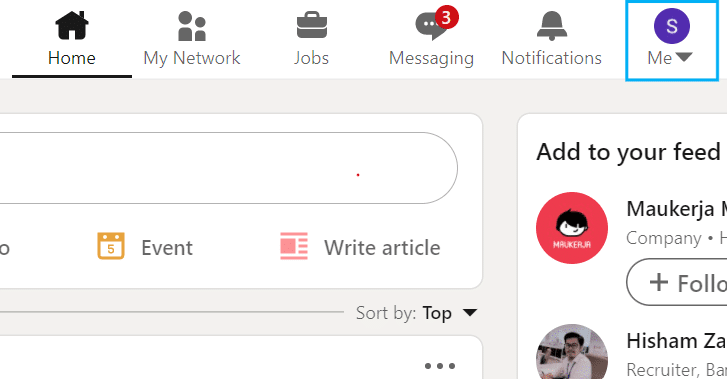
- First, click on the Me icon at the top right of your LinkedIn homepage.
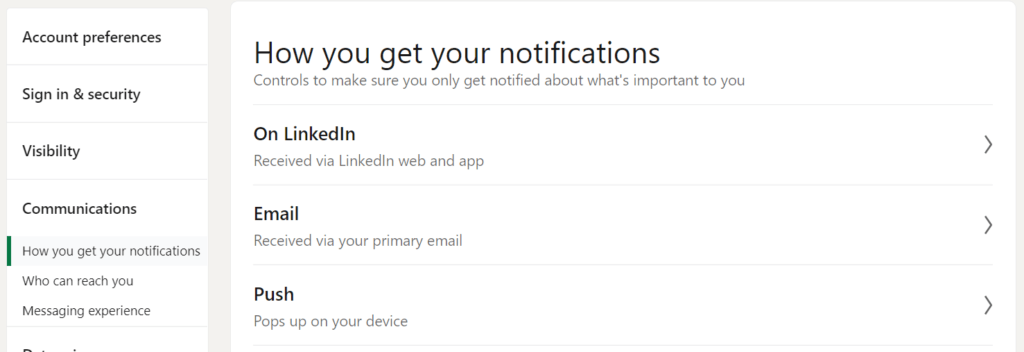
- Next, click Settings and Privacy, then Communications tab on the left.

- Under How to get your notifications, you can pick one from three options: On LinkedIn, Email, Push.
- Once you’ve clicked into an option, you can select a category to individually select items within them.
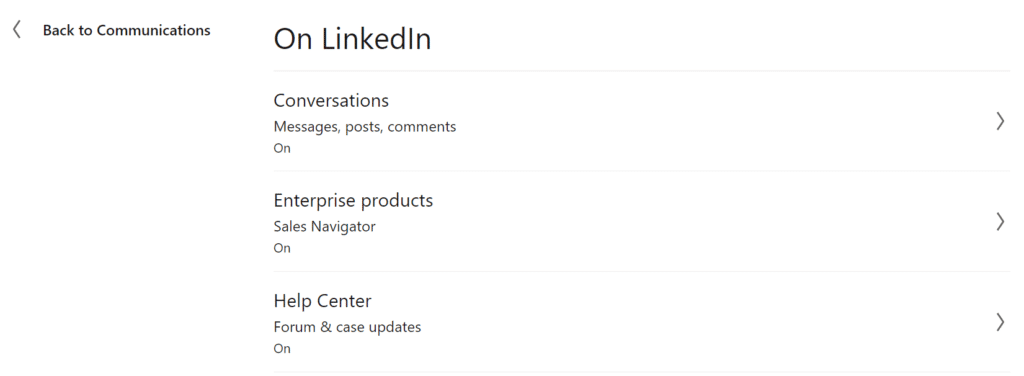
- After that, switch the toggle on or off next to each option to control whether you want a notification about the selected item.
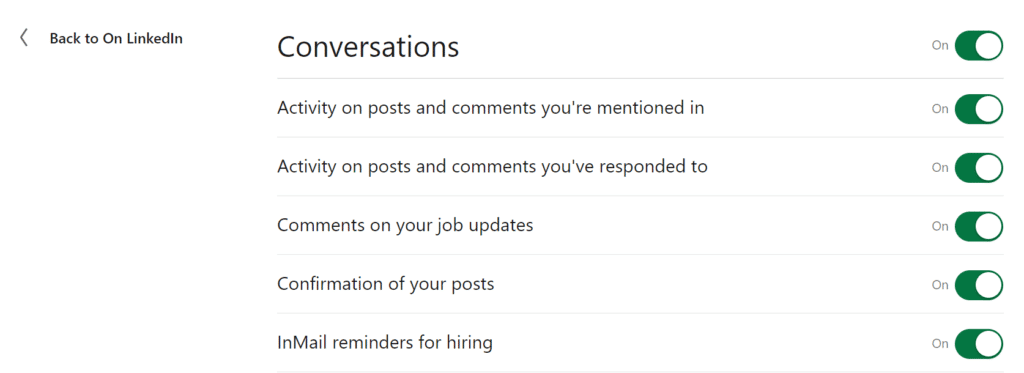
- On top of that, the notification frequency can be changed to prevent unnecessary spam.
For Mobile (Android & iOS)
The following steps were done on an Android device. If you find yourself using an iOS device, the steps can be done the same way:
- First, navigate to your LinkedIn homepage.
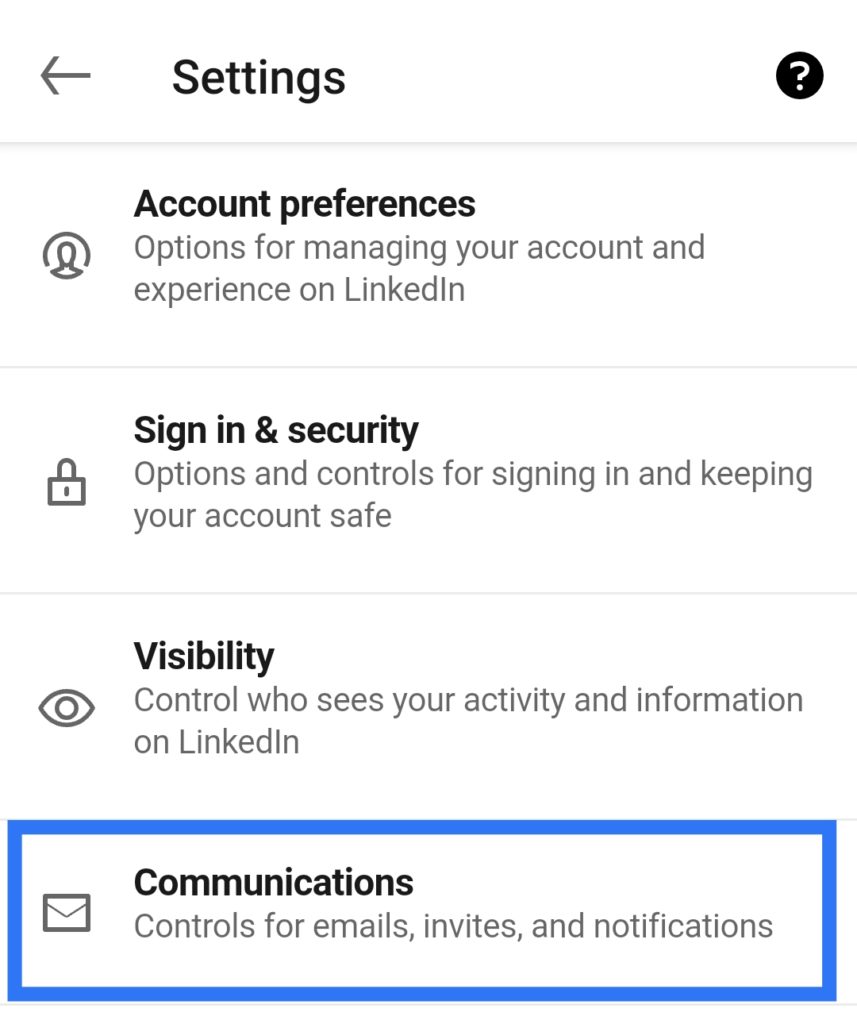
- After that, click on your profile photo and tap Settings.

- Then, select Communications.
- Under How to get your notifications, select from one of three options: On LinkedIn, Email, Push.
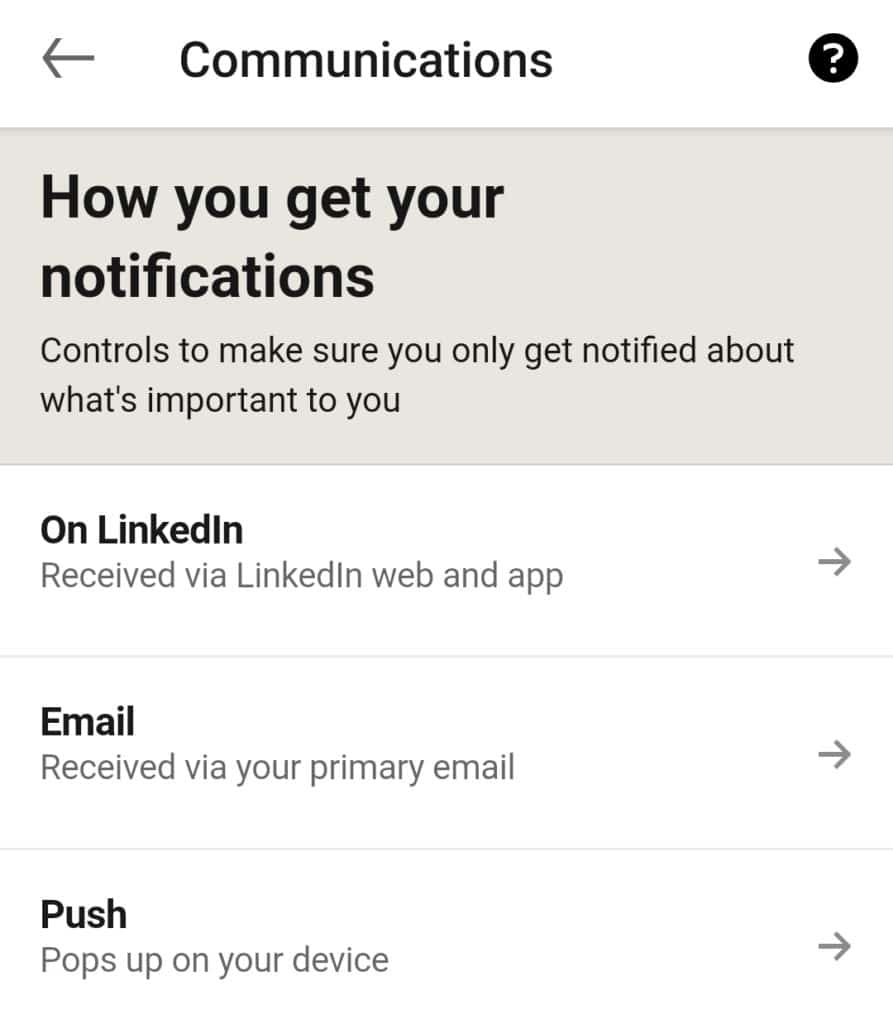
- After that, tap the category to individually select items.
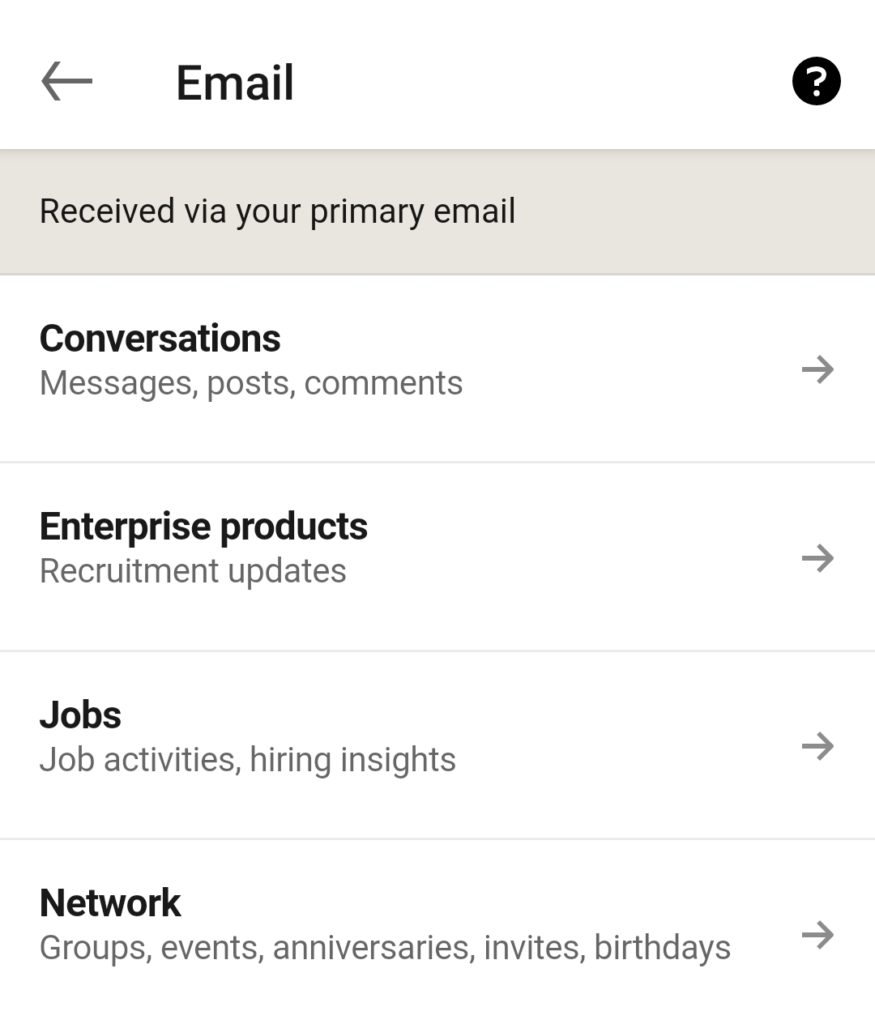
- Subsequently, tap the toggle to turn it off or on next to each option, this will give you the choice of whether you want to receive a notification for it.
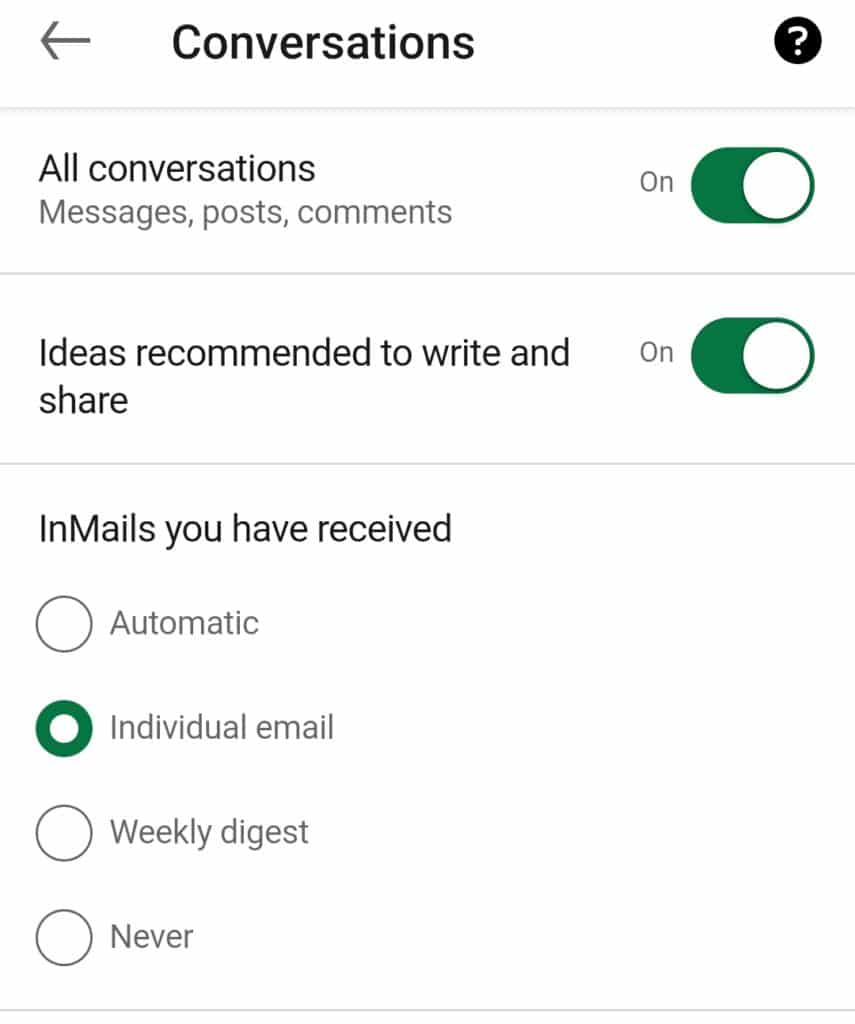
- Finally, you can select the frequency for the notifications you want to receive.
If you don’t see a specific notification appearing, do remember to check the type of notification you’ve selected and the category which the notification falls under. Users can often forget to turn on the option, preventing it from appearing in their push notifications.
3. Manage Updates for LinkedIn Notifications
The notifications tab in LinkedIn is your personal hub to receive updates about yourself, activity from your shares and posts and updates from people who are in your network.
These updates can be managed directly from the Notifications tab, allowing you to determine which type of notifications you’d like to receive. The notification options provided include:
- Mute a notification: Updates for the specific post in your feed will not be prompted and future updates from that thread can be disabled as well.
- Delete a notification: Removes the notification from your Notifications tab.
- Unfollow a notification: Updates from the specific connection will no longer appear, such as job changes, work anniversaries and likes.
- Turn off a notification: Stop receiving a certain type of notification from the people you’re following.
A notification update can easily be deleted, muted, unfollowed or turned off with a few simple steps. However, do note that the notification options are dependent on the type of notification you’re managing. For example, muting a notification is only available for posts that appear in your feed.
Steps to Turn Off or Mute LinkedIn Notification Updates
For Desktop (Windows & macOS)
- First, with LinkedIn open, click the Notifications icon at the top of your homepage.
- After that, click the More icon at the right of a specific notification.

- Lastly, select Delete, Mute, Unfollow or Turn off from the drop-down menu.

For Mobile (Android & iOS Mobile App), Mobile Browser & Lite App
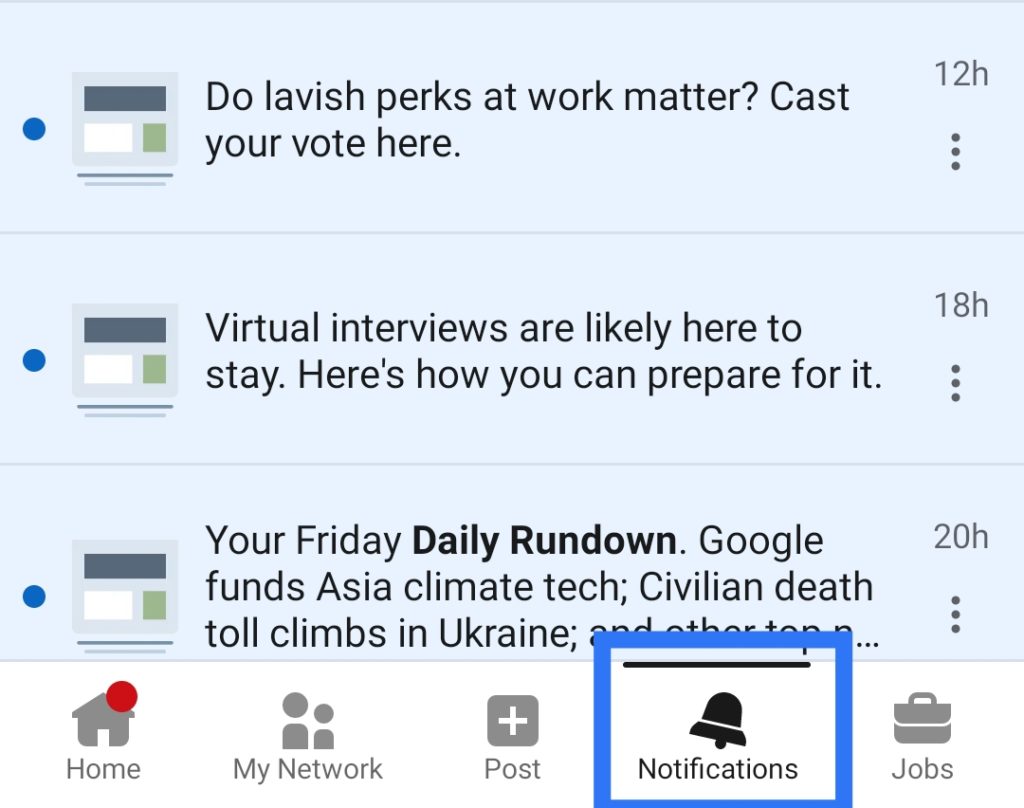
- First, tap on the Notifications icon at the bottom of your LinkedIn page.
- Next, tap on the More icon to the right of the notification you want to manage.
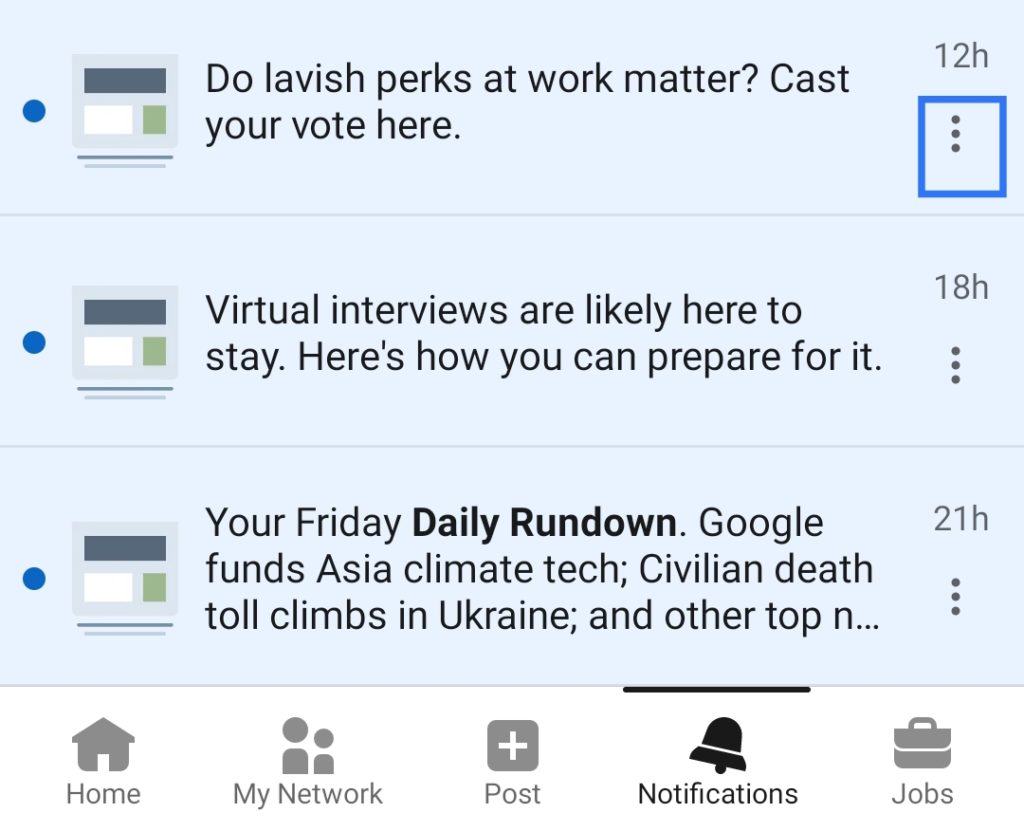
- At last, tap Delete, Mute, Unfollow or Turn off.
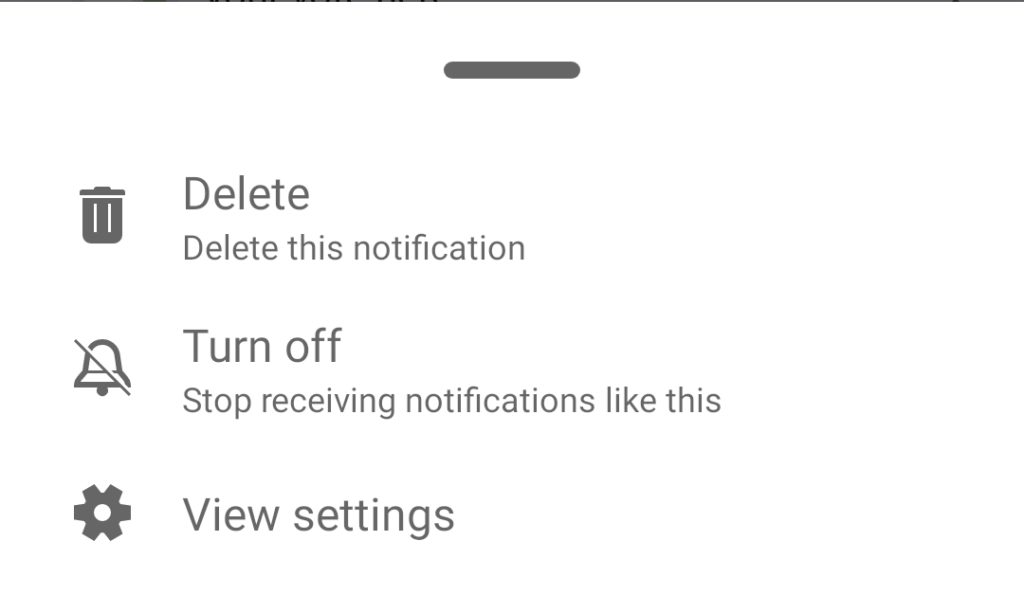
Turning off a notification update will cause all existing notifications to be removed from the Notifications tab, and the alerts for it will not be received as well.
Steps to Unmute or Turn On LinkedIn Notification Updates
We’ve learned how to turn off a notification update, we must learn how to turn it back on as well:
For Desktop (Windows & macOS)
- First, with LinkedIn open, click the Notifications icon at the top of your LinkedIn homepage.
- Under Manage your Notifications on the left side of the page, click View Settings.
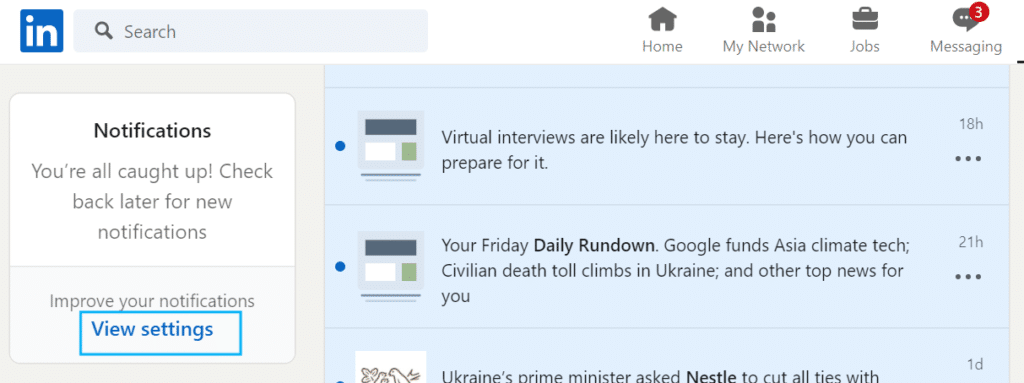
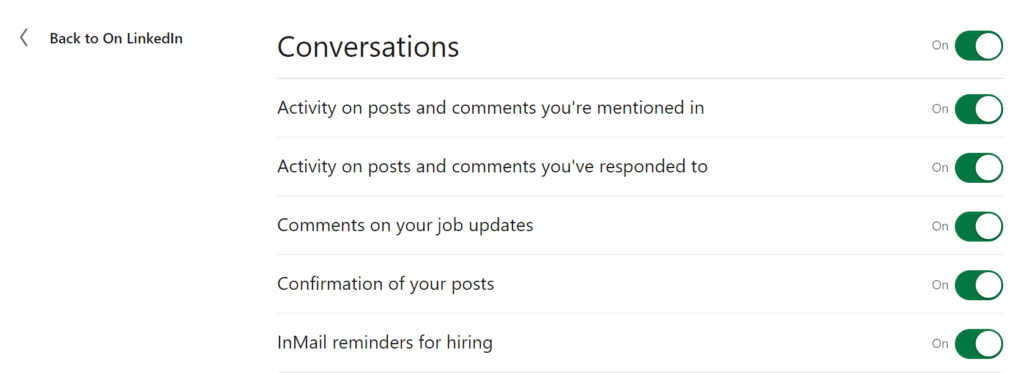
- Under On LinkedIn, click a category to see what type of notification settings you can manage.

- Lastly, you may switch the toggle to the right (On) if you want to receive the notification again.
For Mobile (Android & iOS Mobile App), Mobile Browser & Lite App
- First, in the LinkedIn app, tap on the Notifications tab in the navigation bar.
- Thirdly, tap View settings or the settings icon ⚙️ on the upper-right of the page, then view your notification settings.

- Following that, tap on a category to view the types of notifications you’ve turned off.

- Lastly, switch the toggle to On for the items for which you’d like to receive updates.

Note: The settings option appears only after you’ve specifically turned off a notification.
Once you’ve switched back on updates for a notification, future alerts for the specific notification will be received again, and all previous notifications of the specific type will resurface on the Notifications tab.
If you noticed you’ve stopped receiving updates from a connection/specific notification type, try following the steps above to ensure you didn’t make a mistake muting the notification.
4. Troubleshoot LinkedIn Email Notifications
If you’ve opted to receive LinkedIn notifications via email, but it doesn’t appear in your inbox, start by ensuring they didn’t appear in your email’s spam folder, junk folder, promotional tab and social tab. Sometimes, email providers set the email route from new sources to these few folders.
After you’ve checked through, you can begin troubleshooting your email with these few fixes:
Verify the Email Notification Settings in The Linked in Account
Email settings can sometimes be misconfigured, this prevents some notification updates from being pushed to our email. Here’s how we can check our email settings:
- First, click the Me icon at the top of your LinkedIn page.

- From the drop-down menu, select Settings & Privacy.

- Subsequently, click Communications on the left rail.
- Under How to get your notifications, click Email.

- Finally, click on Details to the right side of the category name, where individual items from a category can be selected.
Correct and Confirm the Primary Email Address
A possible mistake could be the wrong email address being set as the primary email. Typically, your LinkedIn notifications will be sent to the email account’s inbox, which is set to primary. We can confirm our primary email address with the following steps:
- First, click the Me icon at the top of your LinkedIn page.

- Next, select Settings & Privacy from the drop-down menu.

- Following that, click Sign in & security on the left rail.
- In Account access, click Change next to Email addresses.
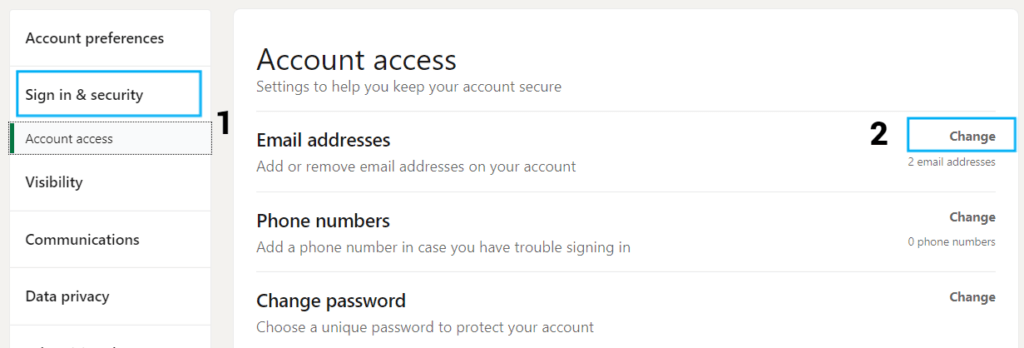
- Subsequently, check whether your email address is correct.
- Lastly, click Make primary next to your email address if you’d like to change the primary email address in your account.

Add Linked in As a Trusted Email Domain
To ensure LinkedIn emails don’t get sent to your spam or junk folder, we can adjust the filter to always receive emails from trusted domains like LinkedIn.com.
The following steps provided is catered for people who use Gmail:
- First, at the top of any Gmail page, click the Down arrow in the search box
- Then, type “LinkedIn.com” into the From field.
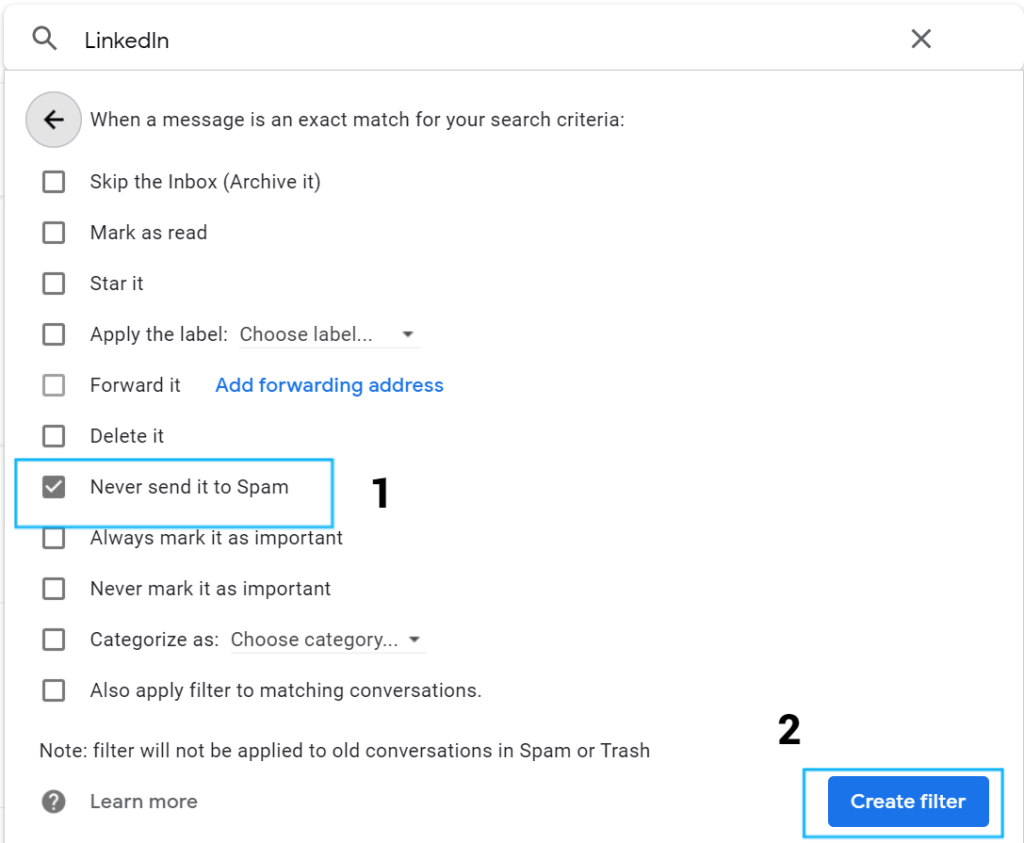
- Next, at the bottom right, click Create filter with this search.

- Check the box next to “Never send it to Spam”.
- Lastly, click Create Filter.
Suppose you’re using Outlook or Yahoo! Mail as your primary email, you may follow the steps through the following links:
Adjust the Frequency of LinkedIn Email Notifications Through the Mobile App Settings
We can also use our mobile devices to check whether we’re receiving emails from LinkedIn correctly. The steps performed are as below:
- First, tap on the Me icon at the upper-left and tap Settings.

- Following after, select Communications.

- Under the Notifications by Channel section, tap Email.
- Fourthly, tap on a category which you’d like to select individual items from.

- Lastly, choose the frequency of which you want to receive emails, from the following options: Off, Recommended, Weekly digest, or Individually.
5. Receive Job Alerts on LinkedIn
Job alerts are a great tool to get notified and stay updated on new job postings that may fit your preference. With this handy tip, your new dream job could be just a click away!
LinkedIn job alerts can be modified to suit your needs. For example, you can customize the notifications to be received on a daily or weekly basis and whether you want to receive them on the LinkedIn app, email or even both!
Here’s how to create an alert based on the job search you’ve just completed. To create a job alert:
Steps to Create or Configure Job Alerts on LinkedIn
For Desktop (Windows & macOS)
- Enter LinkedIn on the web browser.
- After that, click the Jobs icon at the top of your LinkedIn homepage.
- Subsequently, click on the Search jobs field and enter keywords or a company name. You can also enter the job location you’d prefer to work in the Search location field
- Next, click the Search button.

- Following that, the search results page will appear, where you’ll receive a list of job postings related to your job role and the preferred location.
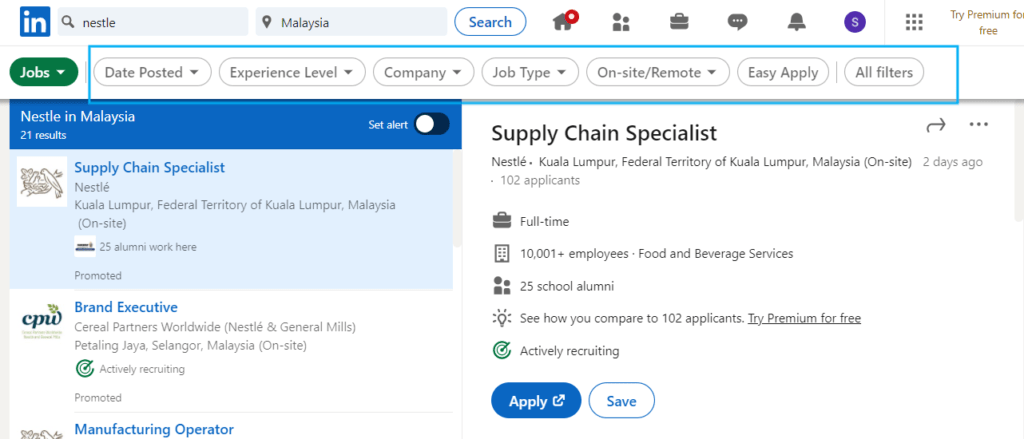
- The filter options at the top of your search results page can be used to filter the results.
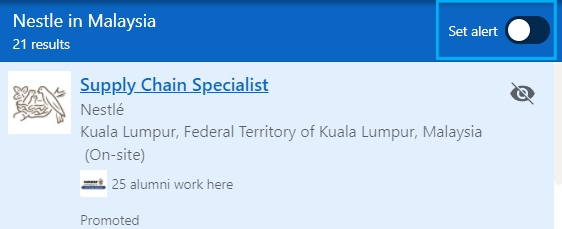
- Next, switch the Job alert toggle to On at the top-right of the search results page, creating a job alert for your search criteria.
- In the “Job alert created.” pop-up, we can select how often we would like to manage and receive alerts about new jobs posted on LinkedIn by clicking Manage alerts.

- We can also choose how we’d like to get notified about the alert from the Get notified via dropdown.
- Lastly, click Save.

For Mobile (iOS & Android)
- First, enter the LinkedIn app.
- Secondly, tap the Jobs icon on LinkedIn’s homepage.
- Following that, type keywords or a company name in the Search jobs field.
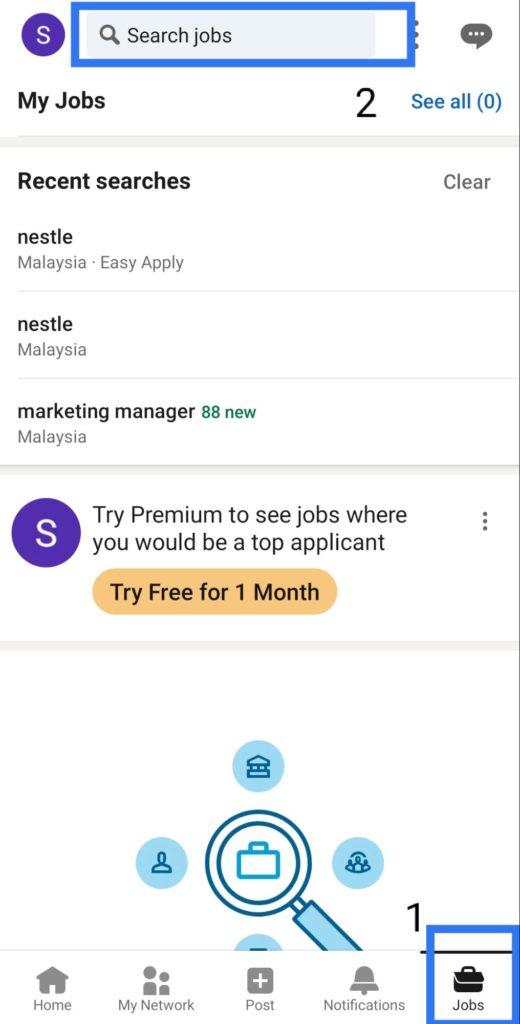
- Subsequently, click on your preferred job location in the Location field.
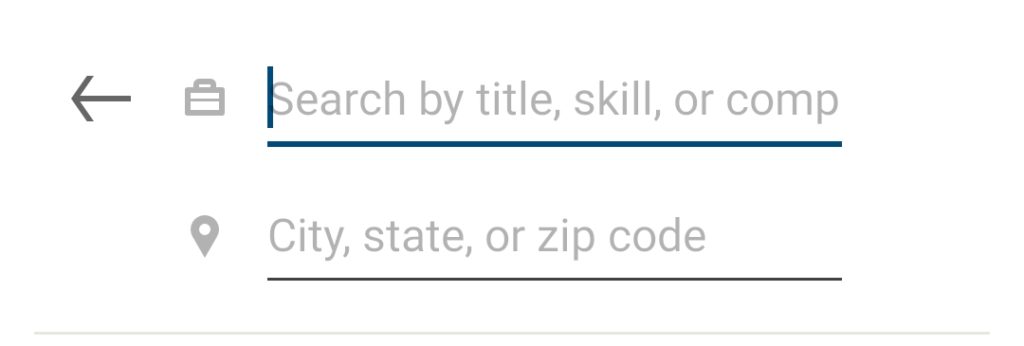
- Tap on Search.
- We can use the filters at the top of the page to refine the search results.
- At the bottom of the search results page, we can switch the toggle to On next to Get job alerts for this search.
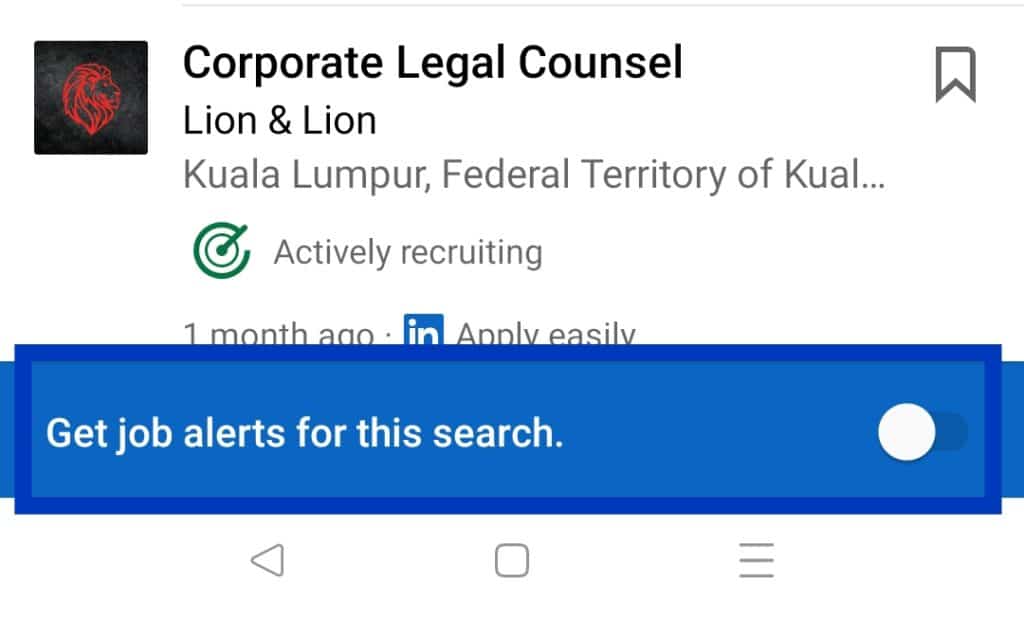
In some cases, an error message can appear when you create a new job alert. Here are a few reasons why this occurs:
- An email alert can’t be created due to the use of offensive words or phrases.
- Your Settings are configured to not allow any LinkedIn emails to be sent to your email address.
- The maximum number of active email alerts has been reached.
Hence, if you find yourself reaching the maximum number of alerts or are no longer interested in the job search you’ve set alerts for, you can change/remove them. Here’s how:
Steps to Remove LinkedIn Job Alerts
For Desktop (Windows & macOS)
- First, click the Jobs icon at the top of your LinkedIn homepage.
- After that, under the search box at the top of the page, click Manage alerts.
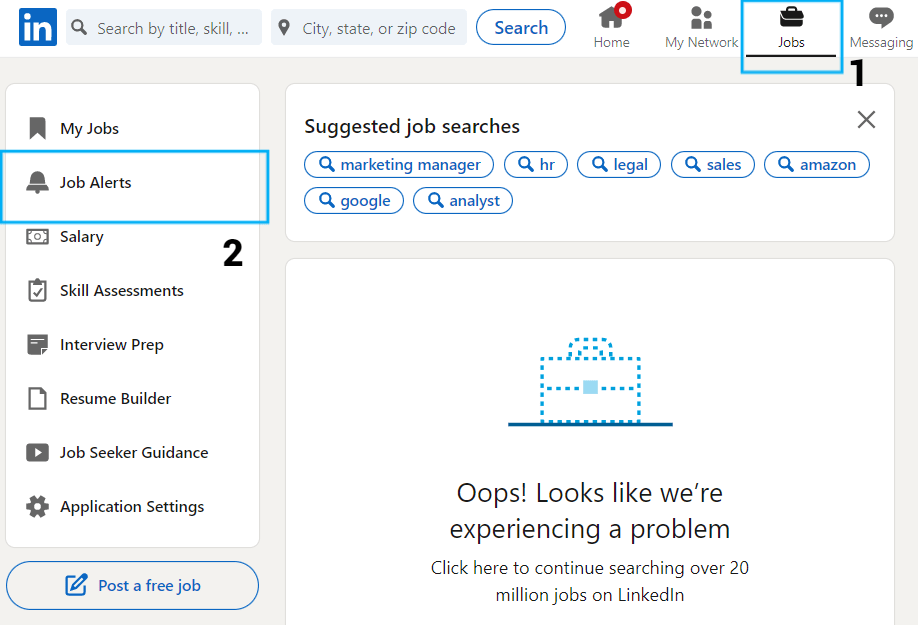
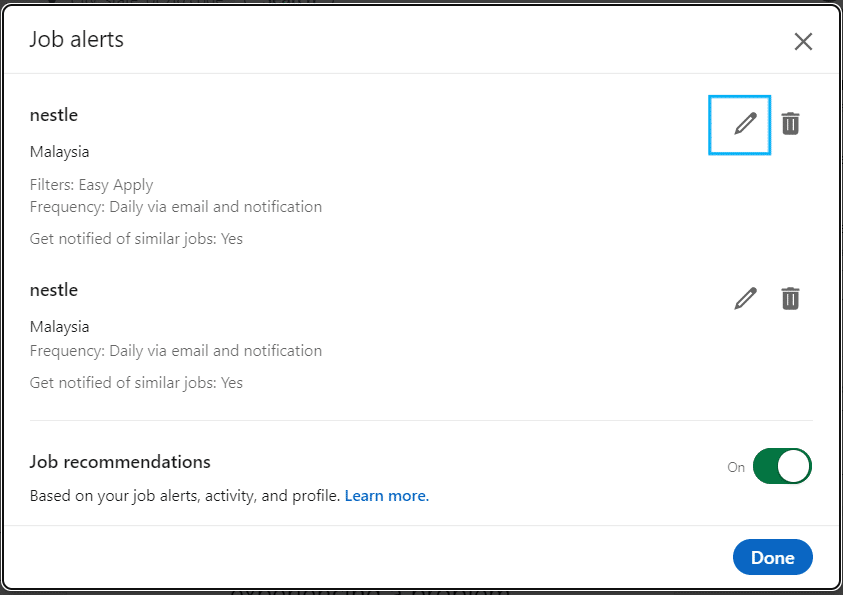
- Afterwards, you can edit or delete search alerts from the Job Alerts pop-up that appears.
- Finally, click Done.

For Mobile (Android & iOS)
- First, select Jobs > Manage Job Alerts.
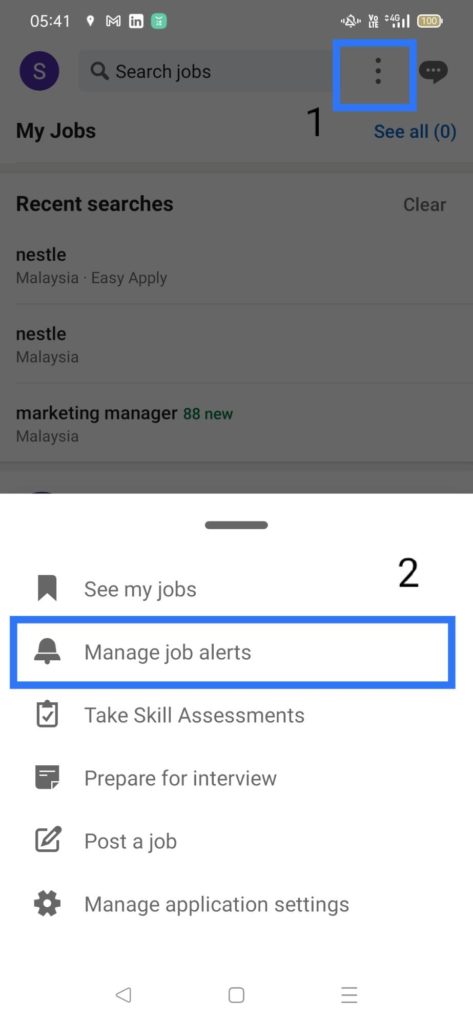
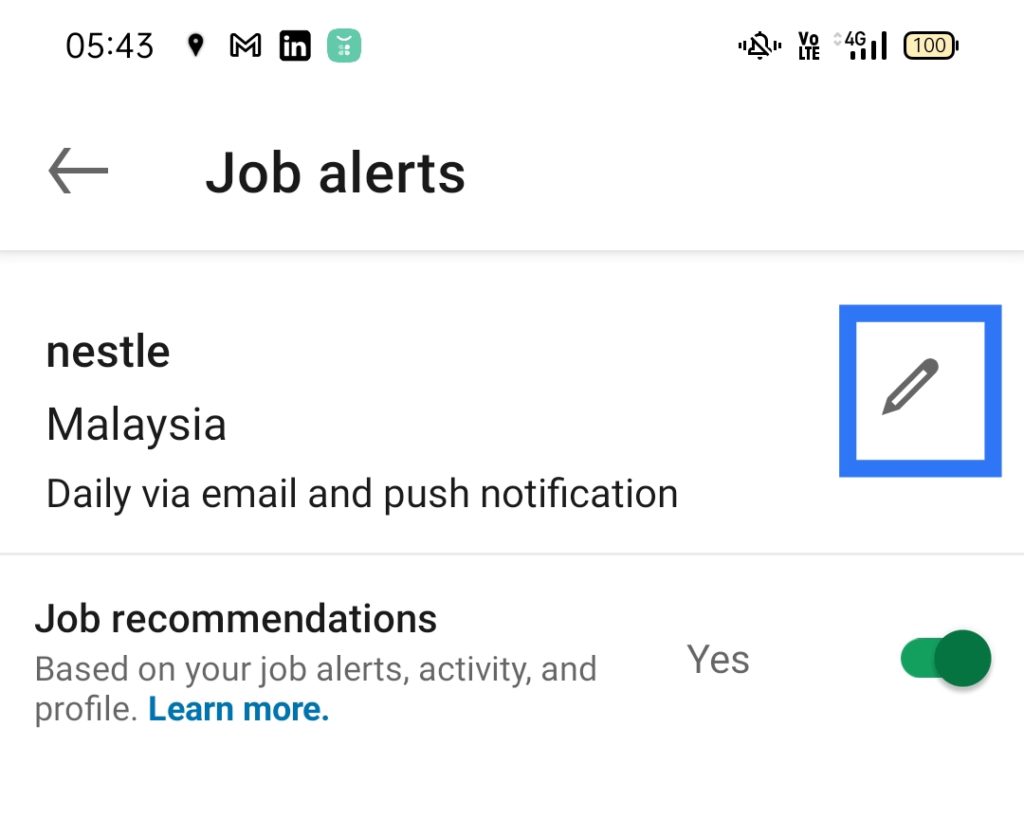
- Secondly, tap EDIT under the job alert you’d like to edit.
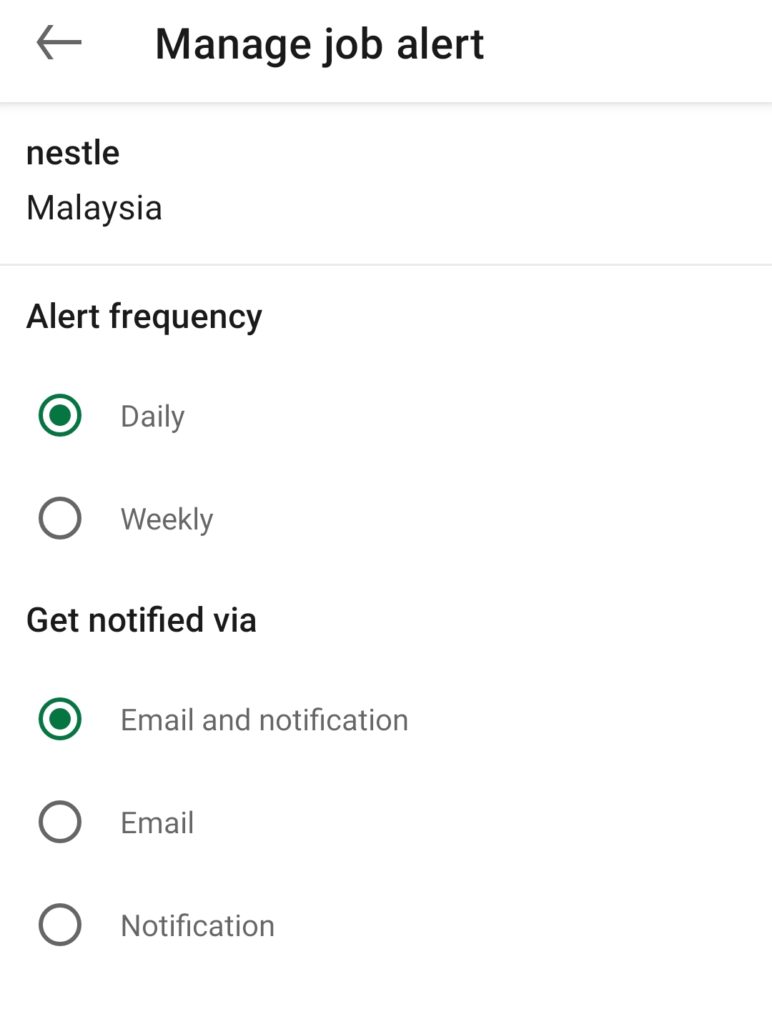
- Subsequently, update the alert frequency and notification mode.
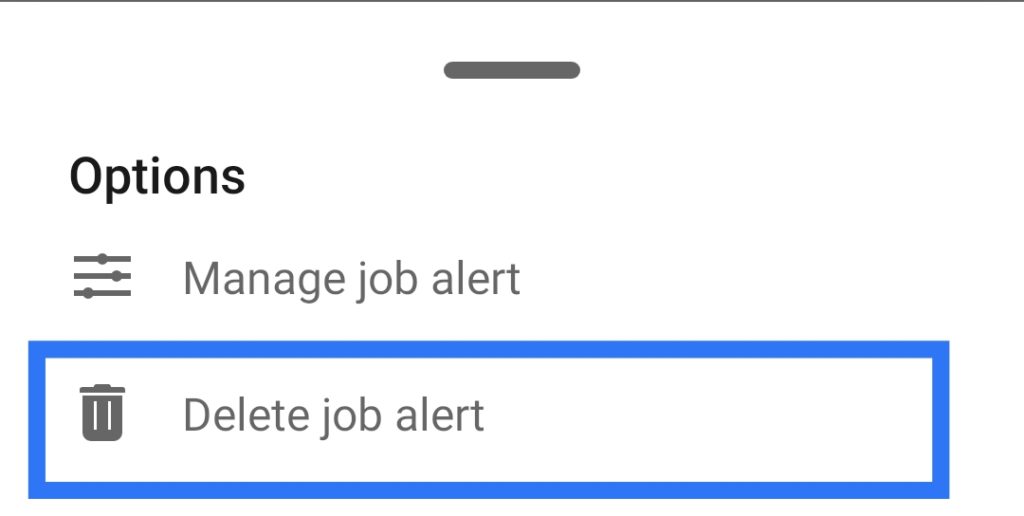
- Lastly, you can tap Turn Off Alerts or Delete job alert under a job alert to delete the specific job alert.
For more help, if you’re not receiving emails from LinkedIn, we recommend checking their guide here.
6. Troubleshoot LinkedIn Mobile Push Notifications on Android
Have you checked your Settings in LinkedIn but still find that you’re not receiving mobile push notifications as you’ve set up in the app? It might have something to do with your phone settings instead of the app itself.
Due to a glitch or tweaked phone settings, a user can overlook an important update because the notification didn’t appear. Thankfully, there are many fixes that you can try if your LinkedIn push notifications are not showing up on your Android device.
Here are a few ways you can troubleshoot the problem:
Reboot Your Device
If the problem is a volatile glitch, restarting your phone might just be your solution. When you restart your device, its memory refreshes, leading to a possible fix. Plus, a quick reboot ensures every running app on your device is halted and restarted as well as processes such as your device’s push notification service.
Here are the steps on how to reboot your Android phone:
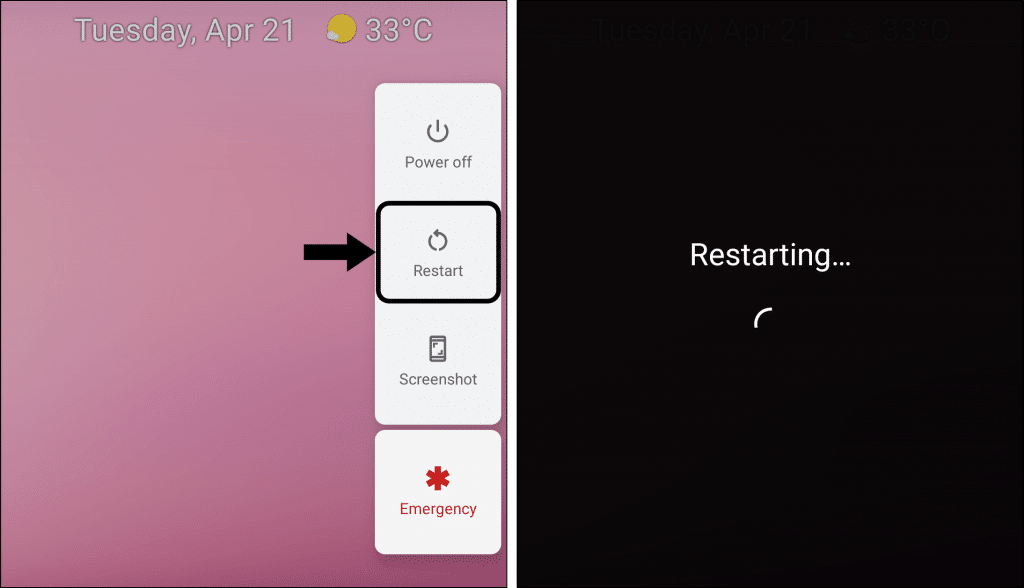
- First, locate, press and hold the power button on the side of your device for several seconds.
- A menu should appear after a few seconds with the Power Off option and Restart option.
- If you don’t find yourself having the Restart option, then click on Power Off. Otherwise, Restart would be the better choice for rebooting.
Ensure that The Do Not Disturb Mode Is Disabled
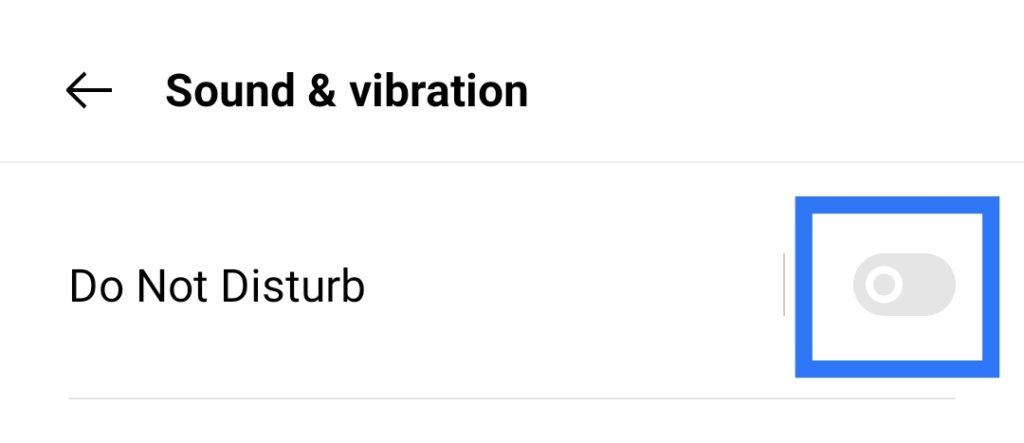
This problem may seem obvious. However, it is one of the most common causes for not receiving notifications. Once the Do Not Disturb setting has been disabled, you’ll receive all your notifications again.
Here are the steps on how to turn off Do Not Disturb:
- Firstly, go to your phone Settings.
- Following that, find and tap on the Sounds & Vibrations category.
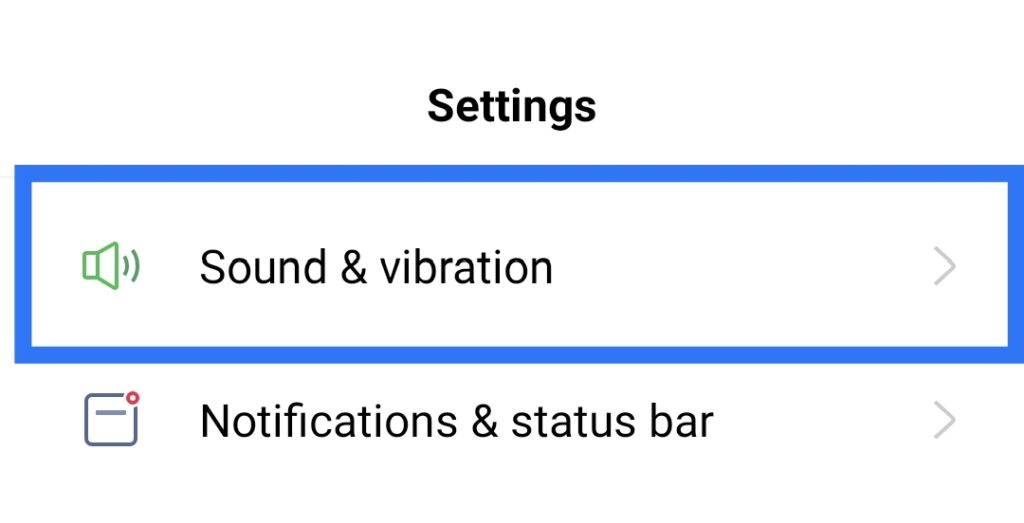
- Lastly, locate the Do Not Disturb mode and ensure the toggle is switched to Off.
Turn On or Refresh the App Notifications in the System Settings
If you find yourself unable to receive notifications from LinkedIn alone, the closest culprit that may have caused it would be the notification settings for the app.
Each app has its own set of permissions to access Android features, and Notifications are part of it. To check whether you’ve granted access to LinkedIn to utilize the push notification service or system and to send notifications, follow the steps below:
- First, open your phone’s Settings app.
- Secondly, tap Notifications > App Settings.
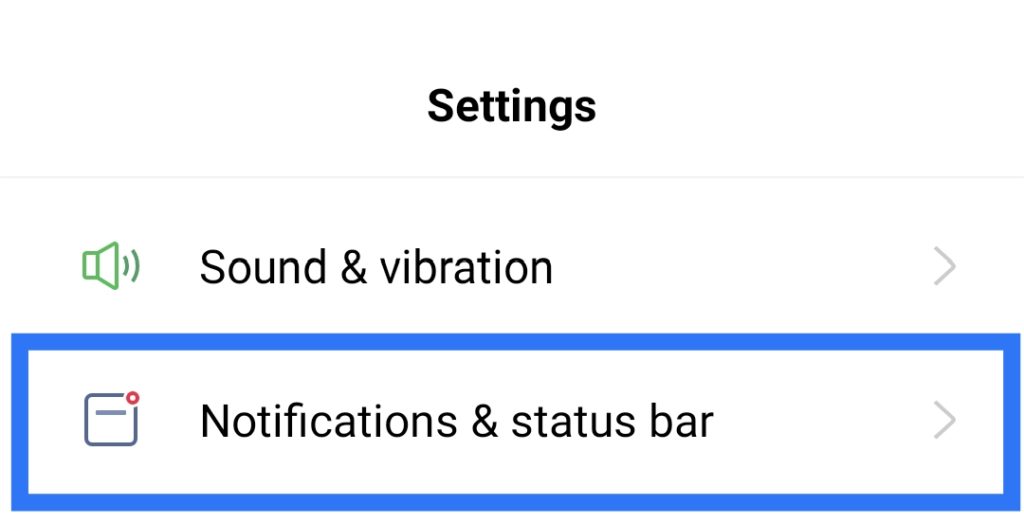
- Under “Most recent”, you can find apps you’ve accessed recently.
- Next, tap All apps to find more apps in the drop-down menu.
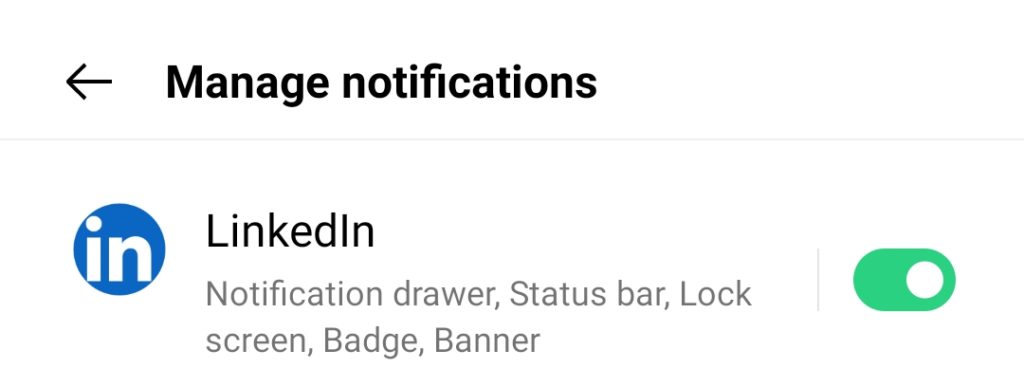
- Following that, find the LinkedIn app and tap on it.
- Finally, check to see whether the app’s notifications are turned On. If it is turned off, switch it to On. You can also refresh these settings by turning it off and then on again to see if that makes a difference to the LinkedIn push notification issue.
Clear the LinkedIn App Cache and Data
Every app has a cache that helps to store temporary files in our mobile phone and enhances the app performance.
Occasionally, excessive cache files can be outdated, corrupted or stored permanently elsewhere. All of these can cause the app to experience technical glitches, affecting the performance of the app. Hence, this cache could interfere with certain app functionality, including the push notifications.
To solve this issue, the following steps may be performed:
- Firstly, open Settings > Apps.
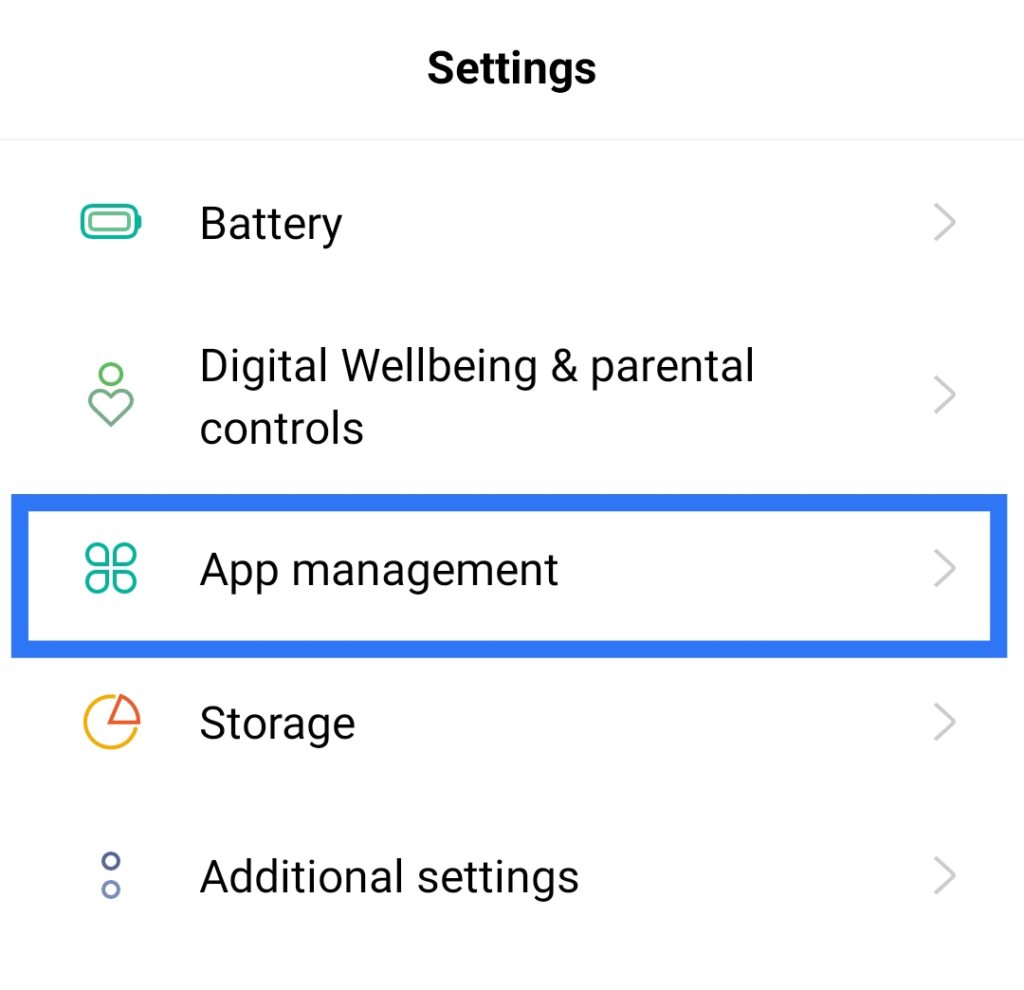
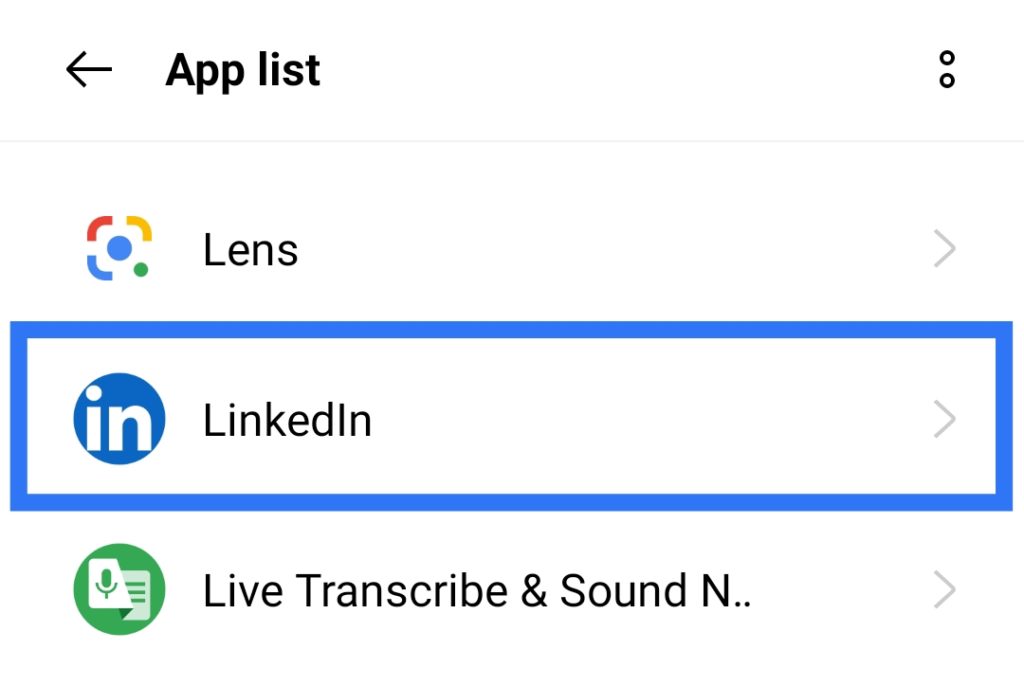
- Subsequently, select the app whose cache you want to clear, in this case, it’s LinkedIn.
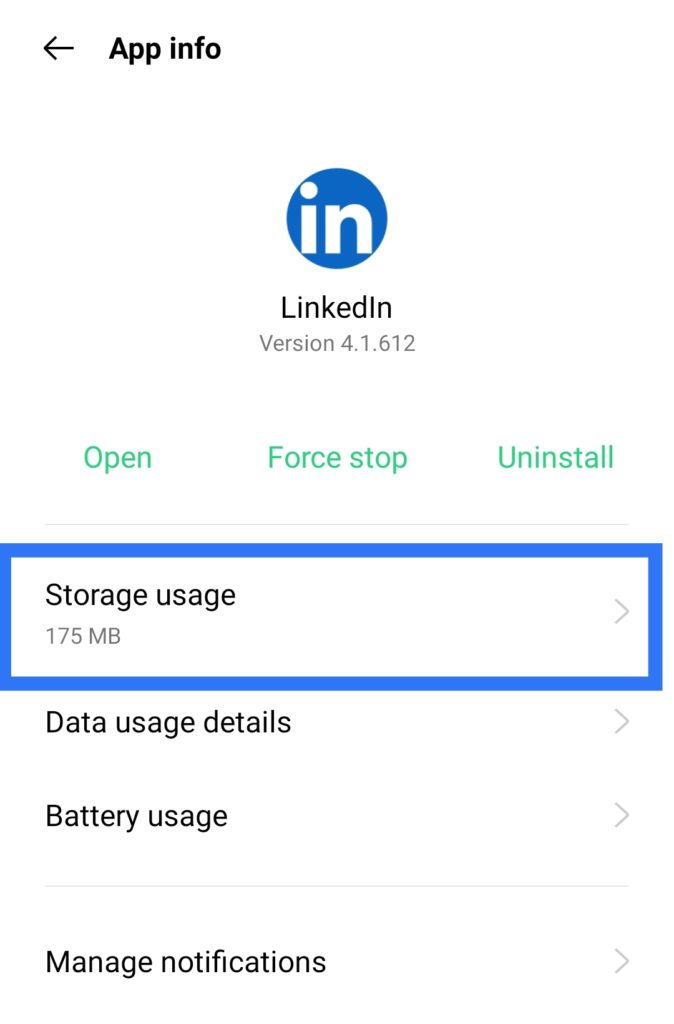
- Afterwards, tap Storage or Storage usage.
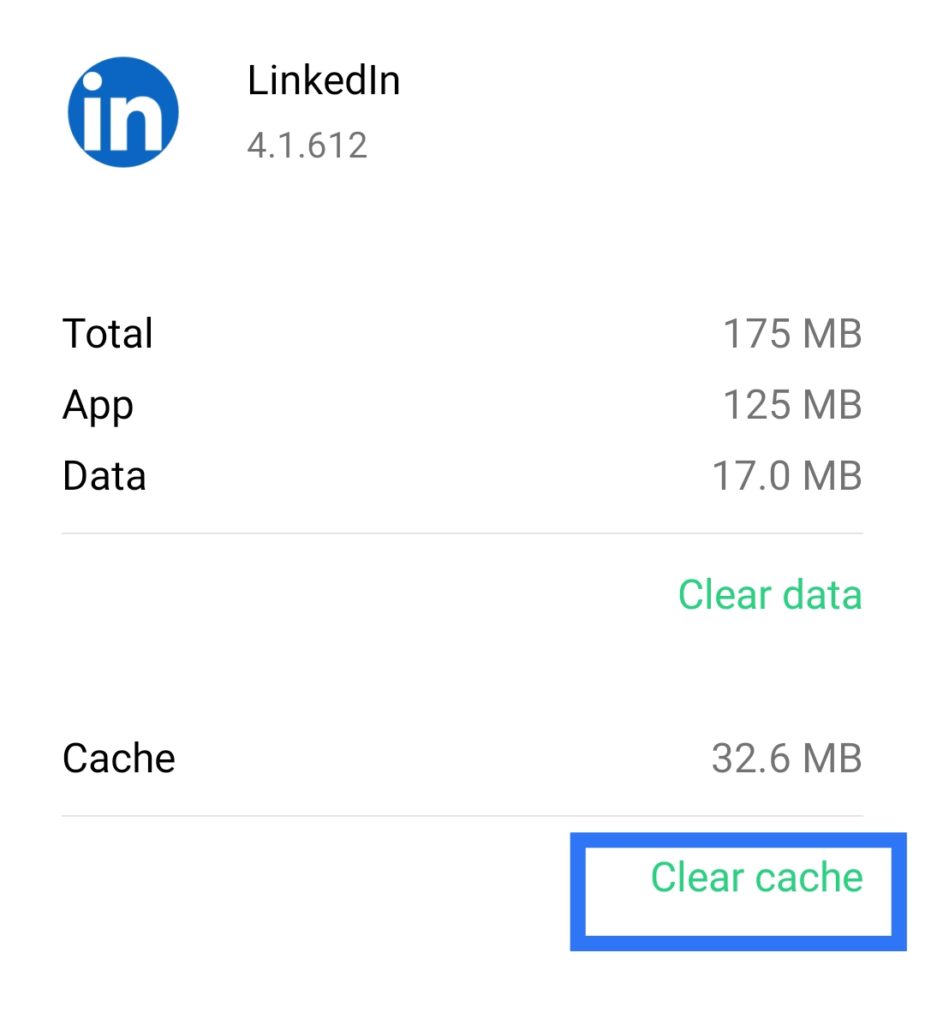
- Lastly, tap Clear Cache to clear the app’s cache. You can also choose Clear Data for a more thorough cleansing. However, do note that clearing the app data may require you to sign in to your account again.
Check Your Battery Saver Settings
When the device battery drops below a certain level, the power settings can be modified so it may disable certain apps/app features from running in the background.
Thus, Battery Saver Mode is a common cause of notification issues as well as running battery saver apps installed on your device. This leads to the potential blocking of app notifications when your Android battery is low.
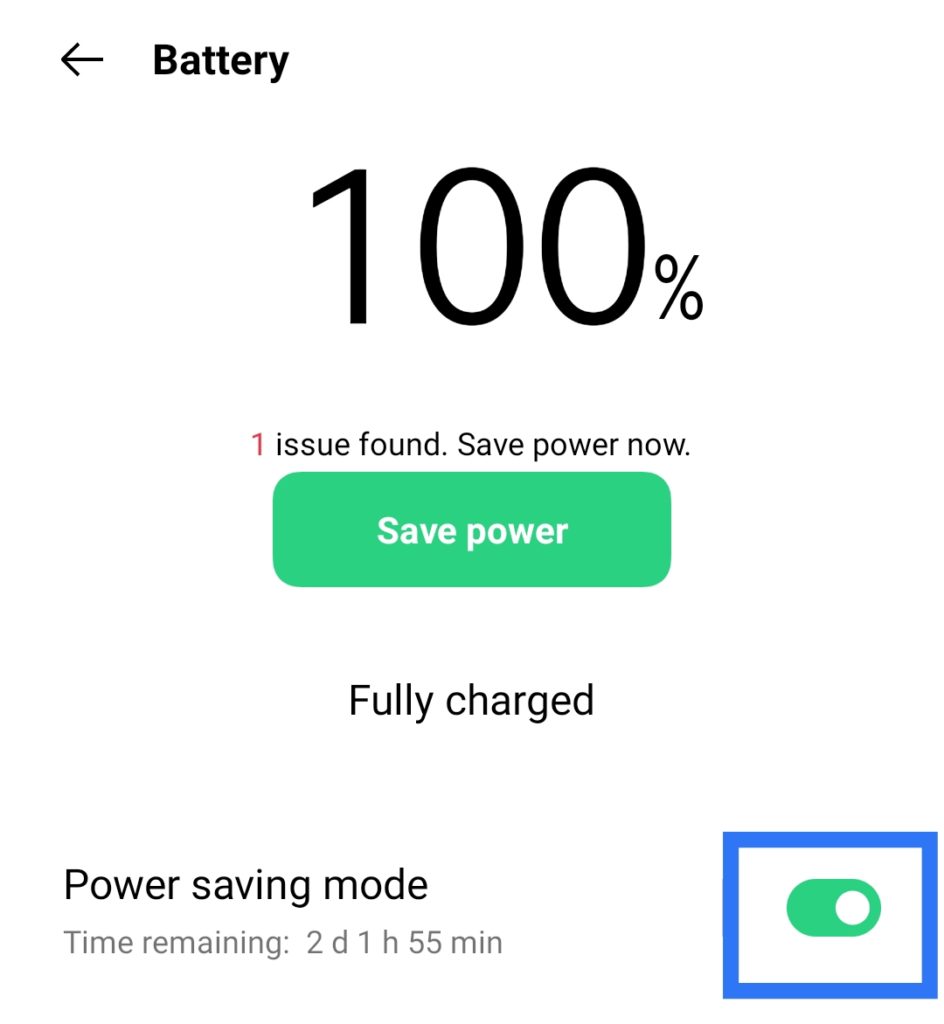
Follow these few steps to disable your Battery Saver Mode:
- First, find and tap on the Settings app.
- Next, scroll down and tap on Battery.
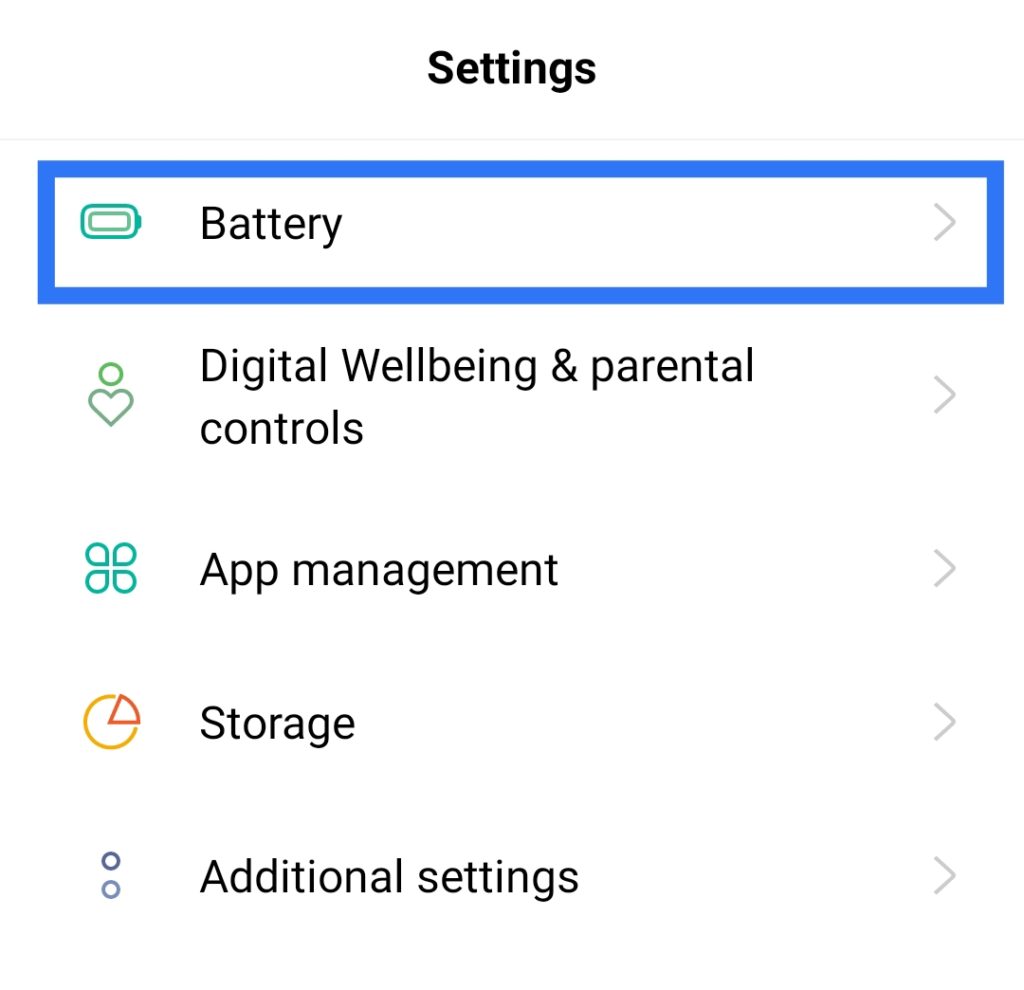
- Lastly, next to the Power Saving Mode option, switch the toggle to Off if you haven’t done so. If the switch is already turned off, that means Power Saving Mode is off.
7. Troubleshoot and Fix LinkedIn Mobile Push Notifications on iOS
LinkedIn notifications can sometimes be significant, especially when it involves a potential job opening. If you’ve confirmed the notification issue doesn’t fall on the LinkedIn app, oftentimes, it may be a potential problem with the setting configuration in our mobile device.
Whether the problem is limited to the app itself or the system, we’ve got you covered with these potential fixes for iOS devices you could try:
Restart Your iOS Device or iPhone
A minor software glitch can sometimes occur on your device, leading to a potential cause to your iPhone not receiving notifications.
Luckily, this problem can often be fixed by rebooting the device. To perform this, follow the steps provided below:
- First, locate the power button on the side of your iPhone.
- Following that, press and hold the power button for a few seconds, or press it along with the volume up button for newer models.
- Subsequently, there will be a slider that appears on the phone screen. Swipe it to the right to turn the device off.
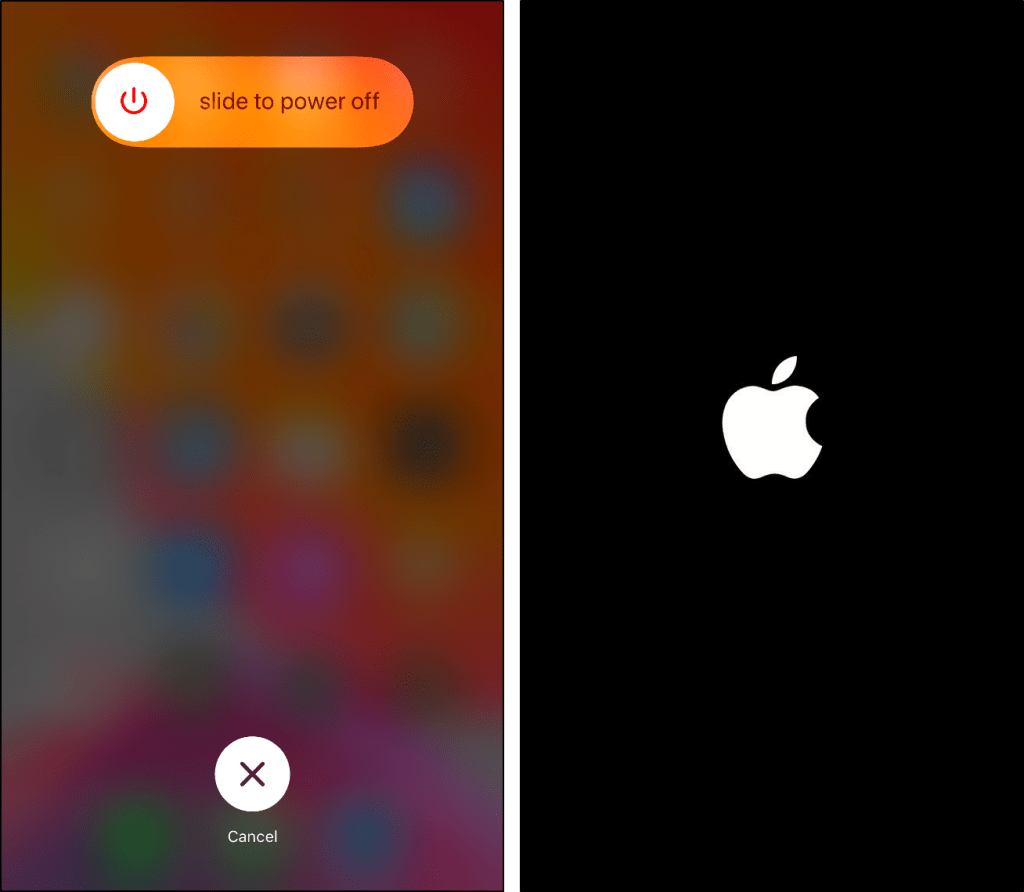
- Afterwards, wait for a minute or two before turning on your iPhone again.
- Finally, to turn your device back on, press and hold the power button at the side of the device until an Apple logo appears.
Disable Do Not Disturb or Focus Mode
Do Not Disturb and Focus mode are features on the iPhone that silences your device and allows you to focus on a specific activity better by muting notifications. Hence, when enabled, the user won’t receive alerts on any calls or notifications you receive. Therefore, make sure you didn’t enable Do Not Disturb or Focus mode by accident on your iOS device.
To disable Focus mode, here’s how:
- On your iPhone screen, swipe down from the top right corner to bring up the Control Center.

- If Focus mode is on, there will be a crescent moon icon to the left of your battery icon.
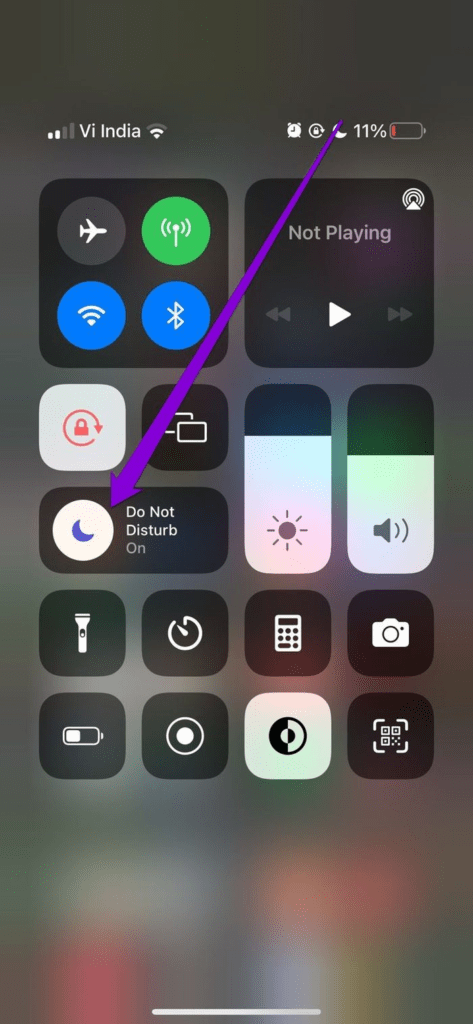
- Now, click on the crescent moon icon to disable Do Not Disturb or Focus mode.
Disable Scheduled Focus Mode
Besides disabling the Focus mode, we need to also ensure that the option isn’t adjusted to turn on according to schedule.
To disable this, we can follow these few steps:
- First, open the Settings app and go to Focus.
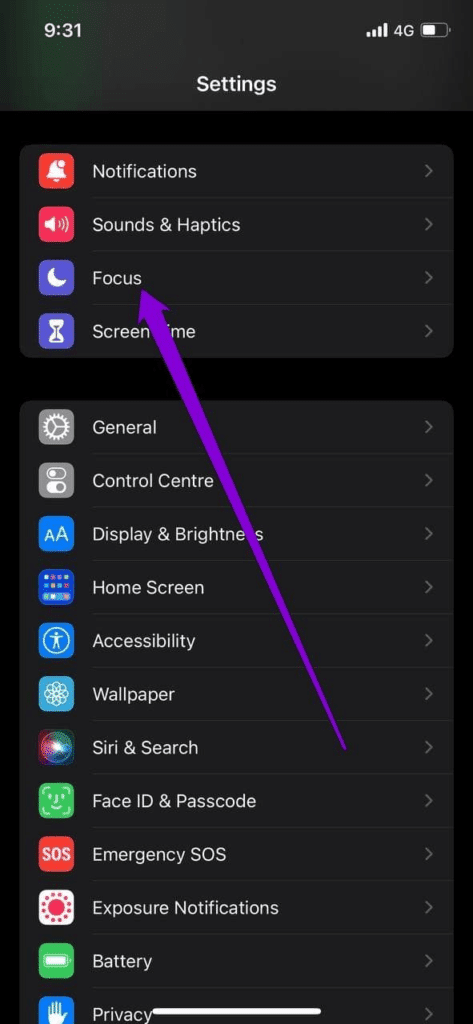
- Secondly, tap on the Do Not Disturb option.
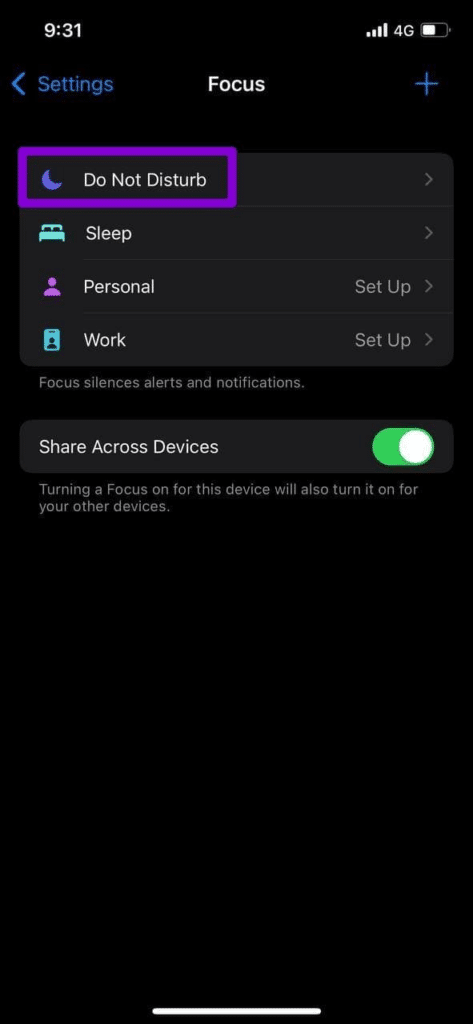
- Following that, scroll down to the Turn On Automatically section.
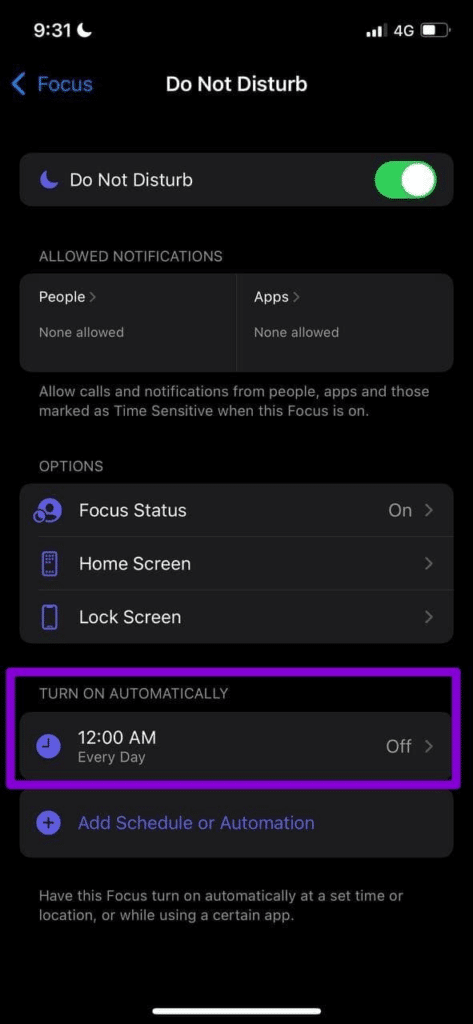
- Afterwards, disable any automatic trigger sets.
- Lastly, repeat the four steps above for the rest of your Focus profiles.
Turn Off Notification Scheduled Summary
Starting from iOS 15 onwards, Apple implemented many changes to how notifications are handled on the device. Notifications Summary falls under one of those changes.
When it’s enabled, this function can prevent certain apps from sending notifications. To check and disable this feature:
- Firstly, open Settings on your iPhone.
- Next, tap on Notifications.
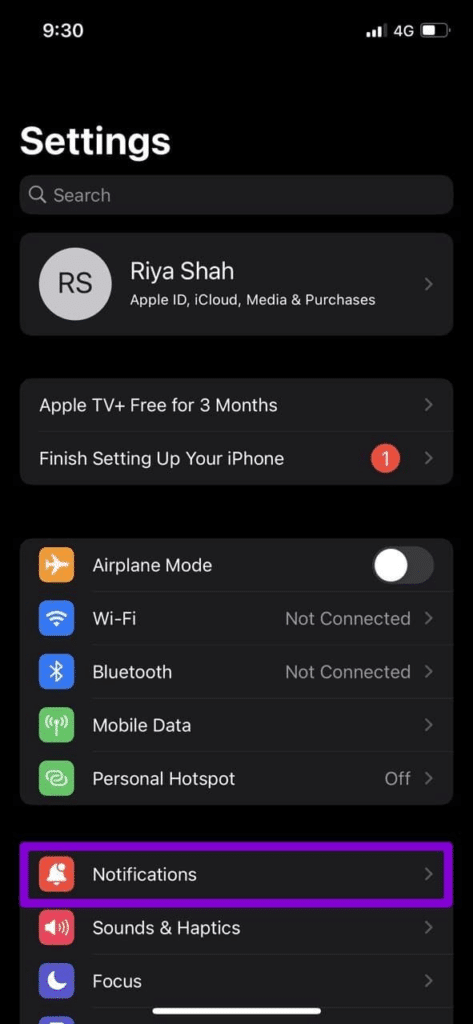
- Subsequently, there will be a Scheduled Summary item at the top of the page.
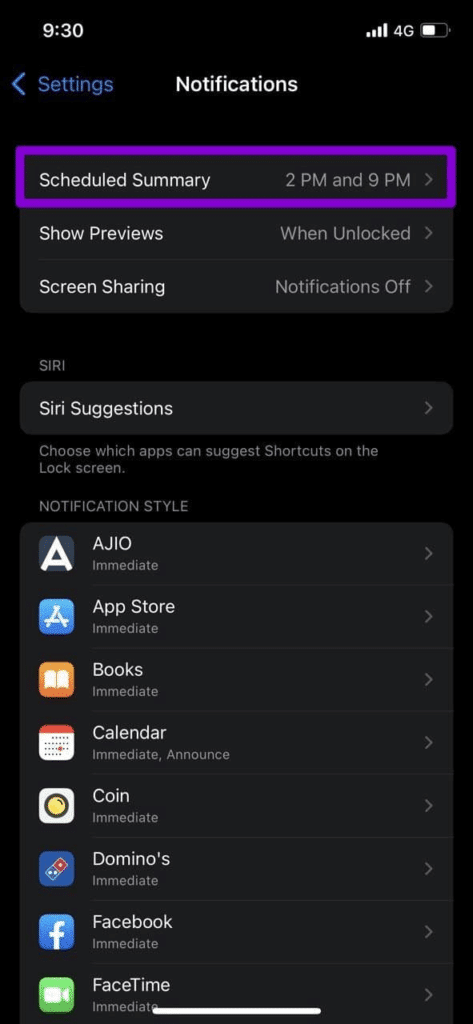
- Finally, toggle the item as Off.

Check or Turn On the App’s Notification Settings in the System Settings
If your notification problem only happens for one or two apps on your iPhone, you can try inspecting the specific app’s notification preference.
Follow the steps below to check:
- Launch the Settings app on your iPhone.
- After that, scroll down to locate and select the app for which notifications are not working, in this case, LinkedIn.

- Thirdly, tap on the Notifications option.

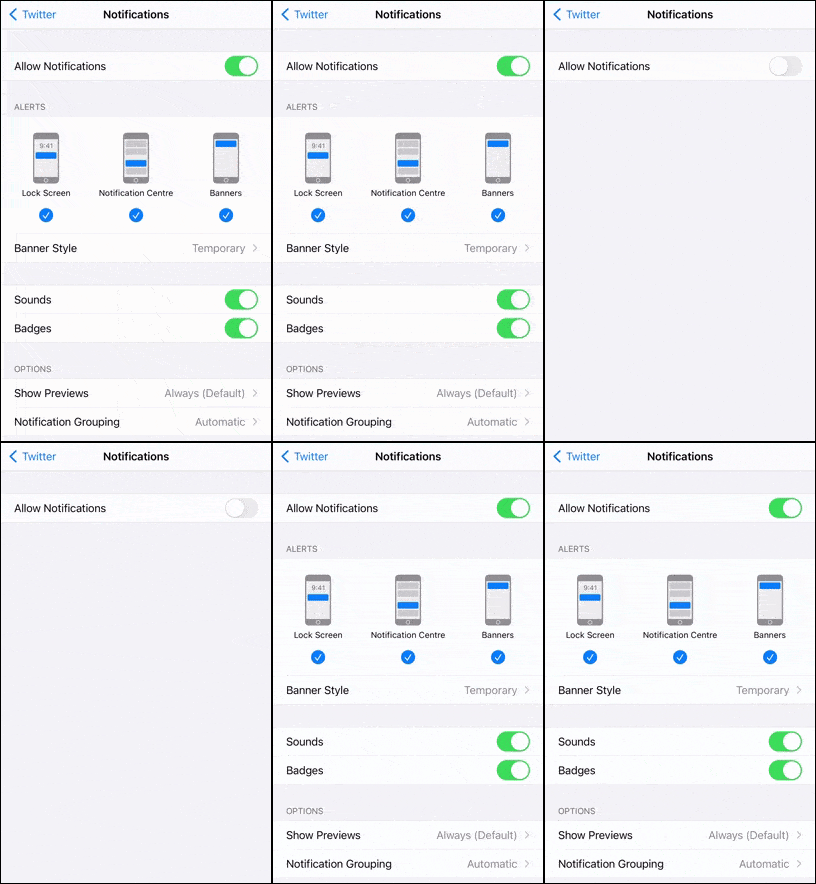
- Finally, toggle on the switch next to Allow Notifications to enable notifications for the app. If the switch is already on the right, notifications have already been enabled.
- Furthermore, ensure that the app is configured to push alerts immediately and show the notifications through the Lock Screen, Notification Center and Banners.
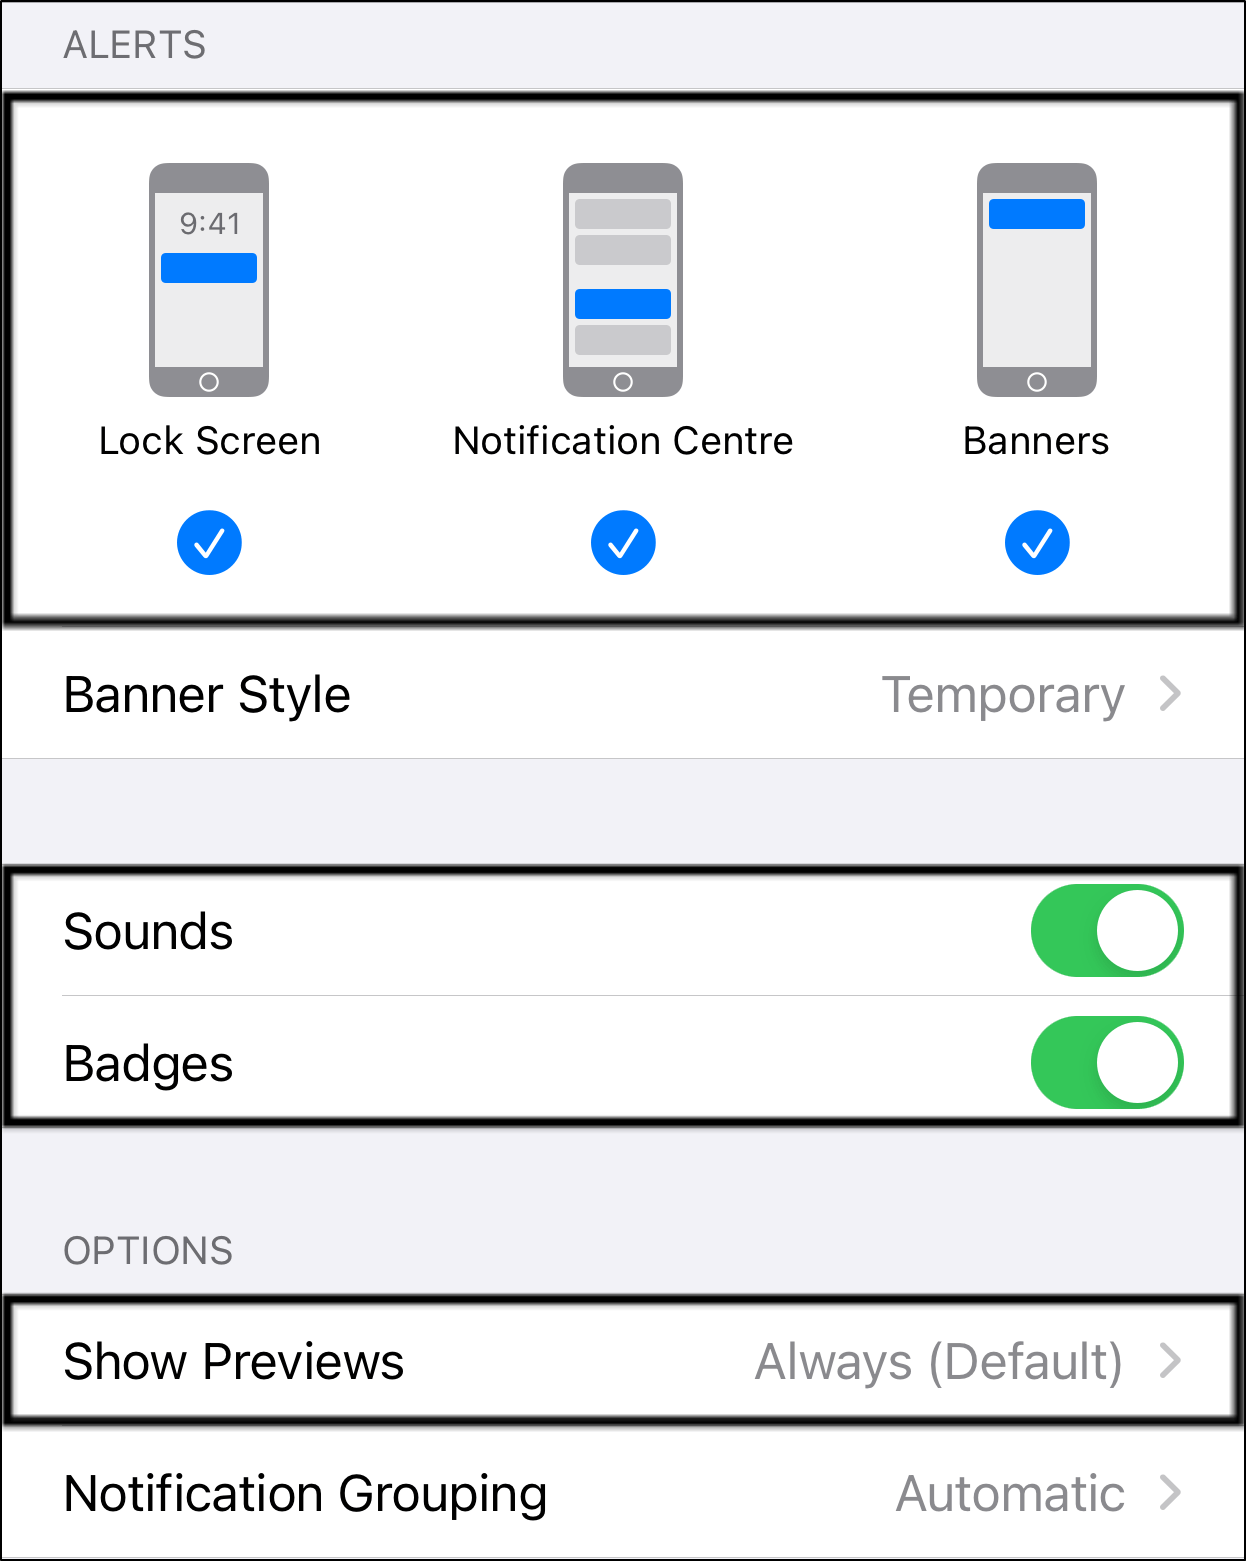
- You can also refresh these settings by turning it off and then on again, to see if that makes a difference to the LinkedIn push notification issue.
8. More Troubleshooting Steps for the LinkedIn App on Mobile Devices
If you’re experiencing a problem with LinkedIn’s mobile app and can’t find a solution on LinkedIn’s Help Center, you can try these basic device troubleshooting tips:
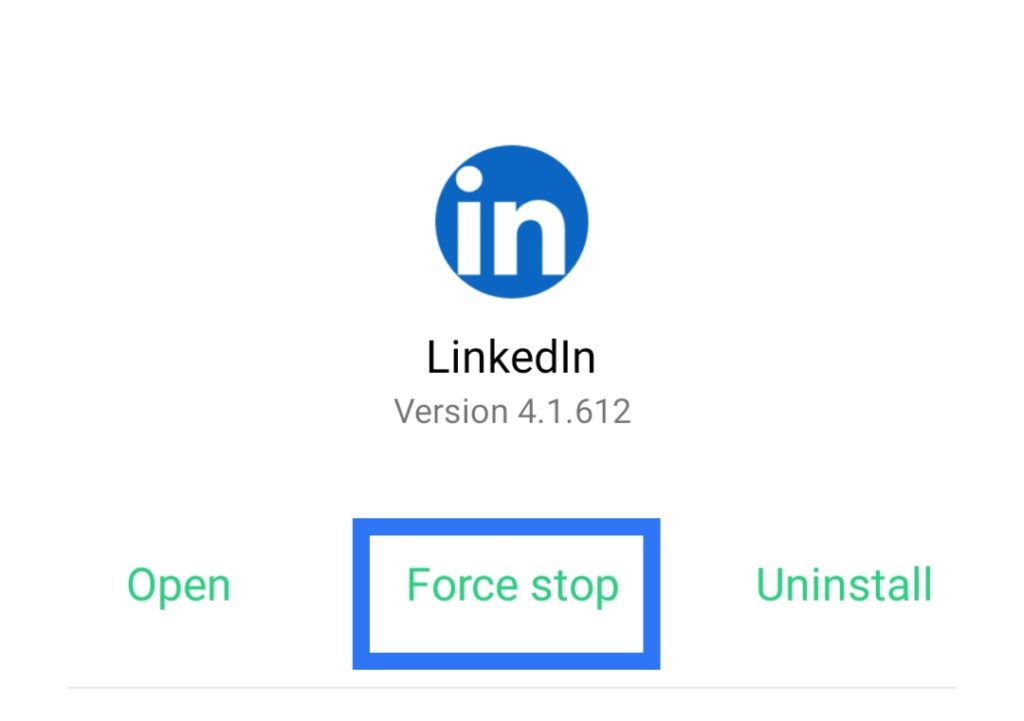
- Force Stop or Quit the LinkedIn app and then reopen it.
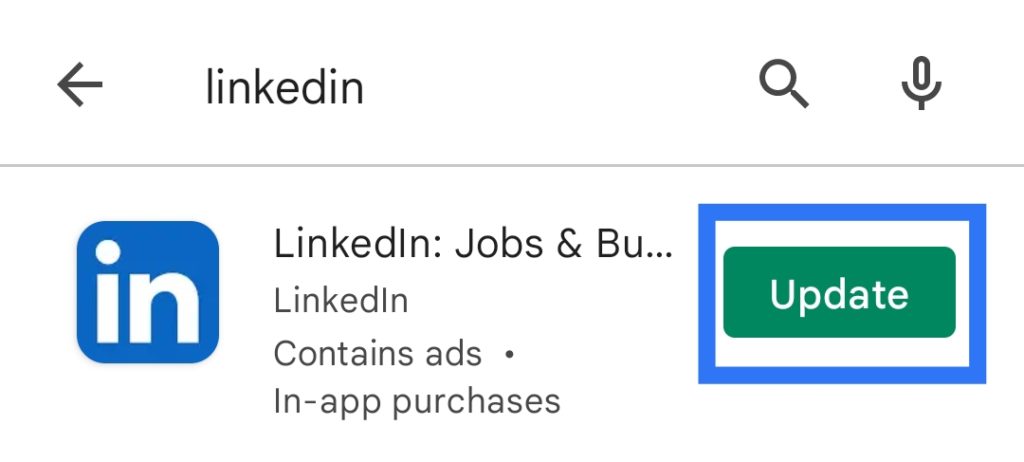
- Go to the Google Play Store (Android) or App Store (iOS) and check whether your LinkedIn app is updated to the latest version. On some occasions when a new update is available for the app, it is possible for the application to have bugs in the previous version that may be causing the notification issues.
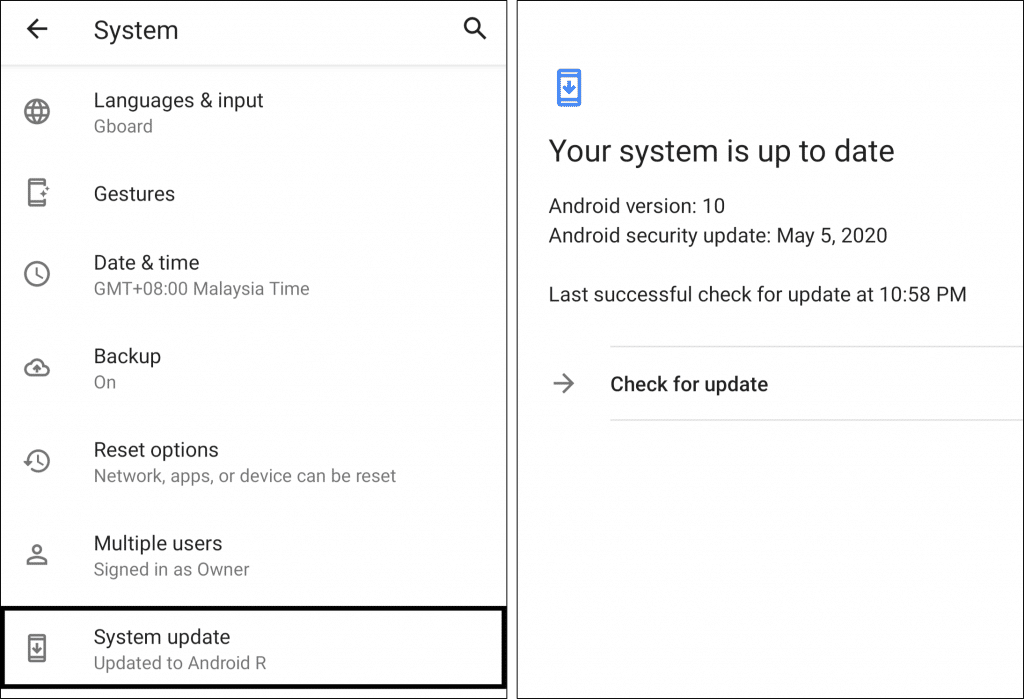
- Go to your phone settings and ensure you’ve downloaded your device’s latest Android OS or iOS version. It is possible that the issue with your device’s push notification system or service has been addressed in that software update.

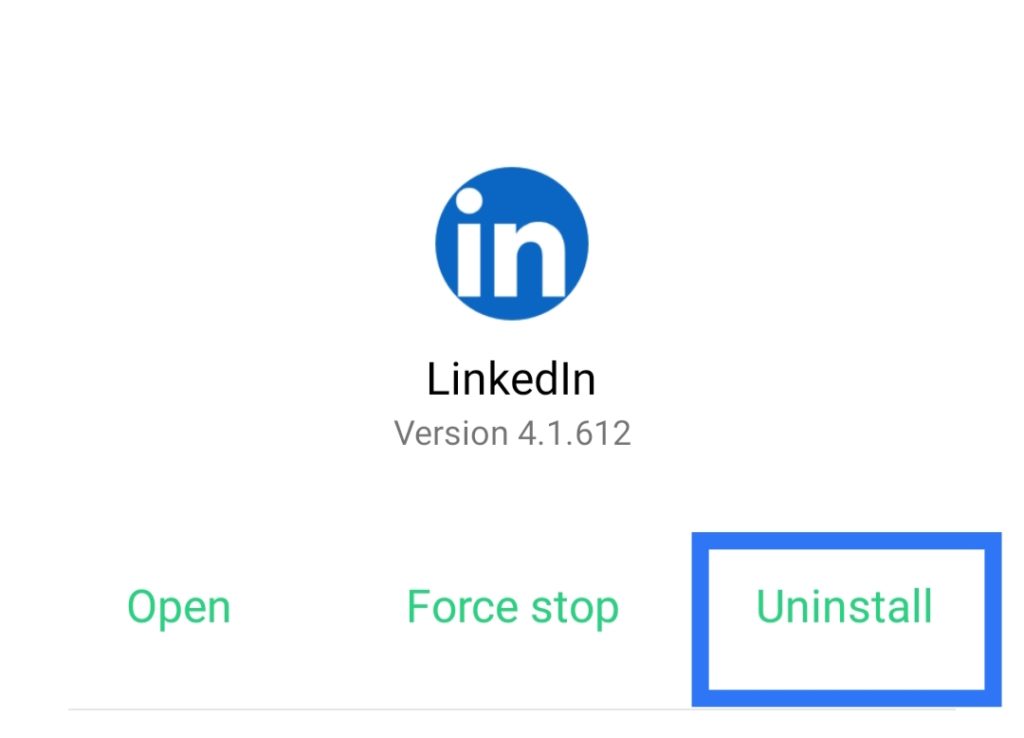
- Delete the LinkedIn app from your device, and head to Google Play Store/App Store to reinstall the app.
9. Enable Notifications on Profile Changes
Notifying your network of profile changes that you’ve made is an important tool that can potentially help you in the long run. For example, if you’ve notified your network that you’re currently looking for a job, one of them might get in touch to offer you a job opening of your expertise.
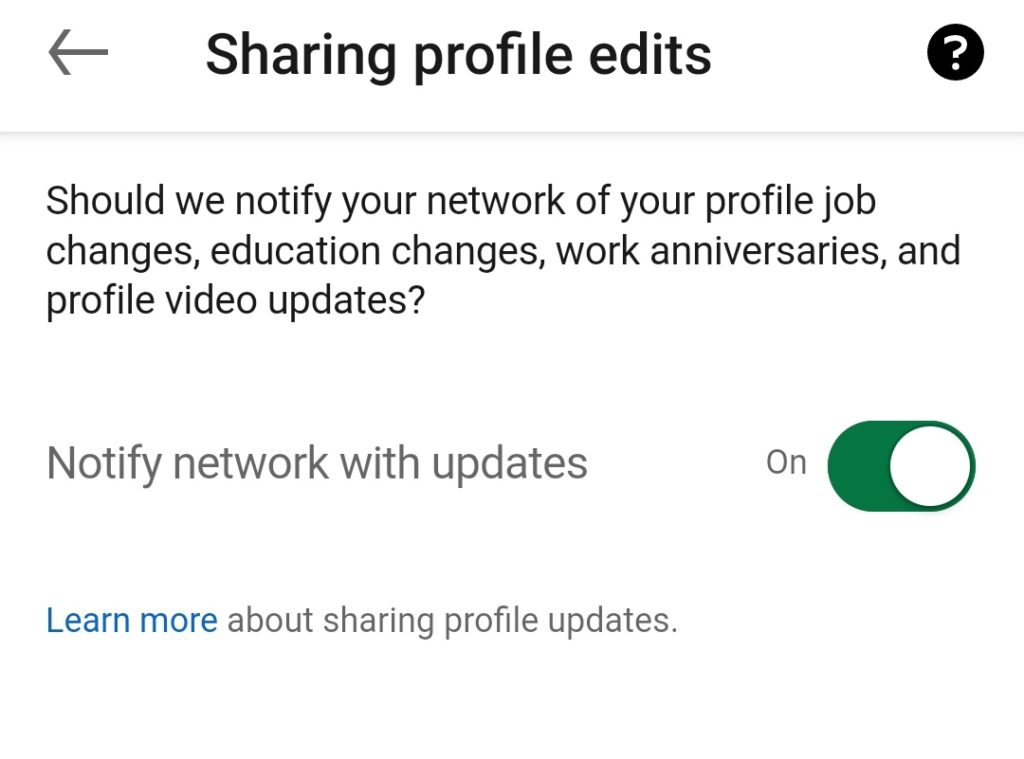
LinkedIn allows users to choose the items that they want to notify the network such as: job changes, education changes, work anniversaries, and profile video updates. Profile change notification may be enabled via a post in your network feed, an email notification or an in-app notification.
Without further ado, let’s get started on how to enable notifications sent to your network about profile changes:
For Desktop (Windows & macOS)
- First, click the Me icon at the top of your LinkedIn homepage.

- Secondly, select Settings & Privacy from the drop-down.

- Following that, click on the Visibility tab on the left side.
- Under Visibility of your LinkedIn activity, click Change next to Share profile updates with your network.
- Lastly, switch the toggle to Yes if you want to share your profile edits or No if you want to stop sharing your profile edits.
For Mobile (Android & iOS)
- First, tap your profile picture, then tap Settings.

- Next, tap Visibility.
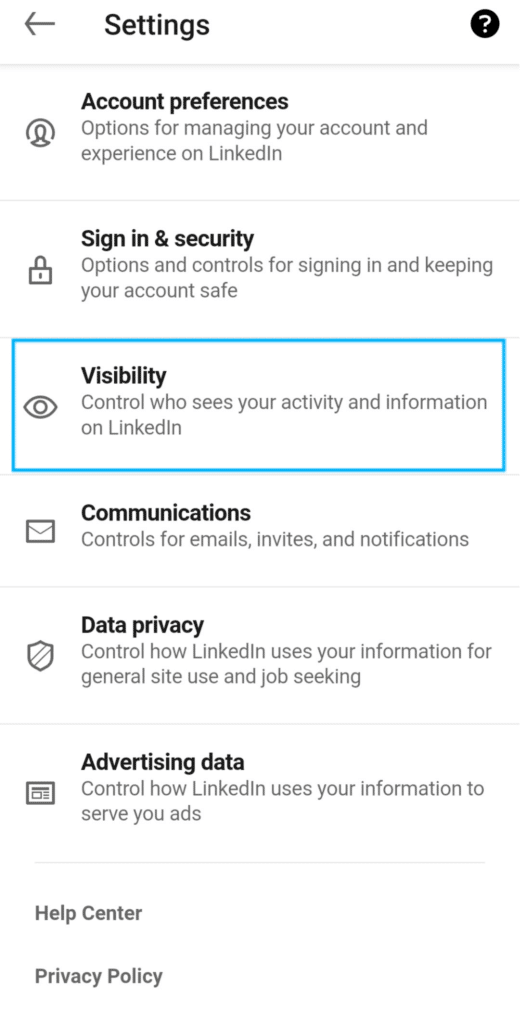
- Subsequently, under Visibility of your LinkedIn activity, tap Share profile updates with your network.
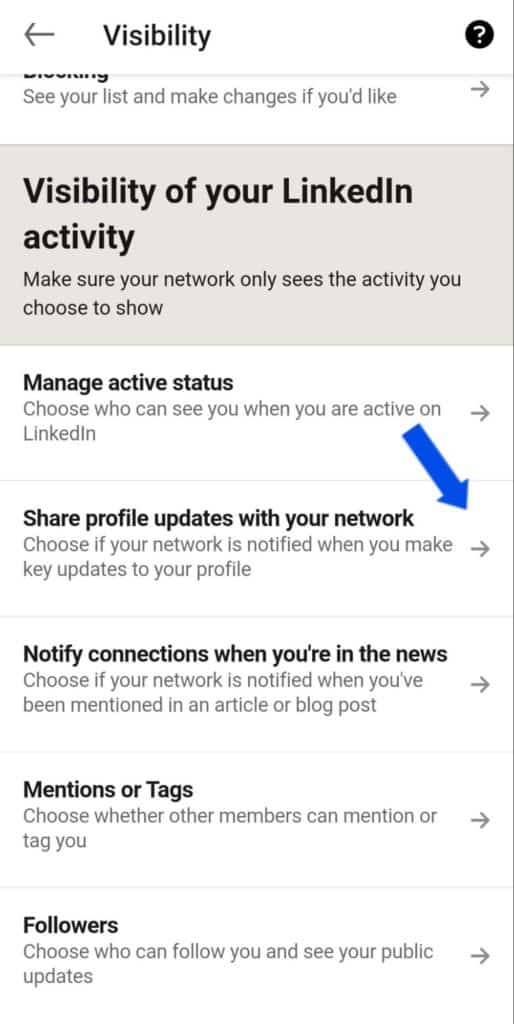
- Finally, switch the toggle to On to share your profile edits and Off to stop sharing your profile edits.
For the Mobile Web Browser and Lite App
- First, tap the Me icon and tap Settings near the upper-right.

- Following that, tap Visibility.

- After that, under Visibility of your LinkedIn activity, tap Share profile updates with your network.

- Lastly, switch the toggle to On to share your profile edits and Off to stop sharing your profile edits.

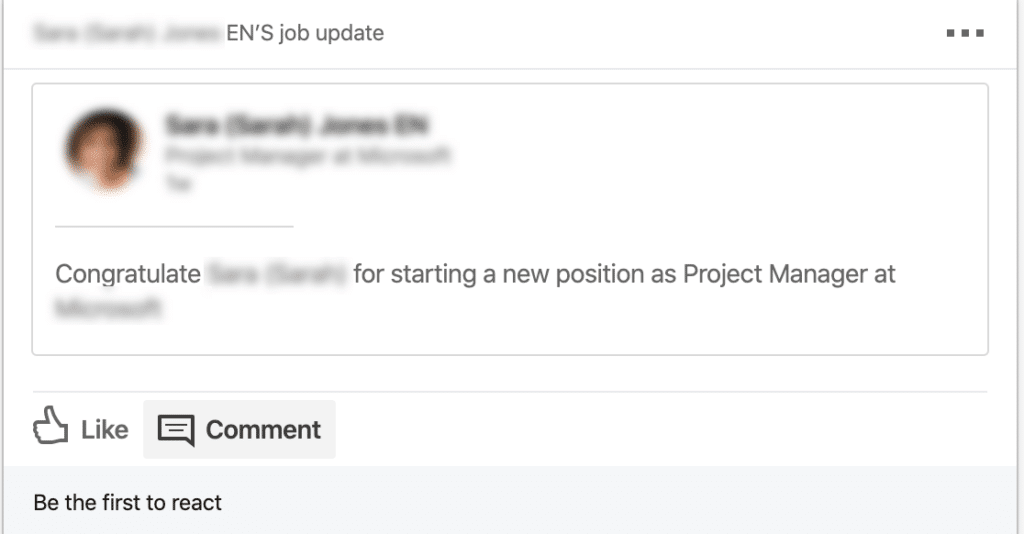
Once you’re done editing, you can check whether the notification is generated under the Recent Activity section on your profile.
Important notes to consider when you try and enable profile change notification:
- Job updates may take up to two hours to get shared with your network.
- Education updates may take up to a month to get shared with your network.
- Work anniversary notifications are usually sent within the same month.
- Editing or deleting the update can affect the notification generation.
- Even if you enable sharing to your network, some types of profile edits still won’t generate notifications. Notification settings can only be generated for your job changes, education changes, promotions and work anniversaries.
- Anyone viewing your profile can immediately see your edits even though you didn’t choose to notify your network about any changes made.
All changes you’ve made to your profile and all recent posts shared will appear in the Your activity section on LinkedIn. It will also determine the type of content that will be displayed on your LinkedIn feed.
Updating your profile or hitting a professional milestone are all visible to your connections in Recent Activity. So, a few changes to your LinkedIn account that may trigger updates include:
- Adding or editing a new/current job position
- Current work experience anniversaries
- Birthday anniversaries
If the option to share profile edits is turned off, it will eliminate notifications about profile changes to your own network. However, it does not hide the Activity section from your profile.
10. Log Out and Log Back In to Your LinkedIn Account
Moving on, this simple step can help to refresh your account sign-in information and resolve various miscellaneous app issues, including this notifications error. Therefore the following are the general steps to re-signing in to your LinkedIn account:
For Desktop (Windows & macOS)
- On the LinkedIn homepage, click the Me icon at the top-right corner.
- Following that, select Sign Out.
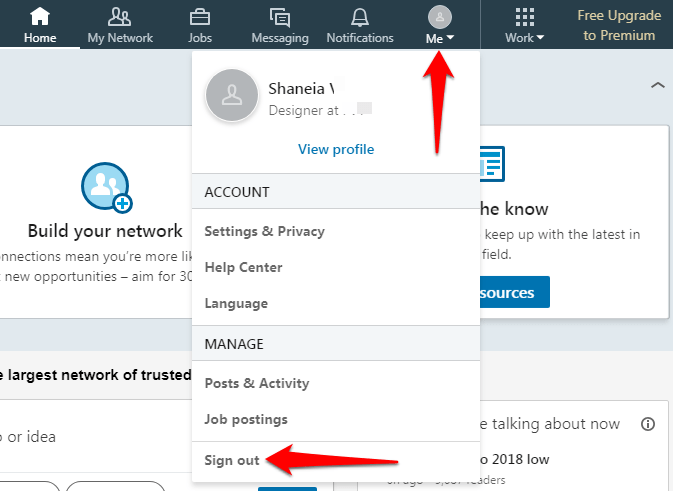
- Once you’re completely signed out, you can click Sign in again. Also, note that passwords are case sensitive and should be at least 6 characters long.
For Mobile (Android & iOS Mobile App), Mobile Browser & Lite App
- First, tap the Me icon and tap Settings near the upper-left.

- After that, scroll down and tap Sign Out.

- Once you’re logged out, you can simply Sign in again after entering your account’s login credentials.
After you’ve logged back in, check to see if the problem persists.
11. Use a Different Web Browser to Access LinkedIn
Sometimes, the browser notification issue could be related to the web browser you’re currently using. So, head over to LinkedIn’s website using a different web browser that you don’t often use.
For example, if you’ve been using Chrome as your primary browser, you could try using Safari or Firefox to sign into your LinkedIn account instead.
If the notification from LinkedIn pops up in your secondary web browser, chances are your primary browser needs to be updated. To check whether your browser is up-to-date, you may refer to the following guides:
After ensuring your browser is installed to the latest version, inspect your browser’s pop-up blocker and disable it. Oftentimes, this can affect a few LinkedIn features, preventing you from seeing or performing certain actions.
12. Clear the Web Browser Cache and Cookies
This is another fix to try if you’re encountering issues with receiving browser notifications from the LinkedIn platform. When we first visit a website, our web browser will automatically save pieces of the site. This allows the browser to display files stored in the cache rather than requesting and pulling the files from a server, speeding up the website load time.
However, the troublesome part comes when web developers want to update the files that incorporate part of the website you visit. If they try to change your file stored in the cache, it will be unsuccessful. The old cached file will keep getting pulled, preventing any new updates from appearing on the site.
This causes problems such as browser run time errors, buttons missing from the page or a specific function that doesn’t respond as intended. There is a possibility your LinkedIn is experiencing the same issue if your browser cache hasn’t been cleared for an extended period of time.
For this fix, it’d be best to write all your saved login credentials from your web browser onto a paper or notepad. After performing this precautionary step, you can sign out from LinkedIn and clear your web browser’s cache and cookies. This will cause all data to be wiped from the browser and sign you out from all websites.
For Windows
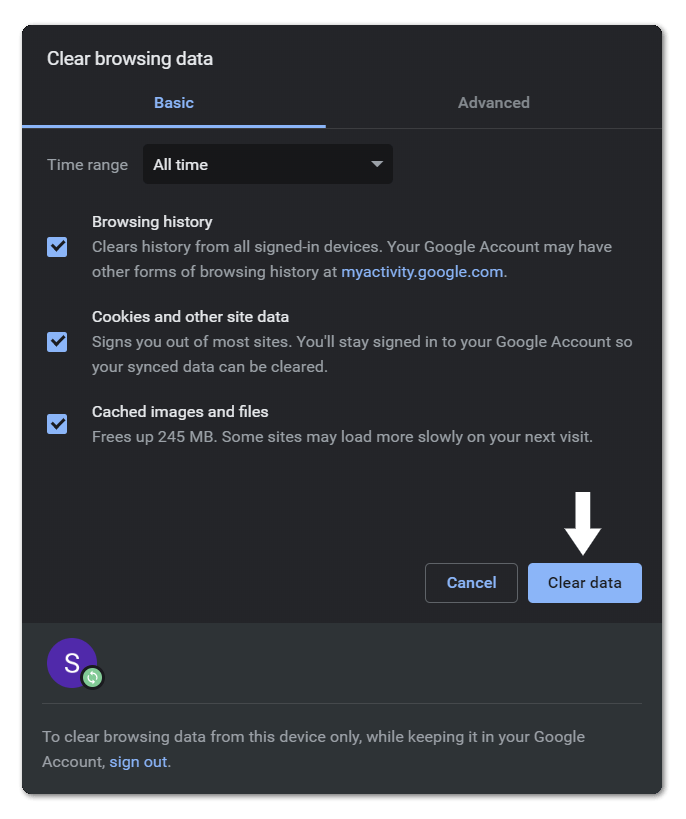
On Google Chrome, here are a few steps on how to clear your browsing data, which are similar to other Windows web browsers:
- On your device, open Chrome.
- Following that, at the top right corner, click More.
- Afterwards, click More tools → Clear browsing data.
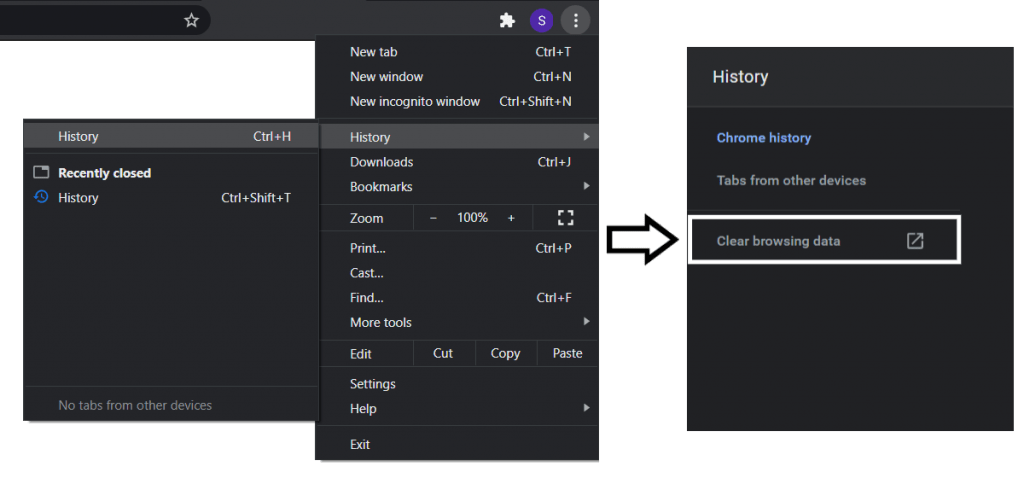
- Fourthly, pick a time range, either Last hour or All time.
- Subsequently, select the type of information you want to delete.
- Lastly, click Clear data.
For Mozilla Firefox, here are a few steps to clear your browsing data:
- After opening Mozilla Firefox, click on the menu button to open the menu panel.
- Following that, click History → Clear Recent History.
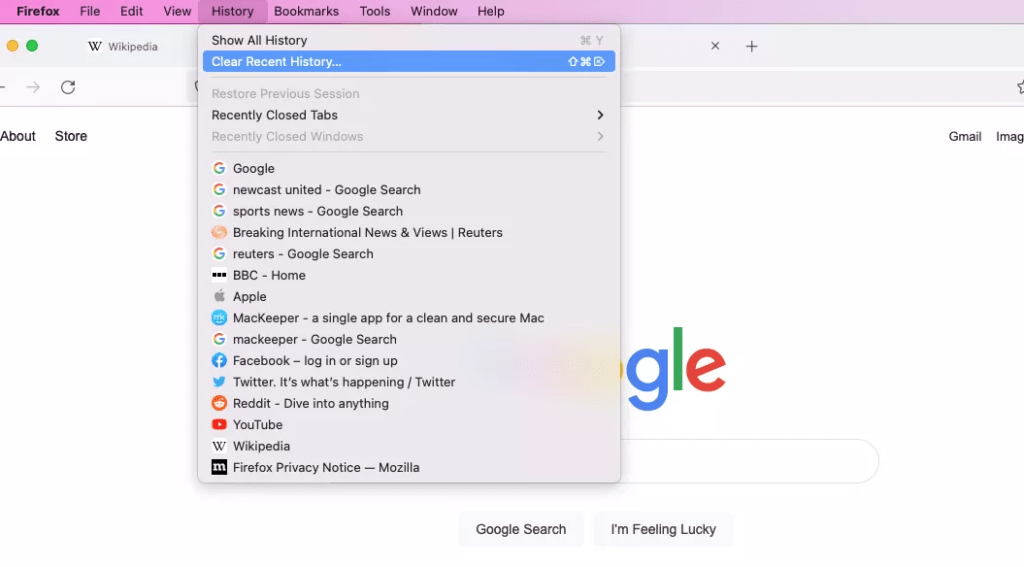
- Afterwards, select how much history you want to remove.
- Click the drop-down menu next to Time range to clear, the options vary from the last hour, the last two hours, the last four hours, the current day or everything.
- Checkboxes are provided for you to select what information you want removed from your browser’s history.
- Lastly, click the OK button. All the items you’ve selected will be cleared from your browsing history.

For macOS
On Safari for macOS devices, here are a few steps to clear your browsing data:
- On your Mac, open the Safari app.
- After that, choose History → Clear History.

- Next, click the pop-up menu.
- Finally, pick how far you want to clear your browsing data and click Clear History.

Next, go on LinkedIn and sign back into your account to check if the problem still occurs.
13. Find Answers on LinkedIn’s Help Center
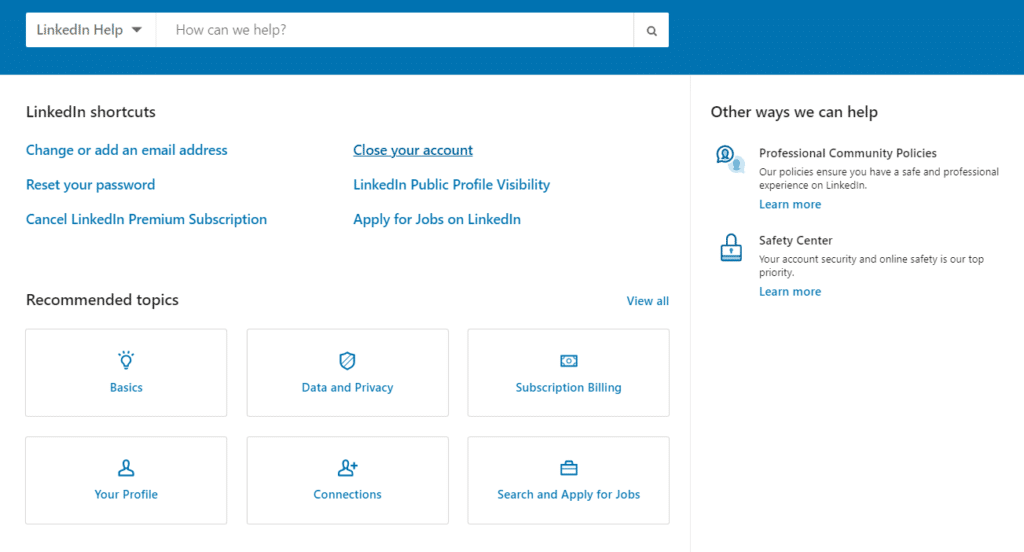
With LinkedIn’s Help Center, you can take advantage of its troubleshooting resources and perhaps find a solution to your problem.
Once you’ve navigated to the help centre’s web page, you can enter keywords relating to the problem you’re experiencing in the search bar. Next, click on the magnifying glass icon to acquire articles that may benefit your problem.
14. Find Answers on LinkedIn’s Help Forum
LinkedIn has many platforms for users to search for solutions to their various LinkedIn problems. One of these platforms is its own Help Forum. If you post a topic or an issue regarding LinkedIn, you may have your answer directly answered by one of LinkedIn’s support members (moderators).
A search field is provided in the Help Forum, you can use it to search a keyword or phrase to see whether a topic about your LinkedIn problem has already been posted and answered in the forums.
If you can’t find any existing forums related to your problem, select Start a New Forum Discussion to post a new discussion topic.
Once you’ve posted the forum, another user or LinkedIn support member could contact and answer your question in as little as an hour if you’re lucky.
15. Contact LinkedIn About the Issue
If you’ve tried applying all the suggested fixes mentioned above and still can’t resolve the issue, there is LinkedIn’s Contact Us form as a last resort. Once you’ve filled in your details and explained the problem in the form, you’ll be directly in touch with a LinkedIn representative. Besides that, you can also email LinkedIn’s customer support team at linkedin_support@cs.linkedin.com.
Do note that your account credentials might be needed for them to assess the issue you’re experiencing.
The time taken to hear a reply from the representative is unclear, but you can always view your open cases and their status at LinkedIn.com/Help/LinkedIn/Cases.
Conclusion
In summary, we’ve discussed a few potential causes for notification problems on LinkedIn. This article discussed how it could potentially be our LinkedIn app not up-to-date, a server-side issue or a device-related error.
LinkedIn is a popular platform that is well-known around the world. It can help you connect with millions of people worldwide, upbring your skills to a higher level and land a job you’ve always dreamed of.
We understand that notification problems in LinkedIn are a major obstacle that hinders us from having the full user experience and causes many of us to miss out on potential job opportunities.
Hence, we’ve come up with this guide filled with 15 fixes to solve different types of LinkedIn notifications problems, such as job alerts, profile updates and push update notifications on Linkedin not working etc.
Keep in mind to always check whether it’s an issue on LinkedIn’s side before concluding it’s a problem from your side. If the issue does fall on LinkedIn’s end, try to log back in after a few hours to see whether the issue has been solved.
Lastly, let us know in the comments below:
- What LinkedIn notification problem do you face? Feel free to share your struggles down below!
- Did any of the above fixes work for you?
- Are there any fixes we’ve missed out on and could be added to the list?
- What other LinkedIn problems do you think we should create a guide for?
Feel free to share this with someone you know who might be facing notification issues with LinkedIn! 😊
