
Does your Microsoft Teams app keep lagging or freezing while you’re in a meeting?
Despite tough competition with services like Zoom and Google Meet, Microsoft Teams managed to secure its place among the best video calling platforms. There are many reasons to choose Microsoft Teams over other video calling services. But, we’ve also found a couple of reasons that may hinder Microsoft Teams users, such as its laggy and unresponsive user interface.
You may have also experienced lag issues with the Microsoft Teams app during long and hectic meetings. For instance, the videos of other participants’ starts stuttering and lagging, or even sometimes the app stops responding or freezes between the calls, causing the system to crash 😡.
If you’re going through the same issues with the Microsoft Teams application repeatedly, it’s time to overcome them with the help of some troubleshooting. Here in this tutorial, we’ve mentioned 24 troubleshooting methods 🛠️ that can stop the Microsoft Teams app from freezing and lagging again and again.
Note: This troubleshooting guide mentions solutions for all devices where the Microsoft Teams app and the website are easily accessible, such as Windows, macOS, Android, and iPhone (iOS).
If you find that the Microsoft Teams app keeps crashing, not responding or has stopped working on your end, you can check this guide of ours with 14 fixes to resolve similar app issues.
What Are the Reasons Behind the Microsoft Teams Lagging & Freezing Problem?
According to our understanding, the issue is most likely because of internet issues. It could be possible that the speed of the internet is either slow or unstable. As a result, the Microsoft Teams app is unable to function correctly.
Besides this, there could be more reasons for this issue, and the below-mentioned could be those:
- Low CPU Resources Available (Step 1)
- Higher Screen Resolution (Step 8)
- GPU Hardware Acceleration Causing Issues (Step 11)
- Higher Video Settings (Step 15)
- Outdated Display Adapters (Step 19)
24 Fixes if Microsoft Teams Keeps Lagging & Freezing
Before trying the below-mentioned solutions with the Teams app, it’s better to ensure that the internet speed is stable and fair to attend and host meetings on the Teams app. You can run a quick internet speed test at speedtest.net and check if your connection is experiencing low speeds or latency.
According to Microsoft, the minimum bandwidth for peer-to-peer video calling in 720P is 1.2Mbps, and 1.5Mbps for video calls at 1080P. In addition, it requires a minimum bandwidth of 1Mbps/2Mbps for HD group video calling. You can read more about the internet speed requirements to use Microsoft Teams by clicking Here.
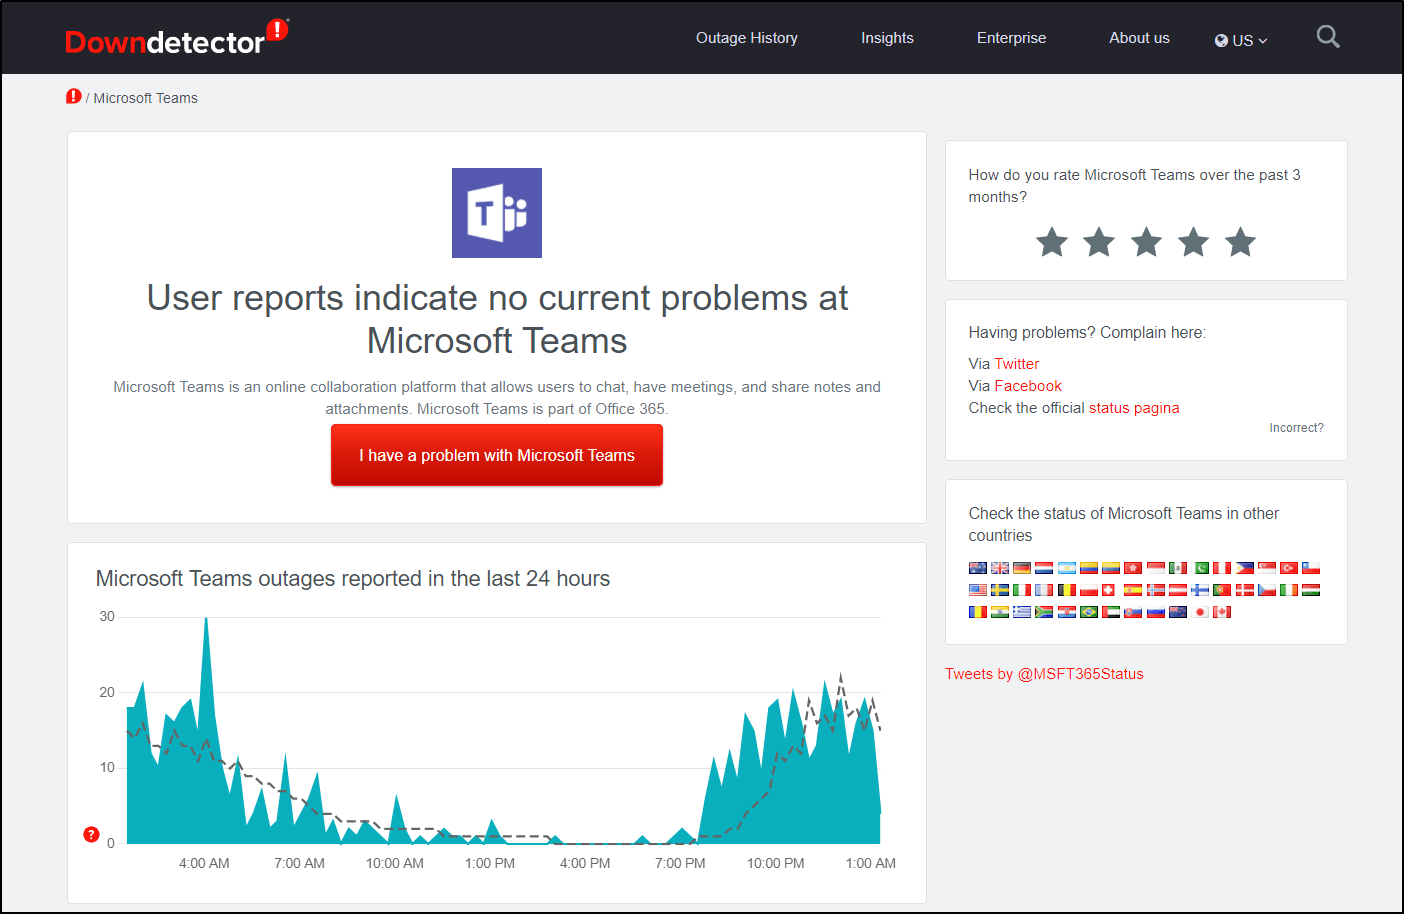
You can also check the server status of Microsoft Teams using DownDetector to confirm that the issue isn’t from the server side.
Once the above mentioned checks are done, you can start implementing the following troubleshooting methods ⬇️ to resolve the problem.
1. Close Unnecessary Applications
It’s always recommended to stop applications from running in the background when they’re not in use. Otherwise, they’ll keep consuming system resources, and other programs won’t get enough resources to perform their tasks correctly.
Similarly, you need to close all the irrelevant applications running in the background to ensure that Microsoft Teams is getting enough resources to run correctly.
It’s pretty simple to close background apps, and the below-mentioned steps demonstrate the same:
For Desktop Users (Windows & macOS)
For Windows
- Start with opening the Task Manager app using the combination of the keyboard’s Ctrl + Shift + Esc keys.
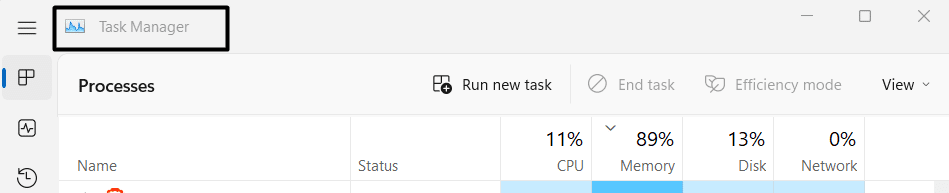
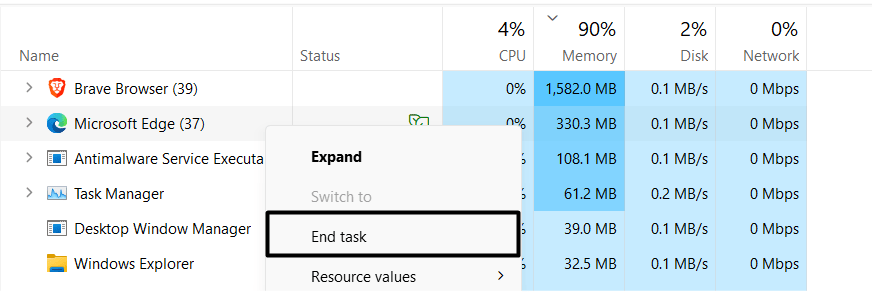
- We assume you only need the Microsoft Teams app; the other background apps aren’t needed now. So, search for an application in the Processes section currently running in the background but not in use. After finding the application, right-click on it to get the option to close its tasks.
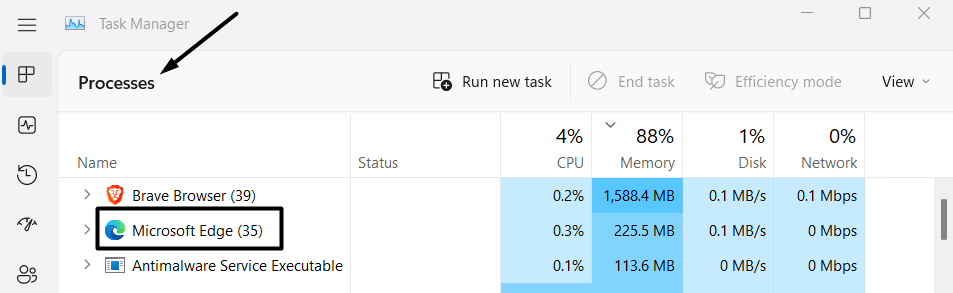
- Next, select the End task option to stop the entire app and its related processes from consuming the system’s resources for no reason.
For macOS
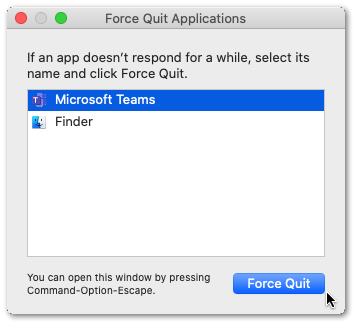
- To close unnecessary applications on macOS, open the Force Quit Applications using the Option + Command + Esc shortcut key.
- Now, choose the software/application running in the background but not currently in use. Once the application is selected, click on the Force Quit option to cease the selected application and its processes from using the device’s resources.
For Mobile Users (Android & iOS)
Closing unnecessary applications on Android & iOS is pretty simple. You only need to remove the irrelevant applications from the Recent Applications tab. That’s all.
Once all unnecessary applications are closed, open the Microsoft Teams app to see if it’s freezing or lagging.
2. Sign Out and Quit the Teams App
Yet, there are a few chances that the issue is with the Outlook account, but we still can’t neglect this factor and move further. So, we suggest signing out of the Teams app and signing in again 🔄 with the same Outlook account. Doing this will refresh the account and eliminate all the existing issues with the account.
Follow the below-mentioned steps to know the exact process of doing it with ease in a few simple steps:
For Desktop Users (Windows & macOS)
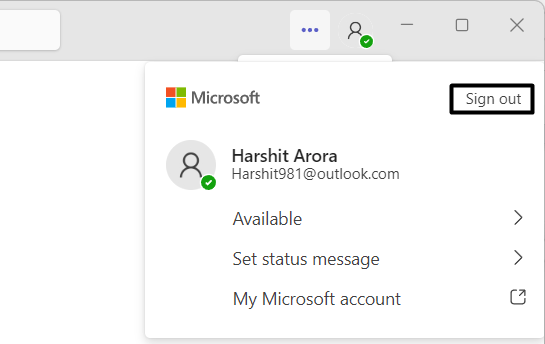
- First, open the Microsoft Teams app and click on the Profile icon at the top-right corner of the screen.

- Next, click on the Sign out option in the Profile dropdown menu to log out of the current device to log in again.
For Mobile Users (Android & iOS)
- To start, open the Microsoft Teams app on your smartphone and tap on the Profile icon in the top-left corner of the display.

- Next, tap on Settings (⚙️) in the left-sidebar to move to the Settings section and modify them accordingly.

- In the end, scroll down until the end and tap on Sign out to log out from your Android or iOS device 📱.

Once you’ve logged out from your device, you’ll start seeing the Login page again. You must log in again to the Microsoft Teams app with the same account. Once this is done, all the lag issues with the Teams app must be resolved.
3. Clear Client Credentials
Another easy solution to resolve Microsoft account-related issues is to clear all the existing Microsoft account credentials 🗑️ from the computer. This will restore your Microsoft Outlook account and make you sign in again, and all the issues with the Outlook account will be resolved during this process.
You can follow the below-mentioned steps to know the exact method of deleting stored account credentials from the system:
For Desktop Users (Windows)
- First, open the Windows Search Bar by pressing the Windows key and type Manage Windows Credential.

- Then, select Manage Windows Credentials from the Best match section and click on Windows Credential to view all the Windows-related credentials stored on the system.
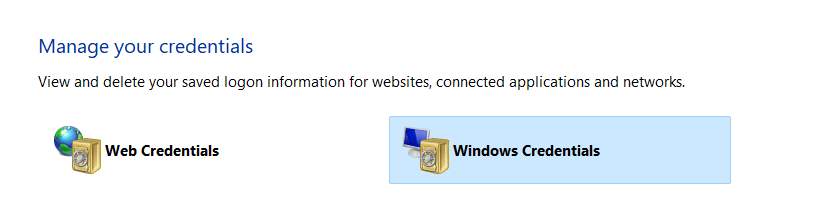
- Next, please search for the Microsoft-related account credentials in the Generic Credentials section, as we need to delete them to refresh the account.

- Once the account credentials are found, click on Remove and then Yes to confirm the credentials deletion from the system.

4. End the Microsoft Teams Process in Task Manager
An easy troubleshooting method to repair all the issues with the Microsoft Teams app is to force close the app 🚫 and restart it again. In simple terms, force closing refers to terminating the app and its processes from the roots and ensuring all the issues have been resolved. This is pretty simple and resolves the issues most of the time.
Below are the steps to do the same in few easy steps:
For Desktop Users (Windows & macOS)
For Windows
- Start with opening Task Manager on the computer using the Windows Search Bar and search for the Microsoft Teams app in the Processes tab.
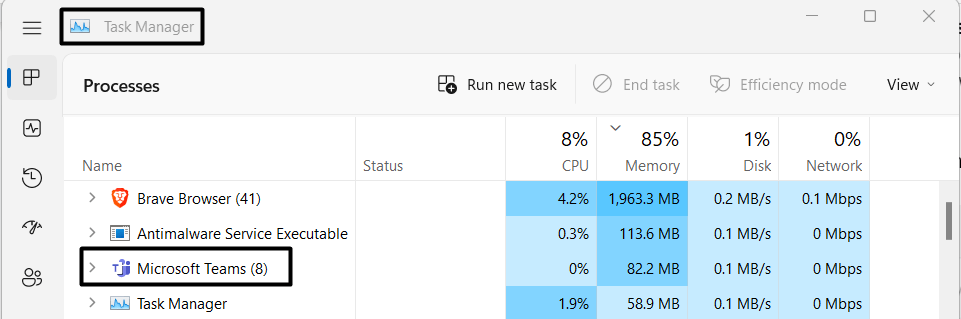
- Then, please right-click on the Microsoft Teams app and select the End Task (🚫) option from the context menu to terminate its current operations immediately.

- In the end, restart the system (🔄) and launch the Microsoft Teams app to see if the issue is resolved.
For macOS
- To force close the Microsoft Teams app on Mac, open the Force Quit Applications utility and search for the Microsoft Teams app in it.
- Next, click on the Microsoft Teams app to select it, and then click on the Force Quit option to instantly end all its current tasks.
Once the Teams app is entirely closed, relaunch it and check if it’s still freezing or lagging during the video meetings or working correctly now.
For Mobile Users (Android & iOS)
For Android
- To start, open the Settings app (⚙️) and move to the Applications section to view all the applications installed on the device in one place.
- In the Applications section, please search for the Microsoft Teams app and tap on it to open the application properties.
- Then, click on the Force Stop (🚫) option to close the app and its operations from the roots and restart the device (🔄) to see the changes.

For iOS
Force-closing an application on an iPhone is more accessible than an Android smartphone. You must remove the Microsoft Teams app from the Recent Applications tab. Guess what? You’re done.
You should now be able to use the Microsoft Teams app on your Android or iOS device quickly and without such irritating issues.
5. Clear Microsoft Teams App Cache
We all know that cache files’ primary purpose is to offer a better user experience, and nothing is new. But we also know that the cache files become junk after a specific time and start affecting the application processes.
This could be the same with Microsoft Teams; in that case, we recommend clearing all the cached data to ensure it isn’t the same.
Here are the steps to clear the Microsoft Teams app cache:
For Desktop Users (Windows & macOS)
For Windows
- Start with opening the Run program using the combination of Windows + R keys on the keyboard.
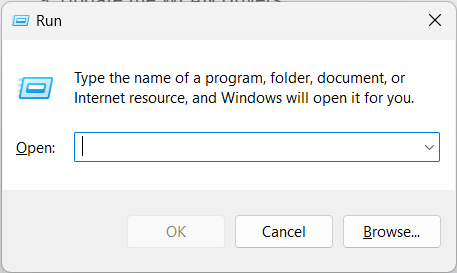
- Now, enter %appdata%\Microsoft\Teams in the Run program’s search box and press Enter.
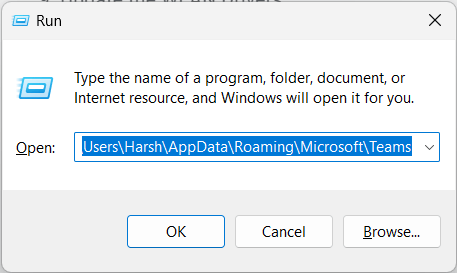
- It’ll now open the Cache folder of the Microsoft Teams software. You must delete all files and folders in the %appdata%\Microsoft\Teams directory, as all these are cached data.
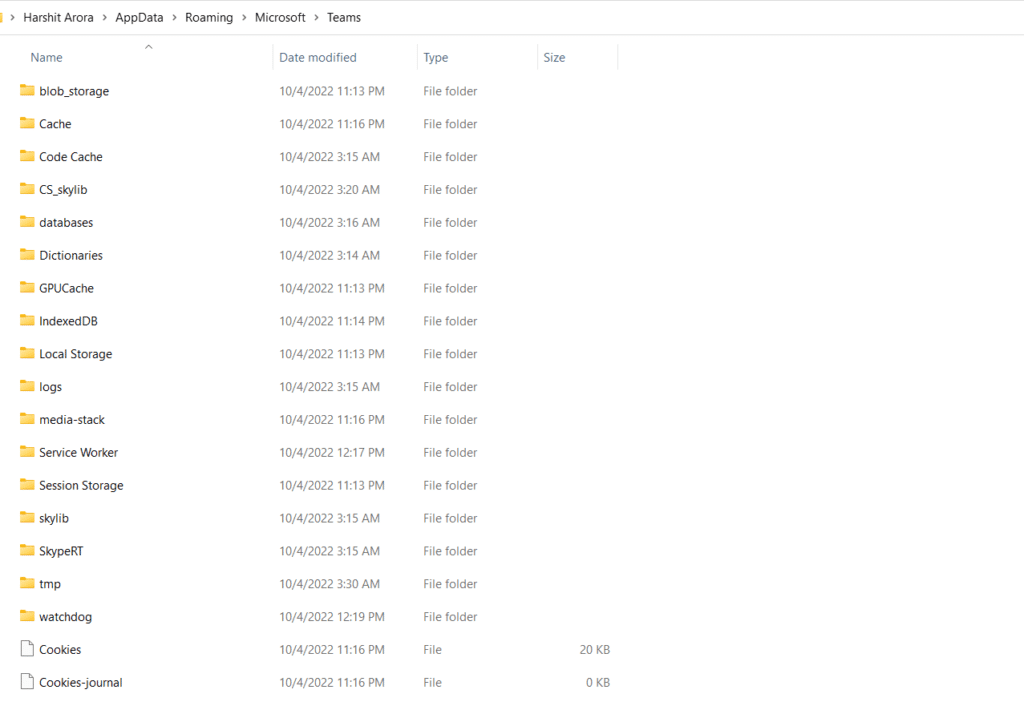
When it’s done, restart the PC and check the issue’s status with the Microsoft Teams app. In most cases, clearing the cache resolves most of the issues.
For macOS
- To start, right-click on the Microsoft Teams app icon in the Dock and select the Quit option from the menu.
- In the Finder utility, open the /Applications/Utilities folder and double-click on the Terminal option on the screen.
- Then, copy-paste the mentioned directory path in the Terminal app and press the Enter key on the keyboard:
rm -r ~/Library/Application\ Support/Microsoft/Teams
For Mobile Users (Android & iOS)
For Android
- Firstly, open the Settings app on your Android smartphone and move to the Applications section to get a list of all installed applications.
- Now, please search for the Microsoft Teams app in the Applications tab and open its properties by tapping on the app.
- Then, navigate to the Storage section in the properties section and tap on the Clear cache option to clear the cache.
For iOS
- Start by opening the Settings app and searching for the Microsoft Teams app.
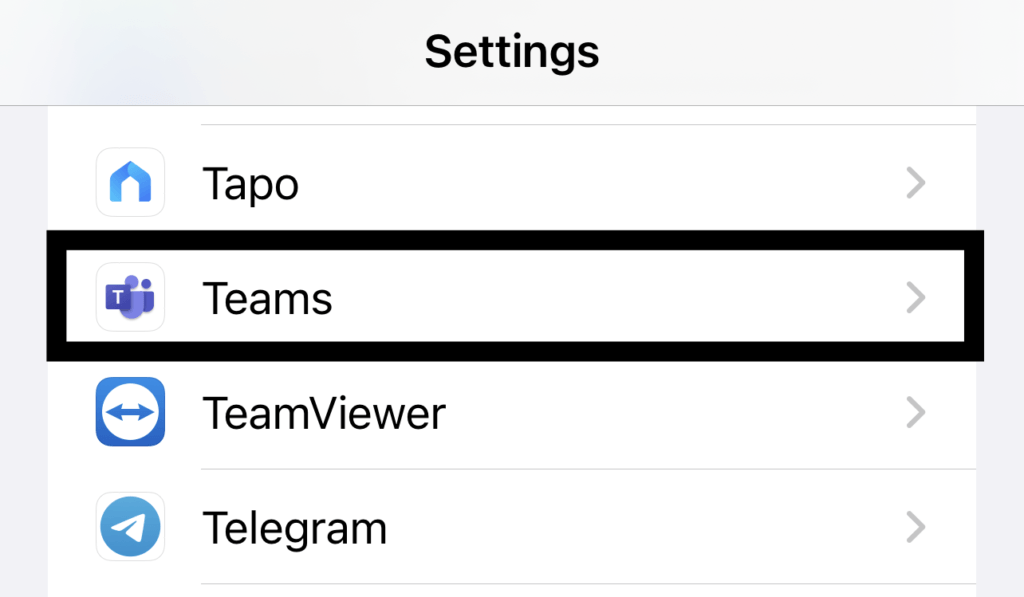
- Then, tap on the Microsoft Teams app and enable the Reset cache on next launch or Clear app data toggle.
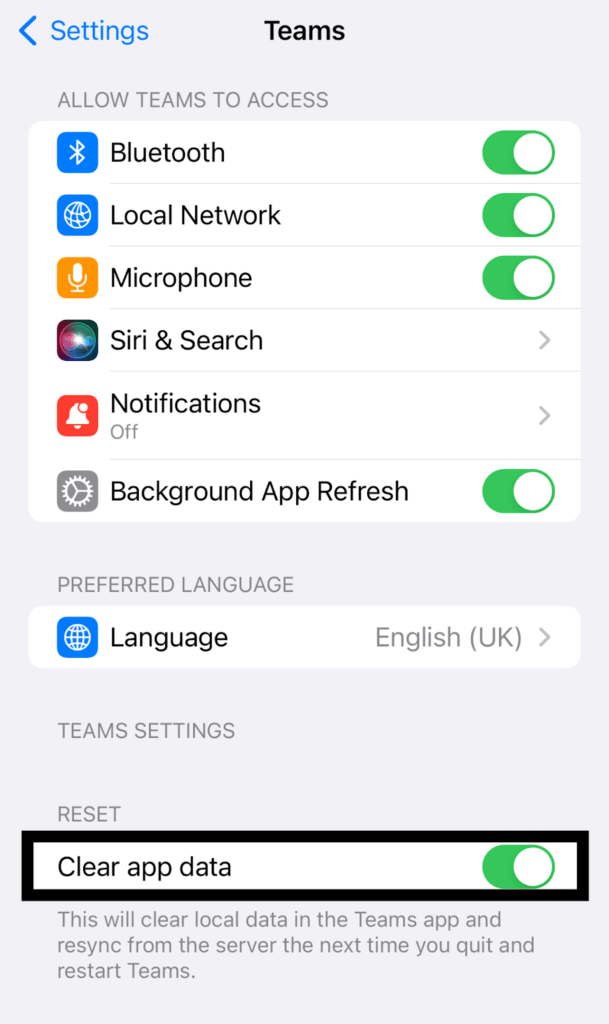
- Lastly, open the Microsoft Teams app again to clear the existing cache.
Once the Microsoft Teams app’s cache is cleared, open the Microsoft Teams app and see if the Microsoft Teams app is still freezing or lagging.
6. Monitor Calls and Meeting With Call Health View
Microsoft Teams has a feature called Call Health View that enables us to monitor our video calls health and troubleshoot issues with them. This can also find the causes of lag issues with the Microsoft Teams app.
You can monitor real-time video, audio, and screen sharing and find and resolve problems. It’s pretty easy to use the Call Health View to Identify, and the below-mentioned steps explain the same:
Note: This Call Health View feature is only available for Microsoft Teams work/school accounts.
For Desktop Users (Windows & macOS)
- Open the Microsoft Teams app on the Windows PC or Mac, and click on the three dots (…) to get additional options.
- Then, click on the Call Health option in the dropdown menu, and Microsoft Teams will display all the necessary details on the screen. It’ll show network, Audio, Video, and screen-sharing details.
- As soon as the Call Health View feature shows the detail, you’ll be able to figure out why the Microsoft Teams app is constantly lagging or freezing.
In case the cause of these issues is a network problem, we suggest contacting the ISP to do something to improve the internet’s speed.
7. Don’t Use Background Pictures During Video Calls
Like every other video calling application, Microsoft Teams also allows us to select and add background to our video in the calls. This comes in use when you want to hide your sludgy room or don’t want the boss to know that you are partying at a beach after passing in a sick leave application.
It’s an excellent feature, but it consumes many computer resources, which may also contribute to these issues. In that case, we suggest disabling background filters during video calls when not needed. This will save a lot of resources and help you eliminate all the issues with the Microsoft Teams app.
8. Lower Screen Resolution
If you’re using a 4K external monitor to attend meetings and other work, we suggest setting the display resolution to Full HD or lower than this. This is because sometimes the external monitors consume a lot of bandwidth, ultimately resulting in issues like these.
You can follow the below-mentioned steps to set the external monitor’s resolution to Full HD:
For Desktop Users (Windows & macOS)
For Windows
- Start by opening the Settings app (⚙️) on the Windows PC and navigate to the Display section to change the resolution.
- Then, move to the Scale & layout section and select the 1920×1080 or lower from the Display Resolution dropdown.

That’s it.
For macOS
- Firstly, click on the Apple logo in the top menu, and then select System Preferences from the Apple Menu.
- In the System Preferences menu, select Display to open the display-related settings to change the display resolution.
- Next, select the external display from the sidebar and then select the Scaled option.
- Then, check the Show all resolutions checkbox to view all the available resolutions in the form of a list.
- Ultimately, choose 1920×1080 or lower from the options to change the external display’s resolution.
Once the display resolution is changed, open the Microsoft Teams app, host a random meeting, and check whether the app is still lagging or facing some issues.
9. Keep Microphone & Video Off When Not In Use
One of the best solutions to reduce lag issues with the Microsoft Teams app is to keep the microphone, and video disabled when not needed. This might seem like an obvious fix, but this can save a lot of the system’s resources.
It’ll reduce the load on bandwidth and improve the Microsoft Teams app performance so that you won’t face the same issue repeatedly.
10. Ensure Bluetooth is Disabled
Many users reported that their Microsoft Teams app mostly crashes when the system’s Bluetooth is enabled. They also added that disabling Bluetooth resolves their issue, and you can try the same.
Below are the steps to disable Bluetooth properly:
For Desktop Users (Windows & macOS)
For Windows
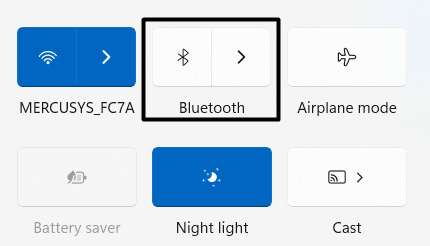
- To start, click on the Battery icon at the bottom-right corner of the screen to open the Quick Action Centre.
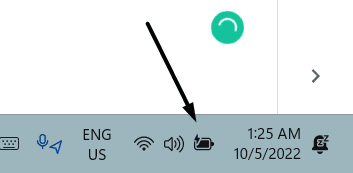
- Then, please search for the Bluetooth option in the top line and ensure it’s disabled. It would be whitish-grey when disabled.
For macOS
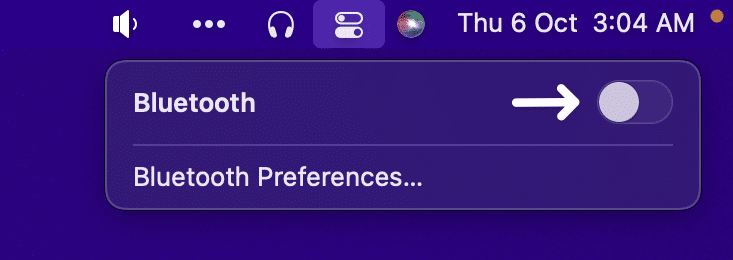
To disable Bluetooth on Mac, click the Bluetooth icon in the Control Centre to open the Bluetooth settings. In the end, click on the Bluetooth toggle to disable it. That’s it.
For Mobile Users (Android & iOS)
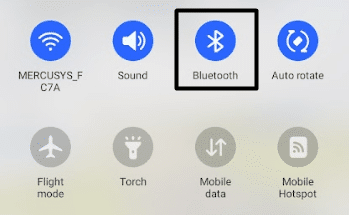
You can disable Bluetooth in an Android and iPhone smartphone from the Notification Panel. So, open the Notification Panel, and look for the Bluetooth icon. Lastly, ensure the Bluetooth is disabled. If not, disable it by tapping on it.
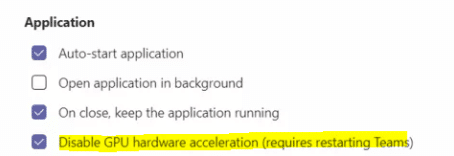
11. Disable GPU Hardware Acceleration
Most issues with the Microsoft Teams app occur due to high CPU and RAM usage. Sometimes, the app demands more resources than the computer can provide, and when the computer fails to allocate the resources, it ultimately results in this issue.
You can overcome this high CPU and RAM usage problem by disabling the Hardware Acceleration option.
Here are the steps to disable the Hardware Acceleration option in the Microsoft Teams app:
Note: This Hardware Acceleration feature only comes in Microsoft Teams work/school accounts.
- Open the Microsoft Teams app and click on three dots (…) to get additional options.

- Then, select Settings (⚙️) from the menu and move to the General tab of Settings.
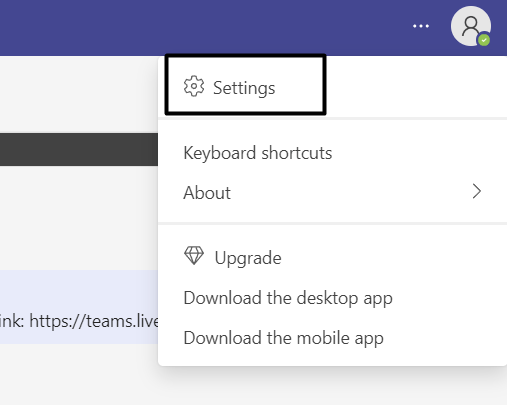
- In the General tab, search for the Disable GPU hardware acceleration (requests restarting teams) option.
- Once found, uncheck the Disable GPU hardware acceleration (requests restarting teams) checkbox.
12. Turn Off Read Receipts
Read receipt lets us know whether the message is successfully sent, delivered, or read by the recipient. It helps us a lot in many ways, but this consumes a hefty amount of the system’s resources and slows down the Microsoft Teams app.
We suggest disabling the read receipt option to ensure it isn’t consuming many of the system’s resources.
Here are the steps to do the same in a few simple steps:
For Desktop Users (Windows & macOS)
- First, open the Microsoft Teams app and move to Settings (⚙️) of the Microsoft Teams app.
- Next, head to the Privacy section in the Settings app (⚙️) and search for the Read receipts option.
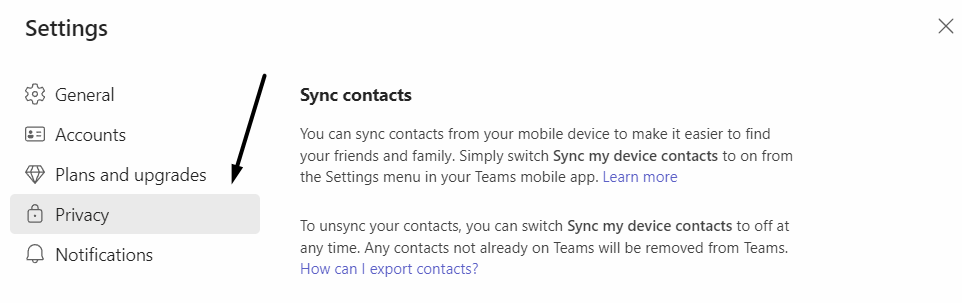
- Lastly, turn off the Read receipts toggle (🔛) to disable the read receipts immediately.

13. Disable All Teams Add-ins in Outlook
Suppose you aren’t using Microsoft Teams add-ins in Outlook. In that case, we suggest disabling them because these add-ins use many system resources and affect the basic operations of the Microsoft Teams app.
Here are steps to disable All Teams Add-ins in Outlook:
For Desktop Users (Windows & macOS)
- First, launch the Microsoft Outlook app on your Windows or Mac computer and select Options.
- Now, click on Add-Ins from the left-sidebar and uncheck the Microsoft Teams Meeting Add-in for Microsoft Office option.
- Then, untick (✅) the Teamviewer Meeting Add-in option.
- In the end, save the changes and restart the Outlook app to save the changes and check the issue’s status.
14. Turn Off Animations In Microsoft Teams App
We all see the animations while using the Microsoft Teams app. These animations make the entire user experience smooth but, at the same time, consume a lot of resources. In that case, we suggest disabling the Animations option to eliminate the lag and freeze issues with Microsoft Teams.
Follow the below-mentioned steps to disable animations in the Microsoft Teams app:
For Desktop Users (Windows & macOS)
- Open the Microsoft Teams app and navigate the Settings (⚙️) tab.
- In the General tab, scroll down and check the Turn off animations (requires restarting Teams) checkbox.

- Lastly, restart the Microsoft Teams app to save the changes.
You should now be able to use the Microsoft Teams app without interruptions.
15. Modify Video Settings
As per the Task Manager app, the Microsoft Teams app consumes many system resources during video calls and even more when you’re multitasking. Surprisingly, sometimes the 4GB RAM system fails to bear the load coming from the Teams app.
You don’t have to stop making video calls through the Microsoft Teams app, but you can make some changes to it so it doesn’t use loads of resources again.
The first thing you can do is avoid using other applications (Step 1) simultaneously when using the Teams app.
In addition, we suggest disabling picture backgrounds (Step 7) during the meetings to stop them from putting a load on the system.
It would also be better to disable the GPU Hardware Acceleration (Step 11) and Read Receipts feature (Step 12).
16. Turn on the Maximum Performance Settings (For Windows)
Most systems run on low-performance settings, which prevents the system from working at its maximum capability to save the battery and the system’s resources. There isn’t anything wrong with using a system at low-performance settings, but apps like Microsoft Teams require the system to operate at maximum capacity to run correctly.
We recommend enabling the maximum performance settings to get a seamless experience without such issues.
Below are the steps to turn on the maximum performance settings on your Windows system:
For Desktop Users (Windows)
- To start, open the Control Panel app and move to the System and Security section.
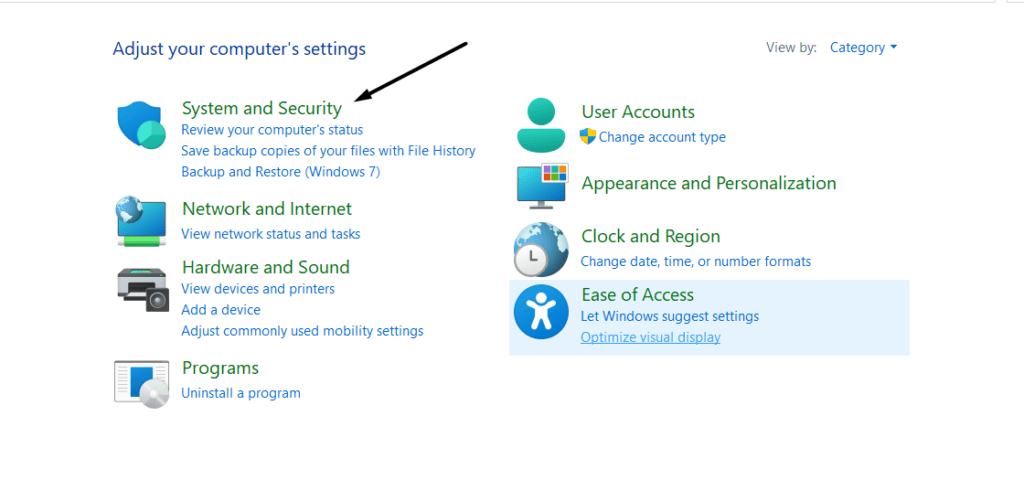
- In the System and Security section, click on Power Options and then click on Change Plan Settings.
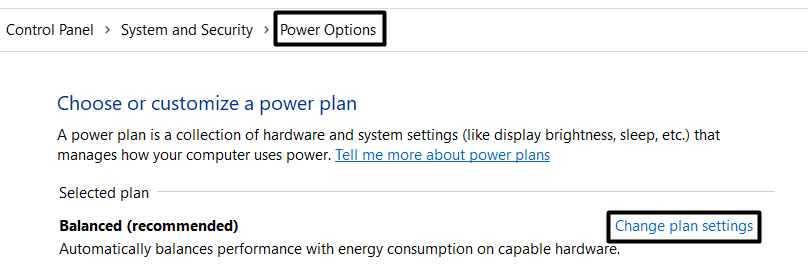
- Once done, click on the Change advanced power settings option.
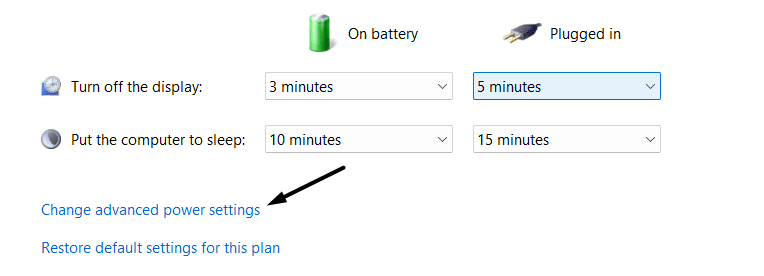
- Then, please search for the Processor power management section in the pop-up window and double-click to expand the section.

- Double-click on the Maximum processor state under the Processor power management section to expand it.

- Finally, in the Maximum processor state section, set both the On battery and Plugged in options to 100% to use the device’s maximum capability.

You should now be able to use the Microsoft Teams app without such freezing and lagging issues.
17. Increase Page File Capacity
Page File, also known as Virtual Memory, comes in every Windows computer that assists the processor process tasks and programs properly and smoothly. You can also increase or decrease virtual memory size according to our needs.
In that case, we suggest increasing the virtual memory size to see if increasing the page file size helps the Teams app function properly.
Here are the steps to do the same with ease:
For Desktop Users (Windows)
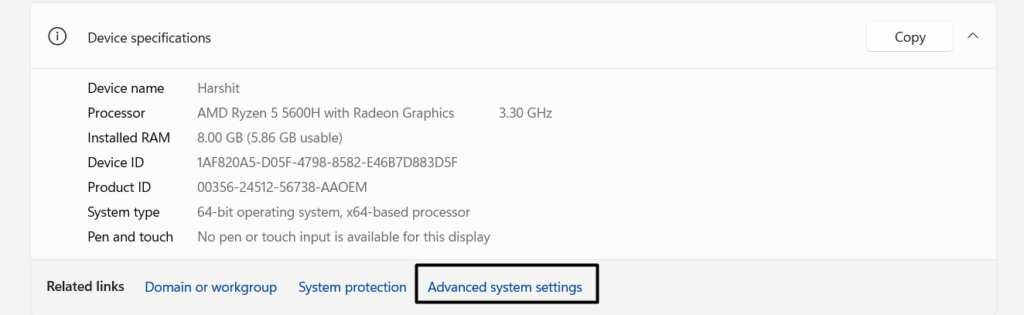
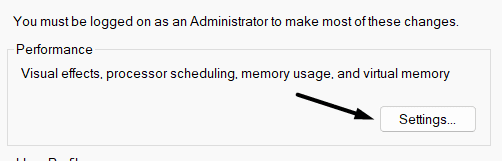
- First, open the Settings app and scroll until you see the About section.

- Then, navigate to the About section and click on Advanced system settings.
- Click on the Settings option under the Performance section in the Advanced system settings section.
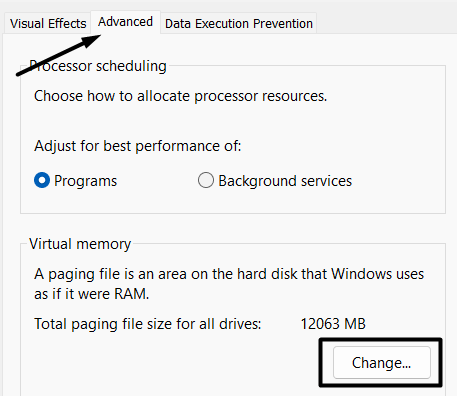
- Now, move to the Advanced section and click on the Change option under the Virtual memory section.
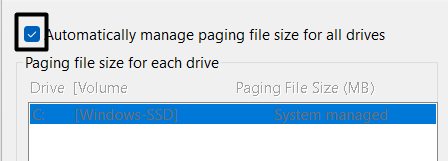
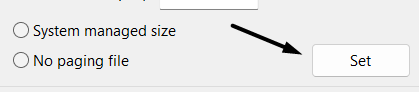
- In the Virtual memory pop-up, uncheck the Automatically manage paging files size for all drives checkbox and select the Custom size radio button.
- Then, enter one and a half times the total available memory in the Initial size (MB) section. And three times of available memory in the Maximum size (MB) section.
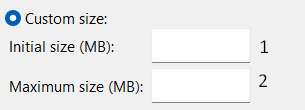
- In the end, click on the Set and then the OK button to save all the settings you’ve recently made.
That’s it! You should restart the system 🖥️ and check the status of the issue. Most probably, the Microsoft Teams app should be working correctly now.
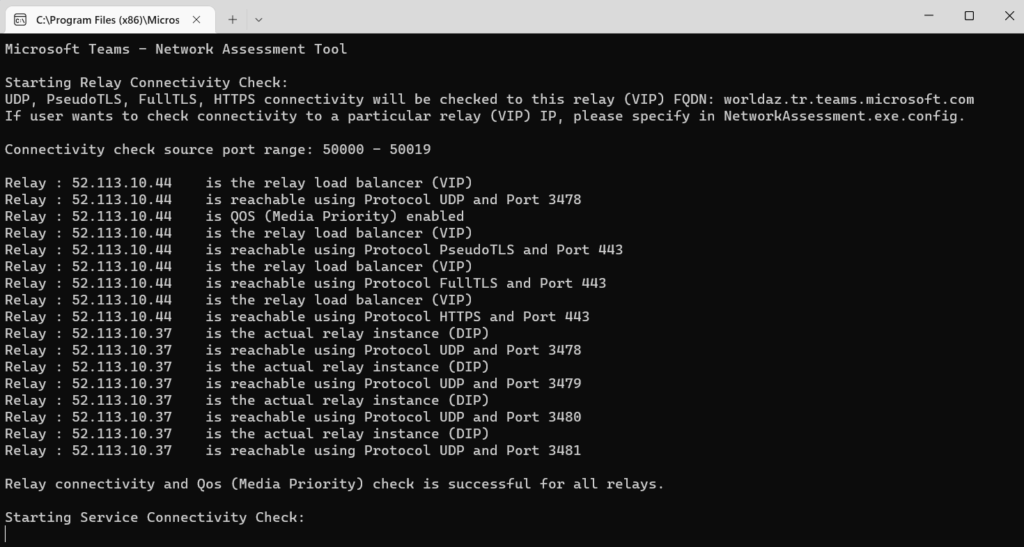
18. Run Microsoft Teams Network Assessment Tool
For some users, the lag issue appeared because of network issues, and they found the same with the help of the Microsoft Teams Network Assessment Tool. You can also use the Network Assessment Tool to check if this is the same case with you.
It’s pretty easy to use the Microsoft Teams Network Assessment Tool and the below-mentioned steps to explain the same:
For Desktop Users (Windows)
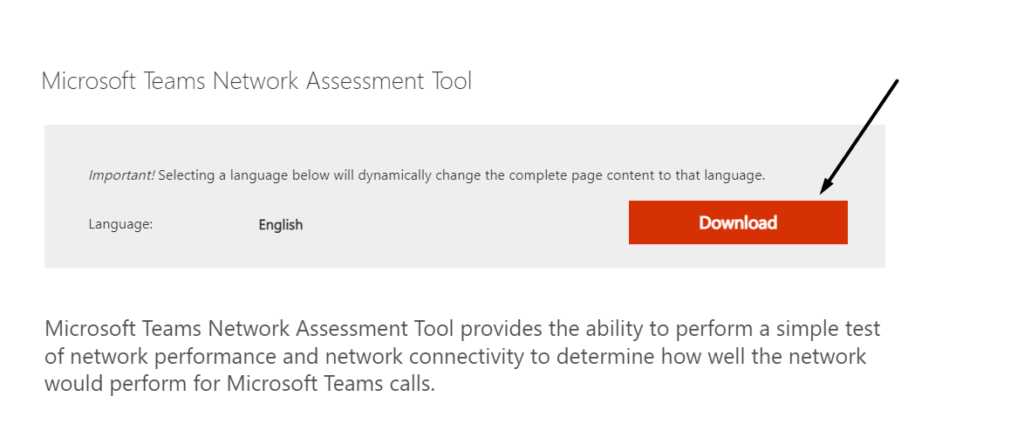
- Start by downloading the Microsoft Teams Network Assessment Tool and installing it on your Window computer.
- Once the Microsoft Teams Network Assessment Tool is installed on the system, launch it and accept all the terms and conditions to proceed further.
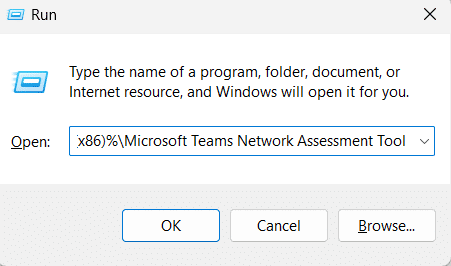
- Now, open the Run program and execute the below-mentioned command in the Run program’s search box:
%ProgramFiles(x86)%\Microsoft Teams Network Assessment Tool
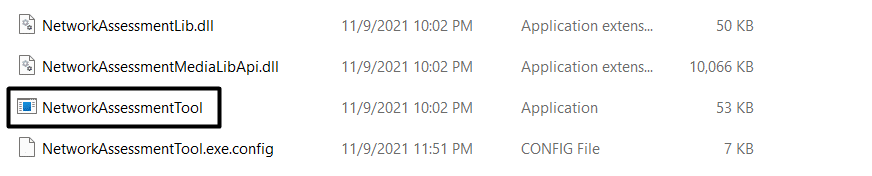
- Next, please search for the NetworkAssessmentTool application file in the folder and double-click on it to launch it.
- Finally, the Microsoft Teams Network Assessment Tool will begin the assessment process and display the results on the screen.
19. Update the Display Adapter Drivers
During the research, we also found that outdated display adapters could lead to crashing and freezing issues. Thus, updating the display adapters is essential to ensure they’re compatible with the system and don’t conflict with the Microsoft Teams app’s processes. We suggest updating the display adapters following the below-mentioned steps to ensure they aren’t the real culprit:
For Desktop Users (Windows)
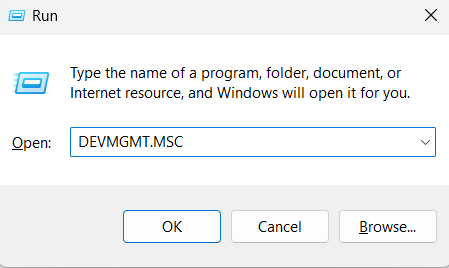
- To start, open the Run dialog using the Windows + R shortcut key and type devmgmt.msc in the search box.
- Now, search for Display adapters in the Device Manager and double-click on it to get a list of all display adapters installed on the system.

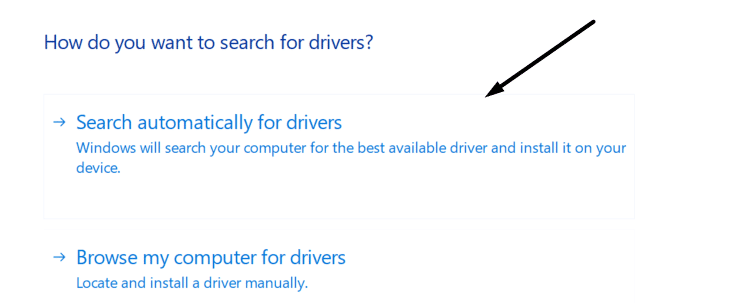
- Next, right-click one of the display adapters and select the Update driver from the contextual menu.

- Then, click on the Search automatically for drivers option in the system, scan for an updated version of the same driver, and install it on the system.
- Before closing the Device Manager tab, follow the same steps with the other display adapters and check if the Teams app is freezing or crashing.
20. Reset or Repair Microsoft Teams
We tried several troubleshooting methods to resolve issues related to the Microsoft Teams app. Still, if none of them work out, we suggest resetting the Microsoft Teams app and deleting all the existing data from the system. If resetting the device also doesn’t seem to fix the issues, we can try repairing the Microsoft Teams app to repair all the issues associated with the app.
Follow the below-mentioned steps to start resetting the app and then repairing it:
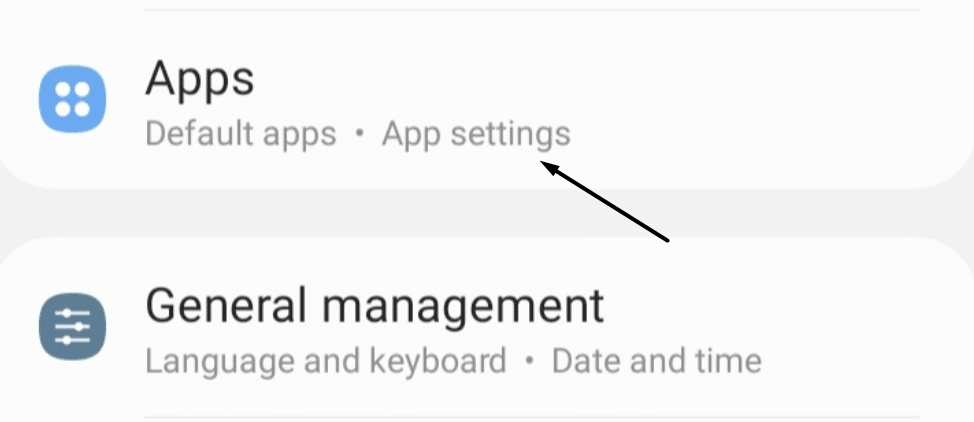
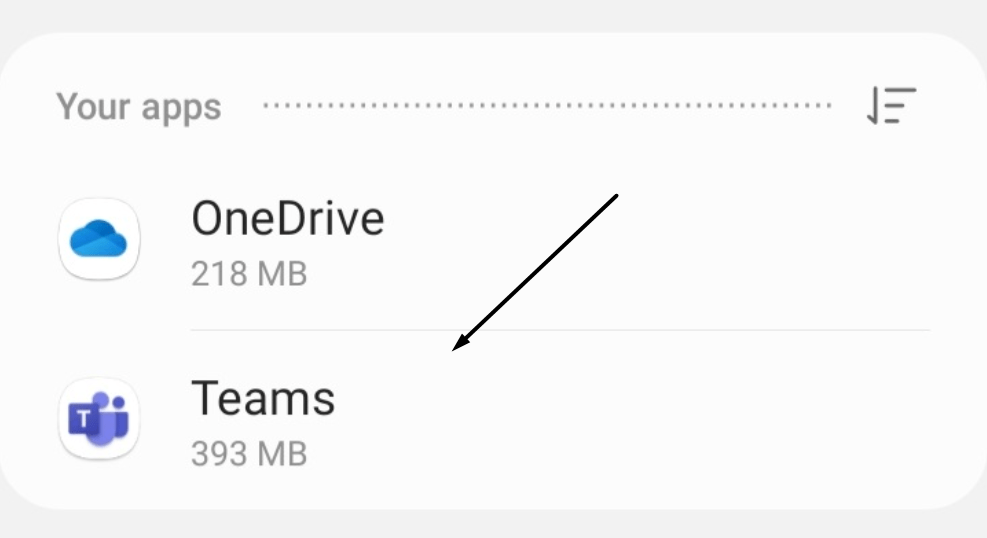
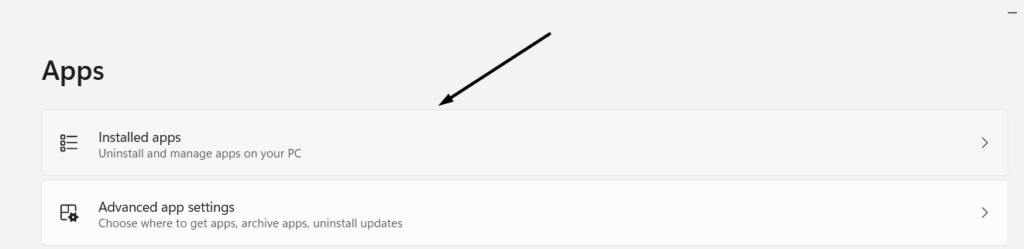
- Firstly, open the Settings app (⚙️) and navigate to the Apps section from the left navigation pane.

- Then, move to the Installed apps area and search for the Microsoft Teams app using the search box.
- Next, click on the three dots (…) and click on Advanced options from the contextual menu.
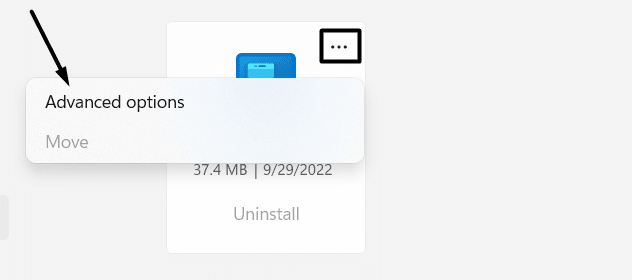
- Following that, click on the Reset button under the Reset section to clear all the existing data of the Microsoft Teams app.

- Finally, click the Repair (🛠️) button to repair the Microsoft Teams app and resolve all the issues with the Microsoft Teams app.
Voila! You can now use the Microsoft Teams app without crashing, freezing, and lagging issues.
21. Update the Microsoft Teams App & Windows
Microsoft Teams regularly receives new updates from the developers for minor bug fixes like this. You also try searching for new updates and installing them to check if updating the application resolves the issue with the Teams app. It’s pretty easy, and the below-mentioned steps explain the same:
For Desktop Users (Windows & macOS)
For Windows
- Firstly, open the Microsoft Store on your Windows PC and move to the Library section from the left-navigation pane.

- Now, search for the Microsoft Teams app in the Updates & downloads section.

- Lastly, click on the Update button beside the Microsoft Teams app to update the application.

For macOS
- To start, open the App Store on your Mac and navigate to the Updates section from the left sidebar.
- After that, look for the Microsoft Teams app in the Update section.
- Once found, click the Update button next to Microsoft Teams to update the app.
For Mobile Users (Android & iOS)
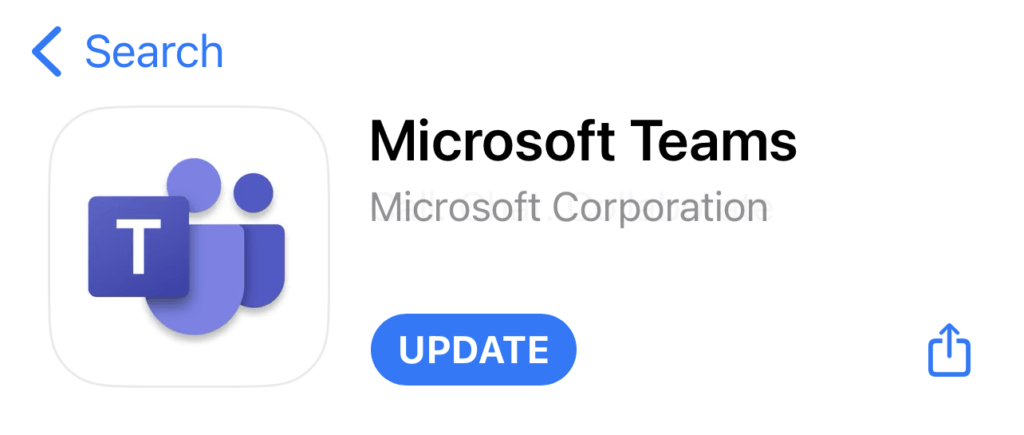
For Android
- First, open the Play Store app on your Android smartphone, tap the search box, and type Microsoft Teams.
![]()
- Then, click on the Update button beside the Microsoft Teams app to update the application.

For iOS
- Open the App Store and tap on the Profile icon at the top-right corner of the screen.
- Now, scroll down and search for the UPDATES AVAILABLE section.
- Then, search for the Microsoft Teams app in the UPDATES AVAILABLE section and tap on the Update button next to the Teams app.
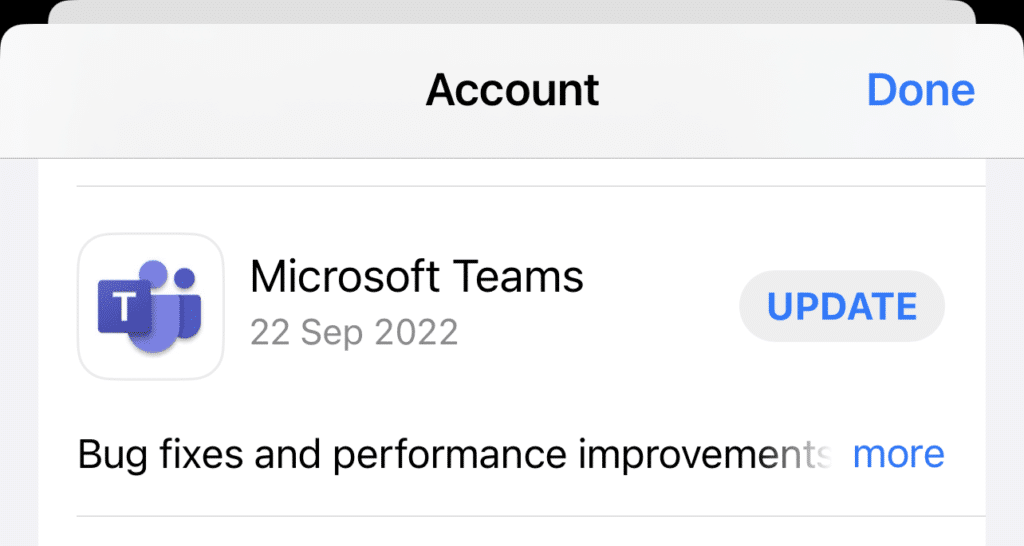
- Otherwise, you may search for the Microsoft Teams app page, and if updates are available, you may tap the Update button that shows up.
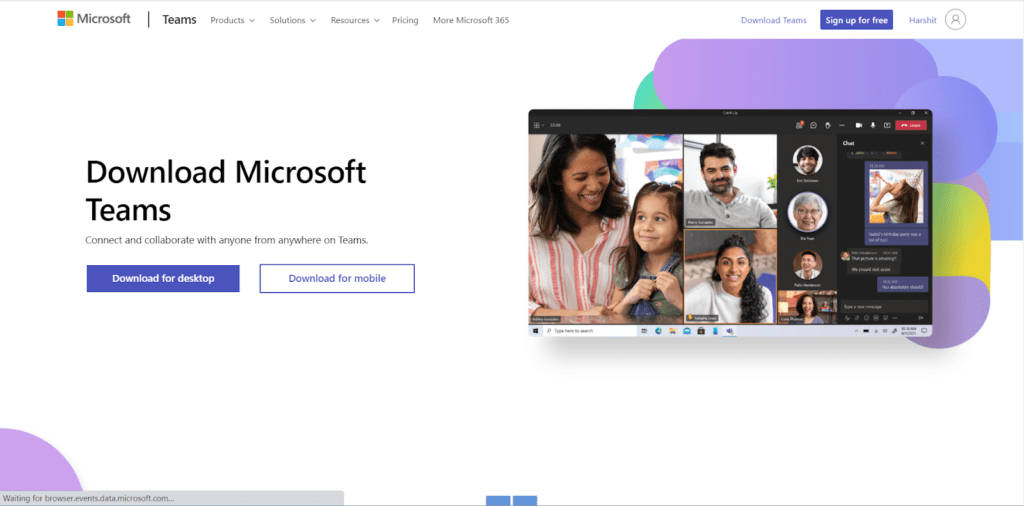
22. Reinstall the Microsoft Teams App
One of the best solutions among all is reinstalling the Microsoft Teams app. If none of those solutions resolved the issue, we suggest reinstalling the Microsoft Teams app from their native app stores.
If you’re using the Microsoft Teams app on a Mac or Windows, click Here to download the Microsoft Teams app. If you’re using the Microsoft Teams app on your Android smartphone, click Here to navigate to the Play Store app and download the application on the smartphone. Lastly, click Here to install it on your iPhone.
23. Sign In to the Desktop Version of Teams
Microsoft Teams also has a web version that offers the same features as the Microsoft Teams app. If none of the solutions helped you overcome these issues, we suggest switching to the website version of Microsoft Teams.
You need to visit the official website of Microsoft Teams and sign in with your Microsoft Teams account to use it. That’s it!
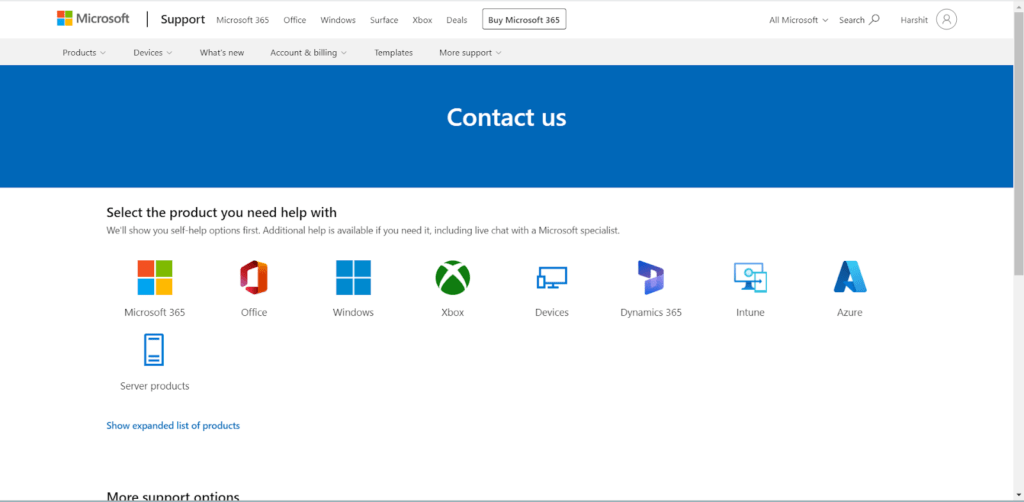
24. Contact Microsoft Customer Support
Suppose you aren’t comfortable using the web version of Microsoft Teams. In that case, we suggest reaching out to the technical support team of Microsoft and asking for assistance with the issue you’re facing.
You need to visit Microsoft Contact Us page and check the on-screen instructions to ask for help from Microsoft’s support team.
Conclusion
Earlier, users were facing crashing issues with the Microsoft Teams app, but they’ve now started encountering performance issues with the Teams app. Many users are frustrated because of these issues, as they can’t use the app for meetings and calls.
Fortunately, this article shared more than 20 troubleshooting methods 🛠️ that can stop the Microsoft Teams app from freezing and lagging while used.
You can implement the solutions mentioned above and eliminate these issues quickly. Also, do share your experience with this troubleshooting guide by simply answering the below-mentioned questions in the comments ⬇️:
- Did we help you resolve your issues with the Microsoft Teams app?
- Which of the solutions mentioned above helped you resolve the issue with ease?
Make sure to share this troubleshooting guide with someone who is also facing lag and freeze issues with the Microsoft Teams app 😊
Frequently Asked Questions About the Microsoft Teams Keeps Lagging & Freezing Issues
How Do I Stop Microsoft Teams From Lagging?
One of the most straightforward solutions to resolve lag issues with the Microsoft Teams app is reinstalling the application (Fix 22) from the native app store or Microsoft’s official download page.
Why Is the Microsoft Teams App So Laggy?
High CPU usage is one of the most common reasons for the lagging and freezing issues with the Microsoft Teams app.
Why Is Microsoft Teams App Using So Much RAM?
Using the Microsoft Teams app with hardware GPU acceleration enabled (Fix 11) could be one of the reasons behind the high CPU usage problem.
Why Is My Microsoft Teams Freezing?
Your Microsoft Teams app is freezing because the system is running on low-performance Windows settings. In that case, we suggest enabling high-performance settings (Fix 16) to overcome this issue.
How Do I Clear MS Teams Cache?
Follow the mentioned steps to clear the Microsoft Teams app’s cache (Check Solution 5 for a detailed explanation)
- Open the Run program and navigate to the below-mentioned path:
C:\Users\(YourUserName)\AppData\Roaming\Microsoft\Teams
- Delete the mentioned folders and files from Microsoft Teams’ cache folder:
- Tmp folder
- Blob_storage
- Cache
- GPUcache
- Databases
- Local storage
You’ve now cleared the Teams app cache.