
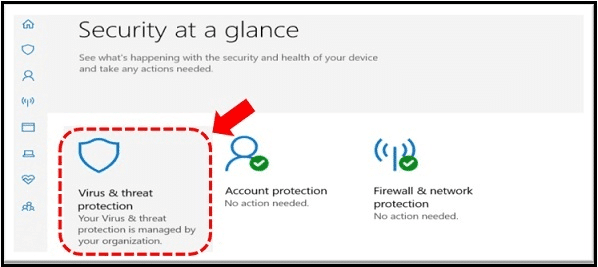
Is your Microsoft Teams camera or video not working? Or is there no camera available to use or is your video just a black screen?
In today’s world, online video calls have become a more popular and common alternative compared to physical meetings, especially due to the recent Covid-19 pandemic. One of the most frequently used communication platforms would be Microsoft Teams.
Teams was first created by Microsoft and has been the fastest-growing app throughout Microsoft’s history. As of today, the app has over 270 million users worldwide! The Teams app has many advantages that help it compete against other platforms like Zoom or Skype.
A few advantages of Microsoft Teams include improved communication and a platform where all the Microsoft Tools are integrated into the app for easy collaboration. For instance, fewer emails are needed as we can communicate via Chat to send files or other important information and meetings have become easier as the recording of the meeting is immediately available for individuals/members in the same meeting tab.
Although Microsoft Teams appears to be one of the best communication platforms out there, it still has occasional bugs that test its users’ patience. With that said, have you ever come across a camera issue when you’re in a Teams meeting?
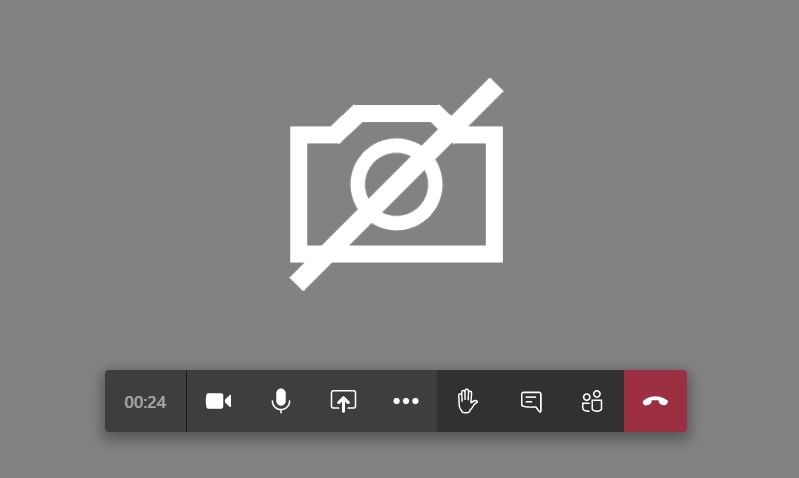
Some users even get stuck on a black screen or receive the “Video isn’t working” error message while in their Microsoft Teams call.
Note: In this article, we’ll be referring to Microsoft Teams as Teams or MS Teams.
A few potential causes of why our camera doesn’t work on MS Teams include:
- Outdated MS Teams app: A major problem that is faced by many users. Oftentimes, we may be using an older version of the Teams app on our device, it may not be compatible with our operating system version, thus conflicting with input/output peripheral devices and causing many errors such as the camera not working.
- Corrupted MS Teams: There can be occasions where the app installation fails and isn’t prominent enough to be noticed. Users aren’t notified about the issue but some program files become corrupted, which leads to multiple errors in the app. Likewise, if MS Teams had failures installing, then you’re most likely to face this problem as well.
- Outdated Camera Drivers: If you’re unable to get the camera working in the Teams app, the problem may lie with the device’s camera driver. The reason for the association is because it falls as the most common reason behind camera detection issues for the Teams app. Outdated drivers can cause improper detection and prevent the usage of the camera by the app.
While you’re in a video call, it’s important to present yourself well, whether it be in your workplace or school environment. By putting your best self out there, it enhances the ability for you to connect with other people, improving your communication effectiveness, and helping to build stronger relationships.
Not having your video on is perfectly fine, however, the worrying and stressful part comes when the host of the meeting calls everyone to turn on their camera. At that moment, your camera may not work, and you need a quick fix for it.
Fret not, as we’ve prepared this guide with 23 fixes to try whenever your camera isn’t working in Microsoft Teams!
Note: This guide provides fixes and screenshots from the Teams desktop client or mobile app. Specific devices where the app can be found are Windows, macOS, Android, iPhone (iOS), and iPad.
23 Fixes for the Camera or Video on Microsoft Teams Not Working
1. Check the Teams Server Status
Before we determine that the issue is occurring on our device, we need to first confirm that the Teams server is up and running correctly. It can be challenging to determine where the exact issue lies, nonetheless, we can refer to reputable sources for an answer on whether Teams’ end is experiencing problems.
By checking the service status of Teams, you might save yourself a lot of hassle trying to fix an issue that’s not yours, to begin with. If the service status says down, chances are it’s affecting users on a large scale.
Here are the four ways to confirm our suspicion:
a) Check Microsoft 365 Service Status Page on Twitter, @MSFT365Status
Microsoft has an official Twitter account called @MSFT365Status to provide its followers with updates on certain Microsoft 365 service incidents. Although it serves as a page for the general health and service status of all Microsoft 365, occasionally it provides insight into the service strength of Microsoft Teams.

b) Check Microsoft Teams Twitter Page, @MicrosoftTeams
Besides having a Twitter account that supports Microsoft 365 tools, Microsoft also has a verified account dedicated to Microsoft Teams alone, @MicrosoftTeams. When you navigate to the account page, all the latest updates and potential service issues are posted there.
c) Search Twitter for Hashtags such as #microsoftteamsdown or #teamsdown
While you’re on Twitter, you can also take the time to search for these two hashtags, #microsoftteamsdown and #teamsdown. Look through the timestamps of each tweet to check if there are many similarities between each one regarding Teams working incorrectly.
Additionally, make sure the time the tweets were posted are recent and fall close to each other. This prevents you from reading any outdated tweets and possibly coming to a false conclusion.
d) Inspect the Server Status Via Microsoft’s Health Service Website
Microsoft’s Admin Center is our one-stop destination to inspect the service status of all Microsoft 365 tools. So, start by heading over to Service Status – Microsoft Admin. Once we’ve navigated to the page, we’ll be able to see the list of Microsoft 365 services’ status.
If a software’s service is running well without any faults, there should be a green tick icon to the right of the section.
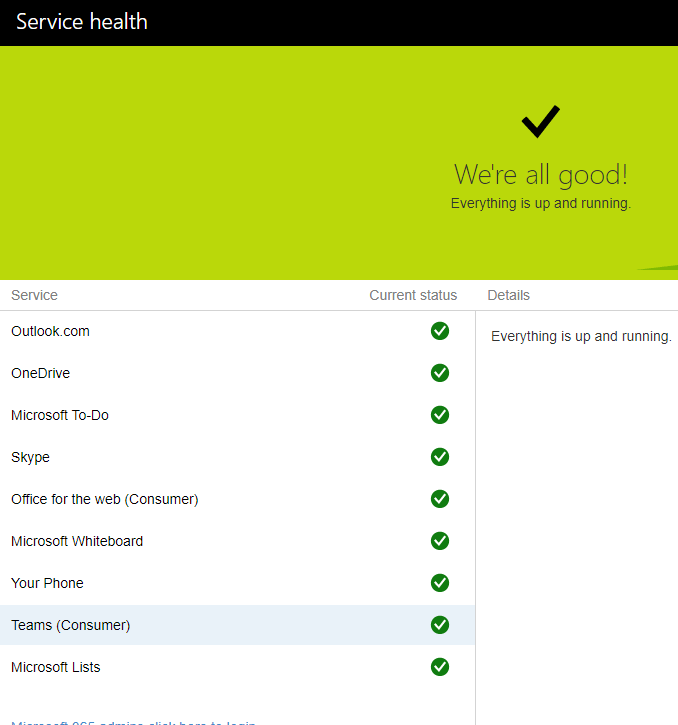
Furthermore, Microsoft Teams is built together with other Microsoft 365 tools. Hence, when you check on MS Teams service health, don’t neglect the status health of other services such as Exchange, SharePoint, and OneDrive for Business.
If one of the mentioned services is experiencing an issue, it doesn’t necessarily mean MS Teams is affected as well. In the end, we can always review the advisories for any affected services to ultimately determine whether or not MS Teams is influenced.
e) Check the Teams Server Status on Third-Party Checkers (i.e., Downdetector)
Downdetector is a famous website where you can view the status of all your favorite web services and social networks, such as Netflix, Facebook, Instagram, etc. Likewise, Teams can be viewed through this site as well.
The website works by collecting several status reports from trusted sources. Then, they will analyze these reports and provide users with up-to-date information on any ongoing server issues or maintenance.
To view the latest status of Microsoft Teams, head over to this DownDetector page.
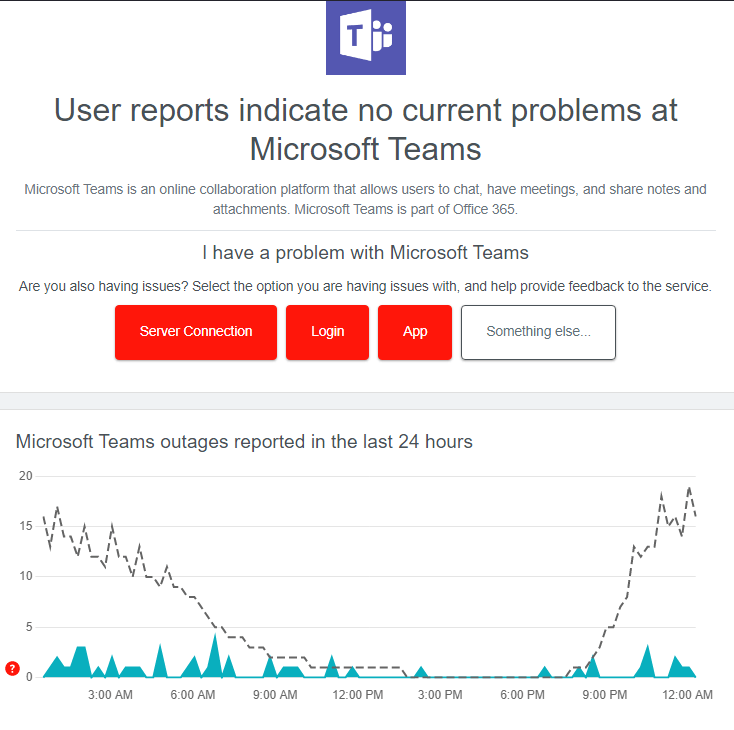
If there’s a green bar labeled as ‘No problems at Teams’, it means no issue’s occurring from their end. Else, if there’s a red bar labeled as ‘Problems at Teams’, there might be a service interruption or outage.
2. Check for Pending OS Updates
After verifying no issue is occurring with the Microsoft Teams service, we can safely assume that the problem has to be associated with our device.
Most of us here usually run our Teams app on a Windows or macOS operating system. Now and then, our operating system needs to be updated. This provides us with a fast and effective way to make sure our laptop system runs smoothly.
As your system is being updated, you’ll be downloading all the latest features, bug fixes, and security patches. Typically our laptop does automatic checking for us, however, there are times when we want to inspect for updates manually. For example, when we encounter a major bug issue or if our computer is running slower than usual.
Updating your system software also ensures that driver updates are implemented and that peripheral io devices such as your device’s webcam are working and integrating correctly.
For Desktop (Windows & macOS)
Here’s how to manually check for OS updates on your desktop device:
For Windows
- First, click the Start button located in the bottom-left corner of your laptop.
- Next, go to Settings (⚙️ gear icon).
- Thirdly, select the Updates & Security icon from the menu.
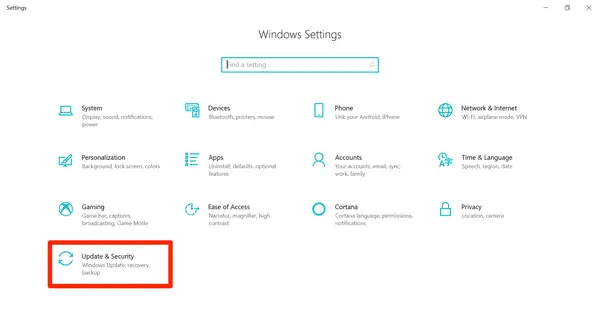
- Following after, click on the Windows Update tab found on the left sidebar.
- Lastly, click the Check for updates button. If there’s any update available for installation, the download will happen automatically.
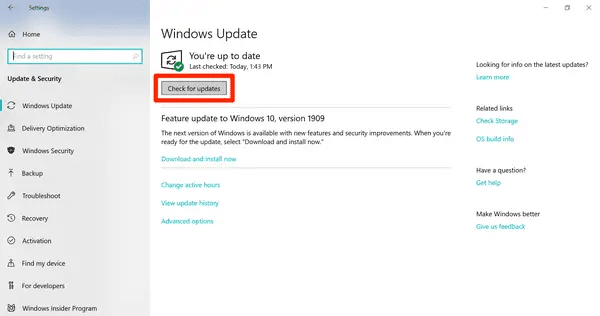
In the case where you don’t see an update, the Windows Update page will also notify you whether your hardware is compatible with the software update. To complete the update, we’ll need to restart your Windows device, the timing can be delayed if you’re not in a hurry.
For macOS
- First, open the Apple menu at the top-left corner of your screen.
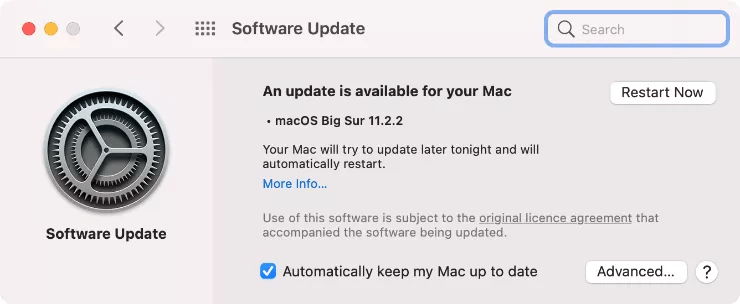
- Following after, click About This Mac, then click Software Update in the window that appears.
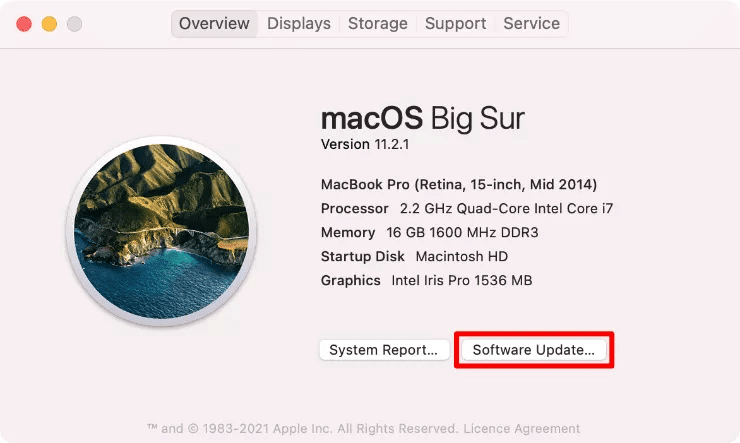
- Next, System Preferences will open and look for any macOS updates to install.
- Lastly, if there’s any to install, click Update Now to download and install the latest update. If the update has been downloaded, click the Restart Now button to begin the installation.
Steps to Schedule System Software Update on Desktop
You may follow the steps below if you’d like to schedule the computer’s restart:
For Windows
- Starting from the Windows Update settings page, select “Schedule the restart” located next to “Restart now”.
- Following after, you’ll be taken to a restart scheduling page.
- Once you’re there, toggle the Schedule a Time slider to On.
- Lastly, grayed-out “Pick a time” and “Pick a day” options will appear for you to select. You may use the time ticker and the date drop-down to select when your computer should restart.
For macOS
- On your mac, choose the Apple menu at the top-left corner of your screen.
- Subsequently, click on System Preferences > Energy Saver.
- Following after, select Schedule.
- Next, choose from the following options you want:
-
- Schedule a startup or wake time for your Mac: Select the “Start up or wake” checkbox. Choose a day or group of days from the pop-up menu, then click Apply.
- Schedule a sleep, restart, or shutdown time for your Mac: Select the “Sleep, restart, or shut down” checkbox and choose the appropriate option from the pop-up menu on the left. Choose a day or a group of days, enter a time, and then click Apply.
For Mobile (Android & iOS)
For Android
- First, open the Settings app, scroll down, and select System.
- After that, choose System Update.
- Then, on this page, you can tap Check for update to search for pending updates.

Note: These steps may differ between Android devices depending on your phone’s model and current OS version. However, you should find the steps are generally like the above.
For iPhone (iOS)
- First, back up important data and plug the device into a power source.
- Next, connect the device to a Wi-Fi connection.
- Then, launch the Settings app.
- From there, select General and choose Software Update.
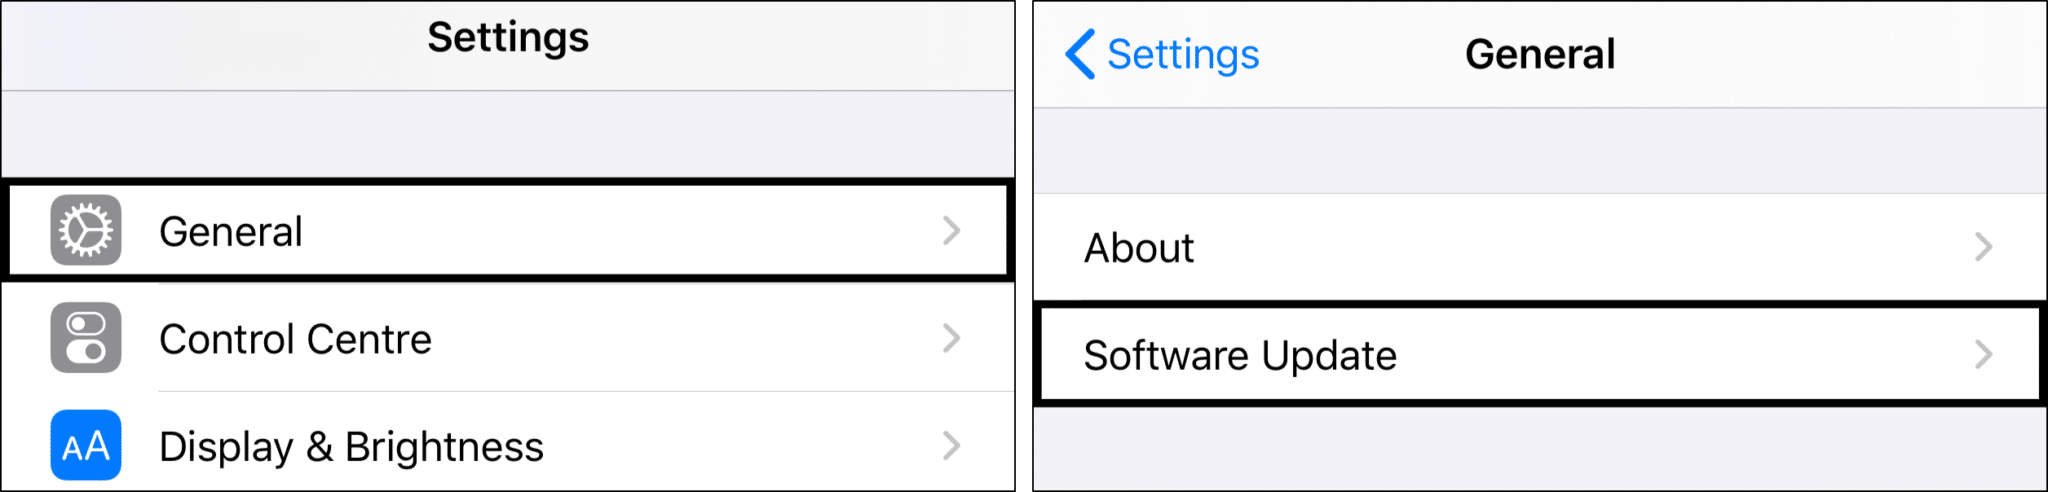
- Suppose an update is available. Then, download the update and install it.
- Finally, reboot your device.
3. Check for Pending App Updates for Microsoft Teams
Besides updating your operating system, make sure you’ve got the latest version of the MS Teams app installed on your device.
The developers for MS Teams 🧑💻 are always trying to provide its users with the best experience and provide fixes for any bugs or issues reported. Thus, it’s recommended to always keep the app up-to-date which may contain a fix for your camera issue or improvement for the app performance.
Without further ado, let’s get started on how to update your app:
For Windows or macOS
To update MS Teams, it can only be performed through the app itself and can’t be initiated through the app store on your desktop:
- First, enter the Teams app on your computer and ensure you have a stable Internet connection.
- Following after, click on the menu icon found in the upper-right corner of the app. When performing the update, the account you’re logged in as will not matter.

- Next, a drop-down menu will appear, click Check for updates.
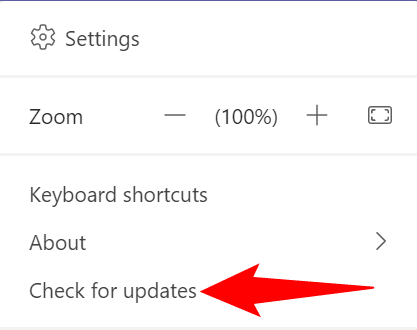
- Lastly, Microsoft Teams will begin to check whether an update is needed. The process is announced through a small message at the top of the window. While the app checks for any updates, you can continue working on Teams as usual.
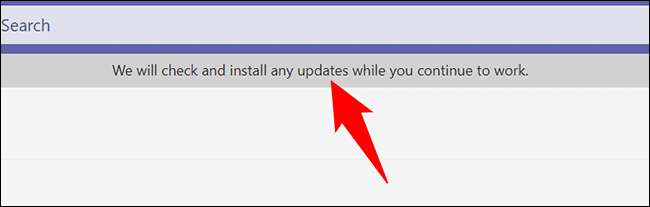
Finally, if your Teams app doesn’t need to be updated, a separate banner announcement will tell you about it. Otherwise, the latest version of Microsoft Teams will be downloaded and installed automatically on your computer. It’s done in the background and once completed, an announcement will tell you the latest update has been installed.
For Android
- First, start by opening the Google Play Store app on your phone.
- Following after, tap the search bar located at the top of the Play Store page.
- Next, type “Microsoft Teams” and tap Enter.
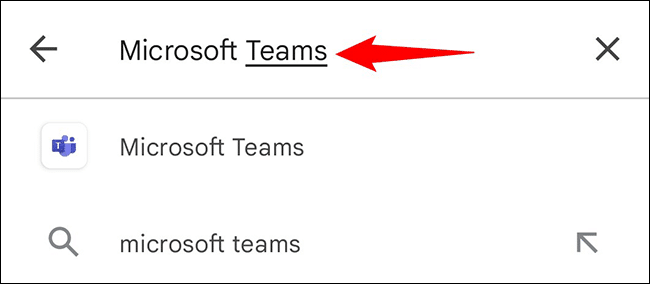
- Fourthly, once you’ve been brought to the search results page, choose “Microsoft Teams”.
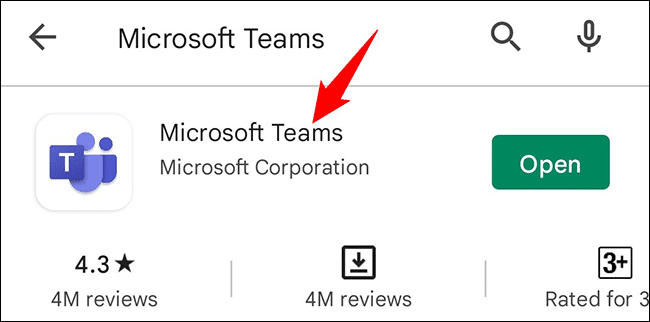
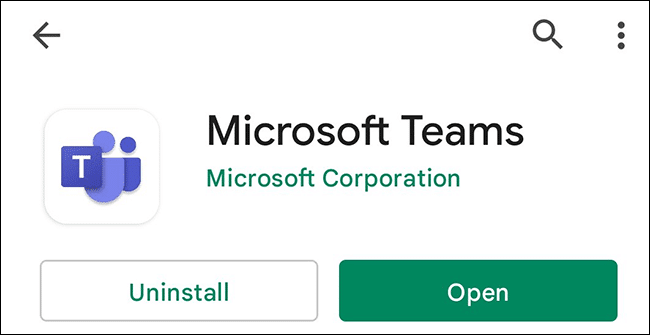
- Finally, on the Teams app page, tap “Update” to install the latest app version. If you don’t manage to find the button, you may have the app version up-to-date already.
For iPhone (iOS)
- First, open the Apple App Store app on your phone.
- Next, tap the “Updates” tab found at the bottom of the page.

- Following after, from the “Updates” screen, keep scrolling until you’ve found the Teams app. If you don’t find it under the Updates tab, your app might have the latest version installed before checking.
- Lastly, if you do find the app, tap “Update” located next to the app name.
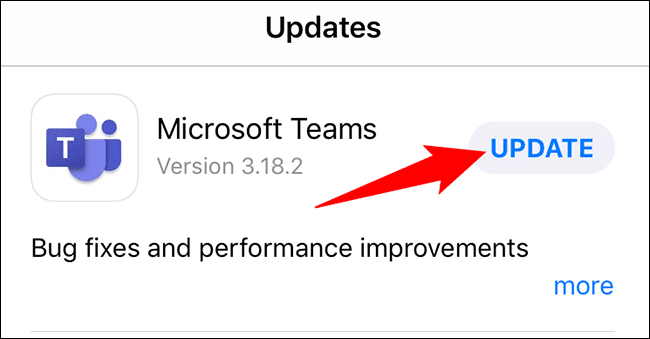
Once you’ve tapped the update button, wait for the installation to be completed and refrain from using the Teams app until then. After the update is done, you’ll be running the latest app version with all the newly-installed features and fixes.
Finally, try to enter the Teams app and check whether your camera issue has been resolved. If the issue has been resolved, you’re officially free from camera troubles. However, if the problem persists, don’t worry, as we still have many more fixes for you to try out!
4. Ensure Your Camera is Not In Use by Other Apps
Sometimes, we may make the mistake of having two communication platforms open. Whilst this may be fine, the issue occurs when we need to turn on our camera. Our operating system will only recognize one platform as the primary camera user, and all other platforms will display an error message when we try to enable the camera on that side.
Thus, here are two simple fixes you can try:
- Close any background apps that might require or are using your camera (such as Skype, FaceTime, or Discord). For an added effect, you can completely end the process or task through the Task Manager on Windows (Ctrl + Shift + Escape), Force Quit Applications menu on macOS, or by closing the background apps in the app switcher or recent apps on Android/iOS.
- If you’re using an external camera, try to unplug and replug it again.
5. Restart Your Device
You could also try fixing your camera issue by rebooting the device. It may be hard to believe, but by doing such a simple action, more than half of the technical problems that regular users encounter are solved.
Why Should You Try Rebooting Your Device?
Rebooting your device is as simple as shutting down and switching your device back on. If you can’t find a restart feature or the power button, try to unplug the device from its power source and re-plug it (power cycling).
So, why does restarting our electronic device work so well? When our computer runs, we may perform actions such as opening and closing programs, installing and uninstalling apps, or downloading and deleting files. Many of these actions that we perform leave an electronic footprint, usually it appears in the form of a background process that is unessential to us anymore.
All the background processes drag our system resources, most of them directed to our RAM. If you’ve been leaving your device on for a long period, the chances of getting a sluggish system, faulty peripheral device integration, or other issues occurring are more often.
By restarting your computer, all programs and processes will close or end. After starting it again, your RAM is back to its optimal state, your computer running faster, and your issue is potentially fixed.
Here’s how to restart on various devices:
For Windows
- First, open the Start menu found in the lower-left corner of the computer screen.
![]()
- Subsequently, click the Power icon at the top (Windows 8) or, for newer system versions, at the bottom (Windows 10/11).
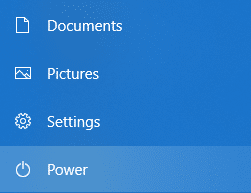
- Lastly, click the Restart option from the list of options in the menu.

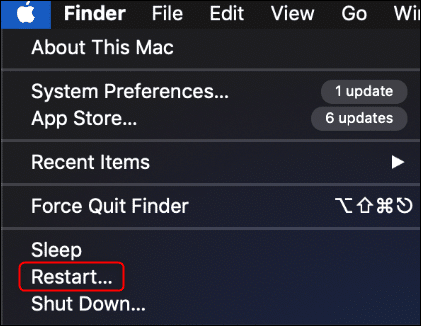
For macOS
- First, click on the Apple menu or Apple logo.

- Following that, click Restart.
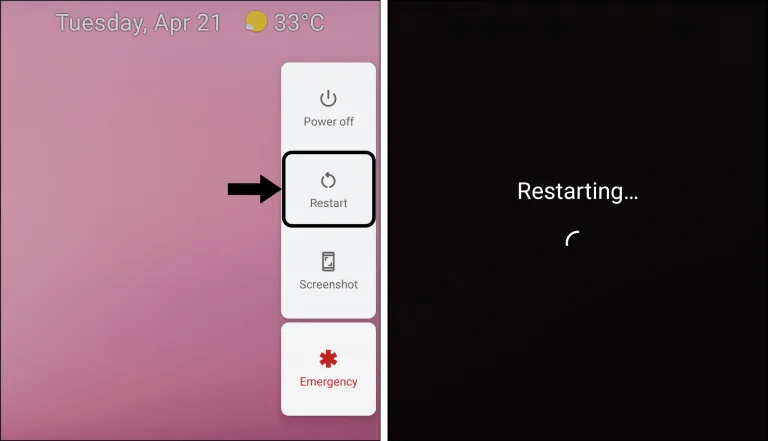
For Android
- First, press and hold the power button located at the side of your device for a few seconds.
- Subsequently, there’ll be a menu that appears with the Power Off option and Restart option.
- Finally, tap on the Restart option to reboot your phone. In the case where you can’t find Restart, the Power Off option is a good alternative as well.
For iOS (iPhone)
- First, find the power button found on the side of your phone.

- Following that, for older models (iPhone 8 and older), press and hold the power button for several seconds, or newer models (iPhone X and newer), press and hold it together with the volume up button.
- Subsequently, a slider will appear on the phone screen. Swipe right to turn the device off.

- Next, wait a minute or two before restarting your iPhone again.
- Finally, press and hold the power button until the Apple logo appears on the screen.
6. Check for Microsoft Teams App Update
If you’re still struggling with the camera issue, check to see if the latest version of the Teams app has been installed on the device.
When we update our app, we’re essentially improving its app performance and fixing bugs that have been reported by users. By performing the update action, the issue you’ve been experiencing may have been fixed in the latest app version.
Here’s how to update the Teams app on different devices:
For Desktop (Windows/macOS)
Updating Teams can’t be done via the Microsoft Store and can only be initiated through the app itself.
- First, locate and open the Microsoft Teams app on your Windows device and confirm that you’re connected to the internet.
- Following after, select your Microsoft account profile picture in the upper-right corner of the app. When you perform the update, the account you’re logged in as will not matter.
- Subsequently, a menu will appear, click Check for updates.
- Fourthly, MS Teams will then begin to check whether an update is needed. An announcement will be made to notify you that the checking is in progress and appears as a small message at the top of the app window.
If your app needs to be updated, the latest version of MS Teams will be downloaded and installed in the background without the need for additional steps. Once the update is complete, an announcement will tell you about it.
However, if the latest version of MS Teams has already been installed before checking, no installation will be made, and a separate banner announcement will tell you about it.
For Android
- First, locate and open the Google Play Store app on your phone.
- Next, tap the search bar at the top of the Play Store page.
- Following that, type ‘Microsoft Teams’ and hit Enter.
- Then, once you’ve been redirected to the search results page, select “Microsoft Teams”.
- Finally, on the Teams app page, tap “Update” to install the latest version of the app. If you don’t come across an “Update” button, that means your app has most likely been updated already.
For iPhone
- First, locate and open the Apple App Store app on your phone.
- Subsequently, tap on the “Updates” tab at the bottom of the App Store page.
- After that, on the “Updates” screen, find the Microsoft Teams app.
- Lastly, once you manage to locate it, tap “Update” to the right of the app. If you have the Teams app installed and can’t find it on the Updates page, we can conclude that the latest app version has been installed on your device.
When you’re updating the Teams app, avoid using it until the installation has been completed. After completion, the latest version of Teams with all its new updated features will be within your grasp.
Not forgetting why you’ve come here, try your luck with the Teams app again and see if your camera issue or black screen has been fixed. If the issue persists, don’t worry, there’ll be many more fixes for you to try out!
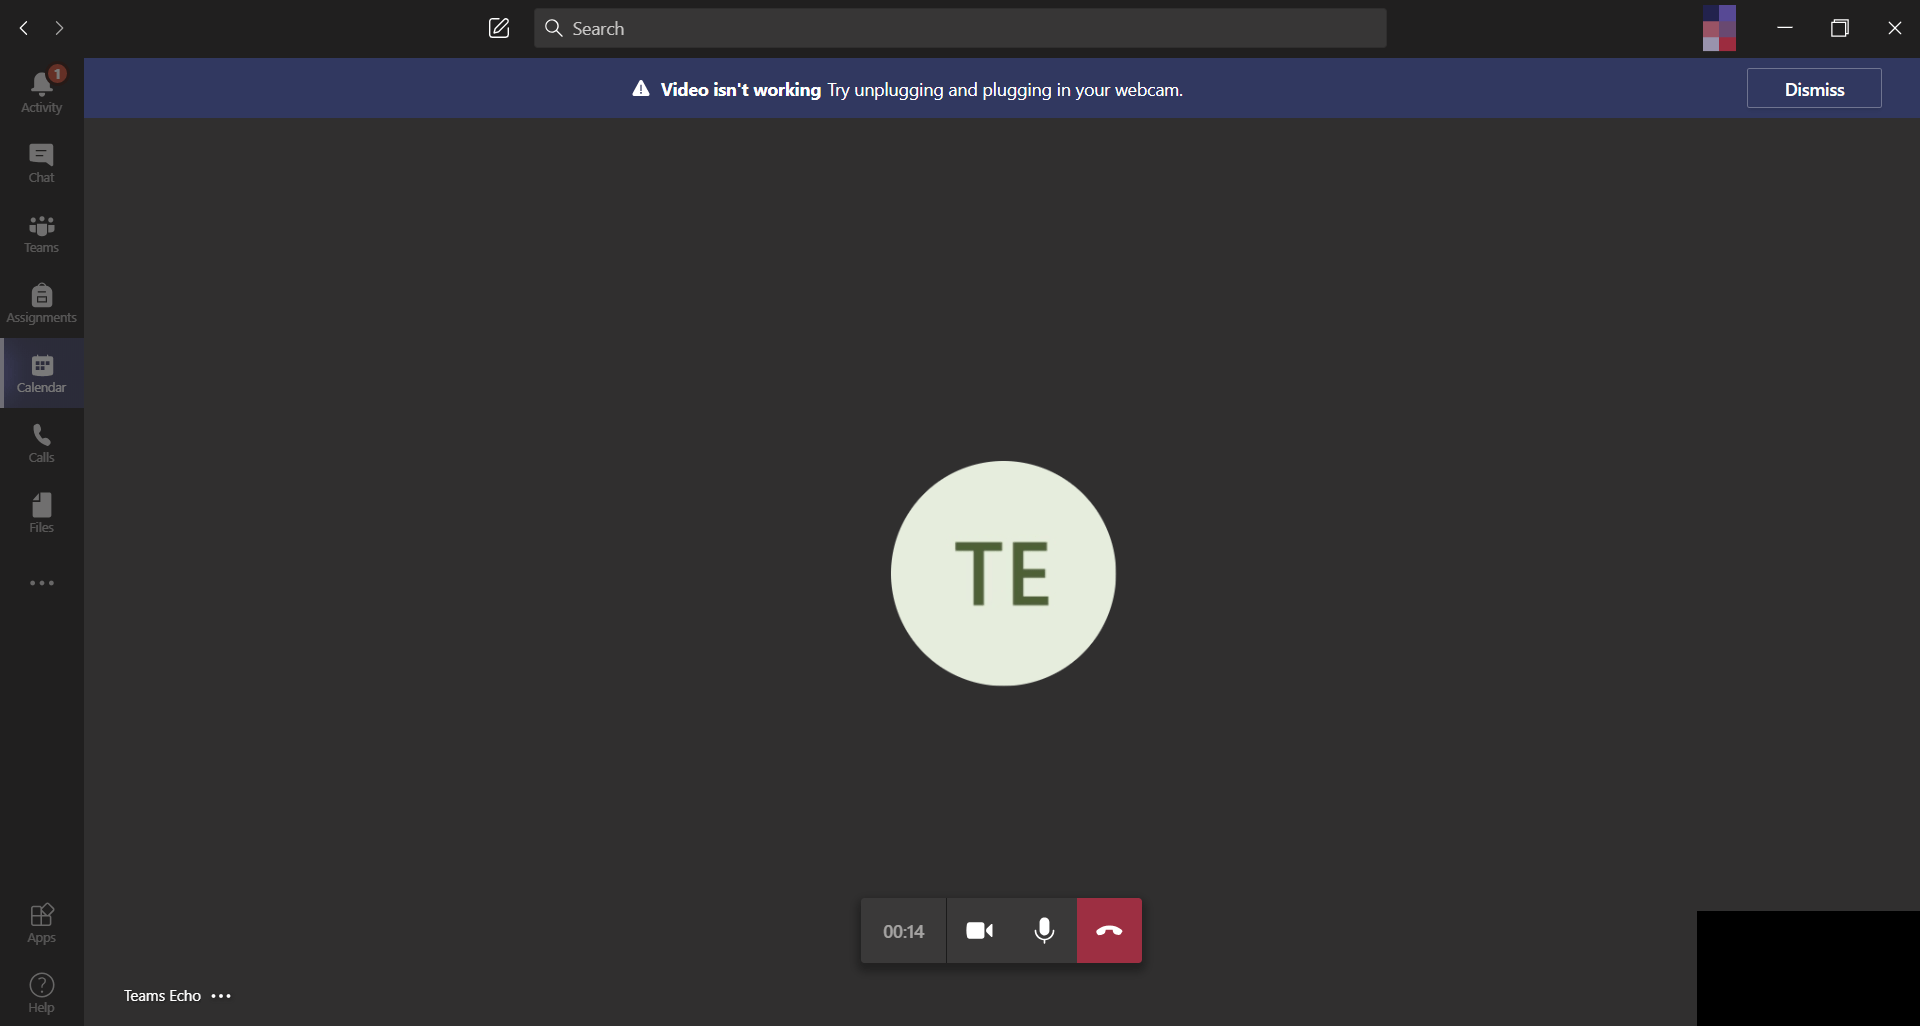
7. Make a Test Call in Teams
Before joining a meeting, it’s always good to make a test call before that. By performing a test call, we can check how our mic, speaker, and the camera is performing.
We also recommend performing this step after every fix in this guide to check whether your webcam is working correctly again.
A few things to note before we jump into the how:
- Currently, the test call feature is only available in English. Any additional languages are not supported and will be made available soon.
- The test recording is deleted immediately after the call ends. Microsoft will not retain any information done during the testing session.
- The test call feature is only made available for the Teams desktop app in Windows or macOS. Besides that, it is also not made available for Teams on the web browser.
- The test call feature is not available for Government High Cloud and Department of Defense tenants who are using the Teams desktop app for Windows and macOS.
With all that said, let’s get on with how to make a test call:
For Desktop (Windows/ macOS)
- First, locate the Teams app on your desktop.
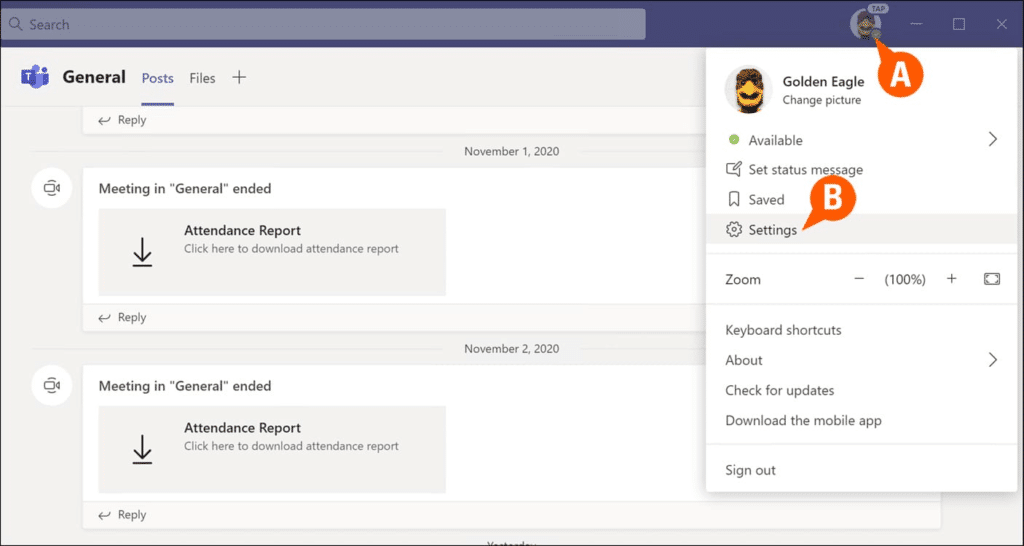
- Subsequently, in the upper-right corner of the main window, select your account profile icon.
- Following after, a drop-down menu will appear where there’ll be a list of options for you to choose from.
- Next, from the menu, click on Settings.
- Fifthly, the Settings window should appear. Click on the Devices section in the left column.
- Then, select the Make a test call button.

- After clicking, the test call will connect. Follow the instructions from the Teams Echo automated service. A chime will cue you to begin speaking and recording your voice. When you hear a second chime during the session, it indicates that the recording has ended.
- Next, the MS Teams Echo bot will play back your message to check the call quality including your mic, audio, and camera.
- Lastly, once you’re satisfied with the overall call quality, you can click the leave/hang up icon to end the test call. Click Close.
8. Manage App Permissions
All devices have an in-built feature called App permissions. It is a setting that gives the specific application access to certain devices connected to your computer or permission to access particular features available in the operating system. App permissions can be set for many hardware and features such as location, webcam, microphone, contact, etc.
When we install an app and try using some of the features that come with it, sometimes it may prompt you to allow access to certain hardware components for it to run smoothly.
Oftentimes, people have made the mistake of denying the Teams app access to their device’s camera. Hence, without the Teams app’s access to your device’s webcam or camera, you might see a black screen instead or find that your video on Teams isn’t working or showing up correctly. Could you be one of these victims as well without knowing?
Fret not, in this fix, we’ll be exploring how to check and allow Teams access to your device’s Camera.
There are multiple ways for us to access app permissions, let’s dive right into them:
For Windows
To only manage the Teams app’s permission:
- Firstly, open the Windows Start menu and right-click on Teams.
- Then, click More > App settings.
- Lastly, locate the Camera under App permissions and ensure that it has been toggled to the right (On). If the toggle switch is on the left side (Off), click on the toggle to switch it to the right.
To manage the Teams app’s permission via Settings:
- First, open the Windows Start menu and locate the Settings icon on the left sidebar or you can search for it.
- Next, click on Settings.
- Once you’re in, click Apps > Apps & Features.
- Subsequently, continue scrolling down the list of apps until you find Teams.
- Following after, click on the app’s menu button, and click Advanced Options.
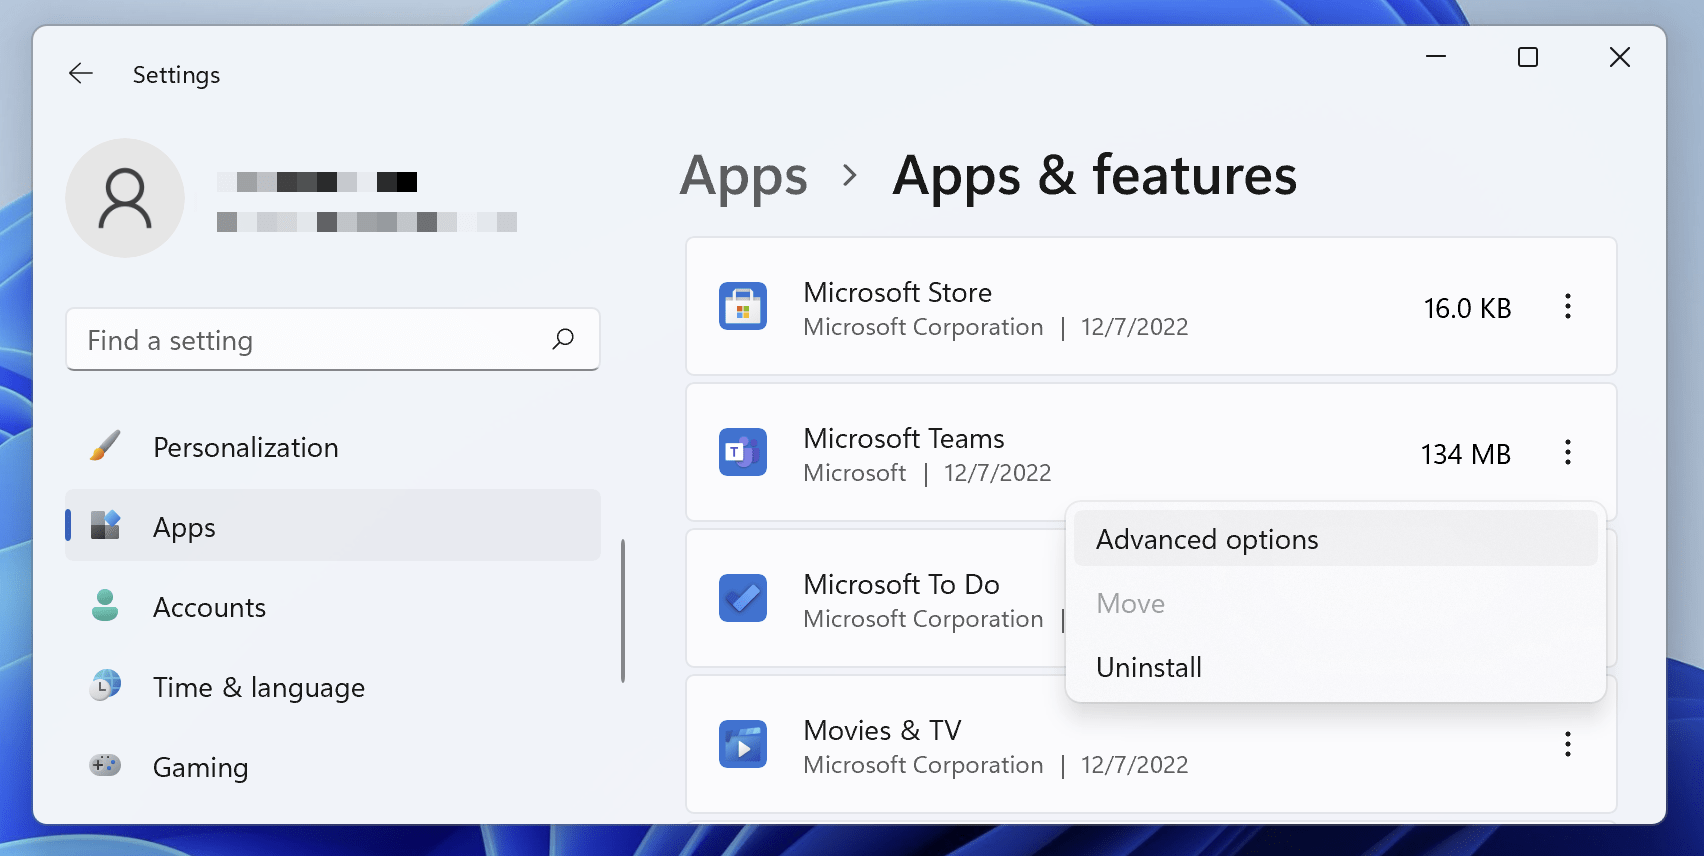
- Then, scroll down until you see the permissions the app can use under App permissions.
- After that, toggle the Camera on to allow access to the app use. If your Camera setting has already been turned on, turn the setting back to Off and then back On to refresh the configuration.

- Lastly, close all apps and restart your computer. (Step 5)
For macOS (applies to macOS 10.14 and higher)
- First, click on the Apple menu or the Apple logo in the upper-left corner of the computer screen.
- Next, open System Preferences.
- Following after, select Security & Privacy.
- Subsequently, under Privacy, choose Camera on the left sidebar.
- Fifthly, click the lock icon to unlock and make changes to the privacy setting.
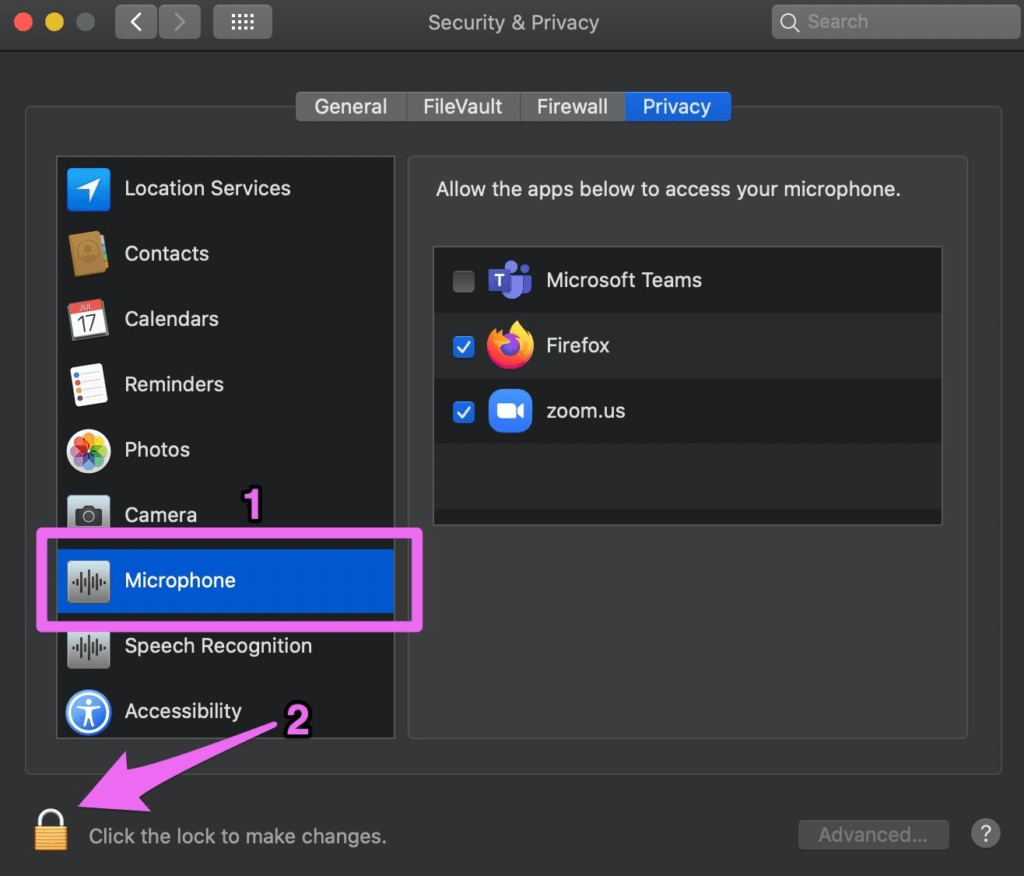
- After unlocking, make sure Microsoft Teams is ticked.
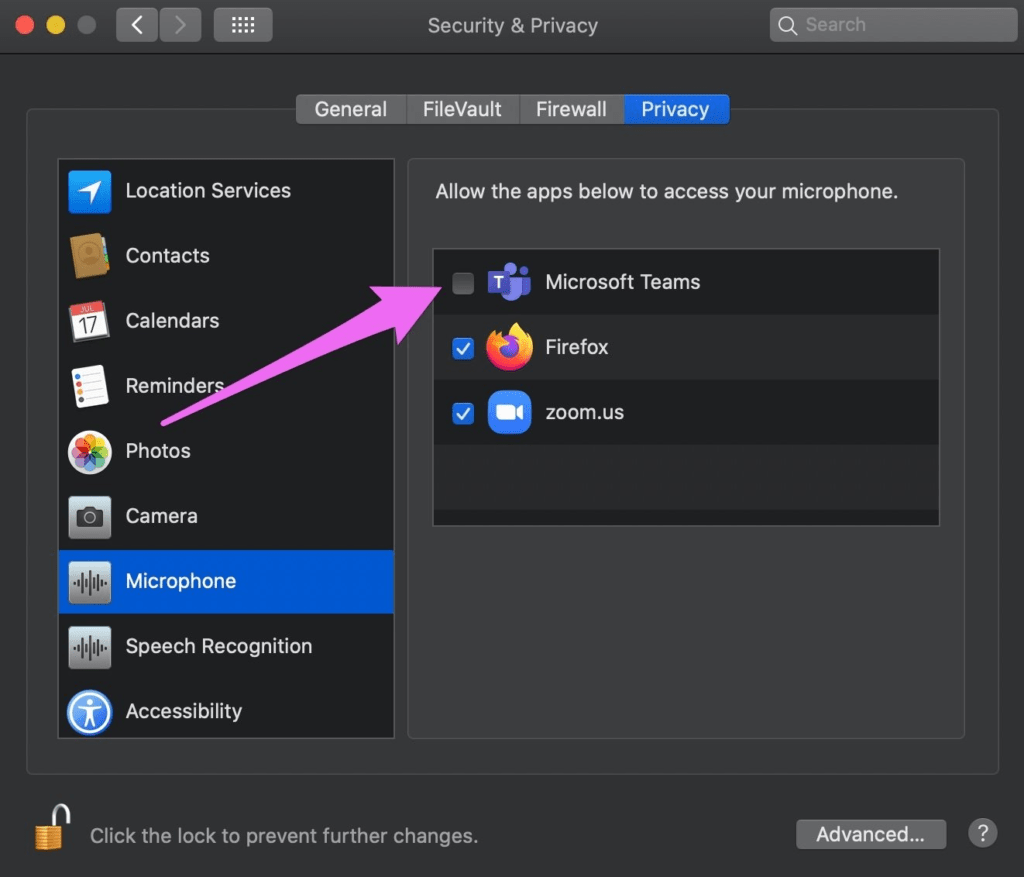
- Lastly, close all apps and restart your computer. (Step 5)
For Android
- First, on your phone, open the Settings app.
- Subsequently, tap Apps.
- Following after, tap the app you want to change, in our case it’s the Teams app. If you can’t locate it, tap on See all apps. Then, you can choose the Teams app from there as well.
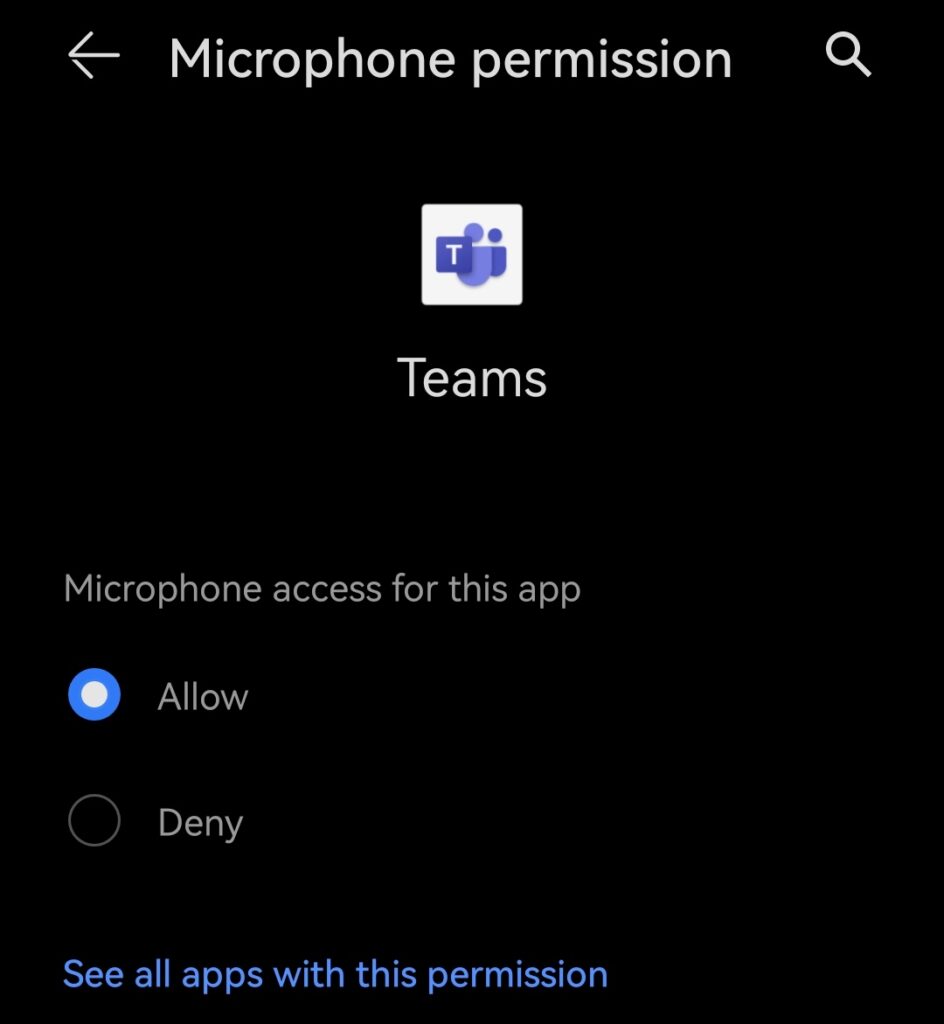
- Next, tap Permissions. If you’ve allowed or denied any permissions for the app, it can all be found here.
- Lastly, tap on “Camera”, and choose to Allow for it. If it has already been set, then tap Don’t allow and select Allow again to reset the configuration.
-
- Fun fact for Camera and Microphone permissions, you can choose either:
- Allow only while using the app: The app is allowed to use the permission only while you’re using it. (recommended)
- Ask every time: Every time you open the app, there’ll be a prompt to ask you whether the permission can be used. Once you’re done using the app, the permission will be denied.
- Don’t allow: Whether you’re using the app or not, the setting will be denied.
- Fun fact for Camera and Microphone permissions, you can choose either:
For iOS
- First, open the Settings app on your phone.
- Subsequently, tap Privacy to view all the permissions available on your device.
- Afterward, find the Teams app and tap into it.

- Finally, tap the toggle to On for “Camera”. If the toggle is already turned on, then toggle it to Off and re-toggle it to On again to help reconfigure the setting.
For Web Browser
The steps performed below were done using Google Chrome. Nonetheless, other web browsers will work similarly as well.
Note: The web version for MS Teams can only be supported on browser engines such as Google Chrome, Mozilla Firefox, Microsoft Edge, and Internet Explorer 11.
- First, go to Settings > Security and Privacy.
- Following after, click Site Settings.
- Next, locate and click View permissions and data stored across sites.
- From there, enter “teams.microsoft.com” in the Search field.
- Lastly, set the Camera permission to Allow.

Now, you can proceed to test whether the camera issue you’re experiencing has been resolved after performing the necessary steps. If you only need to use the camera once in the Teams app and don’t feel comfortable leaving the permission on, it can always be disabled again using the same steps as mentioned.
Nevertheless, allowing Teams permission to use your camera is always preferred as many functions in the app rely on it.
If you’d like to find out what is collected by Microsoft, the app’s data and privacy policy can be referred to. By reading through the policy, a detailed explanation of what happens to the data is given, and from there, you can decide whether or not the permission should be allowed.
9. Check for a Camera Switch or Button on Your Device
For some laptops and portable devices, there exists a physical kill switch or button that helps to turn the camera on or off. When the button is set to off, your device will not recognize that there’s a camera installed into it or it may cause the camera to output an image of a camera with a slash through it.
This button may be nifty in cases when we don’t want our camera to be used by the device itself and prevents hackers from using our camera. However, the troublesome part comes when we forget to turn the button back on when we’re using an app that needs the camera. In a moment of panic, we may even forget that the camera button existed and proceed to try out other fixes that will not work.
Thus, if your computer has such a switch or button, ensure that it’s in the on position before trying to turn on your camera. These switches are not easy to find, so ensure that you have checked all the possible places.
For example, it could be:
- A small slider for a shutter built right into the camera
- A sliding switch located at the side of your laptop
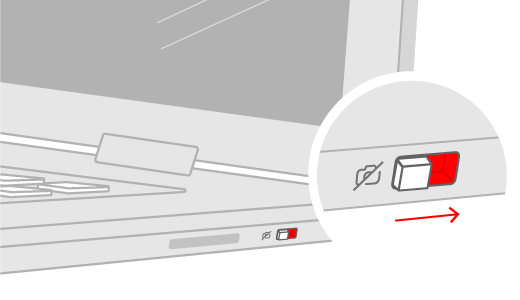
- A button on the keyboard with a camera icon

10. Run Diagnostic for Windows
On most occasions, our computer comes with an in-built diagnostic app or feature. Running the diagnostic can provide a fix for almost all camera issues.
We can start by running the automated camera troubleshooter through the Get Help app. Get Help is a terrific app to use as it automatically runs the diagnostic for us and takes the necessary steps to fix most camera problems.
To use the Get Help app, follow these steps:
- First, click on the Search icon next to Windows Start.
- Following that, in the search field, type “Get Help”.
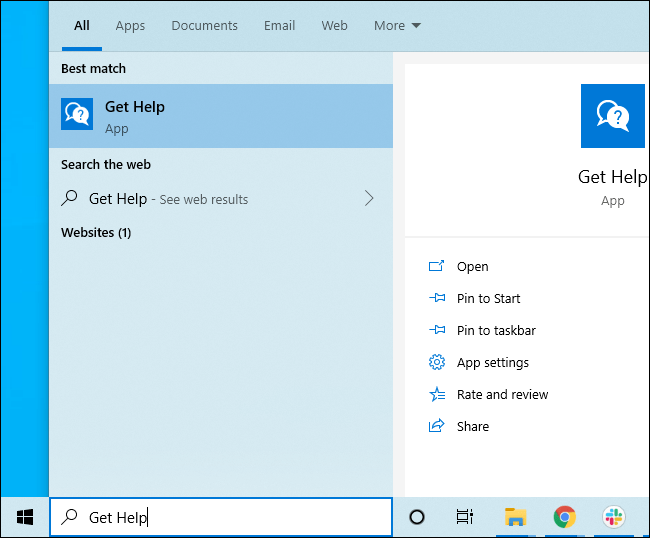
- Once you’re brought to the search results page, click on the Get Help app. If you can’t find it, you may need to install it into your operating system.
- Subsequently, there’ll be a search field beneath the “We’re here to help” title. Click on it and type “camera issues”.
- Next, click Enter.
- Finally, there’ll be a set of questions to help you to find the right solution for your camera issue. After the set of questions, a diagnostic will automatically run and the fix will be suggested to you.
If the Get Help app wasn’t able to resolve the camera issue, we can try to test our camera using the Camera app.
Here’s how to test:
- First, select the Windows Start icon.
- Next, choose Camera from the list of apps. If you can’t locate it, you can also search for it via the Search icon right next to Windows Start.
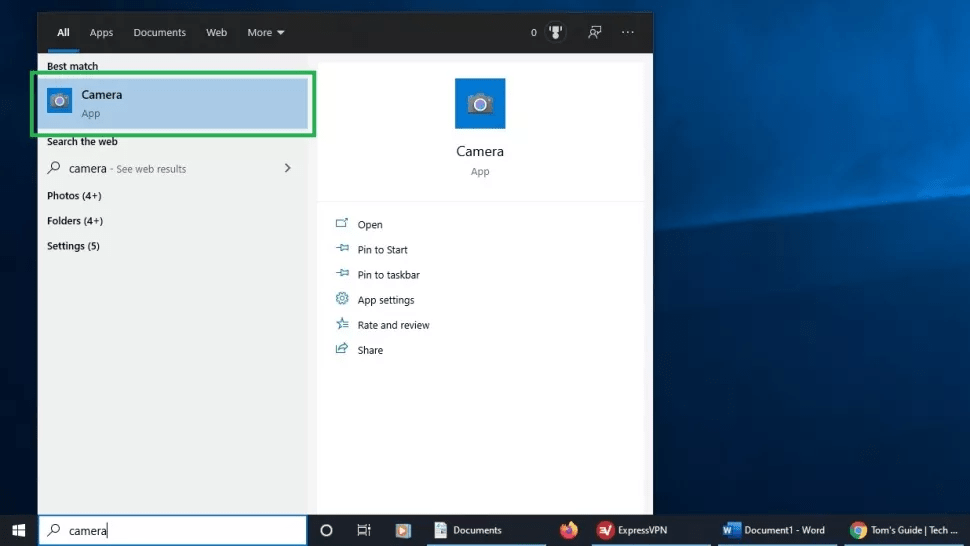
- Subsequently, if the app asks you to provide access to the Camera, select Yes. If the camera works well in the Camera app, the problem might be associated with the Teams app.
11. Run Diagnostic for macOS
When our camera is experiencing issues or is unavailable, Apple has included built-in diagnostic software to help with our trouble. The software will run and search for any hardware problems on the MacBook that might explain why the camera isn’t working.
For us to run the diagnostic, we can follow these steps:
For Macs With Apple Silicon (M1 and Newer)
- First, start up your Mac.
- Subsequently, continue to press and hold the power button as your Mac is turning on.
- Thirdly, release the power button when a startup options window appears.
- Following after, press Command + D to run the diagnostics.
- Lastly, Apple Diagnostics will run automatically. After completion, a list of problems encountered will be presented to you.

For Macs With an Intel Processor
- First, start your Mac.
- Then, press and hold the D key while it turns on.

- Lastly, release the key when the progress bar appears or when you’re asked to select a language.

After running diagnostics and a hardware problem is found, make a note of any error codes that were given. You can either follow the on-screen instruction to fix your issue or contact Apple Support to make repairs for the error codes. If you see the ADP000 code, this means that no issue is found on your Mac and may have something to do with the Teams app itself.
12. Enable Privacy Settings on Windows
Another common issue that people encounter is when their camera isn’t working due to the laptop’s privacy settings. On some occasions, we may forget to turn on permission for camera usage for our apps.
Here’s how to check the camera privacy settings on your device:
For Windows
- Firstly, click on the Start menu on your computer.
- On the menu, select the Settings icon.
![]()
- Next, locate and select Privacy.
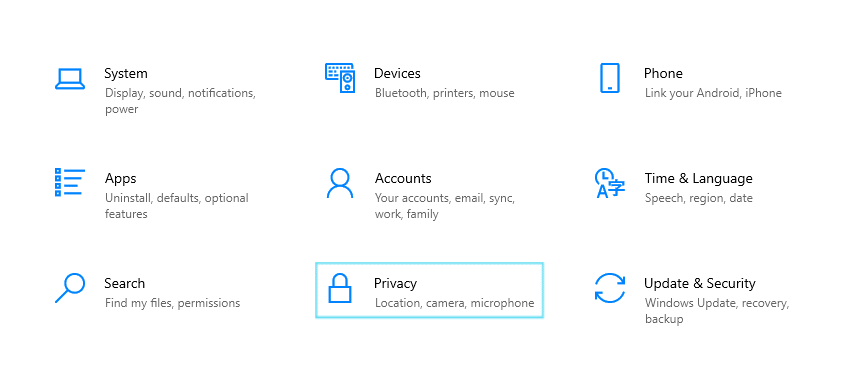
- Subsequently, under Privacy, choose Camera.
- Following that, make sure the setting for Camera access for the device is turned On. If the setting is already on, turn the setting off and switch it back on again, thus allowing the camera configuration to reset.
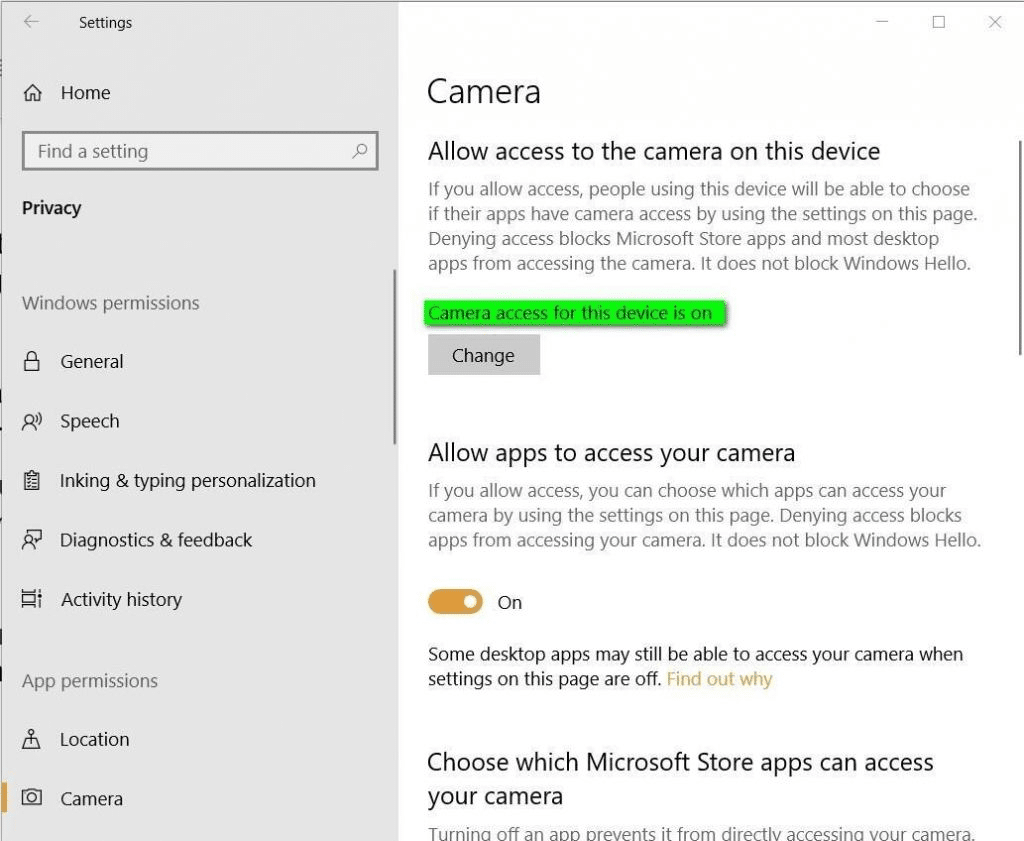
- Lastly, close all apps and restart your device.
13. Check Your Camera Device in Teams
Most of the time, MS Teams can automatically recognize the camera we’re using once we turn it on. However, bugs do occur, and one of them could cause our app to not recognize our camera settings. This is more prone for devices that have many external devices connected to them or a history of previously connected external devices.
Many people face this issue, and it can be solved by selecting the correct device manually in MS Teams. You should note that the feature is only available for Teams on Desktop before diving into the how.
- First, locate the Teams app on your computer and open it. If you can’t find the app shortcut, you can also use the Search function to find it.
- Next, select Settings and more next to your profile picture at the top of your page.
- Thirdly, click on Settings from the drop-down menu.
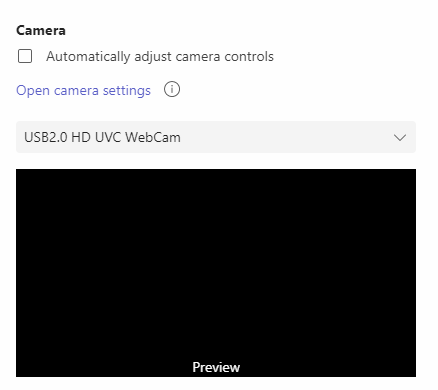
- Following after, find and click the Devices category on the left side of the Settings page.
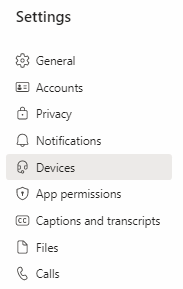
- Subsequently, once you’ve found your way into the category, under the Camera section, select the camera you want Teams to use.
- Lastly, you can preview the selected camera feed to see if everything’s good, parked under the Preview window underneath.
Configuring Camera Settings Using the Meeting Controls
It is always recommended to check and configure your camera settings before you join a call, so there aren’t any obstacles along the way.
However, if you’ve noticed your camera issue only during the meeting and don’t want to leave the call to fix it, don’t worry! MS Teams has developed a way for us to fix our settings during the meeting as they understood the hassle of having to leave the call to fix it.
Here’s how to configure camera settings while in a call:
- First, go to the camera icon on the meeting toolbar and hover over it. Remember to hover, as clicking on the camera icon would only cause the camera to turn on or off.
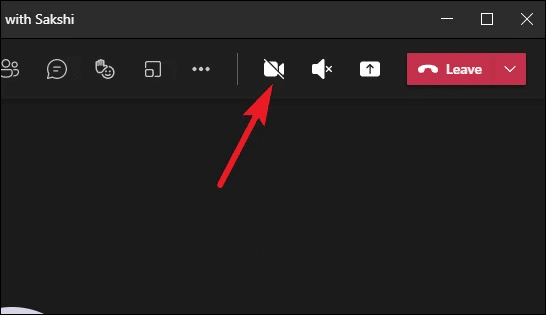
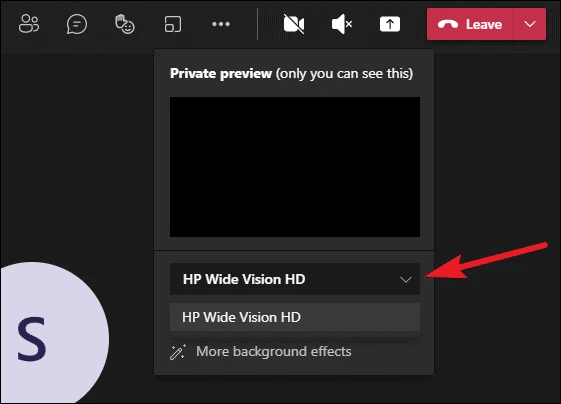
- Subsequently, new options will expand under it. To change the camera you’re using, click on the drop-down menu and select the device you’d like to use instead. A private preview of the camera is also shown to you in the menu.
There’s another way to configure your camera settings besides using the camera icon. It can also be done while you’re in a meeting and by following the below steps:
- First, click the ‘More actions’ icon on the meeting toolbar.
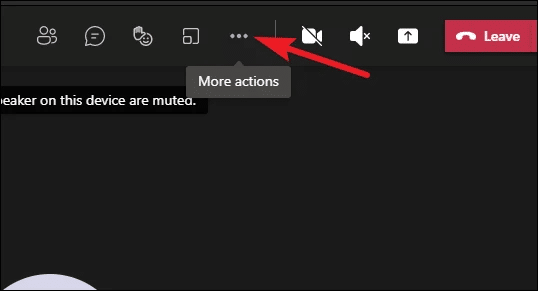
- Following that, select Device Settings from the menu that appears.
- Subsequently, the panel for Device Settings will appear on the right.
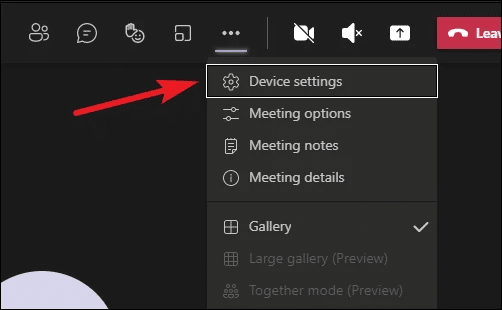
- Next, head over to Camera and configure the camera settings via the drop-down menu.
- Lastly, a private preview of the camera is shown to you in the Preview window.

Once you’ve fixed the camera setting, exit the dropdown menu by clicking anywhere out of it.
14. Install the Latest Camera Driver Updates
Not many people know this, but when we use our computer, a hardware component such as our keyboard, mouse, or network card needs to have a software component called drivers. A driver enables our operating system and gear to communicate with each other.
If a device driver has become obsolete, it can cause many serious problems. Examples of issues that may occur are performance problems when using the component, or it becomes slower.
Oftentimes, an updated driver can help people in solving their problems, your camera issue included.
Initializing a manual installation for the device driver can be mind-boggling and time-consuming. Typically, the downloading and installation of driver updates and many other devices are done automatically via Windows or software/system updates.
Nonetheless, Windows may not register the update, and if we’d like to check the driver and update it ourselves. Follow the steps as shown accordingly:
For Windows (Update)
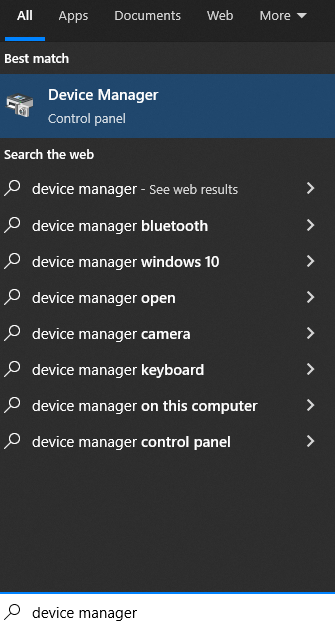
- First, click on the Search icon on your taskbar.
- Next, in the search box, key in Device Manager.
- Following that, a search result should appear where you can select Device Manager.
- Fourthly, select a category to see the name of the devices.
- Then, after entering the category, right-click the device you’d like to update.
- Subsequently, click Update Driver.
- Finally, select Search automatically for updated driver software.
-
- Let’s say Windows didn’t manage to find a newly updated driver for you to install, you can also try looking one up on your device manufacturer’s website and follow the instructions from there.
For Windows (Reinstall)
If you already have the latest driver installed, you can either leave it there and try a different fix or attempt to delete and reinstall the driver again. If you proceed with reinstallation, you’re essentially resetting any configurations as well as securing the latest device driver version.
- First, click on the Search icon on your taskbar.
- Following that, in the search box, key in Device Manager.
- Subsequently, a search result should appear where you can select Device Manager.
- Next, select a category to see the name of the devices.
- Then, once you’ve entered in, right-click or press and hold the device that you’d like to modify.
- Subsequently, click Uninstall device.
- After uninstalling, restart your PC (Step 5).
- Lastly, Windows will attempt to reinstall the driver.
For macOS (Update) – Manual
- First, locate and click on the Apple menu.
- Following after, select System Preferences.
- Lastly, click Software Update.
For macOS (Update) – Automatically Checking
- First, locate and click on the Apple menu.
- Following after, select System Preferences.
- Next, click on Software Update.
- Fourthly, ensure the “Automatically keep my Mac up to date” checkbox is ticked for the operating system to automatically install any macOS updates.
- If you’d like to set advanced options for the update, click Advanced and perform any of the following:
-
- Check for updates: this allows the Mac to check for updates automatically.
- Download new updates when available: this allows the macOS device to download updates without having to ask.
- Install macOS updates: this allows the macOS device to install updates automatically.
- Install app updates from the App Store: this allows the Mac to install any app updates automatically from the App Store.
- Install system data files and security updates: this allows the Mac to install any system files and security updates automatically.
- Lastly, click OK.
In case you want to receive the latest updates automatically, a few recommendations for you to select are: ‘Check for updates”, “Download new updates when available” and “Install system data files and security updates”.
After installing the latest driver update, try and inspect whether your camera issue has been fixed.
15. Check Your Antivirus Software
On some occasions, the antivirus installed in the device might block your camera from being accessed. The most important reason why this happens is that the software wants to shield you from any suspicious software that’s trying to access your webcam. At any given movement, a hacker can inject a certain malware that turns on your webcam without authorization.
Thus, if you believe your antivirus is the cause of your camera problem, fret not as we’re here to teach you how to unlock the webcam.
For Windows
If you’re using a computer that runs on Windows operating system, you may have its in-built antivirus software called Windows Defender. Let’s say you don’t have a third-party antivirus installed, then Windows Defender will be the next culprit for the camera issue.
Here’s how to enable your camera again:
- First, open Windows Defender on your computer.
- Next, select Virus & threat protection.
- Following after, head to Virus & threat protection settings and click on Add or remove exclusions.
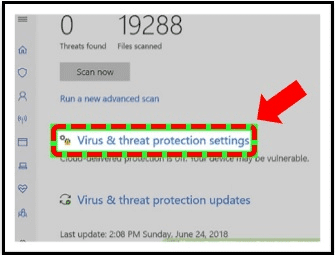
- Lastly, choose the app that you want to give access to your webcam.
For macOS
While Windows doesn’t have a privacy feature for webcam protection, Mac on the other hand does. By default, Mac will not allow any software access to your camera without permission. To gain access to your camera, you’d need to grant each app permission to do so.
Let’s say you disabled the notifications, or the access request doesn’t appear, here’s the manual way to perform it:
- First, press Command + Space to open the search bar.
- Subsequently, type Security & Privacy and search for it.
- Next, select the Camera tab.
- Following after, click on Teams to grant access to your camera.
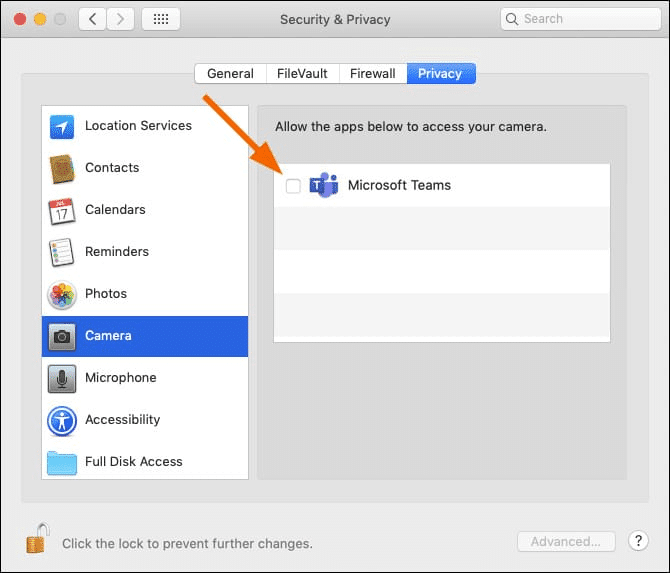
- Lastly, restart the app.
If your device has a third-party antivirus installed, you can visit your antivirus software company’s website to obtain more information on how to disable the camera blockage.
16. Check Your Hardware Drivers
If you’re using an external camera, you’d expect the USB device to work without any issues when plugged into the computer. Nonetheless, your USB port, hard drive, or the device itself may encounter a problem while trying to read the change.
Let’s tackle all possible causes for the camera issue together:
Try a different USB port and scan for hardware changes
First, start by unplugging the external camera from the USB port and use a different port. If the device works well after, then the issue has been fixed. Else, if the device doesn’t work after plugging into all the available ports, then the problem might be associated with the driver.
If replugging the camera into a different USB port didn’t work, or your camera is built into your device. Try this:
- First, click the Search icon located along the taskbar.
- Next, type device manager, then select if from the search results.
- Following after, under Cameras, Imaging devices, or Sound, video, and game controllers, find your camera.
- Subsequently, if you can’t find your camera under any of the above categories, then select the Action menu, and click Scan for hardware changes.
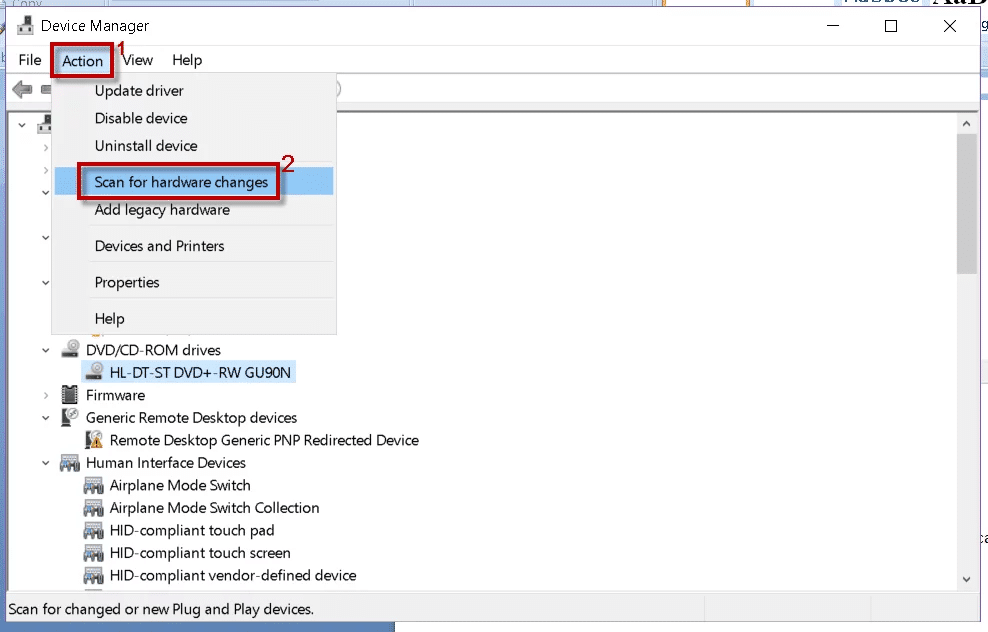
- Fifthly, wait for the computer to scan and reinstall updated drivers.
- Finally, restart your device, then try opening the Teams app again.
If these steps didn’t work for you, proceed with the next.
Check for an incompatible camera driver
There also exists the possibility that the camera you’re using was designed for older devices and isn’t compatible with Windows. Here’s how to check whether your camera is compatible:
- First, click the Search icon located along the taskbar.
- Subsequently, type device manager, then select it from the search results.
- Next, in Device Manager, look for your camera under Camera, Imaging devices, or Sound, video, and game controllers.
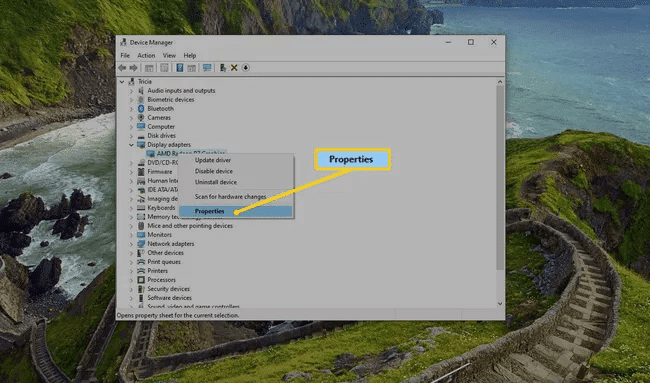
- Following after, right-click (or press and hold) on the name of your camera, and select Properties.
- Lastly, select the Driver tab, click the Driver Details button, and look for a file name that includes stream.sys. If it’s there, that means your camera was designed for operating systems before Windows 7 and you’d need to replace it with a newer camera.
If you don’t find a file name that includes stream.sys, continue to the next steps.
Roll back the camera driver
If your camera stopped working after an update, try out the fix below:
- First, click the Search icon located along the taskbar.
- Next, type device manager, then select it from the search results.
- Subsequently, in Device Manager, right-click (or press and hold) on your camera, then select Properties.
- Following after, select the Driver tab.
- Fifthly, click Roll Back Driver, and then choose Yes. (Some drivers don’t provide a rollback option. Hence, if your driver doesn’t have a Roll Back Driver available, proceed to the next fix.)
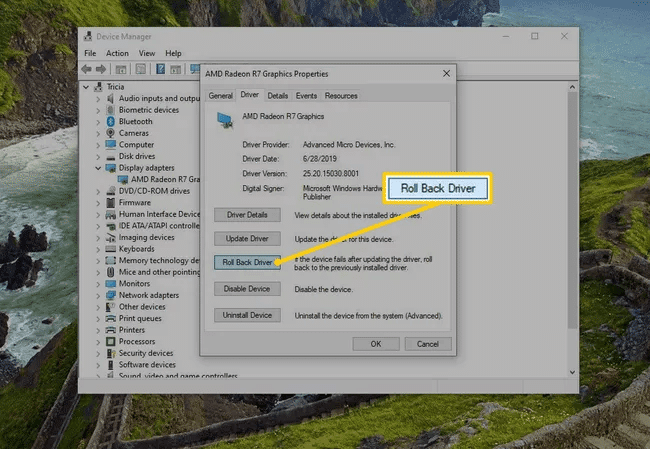
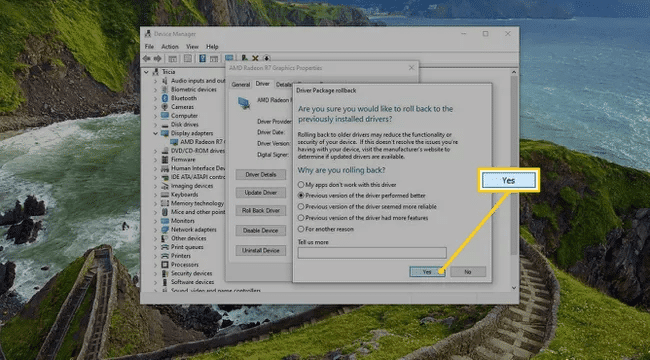
- After the rollback is complete, restart your device, then try testing the camera on the Teams app again.
If rolling the camera driver back or isn’t available, continue to the next steps.
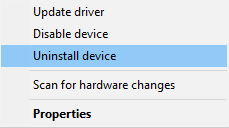
Uninstall your camera driver and scan for hardware changes
- First, click the Search icon located along the taskbar.
- Following after, type device manager, then select it from the search results.
- Next, in Device Manager, right-click (or press and hold) on your camera, then select Properties.
- Subsequently, select the Driver tab, then click Uninstall Device.
- After that, select the check box for Delete the driver software for this device, then click OK.
- Then, in Device Manager, on the Action menu, select Scan for hardware changes.
- Finally, wait for it to scan and reinstall updated drivers, restart your PC and try testing the camera on the Teams app again.
Switch to UVC driver
Most available USB webcams, are UVC (standard USB Video Class) compatible cameras. Thus, they will work well with the UVC driver that’s included in Windows (the in-box UVC driver).
If your webcam is not working as it should, you can also try swapping to the in-box UVC driver. Doing so may resolve the camera issue you’re experiencing.
Note: The in-box UVC driver for Windows might not support all the features of your camera. An example would be Windows Hello face recognition. The feature will no longer work as it needs to be supported by the camera manufacturer’s driver using custom USB extensions not supported by the in-box driver.
Please follow the steps below to change drivers (admin rights are required):
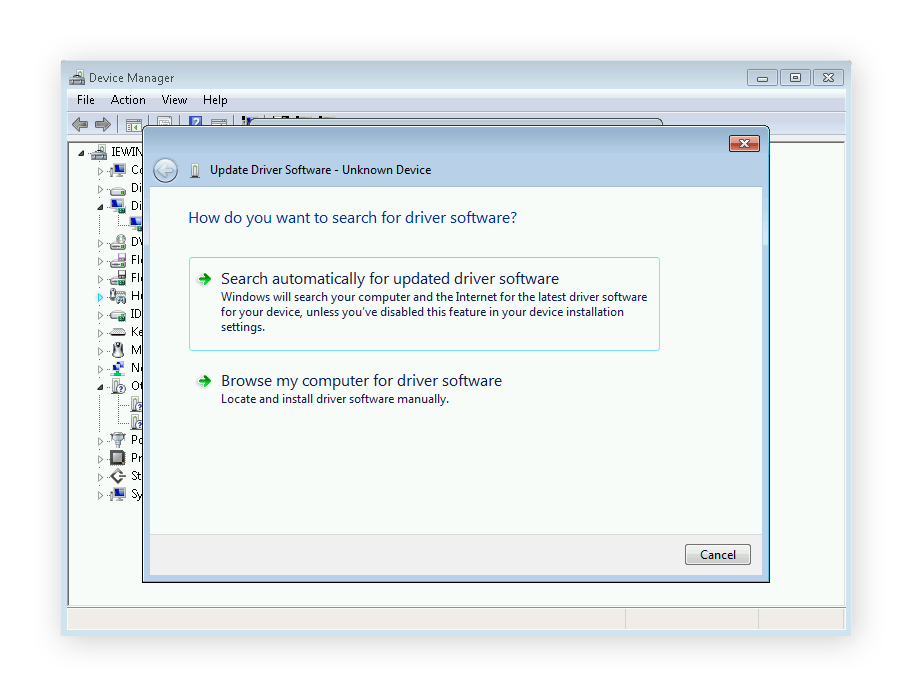
- First, click the Search icon located along the taskbar.
- Next, type device manager, then select if from the search results.
- Subsequently, right-click the webcam device with your mouse and select Update driver.
- Following after, click on Browse my computer for drivers.
- Fifthly, select Let me pick from a list of available drivers on my computer.
- Then, select USB Video Camera and click Next to complete the driver update.
- Lastly, click Close to acknowledge settings choices and head back to Device Manager. The webcam will now appear under the Cameras category in the Device Manager list.
17. Disable Camera Devices From the Computer
If you’re using an external webcam on your device and not the in-built one, perhaps try disconnecting the camera device and using the in-built camera.
If the solution so happens to work and you need it for an urgent matter, the built-in hardware can be a quicker solution to continue using for Teams.
However, if you must use a USB camera, try disabling the built-in camera through the Device Manager. Do note, that while the peripheral is disabled, it cannot be used with other apps.
Let’s begin! To disable the built-in webcam, here’s how:
For Windows
- First, open Windows Start located along the taskbar.
- Following after, search for Device Manager, and click the top result to open the app.
- Next, expand the Imaging devices, Cameras, or Sound, video, and game controllers branch.
- Then, right-click the camera and select the Disable device option.
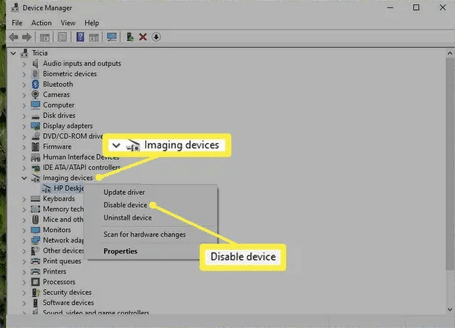
- Lastly, once you’ve completed the above steps, try opening the Teams app again and test out the camera using the Test Call function.
If you’d like to enable the hardware again, follow the same instructions above. The only difference is in step 4, make sure to select the Enable device option instead of Disable device.
18. Disable Skype Autostart
For those who have Skype installed on the device, you can try out this fix. By default or unless configured otherwise, Skype automatically runs in the background every time you start your computer. When this happens, the needed resources for the Teams app, such as microphone or camera components, may be interfered with by Skype. Thus, causing unwanted problems.
If it does occur, here are the following steps you can take to stop Skype from running automatically in the background during computer startup:
For Windows
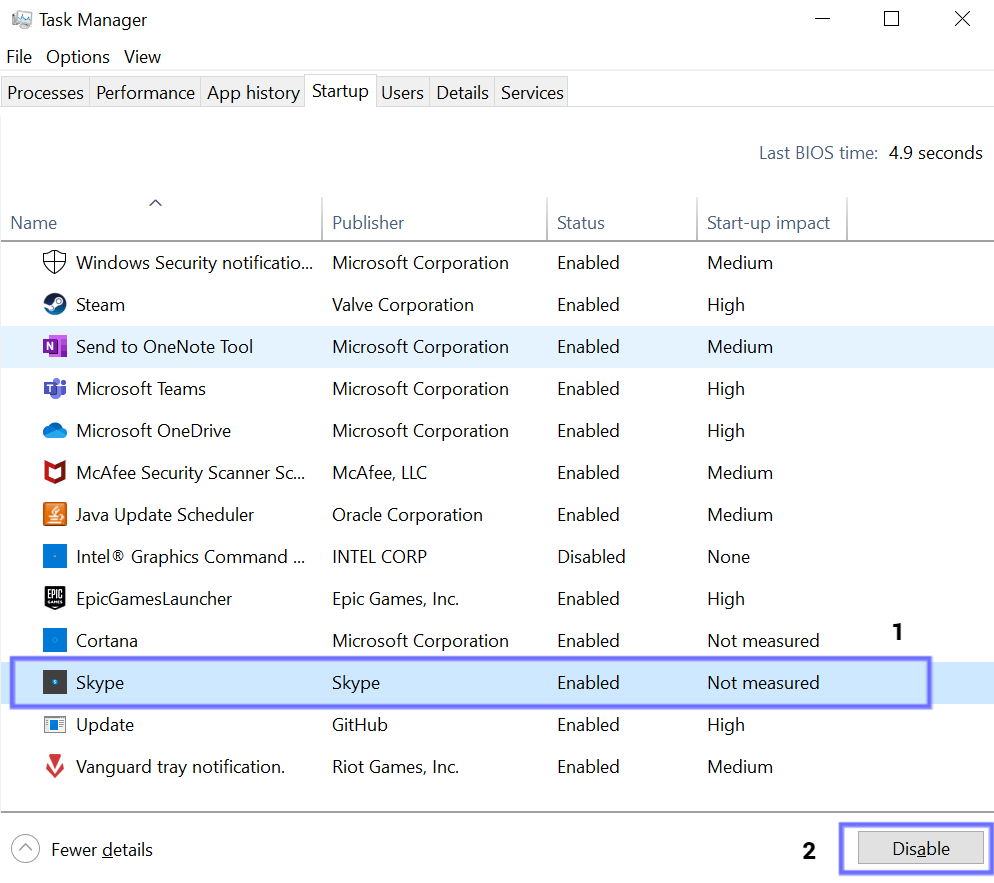
- First, open Task Manager by pressing Ctrl + Shift + Esc on your keyboard.
- Next, click on the Startup tab.

- Following after, scroll through the list of apps until you’ve located Skype.
- Lastly, once you’ve located the app, click on the Disable button for it at the bottom of the window.
For macOS
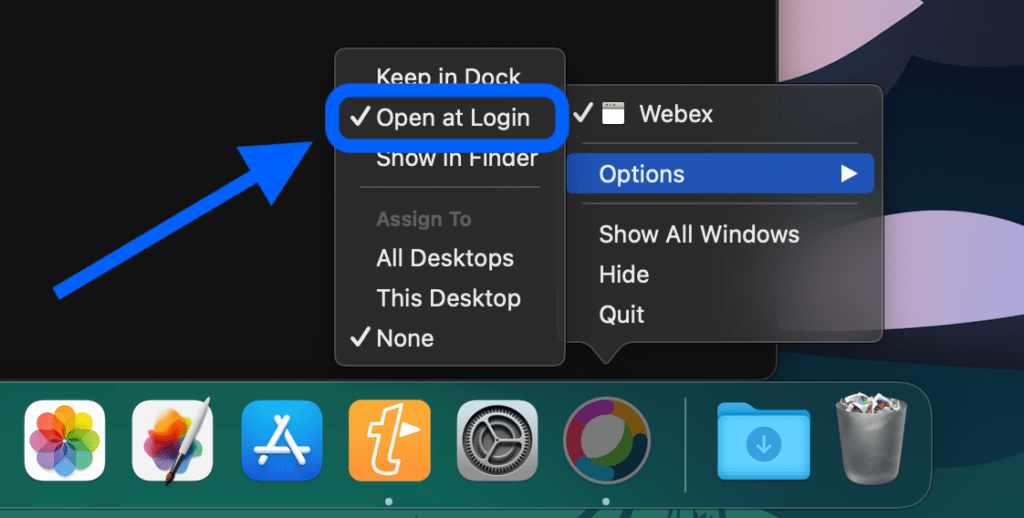
If you’re able to access Skype via the Dock, follow the steps below:
- First, right-click on the Skype icon located in the Dock of your mac.
- Following that, hover your mouse over Options and click on the Open at Login option in the contextual menu to uncheck it.
- Lastly, once the “Open at Login” option has been unchecked, this will prevent Skype from automatically starting on Mac whenever you turn on your computer.
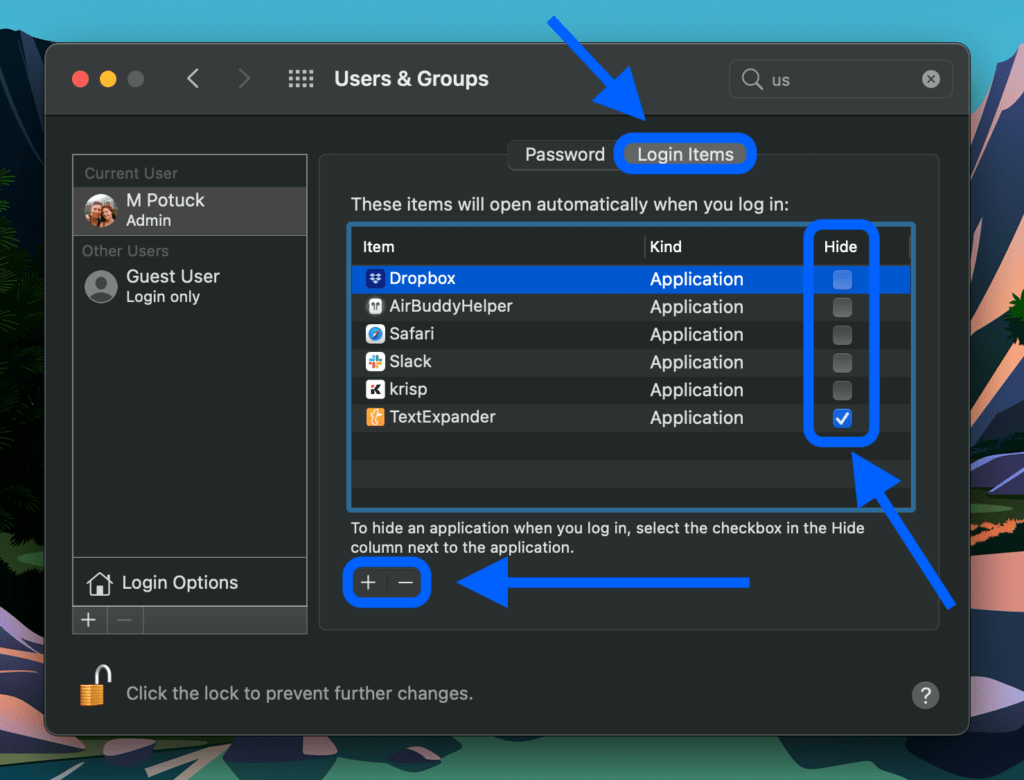
Similarly, you can also stop Skype from starting automatically by using the system settings. Here’s how to do it:
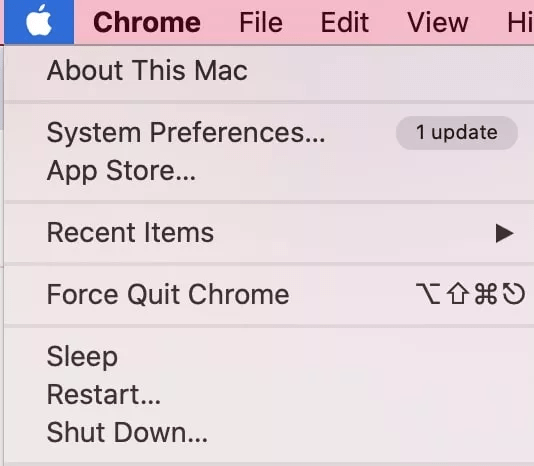
- First, click on the Apple menu or the Apple icon located at the top-left of the menu bar on your Mac.
- Next, click on System Preferences from the drop-down menu.
- Following that, on the System Preferences screen, click on the Users & Groups option.
- Subsequently, on the Users & Groups screen, click on your Account Name > Login Items tab.
- Finally, in the Login Items window, select Skype and click on the minus icon to remove Skype from the list of programs that are allowed to run automatically during your Mac startup.
19. Clear Cache From the App or Web Browser
If you’ve ever performed troubleshooting on your computer or cleared your browsing history, most likely, you’d come across advice related to the cache, such as a prompt asking you to clear it.
What is Cache in Microsoft Teams & Why Should You Remove it?
A cache is a reserved storage location that collects temporary data, so it helps our browsers and apps load faster. Whether the device we’re using is a computer, laptop or phone, web browser, or app, we’re bound to find a variety of cache.
In our case, cache helps store chunks of the Teams app so we can load into it quicker. Nonetheless, developers of the app will experience a major issue when they want to perform an app update for us.
For example, when they want to change the files stored in our cache, the chance of success is very low. Due to the old cached files of MS Teams in our device, it will keep getting pulled and doesn’t allow any modifications to happen to it. As a result, it prevents certain features from getting a new update for our app.
A few problems that can be caused include runtime errors for the app, microphone issues, or camera issues. Your computer becomes more vulnerable to these issues the longer your cache hasn’t been cleared. As time prolongs, your cache can become overloaded or corrupted. Hence, it’s always good to clear our cache now and then.
Before we jump into how we clear our device’s cache, it’s recommended to note down all your login credentials from your web browser or the Teams app. This is a precaution in case you’re not aware what’s your login credentials for certain web services or apps.
After jotting them down, you can sign out from the Teams app on your desktop or from the web browser. Next, you can proceed to clear the cache. All data from the web browser or app will be wiped from your device and cannot be recovered unless you login back into the app or website.
With that being said, here’s how to clear cache:
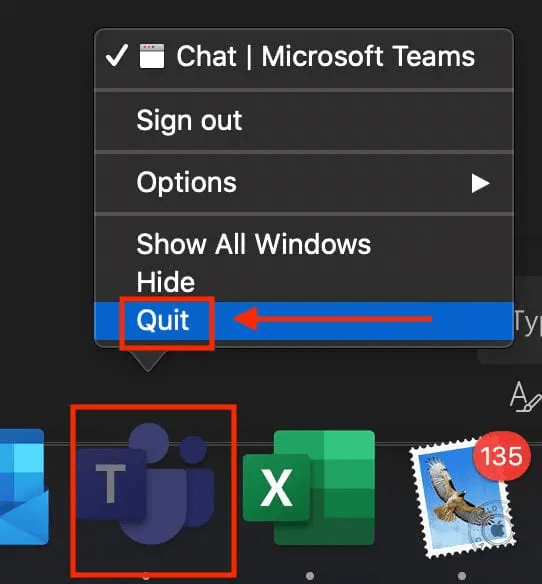
For Windows
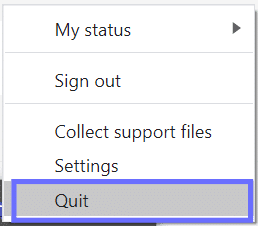
- First, select the Up Arrow found at the bottom right of your toolbar.
- Following that, right-click on the Teams icon to open a context menu.
- Next, click Quit to exit from the app.
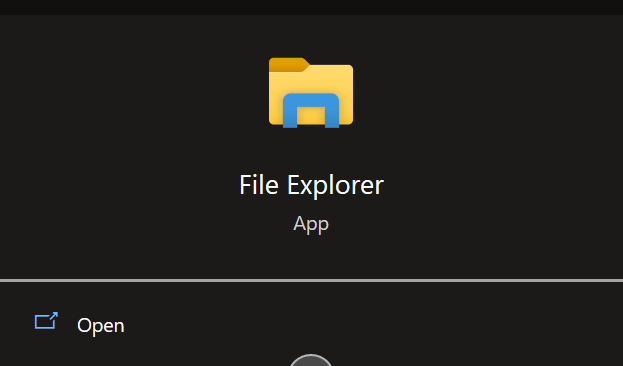
- From there, select the Search icon (Win + S) next to your Start or Windows button at the bottom left of the toolbar.
- In the Search, type in ‘file explorer. A search result should appear with ‘FIle Explorer’ as its best match, so proceed to select it.
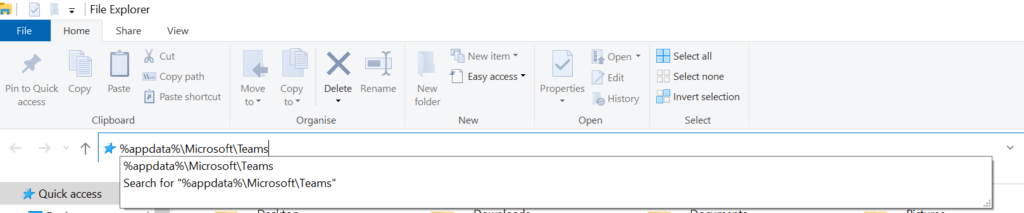
- Subsequently, click the Address Bar and enter %appdata%\Microsoft\Teams.
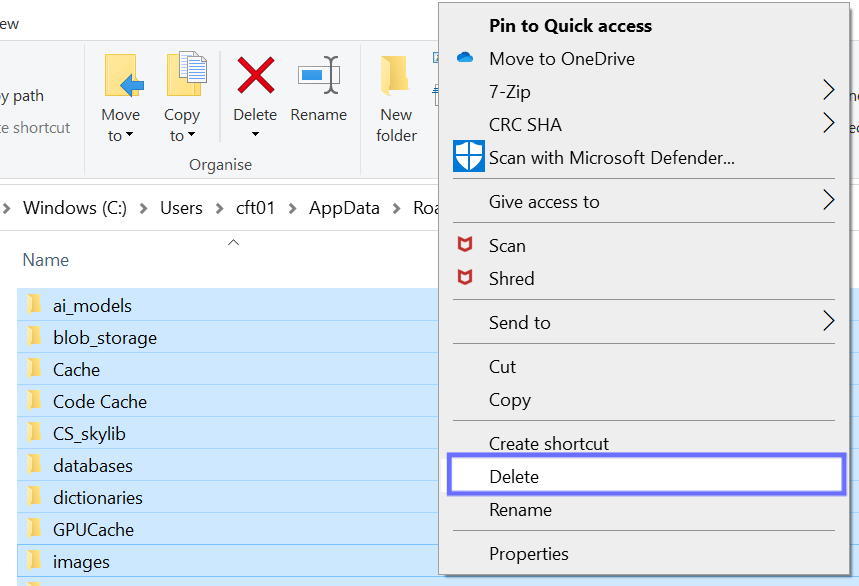
- Then, delete all files and folders found in the directory.
- Finally, reopen the Teams app and sign in with your login credentials.
For macOS
- First, right-click on the Teams icon in the dock and then select Quit.
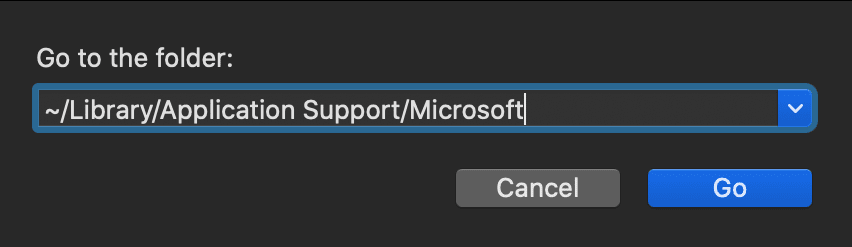
- Subsequently, open Finder, then click Go and select Go to Folder.
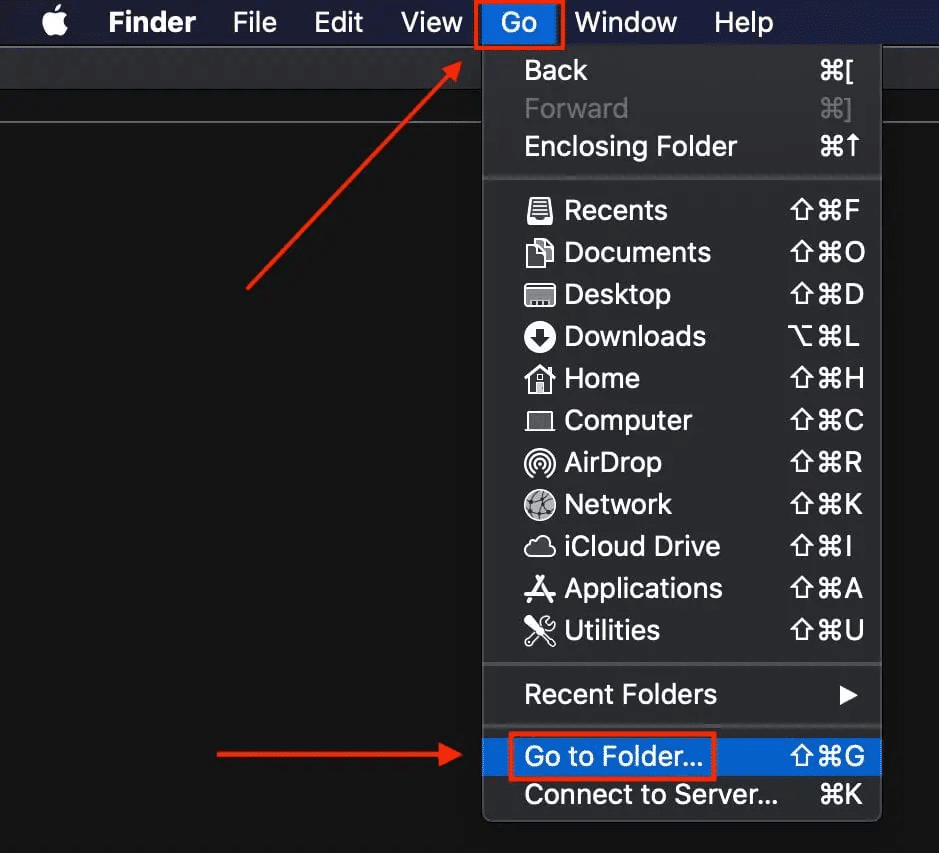
- Next, open the /Application/Utilities folder and double-click Terminal.
- Following after, enter the following commands in the console:
rm -r ~/Library/Application\ Support/Microsoft/Teams
- After that, press Return.
- Lastly, restart Teams (Step 5) and log in to your account using the noted login credentials.
For Android
- First, head over to the Settings app on your phone.
- Subsequently, tap Apps and select Teams.
- Following after, go to Storage and hit the Clear Cache button.
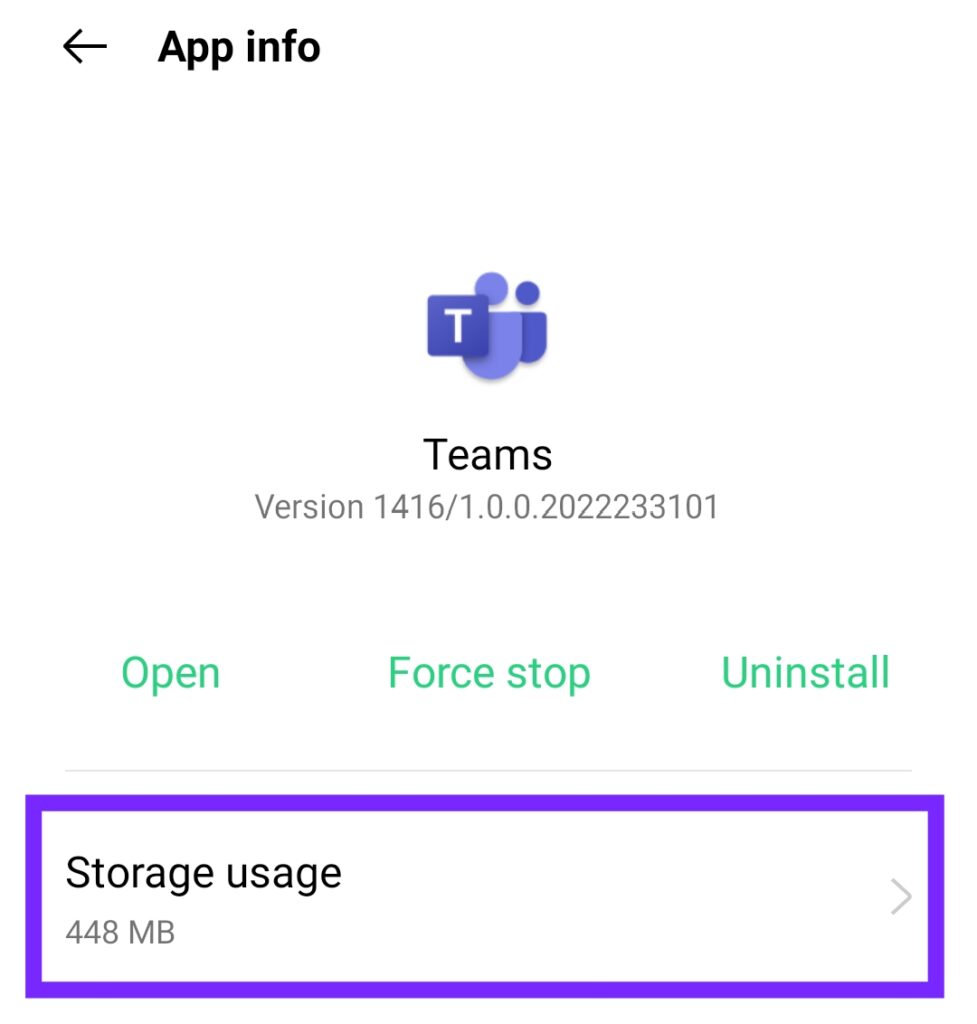
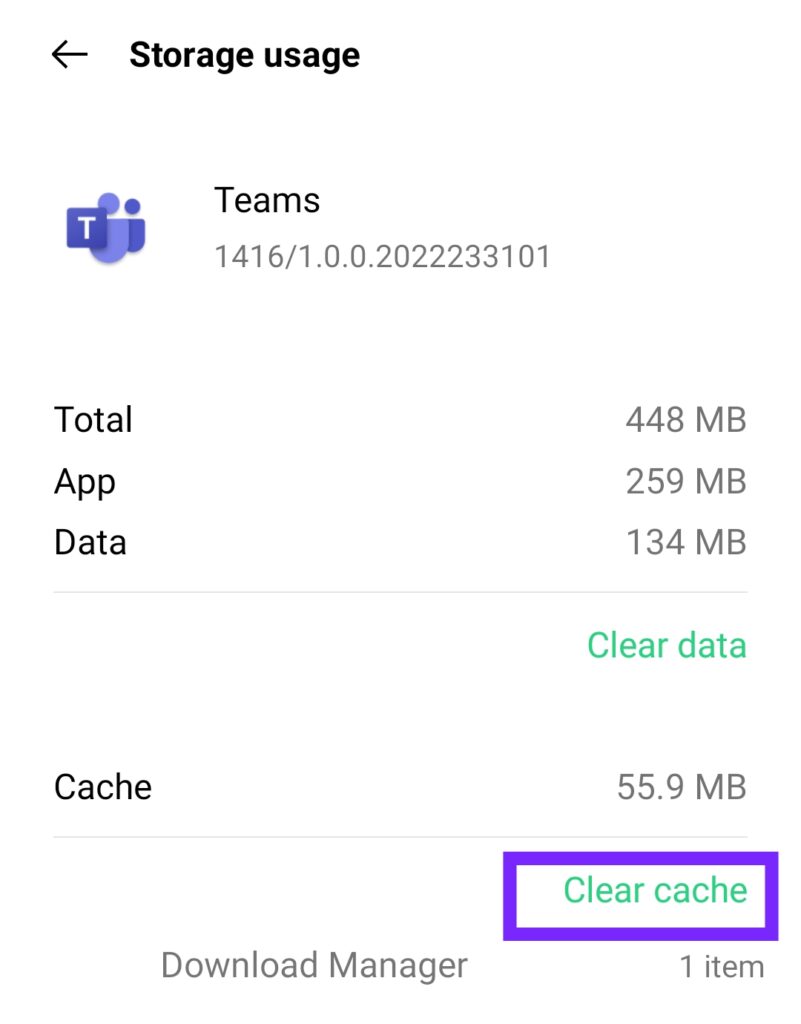
- Lastly, enter your Teams app and sign back into your account.
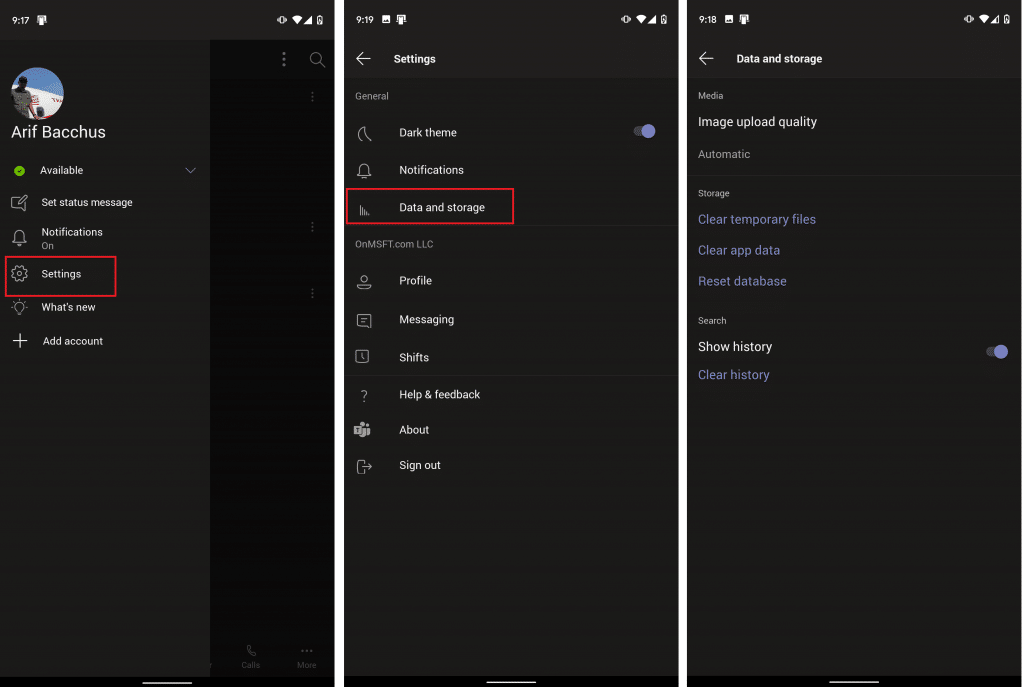
For iPhone
- First, open the Microsoft Teams app on your phone.
- Following that, from the sidebar select Settings.
- Next, choose Data and storage.
- After that, select Clear temporary files and Clear app data, and then restart the Teams app.
For Web Browser on Computer (Windows/macOS)
The steps performed below were done using Google Chrome. If you’re using other web browsers, the process works similarly.
- First, on your computer, open your web browser.
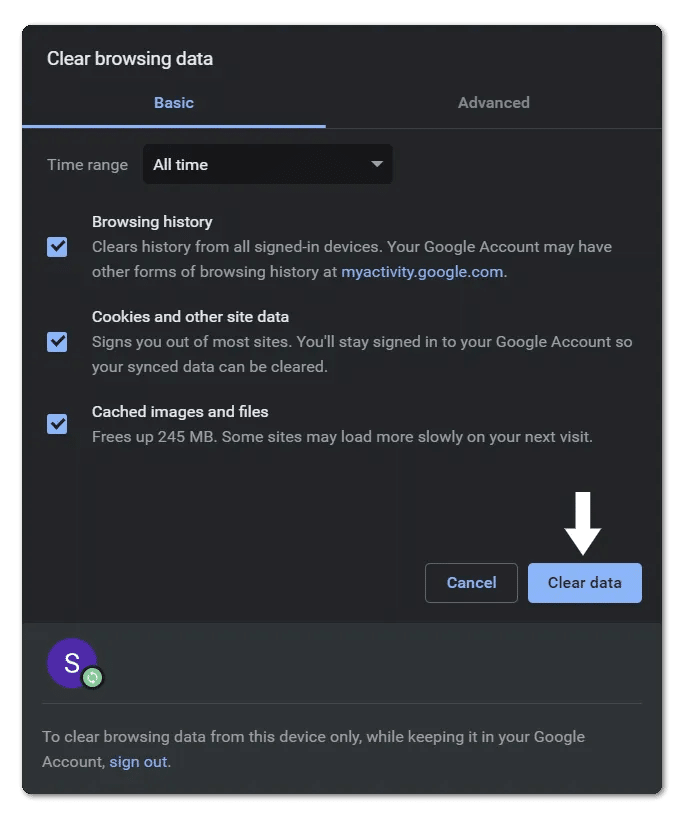
- Next, at the top-right corner of the page, click More.
- Following after, select More tools → Clear browsing data.
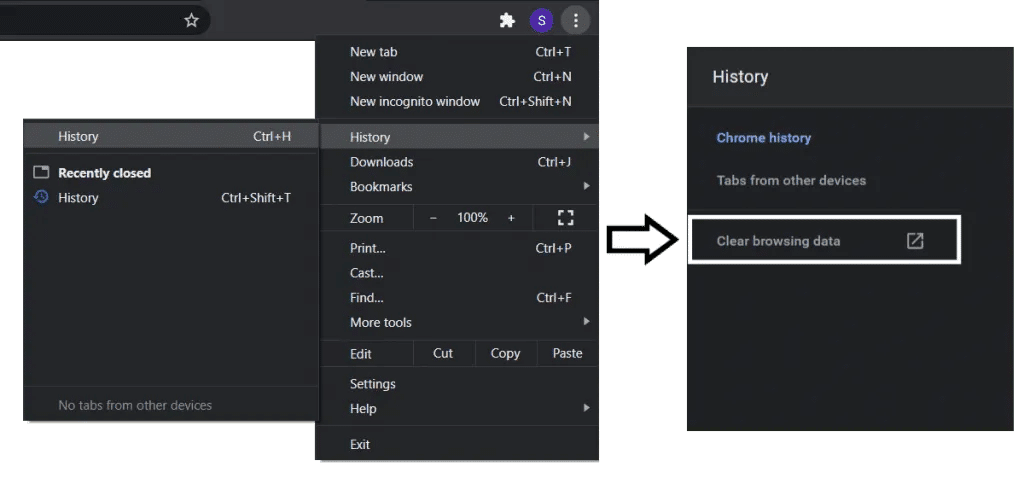
- Then, pick a time range, either Last hour or All time.
- Subsequently, check the boxes next to Cookies and other site data as well as Cached images and files.
- Lastly, click Clear data.
For Web Browser on Android, iPhone & iPad
The steps performed below were done using Google Chrome. If you’re using other web browsers, the process works similarly.
- First, on your mobile device, open the web browser app, in this case, Google Chrome.
- Next, at the top-right, tap More.
- Following after, tap History > Clear browsing data.
- After that, at the top, choose a time range. If you’d like to delete everything, select All time.
- Subsequently, next to Cookies and site data along with Cache images and files, check those boxes.
- Lastly, tap Clear data.
After you’ve performed the necessary steps, try using the Teams app test call function to check whether your camera can work well again.
20. Make Sure Your Camera Is Not Disabled on MS Teams
If you’re attending a webinar, for example, there are occurrences where the camera for all attendees is disabled. Two main reasons for disabling attendees’ cameras include preventing accidental or random videos from showing to other participants and making sure the attendee’s videos don’t end up in the webinar recording.
Thus, it’s always good to check and ensure your camera hasn’t been disabled during the call.
If you see that the camera icon has become a darker shade of gray and cannot be clicked, it means your camera cannot be turned on throughout the call. Besides that, when you hover your mouse over the camera icon, there should be a quote that states ‘Only select participants can share video’.

21. Find Help on the Teams Help Forums
Microsoft has a platform for users to search for the problem they’re facing with Teams. This platform is their very own Help Forum. On the website, you can check out the different blog posts that people have made and through there, possibly find a solution to the Teams issue you’re encountering.
With the issue you’re experiencing, chances are someone may have encountered the same problem already and decided to share their solution on the website. However, if you’re unable to find what you’re looking for, you can always start your discussion.
Depending on how challenging your problem is, the waiting time needed for someone to get back to you may range from a few minutes to hours. Meanwhile, you can continue trying to fix the MS Teams camera with our other fixes!
22. Find Help via Microsoft Community
Another platform similar to Microsoft’s Help Forum is a place called Microsoft Community. Microsoft’s community helps to answer any Microsoft products and service questions you have with responses from other knowledgeable community members.
A search engine is provided as a guide to millions of existing questions that users have encountered and proven solutions that worked for them. A few examples of what you can search by include product, feature, error message, or other keywords.
Before you become a member of the community, you’d need to create an account on the platform. Not to worry, as the account creation process is free and easy. After signing into the Microsoft Community account, you can proceed to ask your question, reply to someone else’s, or start a discussion.
If you can’t find a post that targets your issue and wants to ask your question, make sure your post is specific, clear, and complete. Include any error messages, system information, and recent software or hardware changes when you post.
Depending on how complex your question is, it may affect how long a reply is received. The help and advice you’re receiving come from a variety of places, such as other customers, community experts, or Microsoft specialists. As soon as someone has replied to your question, Microsoft will send you an email to notify you about it.
23. Contact Microsoft Support
If you’ve tried out all the above fixes, the last resort you can turn to is Microsoft’s very own help center, Microsoft Support. The platform acts as a place where you can describe your issue to the support team, and they’ll link you to the right help and support.
However, do note that because Microsoft is a large company and they need to attend to all users around the world who are facing a problem, the estimated wait time for you to get a response from them can prolong up to a few days.
Hence, make sure you’re not in a hurry to fix the issue if you’ve decided to contact Microsoft Support.
Conclusion
To close off, we’ve talked about a few reasons why your camera in MS Teams might not be working. Examples are outdated camera drivers, outdated MS Teams, potential file corruption for MS Teams, etc.
After identifying potential causes as to why our camera hasn’t been working as it should, we discussed potential fixes that might help. A few common and effective solutions include uninstalling and reinstalling the MS Teams app, checking and updating our camera driver, and clearing the cache for our Teams app on a desktop or web browser.
We understand that turning on the camera during a meeting is important, more so when it involves a client of the company. Turning on our webcam and engaging with others in the online meeting improves engagement and gives a better impression from your clients to you.
It’s always good to realize our problem before the meeting starts. Doing so can help save us from panic and stress when we realize our camera doesn’t work during the call. To make matters worse, when our higher-ups ask us to turn on our video.
Thus, a few ways we can test our video before the call is by using the test call function in Teams, or if you have two devices in hand, join the same meeting on both of them. Then, have one device’s video on while the other checks whether the video can be seen.
If a camera issue does occur, you can always follow our guide of 23 fixes to satisfy your needs.
Having said all that, always keep in mind to inspect whether the issue is happening on Teams’ end before jumping to any conclusions and trying out fixes. If the issue does happen to be from them, log in again after a few hours to check whether it has been resolved. Else, if you’re already in the meeting, notify your higher-up and provide evidence that your camera issue isn’t happening from your end.
If you require assistance with any other Teams problem you’re struggling with, share it in the comments below or check out our other Teams-related guides here.
In conclusion, let us know in the comments below:
- What struggles do you face when using Teams? Feel free to share your struggles below!
- Have you tried any fixes above? What worked best for you, and what was the issue you faced?
- Is there a fix that you’ve tried, but we’ve missed out on? If so, feel free to share it down below.
- Do you have any issues with other software and would like us to tackle them?
Feel free to share this with a friend or colleague who’s also facing an issue with the camera on Microsoft Teams! 😊