Find that you can’t record on Microsoft Teams or that the recording or recorded video is unavailable, not working, playing or showing up in the chat? Here are 16 fixes to try.
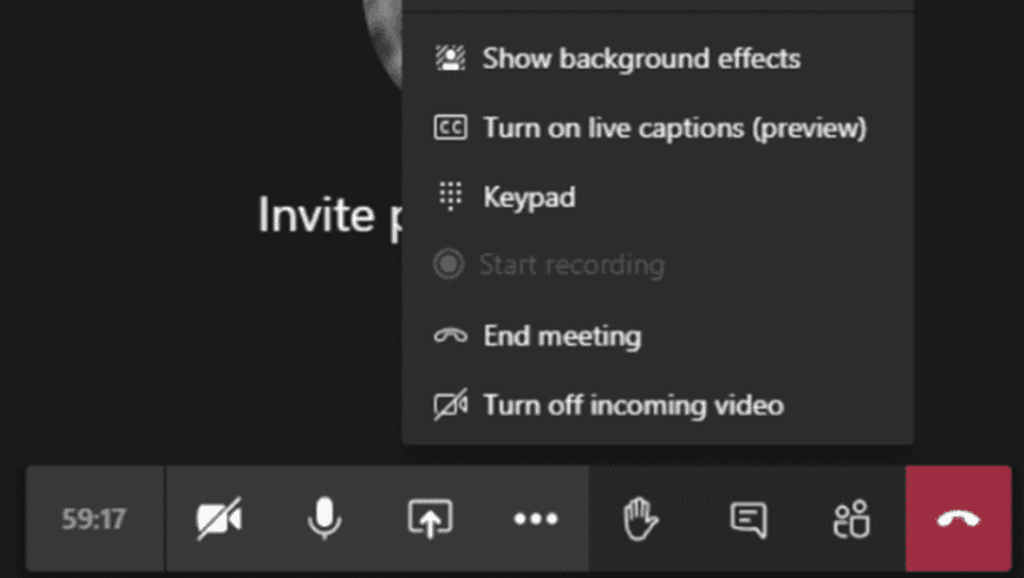
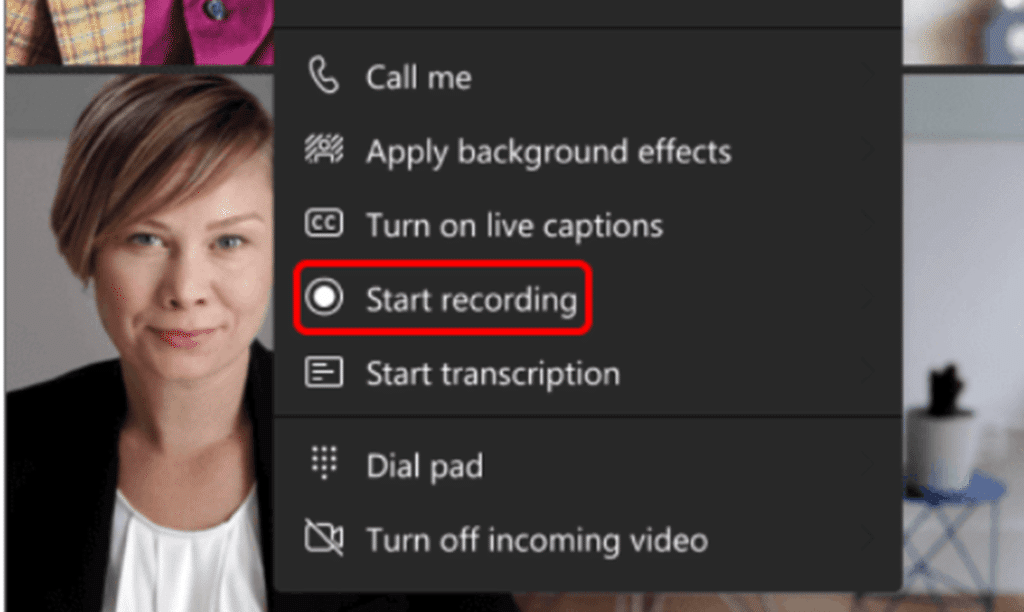
Like other video conferencing platforms, Microsoft Teams also allows you to record your meetings with audio, video, and screen-sharing activity. You can quickly start recording the session by selecting the Start recording 🎦 option from the More options (…) menu. Here comes the main issue with the Recording feature that needs to be resolved immediately.
Many users are currently facing issues recording their sessions on Teams. According to them, they aren’t getting the Start recording option in the More Options (…) menu. Even if the option is present there, it’s greyed out and can’t be pressed 🚫 to start recording the meetings. Some users also said they couldn’t find the recorded sessions at their respective places.
Due to this, many users are frustrated and looking for some working ways to fix this issue with Microsoft Teams. If it’s the same with you, we can understand what you’re going through now. To help you with this, we’ve found 16 tried and tested solutions ⚒️ that can help you fix this issue with Microsoft Teams.
Note: All the workarounds mentioned in this guide apply to all devices where the Microsoft Teams app and website are easily accessible, such as Android, iPhone, Windows, and Mac. You should try all the solutions carefully and patiently to resolve the issue quickly.
Why is the Microsoft Teams Recording or Recorded Video Not Working or Playing?
Here are some of the most prevalent causes that are expected to cause the Microsoft Teams recording not working issue:
- Recording Feature Not Available in Your Region (Fix 1)
- Not Using the Personal or Work Account (Fix 2)
- Microsoft Teams Servers Are Down (Fix 4)
- Slow Internet Speed (Fix 5)
- Recording Is Disabled by the Admin (Fix 7)
- Team Parameters Aren’t Set (Fix 8)
- Corrupted Microsoft Teams App’s Cache (Fix 10)
- Issue With the Device (Fix 12)
- Bugs Within the App (Fix 13)
16 Fixes For Microsoft Teams Recording Not Working, Playing or Can’t Record Meeting
Here in this section, we’ve mentioned some 16 tried and tested working solutions that can resolve this issue with ease. So, let’s get started with the first solution and fix the Microsoft Teams recording not working issue.
1. Ensure the Recording Feature Is Available in Your Region.
One of the most common reasons behind this issue is the unavailability of the Recording feature 🌍 in some regions/countries. The Recording feature is currently not available to use in all countries. It could be possible that the Recording feature isn’t launched in your country yet, which is why you aren’t getting the Start recording option in the More options (…) section.
2. Make Sure Your Account Meets All Requirements To Record a Meeting
The Cloud recording function is only available to use for some sorts of Microsoft 365 accounts. You won’t get the recording function if you’re using a Free, Personal, or Home subscription. This function is only available for specific enterprise account types, like Office 365 Enterprise E1, E3, or E5, Office 365 Enterprise F1, etc.
You can check the mentioned list and confirm if you’re eligible to use the native Recording feature of Microsoft Teams ⬇️:
- Office 365 Enterprise E1, E3, or E5
- Office 365 Enterprise F1
- Office 365 Enterprise A1, A3, A5
- Microsoft 365 Business
- Microsoft 365 Business Premium
- Microsoft 365 Business Essentials
If you want to use the cloud recording functionality, your Microsoft 365 account must be part of an organization. Also, before moving to the next solution, we suggest running the Teams Meeting Recording test 📶 to find and fix account-related issues with your Microsoft Teams account.
3. Ensure You’re Recording a Meeting, Not a 1:1 Call
You can use Microsoft Teams to host and attend all kinds of cloud-based video meetings, such as 1:1 meetings, group meetings, etc. But you can only record conferences with more than one person 👥 on Teams. If you’re on a call with one person and want to record it, then you can’t. So, make sure you aren’t trying to record a 1:1 meeting.
4. Check the Microsoft Teams Server Status
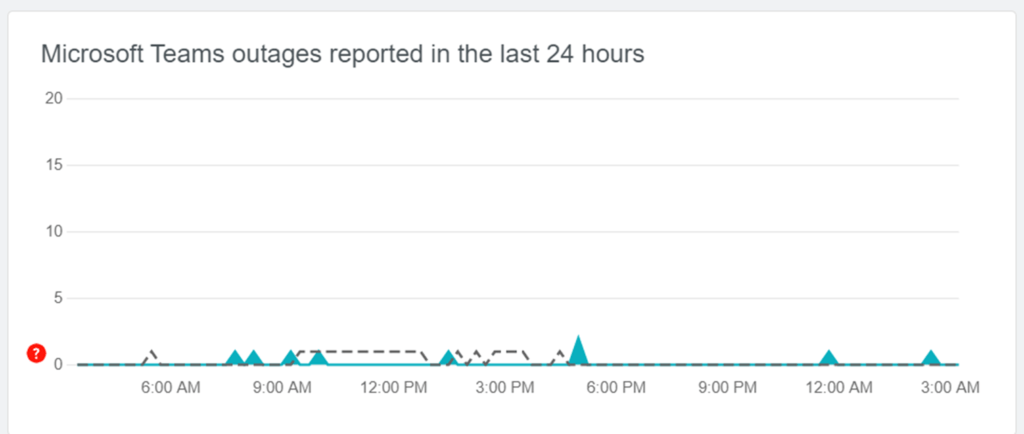
It could be possible that the Microsoft Teams servers are currently down, which is why you are unable to access and use the Cloud Recording function. In that case, you can check the Microsoft Teams server’s status 📶 to know if the issue is generated from the backend or your end.
If the Microsoft Teams servers are up and running, proceed and try other solutions. In case there’s something wrong with the servers, you should wait until the server comes back to its running state.
Method 1: Through the Official Microsoft Service Health Page
For this, you can check both the server health for Microsoft Teams and Office Services through the official portal.
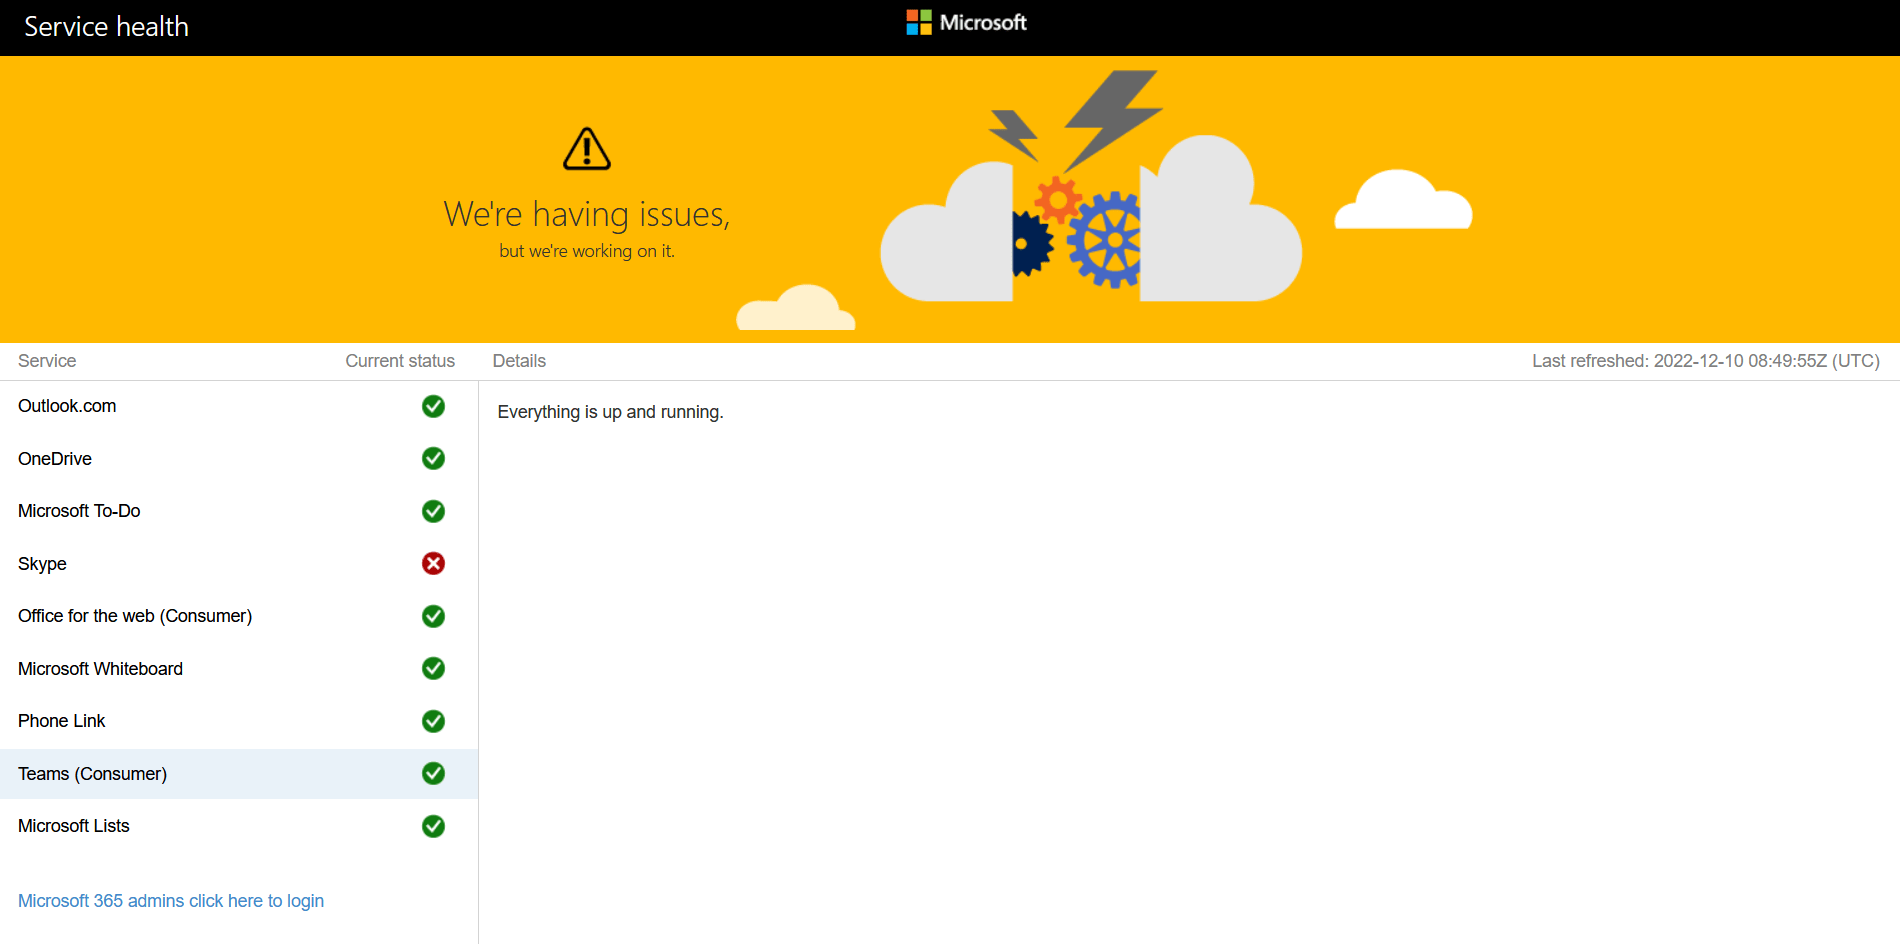
Basically, there are tabs on the left side that allow you to see the service health details of whatever specific Microsoft service you want to check out. Of course, since we’re concerned with Microsoft Teams here, go ahead and click on the Teams (Consumer) tab. Here you can see that it says “Everything is up and running”.
Method 2: Through Third-Party Server Status Checkers (i.e., DownDetector)
There are a plethora of third-party sites that allow you to view the current status of Microsoft Teams’ current server status. Among the vast selection, we highly recommend Downdetector since it’s really easy to use and also comes with tons of useful features and integrations that make your life that much easier when it comes to determining if it’s truly a server-side issue.
5. Take a Look at Your Internet Bandwidth
Microsoft Teams require a working and high internet speed to host and attend long meetings seamlessly. If you aren’t connected to a good internet connection, which could also lead to this issue. According to Microsoft, you need at least 1.5/Mbps network bandwidth to do peer-to-peer HD-quality video calling.

You can now imagine the network bandwidth it’ll require while recording meetings and saving them to OneDrive. Keeping this in mind, we suggest you check the internet connection speed 📶 using the Speedtest tool by Ookla. If the internet speed is too slow, you can try the below-mentioned tips to boost it.
- Reboot the Affected Device
- Close All Unnecessary Apps From the Background
- Reset the Router’s DNS Settings
- Stops All Running Downloads 🚫
- Enable & Then Disable the Airplane Mode ✈️
- Re-enable the WiFi 📶
- Reset the Router
6. Ensure OneDrive Has Enough Storage Left
Earlier, Microsoft Teams used to upload videos directly to Microsoft Stream. But now, it saves recordings in cloud storage, OneDrive. A user with Microsoft 365 Enterprise plan gets around 5TB of cloud storage 💾 to store files and Teams recorded meetings.
But if the same account is distributed to five users, each user gets one terabyte of storage. For some people, it’s enough, and maybe a lot. But if you want to use it to store Teams recordings, it may not be enough for you.
It could be possible that your OneDrive’s storage is completely full, which is why you don’t see the recorded meeting in OneDrive. In that case, the best solution is to free up some storage by removing the non-essential files 💾 from your OneDrive storage.
7. Enable Meeting Recording in Meeting Policies Section
This solution may be overlooked, but it’s essential to ensure that the Allow cloud recording 🎦 option is turned on. You can’t check whether the option is enabled or disabled. Instead, you’ve to reach out to your IT admin and request them to turn on the Allow cloud recording toggle 🔛.
We’ve demonstrated the whole process in the below-mentioned steps. You can share this guide with your IT team manager 👨💻 for reference and ask them to enable this option.
For Desktop Users (Google Chrome & Safari)
- First, visit the Microsoft Teams’ Admin Center on your browser, and sign in with the school or work account.
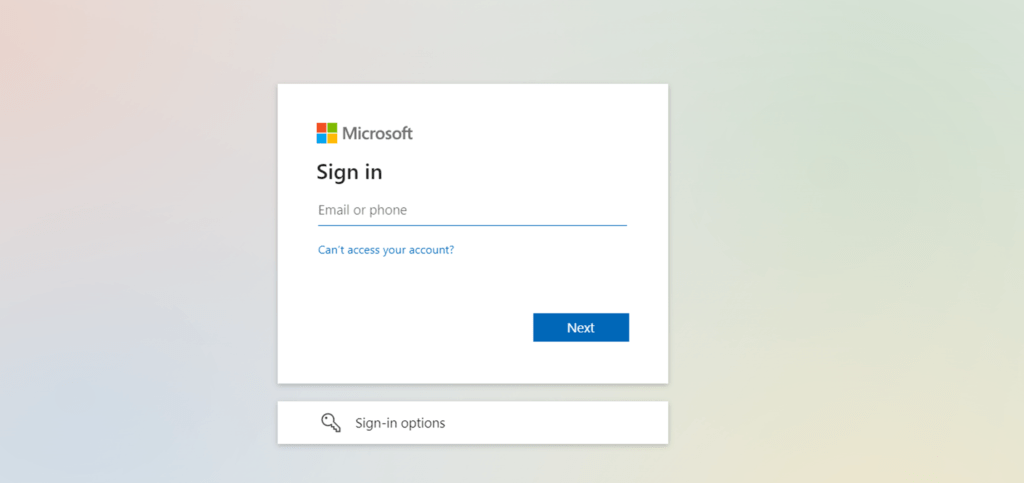
- Once signed in, expand the Meetings section in the left sidebar, and select the Meeting policies option.
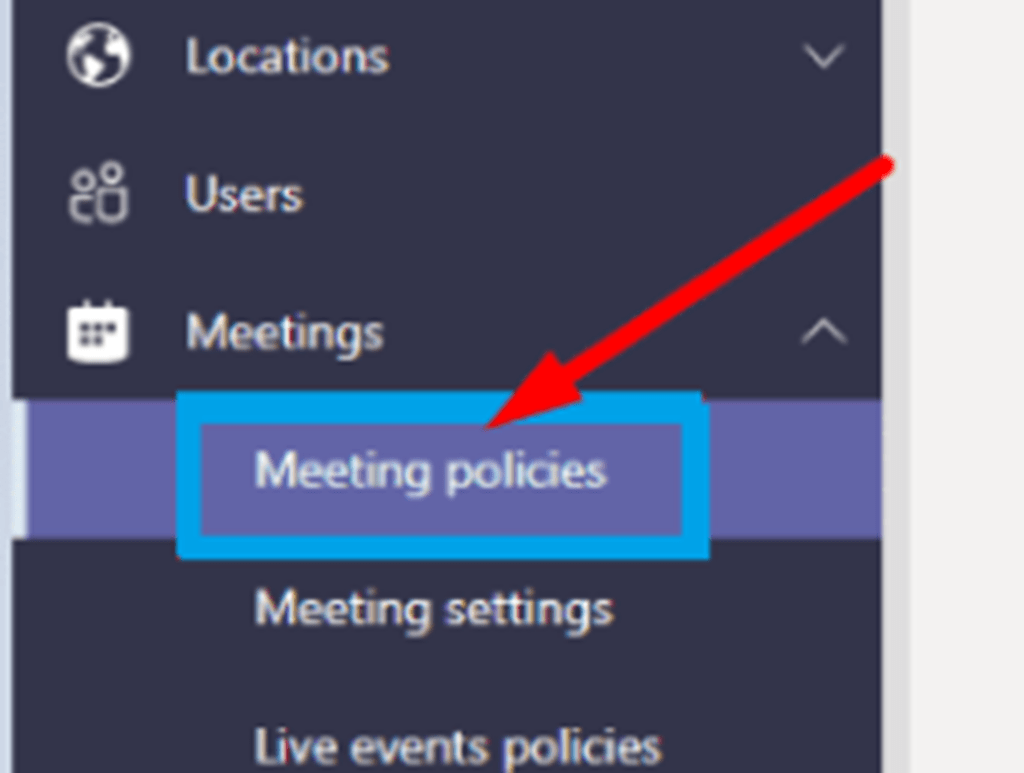
- Now, enable the Allow cloud recording option in the Audio & video section and then navigate to the Users tab.
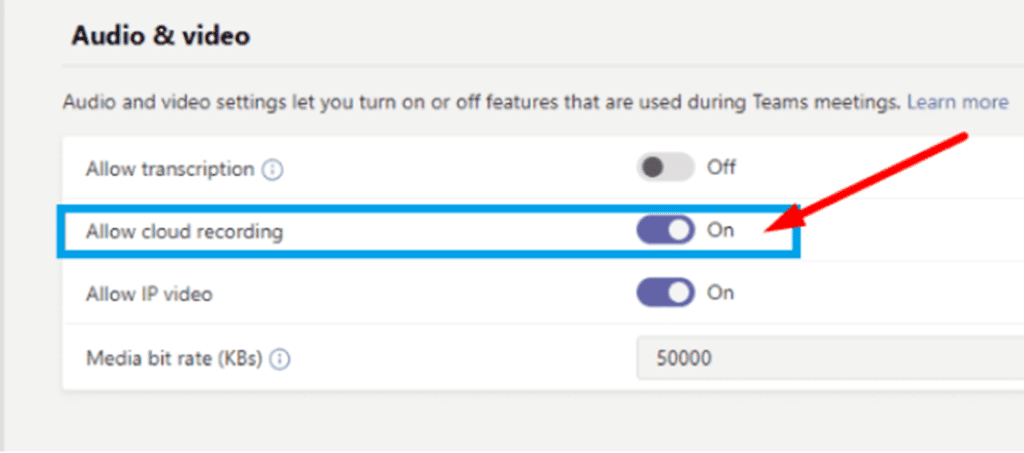
- Lastly, select the Policies option, and then select the Global (🌍) option under the Meeting policies section.
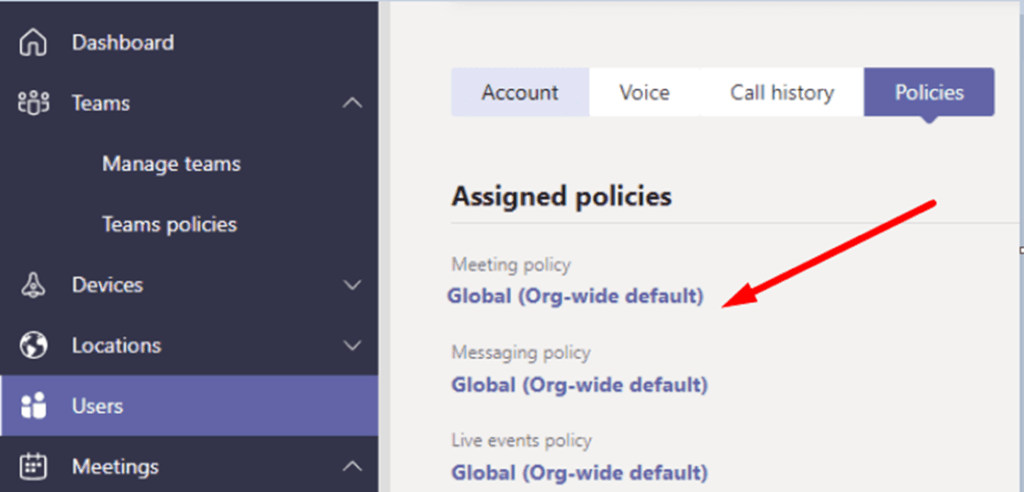
You should be able to record the sessions with ease.
8. Set Teams Parameters
You don’t need to worry if the previous solution didn’t work. We’ve another solution that can fix the Microsoft Teams recording not working issue with ease. You can try setting some parameters on Microsoft Teams and make sure all users are allowed to record the meetings.
This can simply be done by executing a few commands in the Command Prompt. So, follow the below-mentioned steps to set some parameters.
For Desktop Users (Windows)
- To start, open the Command Prompt on your Windows PC with the admin privileges using the search box.
- First, copy-paste (📋) the below-mentioned command in Command Prompt to connect your Microsoft Teams with the tenant.
Connect-MicrosoftTeams
- Secondly, execute the below-mentioned command in the same console to verify your CsTeamsCallingPolicy status.
Get-CsTeamsCallingPolicy -Identity Global
- Lastly, copy-paste (📋) the mentioned command into the console to enable the Cloud Recording option.
Set-CsTeamsCallingPolicy -Identity Global -AllowCloudRecordingForCalls $true
That’s it!
9. Force Close & Restart the Microsoft Teams App
If setting the parameters on Teams doesn’t fix the issue, you can try to force close and restart the Microsoft Teams app 🚫. These days, all operating systems allow us to stop all the current processes of the application and start them again 🔃 with just one tap. Doing this will make sure that all the issues with the Microsoft Teams app have been fixed.
So, follow the below-mentioned steps to force close and restart the Microsoft Teams app with ease.
For Mobile Users (Android & iOS)
For Android
- Firstly, open the Settings app (⚙️) and move to the Applications section to see all the apps installed on the smartphone.
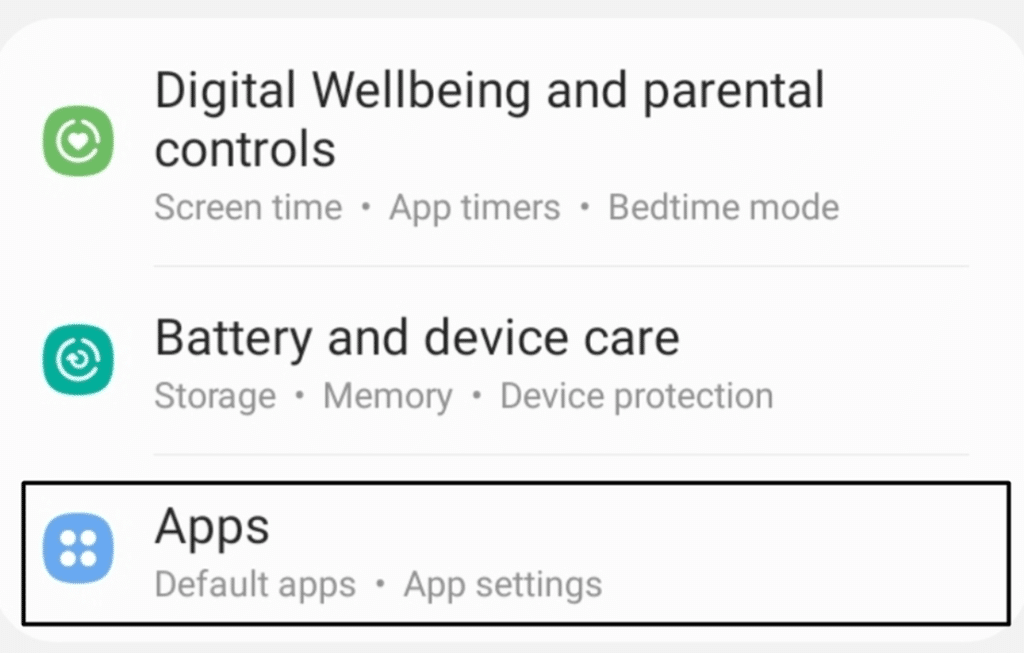
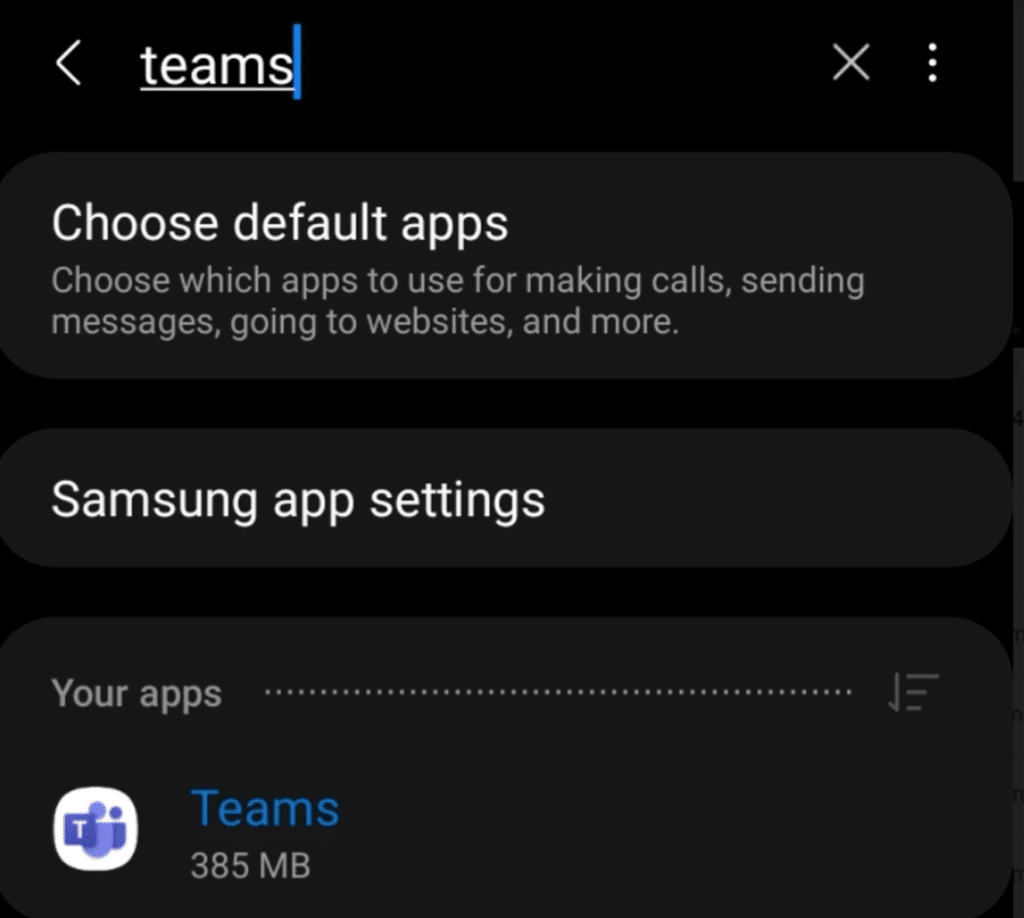
- Next, search for the Microsoft Teams app in the Applications section and tap on the app to open the app properties.
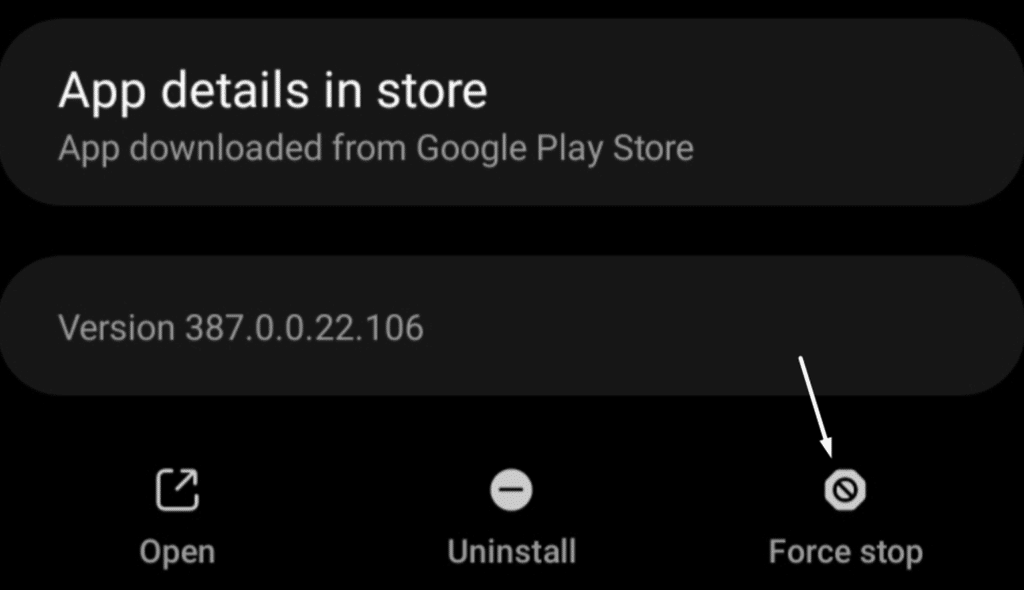
- In the end, tap on the Force stop (🚫) option to terminate all the running operations of the Microsoft Teams app instantly.
For iOS
- First, press the volume up button 🔊 and then press the volume down button 🔊. Once done, keep pressing the Power button on the right side of the iPhone for two seconds.
- Once the Power off dialog appears, tap on AssistiveTouch Menu and hold the Home button for two seconds until the Lock screen appears.
Now, all the apps running in the background would be closed now. If you try to open the apps again from the Recent applications tab, they’ll start from scratch.
For Desktop Users (Windows & macOS)
For Windows
- First, open the Task Manager app on your Windows PC by pressing the Ctrl + Shift + Esc keyboard shortcut.
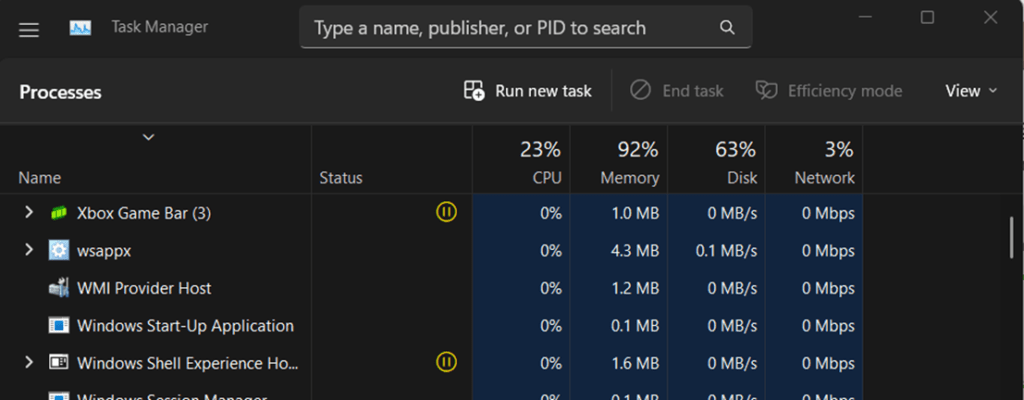
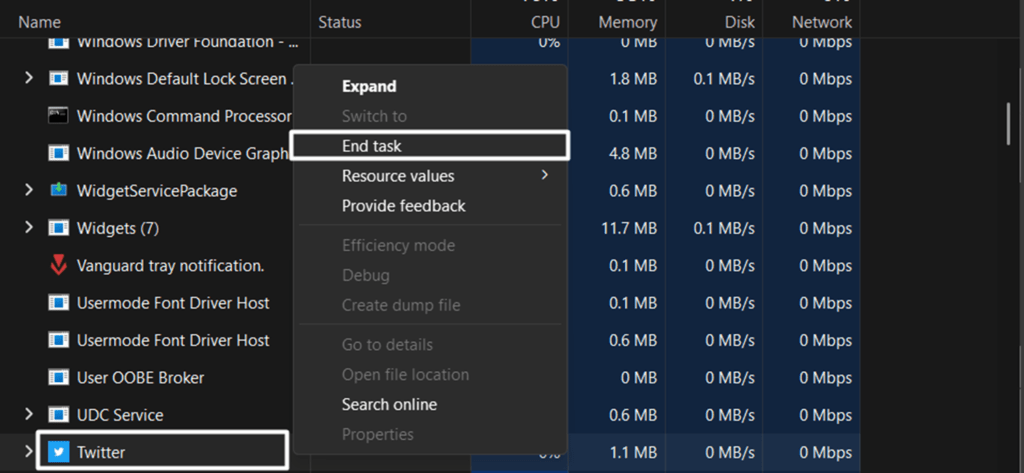
- Next, look for the Microsoft Teams app in the Processes section and open the contextual menu on the screen by right-clicking on the app.

- Last, select the End task (🚫) option from the menu to close the Microsoft Teams app and its operations completely.
For macOS
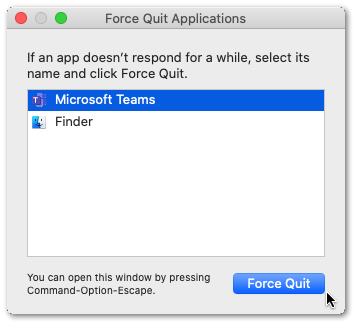
- First, open the Microsoft Teams app on your Mac PC, minimize it, and launch the Force Quit Applications utility. You can use the Option + Command + Esc keyboard shortcut to open this utility.
- Now, select the Microsoft Teams app in the Force Quit Applications window and click on the Force Quit option.
Now, restart the affected device 🔃, open the Microsoft Teams app and check if the Start recording option is now visible in the More Options (…) menu.
10. Clear Microsoft Teams App’s Cache
Like other video conferencing apps, the Microsoft Teams app also stores cache files, also known as temporary files, that help the app perform specific tasks efficiently and effectively. But, keeping the cache files on the device’s storage for a long time can cause crashes and speed issues. This is why we always suggest users timely clear the app cache 🍪.
You can also try clearing the Microsoft Teams app’s cache data and see if this resolves the issue with the app. Below are the exact steps to clear the app cache on Android, iOS, and Windows in a few simple steps:
For Mobile Users (Android & iOS)
- First, open the Microsoft Teams app on your Android or iOS smartphone 📱 and tap on the Profile Photo at the top left corner of the screen.

- Now, select the Settings (⚙️) option from the left navigation menu and proceed to the Data and storage (💾) section.
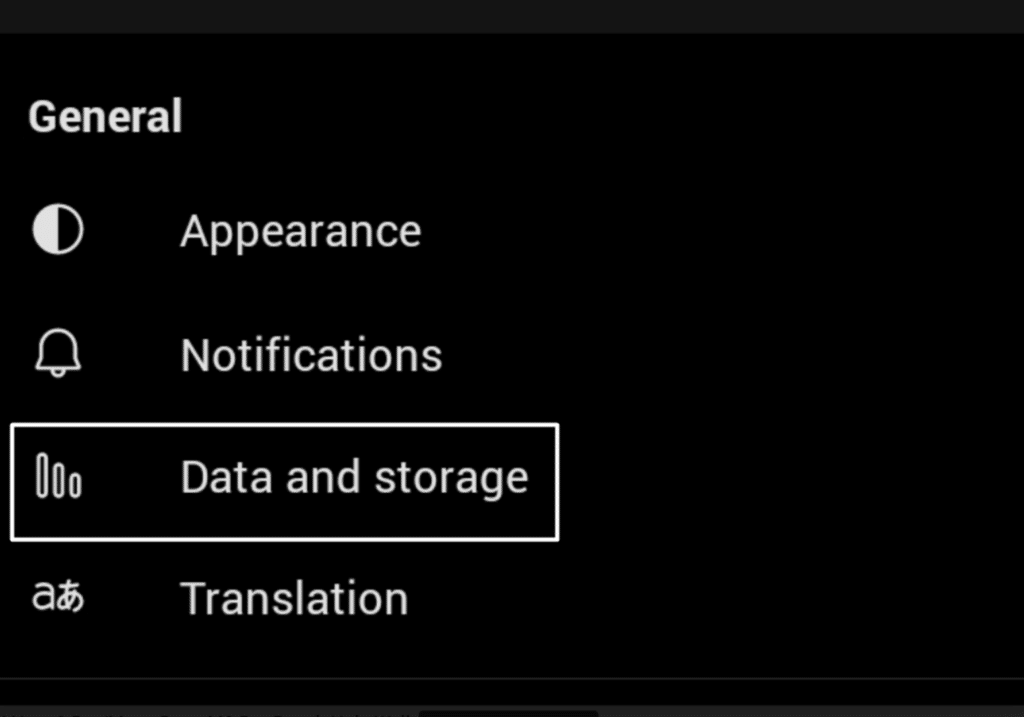
- Next, tap on Clear app data (💾) on your Android phone to open the Microsoft Teams’ app properties. If you’re an iOS user, simply tap on the Clear app data option to clear the data. You don’t need to do anything else.

- Afterwards, move to the Storage section and tap on the Clear cache (🍪) option to remove the cache files from the device.

For Desktop Users (Windows)
- To start, open the Run utility using the Windows + R shortcut key, type C:\Users\(YourUserName)\AppData\Roaming\Microsoft\Teams in the Run program’s search bar, and press the Enter key.
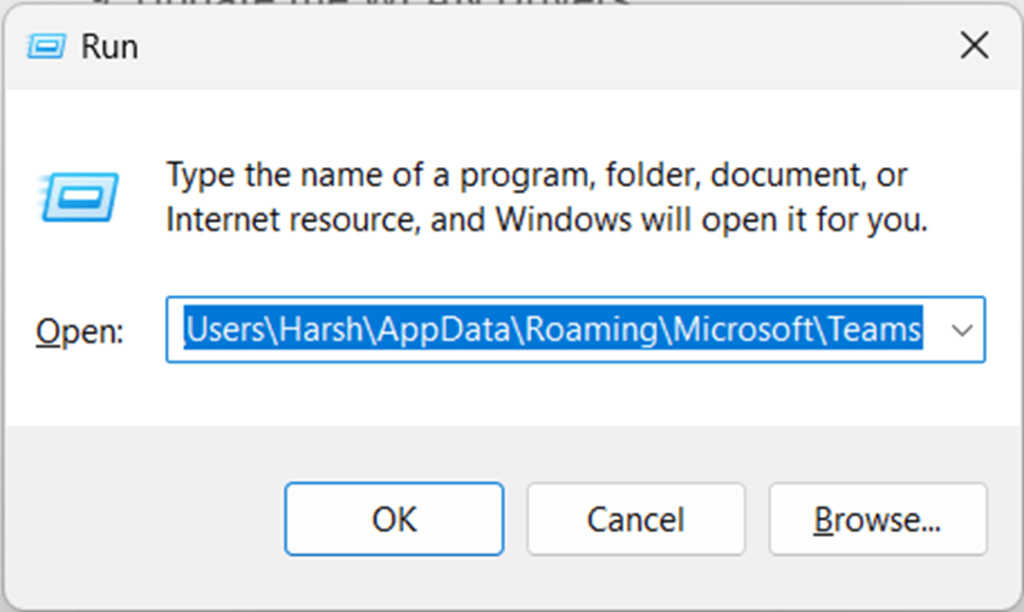
- Now, delete the mentioned folders and files from the Microsoft Teams folder, as all these are cache and temporary files:
- Tmp folder
- Blob_storage
- Cache
- GPUcache
- Databases
- Local storage
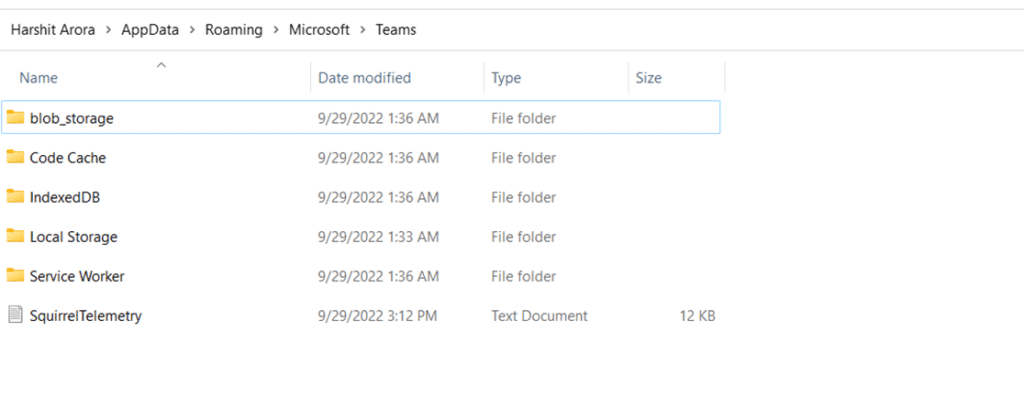
- Next, open the IndexedDB folder and delete the .db file from the folder and then reboot the system.

You should now be able to record meetings properly and view the meeting recordings easily in the Chats section.
11. Reset or Repair Microsoft Teams
Windows has a built-in Repair option that lets you repair the programs in a click that aren’t working correctly. If you use the Microsoft Teams app on Windows, then you can use the Repair option 🔨 to fix all the issues with it. You can follow the below-mentioned steps to know the exact process of repairing the Microsoft Teams app in Windows 11:
- To start, open the Settings app (⚙️) on your Windows 11 PC and proceed to the Apps section from the left-navigation pane.

- Now, click on the Installed apps in the Apps section to manage apps and search for the Microsoft Teams app in the installed apps.

- Next, click on the three dots (…) and select the Advanced options option from the dropdown menu.

- Once the Advanced options screen is opened, move to the Reset section and click on the Reset option.

- Lastly, click on the Repair (🛠️) option in the Reset section and let the system repair the Microsoft Teams app.

We hope the Microsoft Teams app is now working properly.
12. Upgrade the Affected Device to the Latest Version
It could be possible that the issue is within your current device, and you’re blaming other factors for causing this issue. Yet, there are few chances of this happening, but you shouldn’t ignore it. So, we suggest updating the affected device 🔄 and fixing all the bugs within the device and getting rid of this issue in seconds.
Below are the exact steps to update the affected device:
For Mobile Users (Android & iOS)
For Android
- You need to first open the Settings app (⚙️) on your smartphone and proceed to the Software update section.
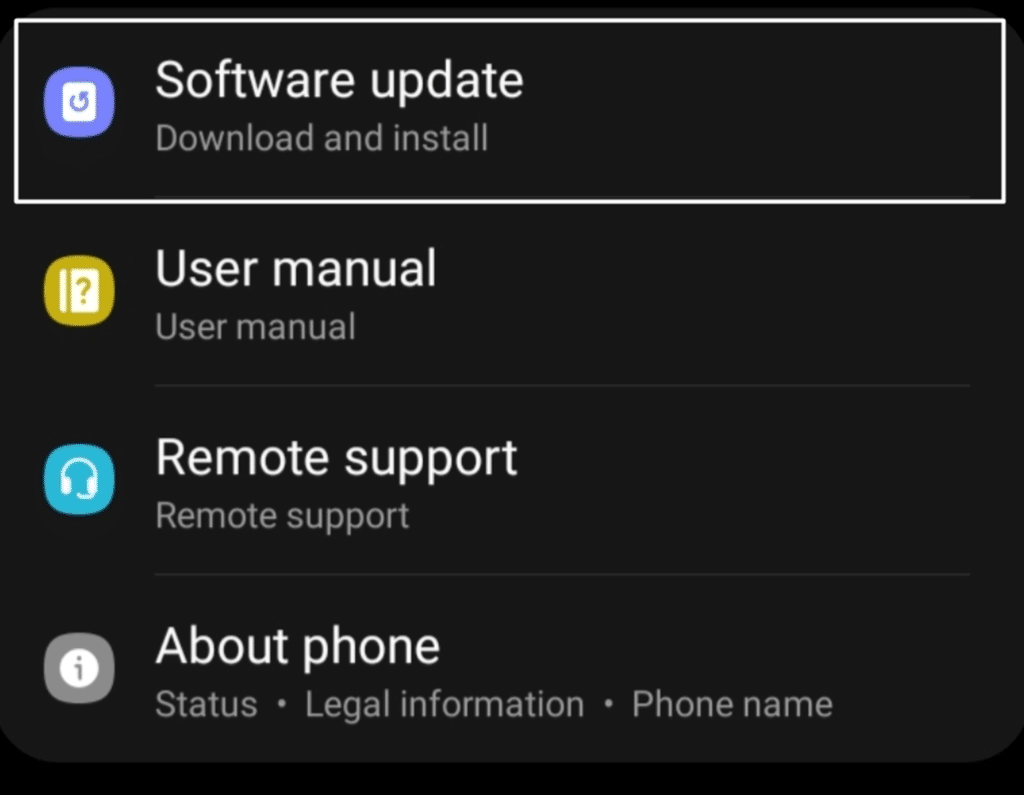
- Once you enter the Software update section, the OS will automatically start searching for the new updates to install on the mobile.
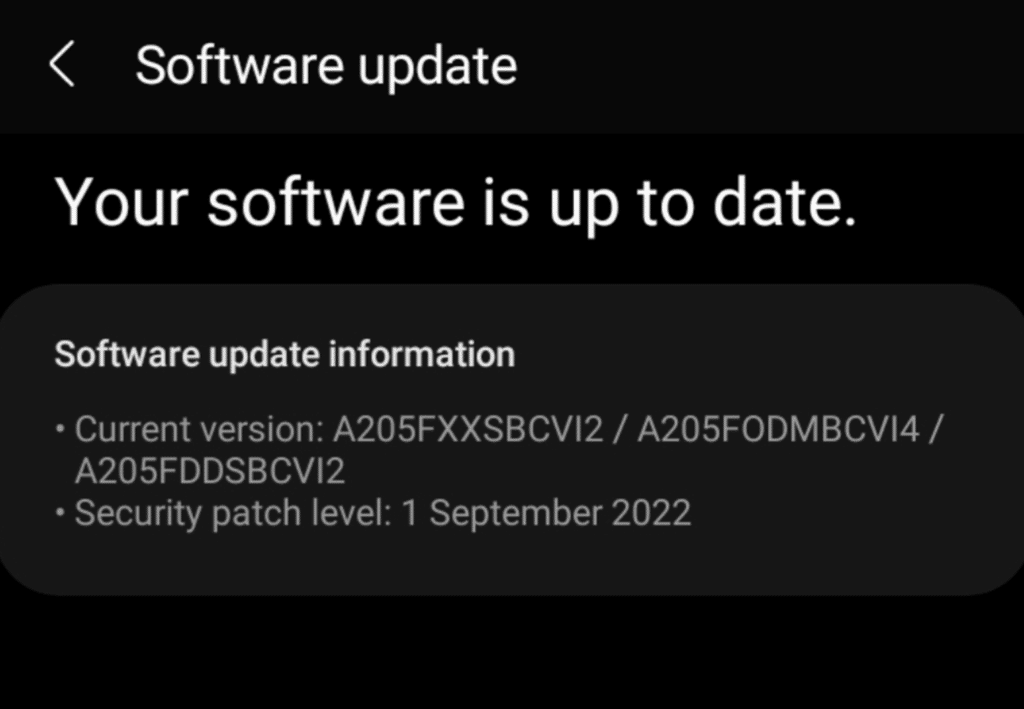
- If it doesn’t show any pending updates, tap on Check for updates to manually search for new updates.
- Once the scanning process is completed, tap on the Download and install option to install the pending updates on the smartphone.
For iOS
- To start, open the Settings app (⚙️) on your iPhone, move to the Software update section, and let the OS search for new iOS updates.
- If the system finds new updates, click on Download and install (⬇️) to install those pending updates on the iPhone. In case it doesn’t find any new updates, you’ll see the “Your iOS Is Up to Date” message.

For Desktop Users (Windows & macOS)
For Windows
- Press the Windows + I key combination to open the Settings app (⚙️) on your Windows PC and navigate to the Windows Update section.

- Now, click on the Check for updates (🔃) option in the Windows Update section and let the system search for new updates from the database.

- If it finds new updates, click on the Download and install all (⬇️) option to download and install the new updates on the system.

For macOS
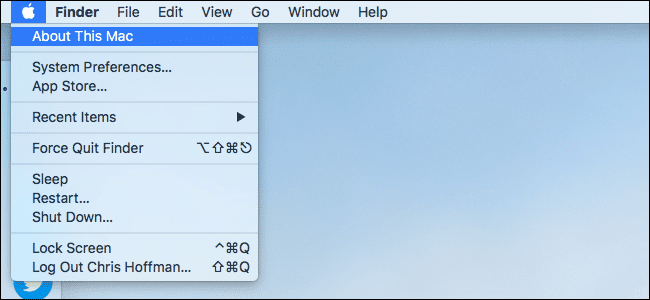
- To start, click on the Apple Logo in the top menu bar to open the Apple Menu and click on the About this system option.
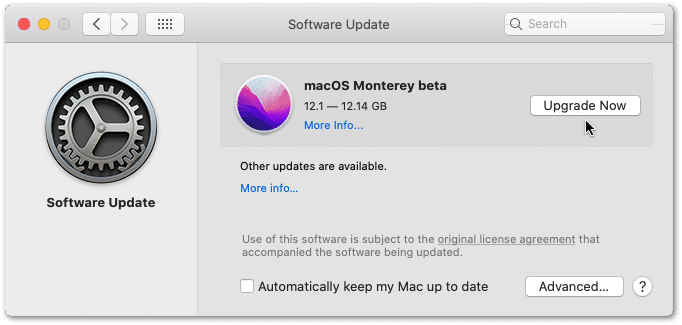
- Now, move to the Overview section and click on Check for updates to manually search for new macOS updates.
- If there would be new system updates, click on the available option to download and install those updates.
Now, open the Microsoft Teams app on your device and check if you’re able to record meetings or play the recorded meetings without any previous issues.
13. Update the Microsoft Teams App
Another easy way to fix the Microsoft Teams recording not working issue is to update the Microsoft Teams app 🔄. Doing this will ensure all the bugs within the app have been eliminated and won’t irritate you again. In most cases, doing this fixes the issue; you can try your luck too.
So, follow the below-mentioned steps to update the Microsoft Teams app from the native app store in a few simple steps:
For Mobile Users (Android & iOS)
For Android
- To start, open Google Play Store on your phone and tap on the Profile Photo at the top right corner.

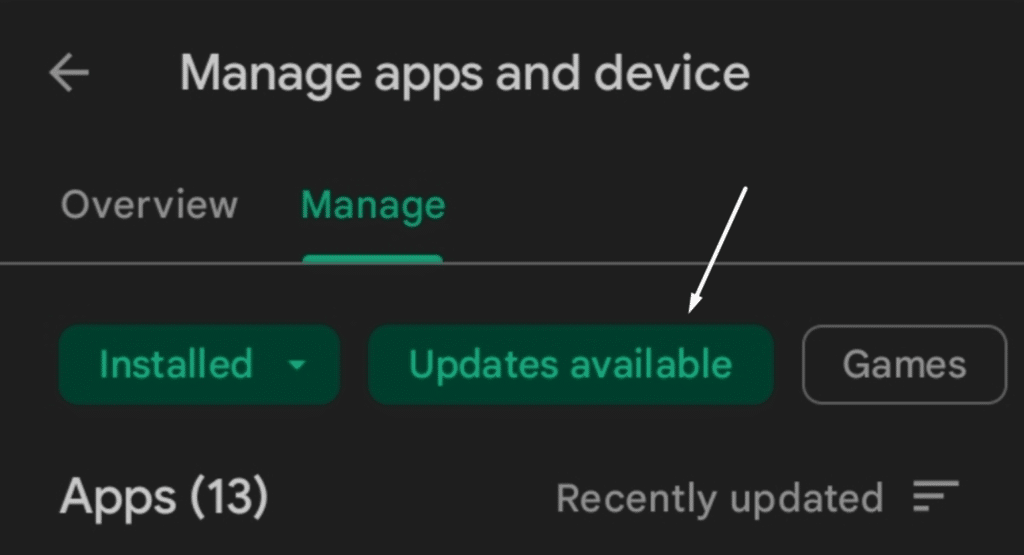
- Next, select the Manage apps and device option from the menu and proceed to the Manage section.

- Now, select the Updates available option in the Manage section to see all the apps that are ready to update.
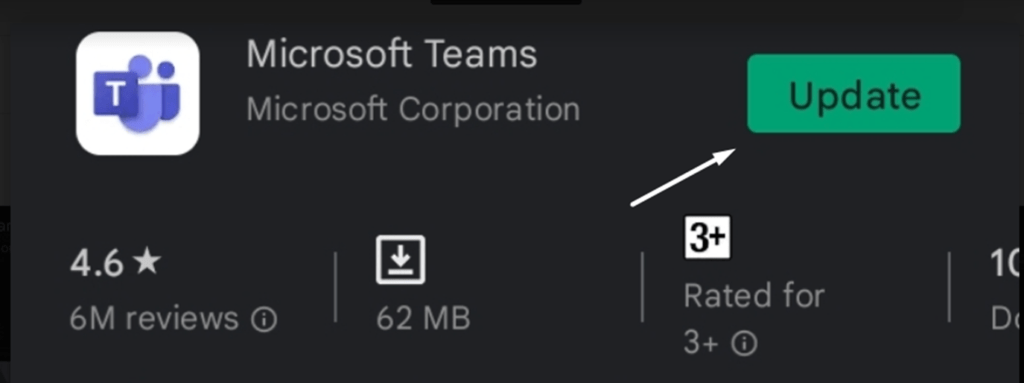
- Lastly, search for the Microsoft Teams app in the Updates available section. Tap on it, and then tap on Update next to it to start updating it.
For iOS
- First, open the App Store on your phone and tap on the Profile Photo at the top right corner of the display.
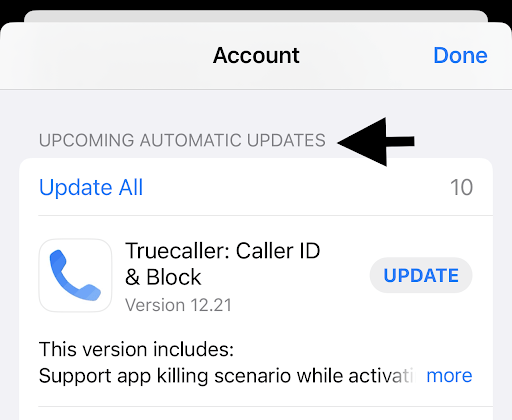
- Now, search for Microsoft Teams in the Upcoming Automatic Updates section. Once found, tap on the Update button to update it.
For Desktop Users (Windows)
From Microsoft Store
- Launch Microsoft Store on your PC and search for the Microsoft Teams app using the top search box.

- In the end, tap on Update next to the app to update it. If there are no pending updates, you won’t see any Update button next to the Microsoft Teams app.

Within the Microsoft Teams App
- Firstly, open the Microsoft Teams app on your Windows PC and click on the three dots (…) in the top menu bar.

- Next, click on the Check for updates option to check for new app updates and install them immediately.
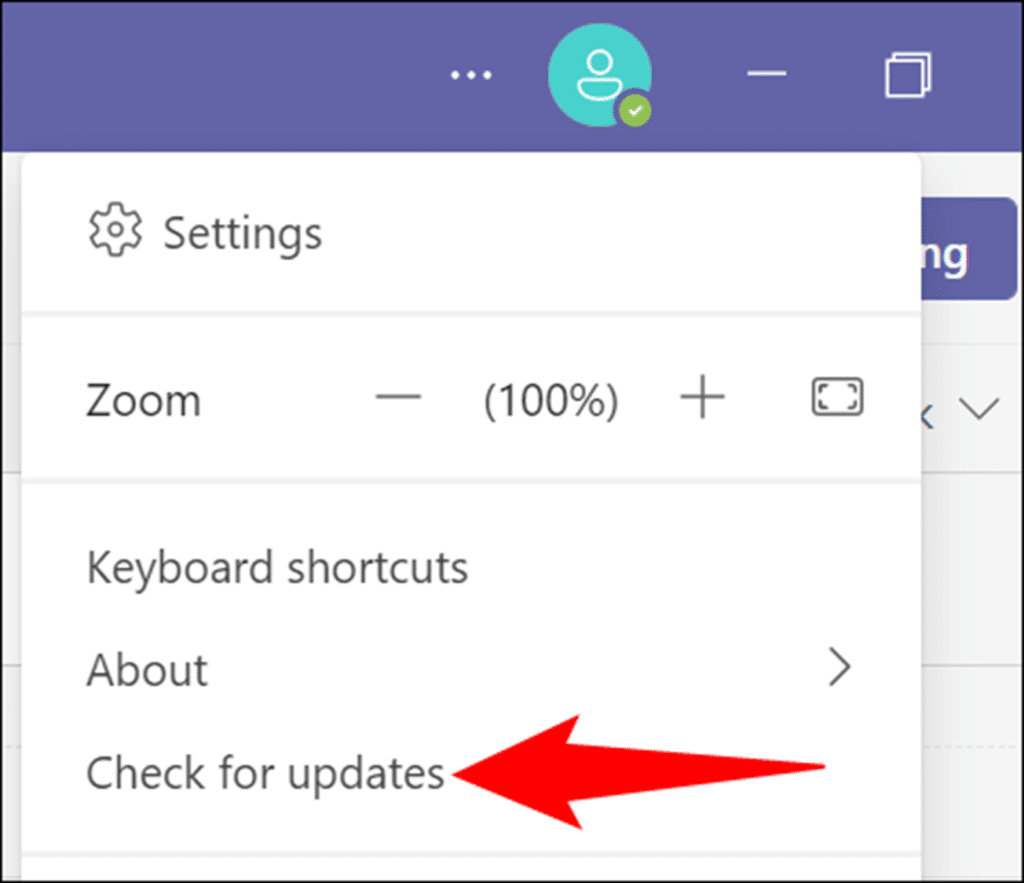
- If there are new updates to install, the app will start updating them automatically. Otherwise, you’ll see the “We Will Check and Install Any Updates While You Continue to Work” message.

Once done, relaunch the Microsoft Teams app 🔃, and see if the Recording option is visible now in the More options (…) menu.
14. Reinstall The Microsoft Teams App
In some cases, even updating the app doesn’t resolve the issue. And, if it’s the same with you, we got you covered. In that case, you can try reinstalling the Microsoft Teams app 🔄 on your device from the native app stores.
According to us, it’s one of the most effective solutions in this guide that can resolve the issue within a few seconds. Follow the below-mentioned steps to reinstall the Microsoft Teams app from the built-in application store:
Note: Uninstall the existing Microsoft Teams app from the affected device before implementing the mentioned steps.
For Mobile Users (Android & iOS)
For Android
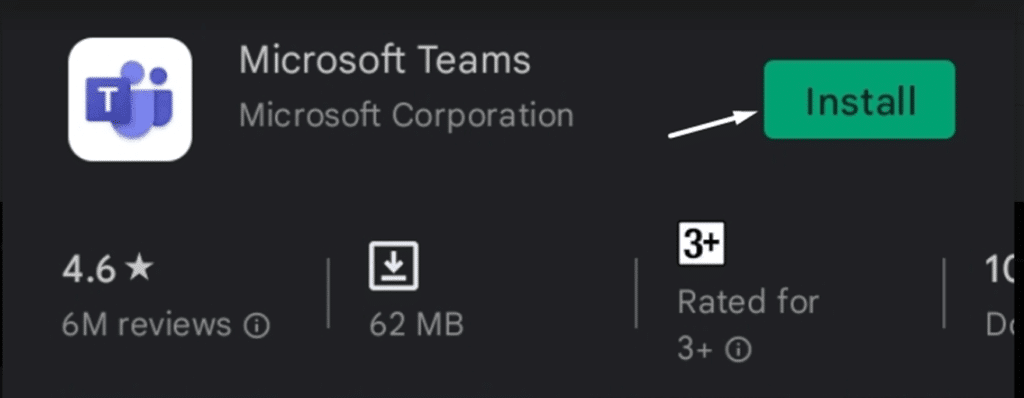
- First, open Google Play Store on your Android smartphone and search for the Microsoft Teams app.

- Now, select the Microsoft Teams app from the search results, and click on Install next to the Microsoft Teams app to install the app on your device.
For iOS
- To start, open the App Store on your iPhone and search for the Microsoft Teams app using the search feature.
- Then, tap on Get to install the Microsoft Teams app on your iPhone again and wait for it to install on the device.
For Desktop Users (Windows)
- Firstly, open the Microsoft Store app on your system and search for Microsoft Teams app on the application store.
- Then, click on the Install option next to the Microsoft Teams app to install the app on your Windows PC.

Once the Microsoft Teams app is reinstalled on the device, open it, and click on the three dots (…) in the top menu to open the More options menu. Now, check if the Start recording option is present in the More options menu.
15. Use the Team’s Web Client To Join and Record the Meeting
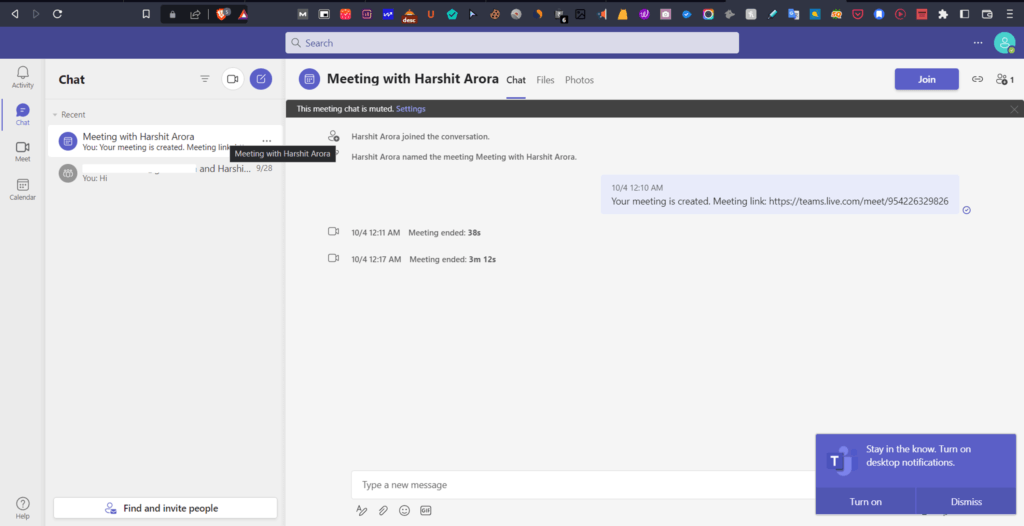
If updating and reinstalling the Microsoft Teams app doesn’t resolve the issue, switch to the web version of Microsoft Teams 🌐. You can use Microsoft Teams’ web version until the issue with the app gets fixed. The web version of Microsoft Teams also has recording functionality, so you won’t face any issue.
In addition, Microsoft Teams’ app and web version both have the same interface, so you won’t face issues while using it. We hope you don’t get the same issue while using the web version of Microsoft Teams.
16. Contact Microsoft Customer Support
If the web client of Microsoft Teams also has the same issue, then the last way to get rid of this issue is to contact Microsoft customer support 📞. According to the situation,this is the most recommended solution, and we hope this helps you. We already listed the most working solutions above, and we don’t think any other troubleshooting method can solve this issue now.
We hope they’ll suggest some working troubleshooting methods to you. You can follow the below-mentioned steps to contact Microsoft Customer Support:
- First, visit Microsoft’s Contact Us page and click on Show expanded list (🔻) of products to view all the products by Microsoft.
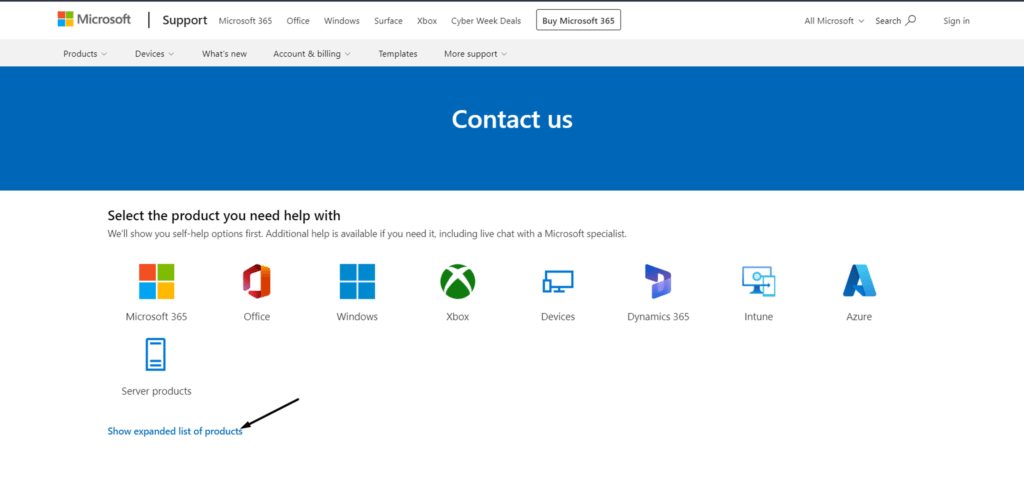
- Once all the Microsoft products are displayed, click on the Teams option in the Microsoft 365 section.

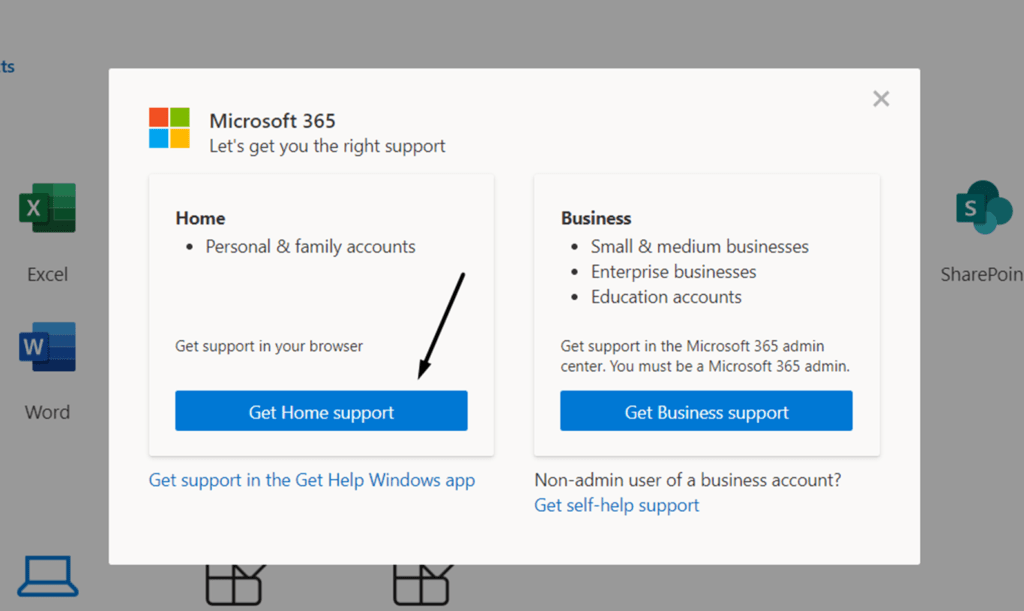
- Now, click on Get Home support, type the search query in the search box, and click on the Get help option.
- You’ll now see a lot of troubleshooting articles. You can read those articles (📑) and check if the articles can help you fix the issue. If you don’t get a working fix, click on the Contact Support option.

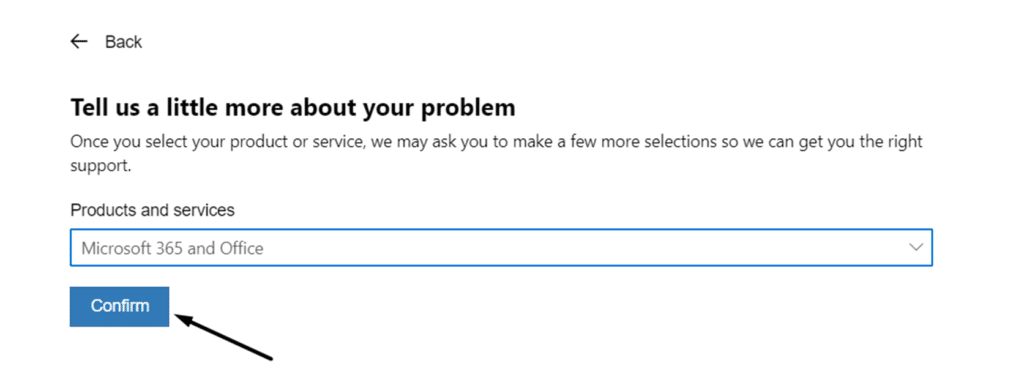
- After that, select Microsoft 365 and Office from the Products and Services dropdown and click on Confirm (✅) to proceed ahead.
- Then, click on the Click here to get more help with Microsoft Teams for personal use option and click on choose a support option.

- Lastly, follow the on-screen instructions to connect with a customer support executive from Microsoft.
Conclusion
We all use Microsoft Teams to host and attend all kinds of meetings, from personal to work. 👨💻 Most of the time, we wish to record our sessions, and thankfully, Teams has a Recording feature that lets us do the same. Sadly, the Recording feature isn’t working for some users, and they eagerly want to fix this, as it’s hampering their user experience a lot. ☹️
Fortunately, in this troubleshooting guide to fix Microsoft Teams recording not working, we listed some troubleshooting methods 🛠️ that have great potential to fix this issue. If you’re also facing the same issue with Microsoft Teams, you can follow the above-mentioned methods to fix it. We hope those workarounds help you resolve the Microsoft Teams Recording option not working issue. 😀
Check out our other Microsoft Teams guides covering similar Teams issues for more fixes:
- Microsoft Teams Files and Folders Not Showing or Downloading
- Microsoft Teams Contacts and Calendar Not Showing or Syncing with Outlook
- Microsoft Teams “Failed to Update Your Profile” or Picture Not Showing
- Microsoft Teams Crashing, Not Responding or Stopped Working
- Microsoft Teams App Lagging and Freezing
- Microsoft Teams Camera or Video Not Working
- Microsoft Teams No Sound, Audio, or Microphone Not Working
- Can’t Download, Install or Update Microsoft Teams
Once you’re done trying all the solutions, share your experience with this guide by answering the questions below 👇:
- Did we help you fix all the Recording issues with the Microsoft Teams app?
- Did any of the workarounds mentioned above work for you?
- Do you have other workarounds that worked for you, and we can mention them in the guide?
At last, don’t forget to share this guide with someone who can’t also find the Recording option in the More options menu 🙂.
Frequently Asked Questions About Microsoft Teams Recording or Recorded Video Not Working or Playing
How Do I Enable Recording in Microsoft Teams?
To start recording a meeting in Microsoft Teams, click on the three-dots or More options (…) in the top menu to open the additional options. Then, click on Start recording in the More options menu to start recording the session. If you want to stop the recording, click on the Stop recording option in the More options menu.
Why Is Recording Disabled in Microsoft Teams?
It could be possible that your organization’s IT manager hasn’t turned on the Cloud recording option on their end, because of which you’re unable to record meetings. To record meetings, you need to ask your IT manager to enable the Cloud recording option from the Meeting Policies Section. We suggest checking Fix #7 for a detailed explanation and steps.
Why Is Microsoft Teams’ Recording Not Working?
There could be varied causes for this issue. But one of the main causes is the restrictions imposed by your organization’s IT admin. It could be possible that the IT manager hasn’t provided the recording permissions to all team members. It means only a few sets of roles/people are allowed to record the meetings, such as the host.
How Do I Open Microsoft Teams Recorded Video?
Earlier, Microsoft Teams used to save meeting recordings in Microsoft Streams, a video storage, sharing, and collaboration platform. But now, they get stored in OneDrive. You can easily find the meeting recording in the channel’s chat. Another way to find the channel’s meeting recordings is by selecting the Files tab in your channel.
Do Microsoft Teams Recordings Expire?
According to Microsoft, the recorded meetings automatically expire after 120 days of creation. You can change the default expiration time from the Meeting Policies settings. Also, you can keep the recordings forever in OneDrive. But, for that, you need to disable the Meetings automatically expire option from the settings of Microsoft Teams.
