
Are you finding that videos on YouTube have no sound, muted audio, or the volume just isn’t working correctly? This is the complete guide to fixing all your YouTube audio problems!
YouTube is an online video sharing and social media platform that has been around since the early 2000s, way before apps like TikTok even existed. YouTube has over a billion monthly users who collectively watch over a billion hours of video content each day 🎥. Hence, it makes YouTube the second most visited website right after Google itself!
However, despite the growth and success of YouTube, along with its unprecedented social impact, the app isn’t perfect. With the wide expansion upon demand, users occasionally encounter various problems when streaming videos on YouTube.
For one, users have reported no sound playing or the audio is muted 🔇 when streaming videos, although the visuals appear correctly. Meanwhile, others find that the audio on YouTube videos is delayed or out-of-sync with the video stream.
Addressing this problem is crucial as having no sound when watching a video can ruin your entire streaming experience!
Therefore, this guide will show you 25 fixes you can try on your end whenever your YouTube videos have no sound.
With that settled, let’s dive in!
Note: This guide provides pictures and steps taken from the YouTube website or app on Windows, macOS, Android, iPhone and iPad. The steps also work effectively and similarly for other streaming devices, including game consoles (PS4, PS5, Xbox, Nintendo 3DS), Smart TVs and set-top boxes (Roku, Firestick, Apple TV).
Table of Contents
25 Fixes When YouTube Has No Sound, Muted Audio or Volume Not Working or Playing
- Run Basic Diagnostics
- Test the Audio on Headphones or an External Audio Device
- Check the YouTube Server Status
- Update the YouTube App
- Restart the YouTube App or Refresh Your Web Browser
- Close Unused Apps and Browser Tabs
- Reboot Your Streaming Device
- Check and Improve Your Internet Connection
- Test the Audio Stream on a Different YouTube Video
- Check the System Sounds (Windows)
- Check the Volume Mixer Settings (Windows)
- Reinstall or Update the Audio Drivers (Windows)
- Update Your Device’s System Software and Firmware
- Stream YouTube on an Incognito Window
- Disable the Web Browser Extensions
- Turn Off AdBlocker Extensions on the Web Browser
- Check for Any Pending Browser Updates
- Try Streaming YouTube on Another Browser
- Ensure That the YouTube Website Is Not Blocked
- Delete the Web Browser Cache Data
- Clear the YouTube App Cache and Data
- Reinstall the YouTube App
- Update the Adobe Flash Player
- Troubleshoot Using the Built-in Audio Troubleshooter
- Report the Audio Problem to YouTube Help
25 Fixes When YouTube Has No Sound, Muted Audio or Volume Not Working or Playing
1. Run Basic Diagnostics
Before going into more technical fixes, it’s always important to perform some basic troubleshooting. This is so we won’t waste time and effort only to find out that the YouTube audio problem was caused by small mistakes that are often overlooked.
With that said, there are a few areas you can inspect, namely the YouTube volume settings, browser audio settings, system sound, Bluetooth and external audio devices:
Check the YouTube Volume Settings
For starters, YouTube offers the mute button functionality 🔇 where one can mute the streamed videos without muting the entire device’s audio. So, when the mute mode is enabled, all sound features on YouTube will be disabled.
This feature comes in handy when you wish to watch YouTube videos while having other audio playing in the background. However, once the mute mode is enabled, it will remain on for all subsequent videos that you play on YouTube unless manually turned off. Therefore, there’s a possibility that you may have muted a YouTube video during your previous visit and forgotten about it.
To overcome this, simply open the YouTube video that you want to watch and click on the ‘Speaker‘ icon as shown in the screenshot below. This step will unmute all videos on YouTube.

Unmute the YouTube Site on Your Web Browser
Next, you should also ensure that you didn’t mute the YouTube tab on your browser. In the latest version of the Google Chrome browser, users are allowed to mute separate tabs. Previously, one cannot play media on two different tabs because the audio from both videos will overlap. Now, you can selectively mute certain tabs on your Google Chrome. However, if you have muted YouTube on Chrome, it will be muted forever unless manually disabled.
So, to unmute the YouTube site on any browser, the steps are generally as follows:
- Firstly, open the YouTube website.
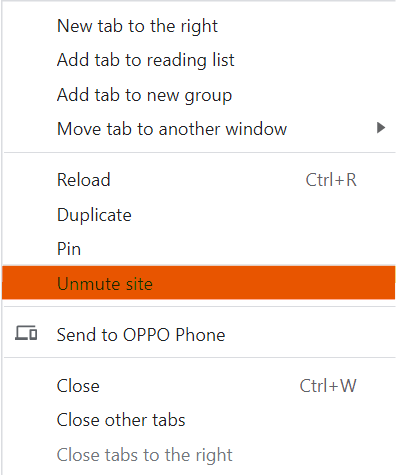
- Then, move over to the YouTube browser tab and right-click on it.
- After that, from the right-click menu, select the Unmute site option.
From there, play the YouTube video, and the audio should be available.
Ensure That System Sound Is Not Muted
Another possible cause resulting in the audio of YouTube videos not working is your device’s system sound is at either the lowest settings or muted. There are a few ways to identify this on different devices:
For PCs
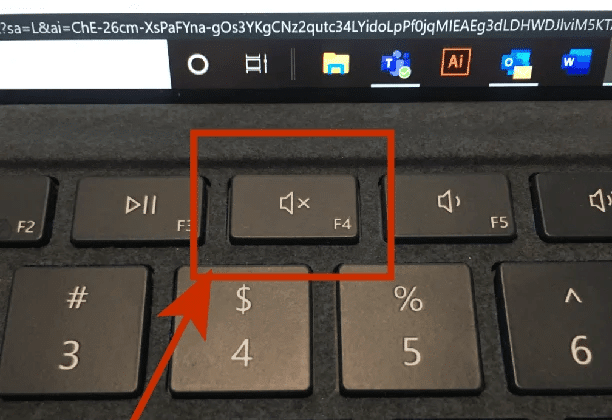
Starting off with the system sound on your laptop, the first method is taking a look at the mute key on your keyboard. This applies to some PCs. Supposedly it is lit up, it means that your device audio is muted.
Secondly, you can also determine if your PC is muted by looking at the audio icon at the bottom-right corner of your screen. If the icon shows an ‘X’ next to the speaker, it indicates that your volume is set to 0 and muted.
![]()
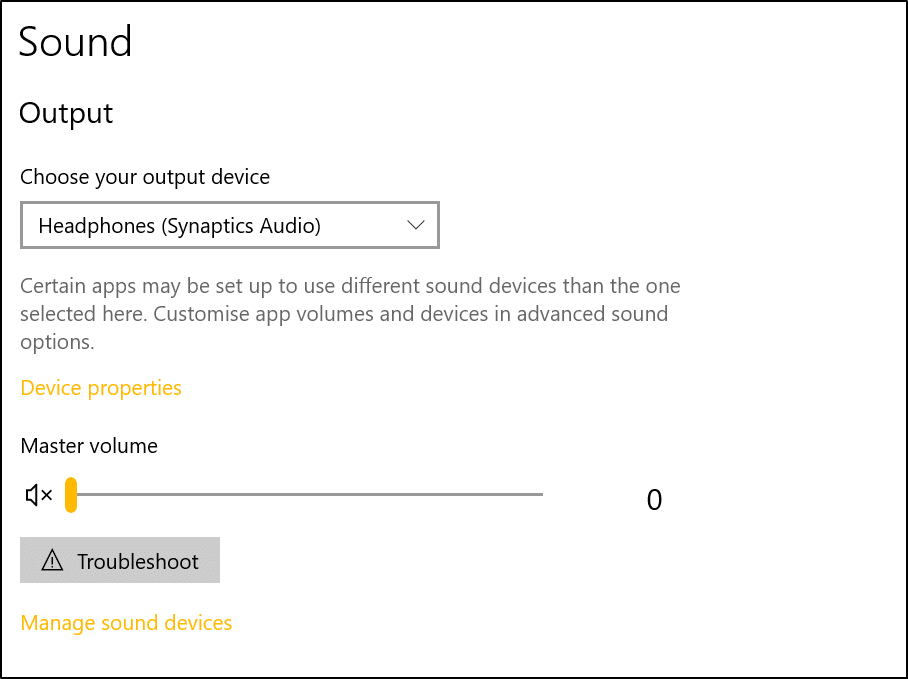
Lastly, you may also head over to Sound settings and take note of the Master volume.
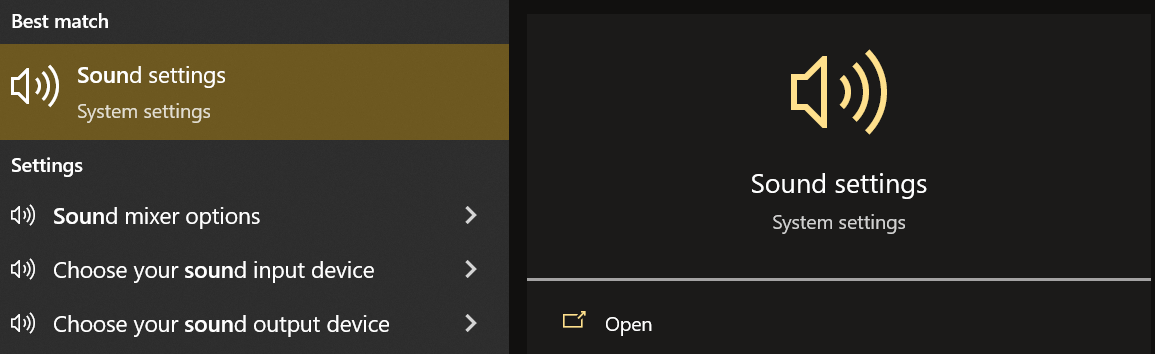
From there, you can unmute and adjust your system sound level under Master Volume to your preference.
For Mobile Devices (Android & iOS)
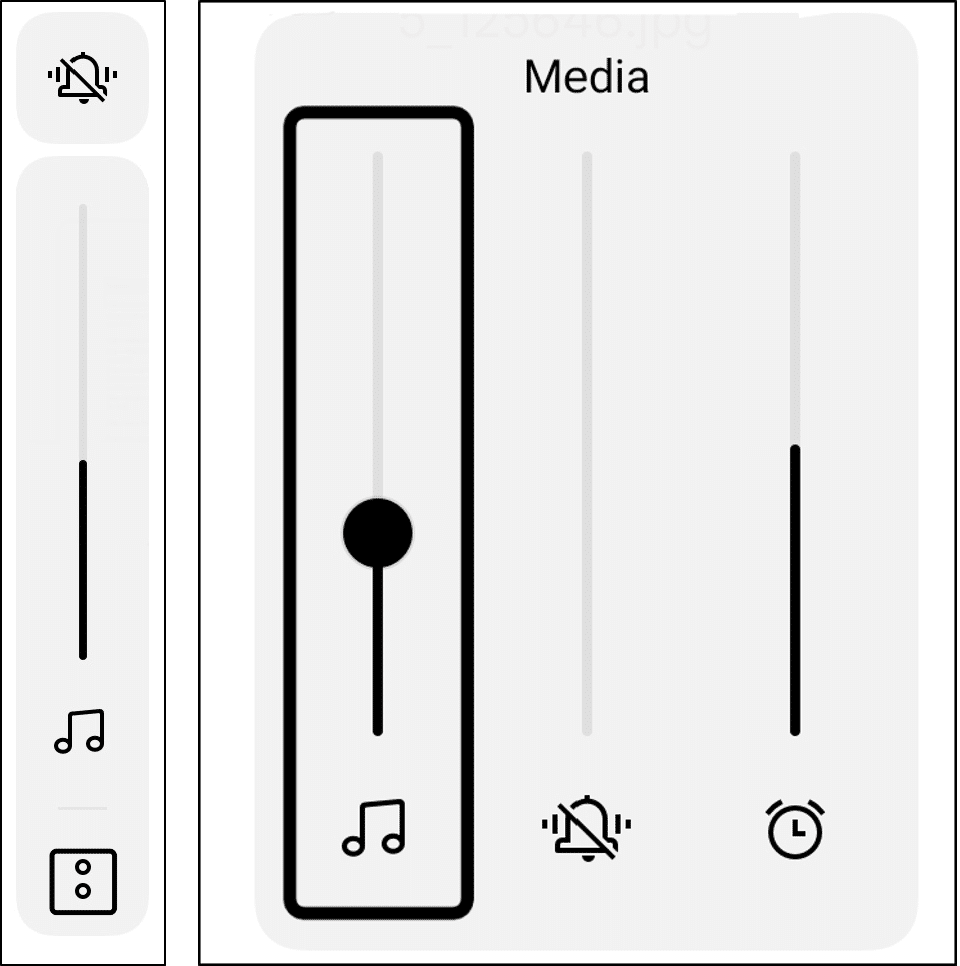
For mobile devices, it is important to note that the audio is differentiated into three main categories, namely ringtone, media and alarm. However, some may assume that raising the ringtone volume via the volume up button, increases the media volume as well.
The correct way around this is as follows:
- Firstly, press the volume up button and a volume level bar will appear on the left.
- Then, under the volume level bar, tap the menu icon represented by dots to expand the volume box and two other volume level bars will appear.
- After that, find the volume level bar with the music note icon. That volume level bar allows you to adjust the media volume.
- Finally, adjust the media volume level to your preference.
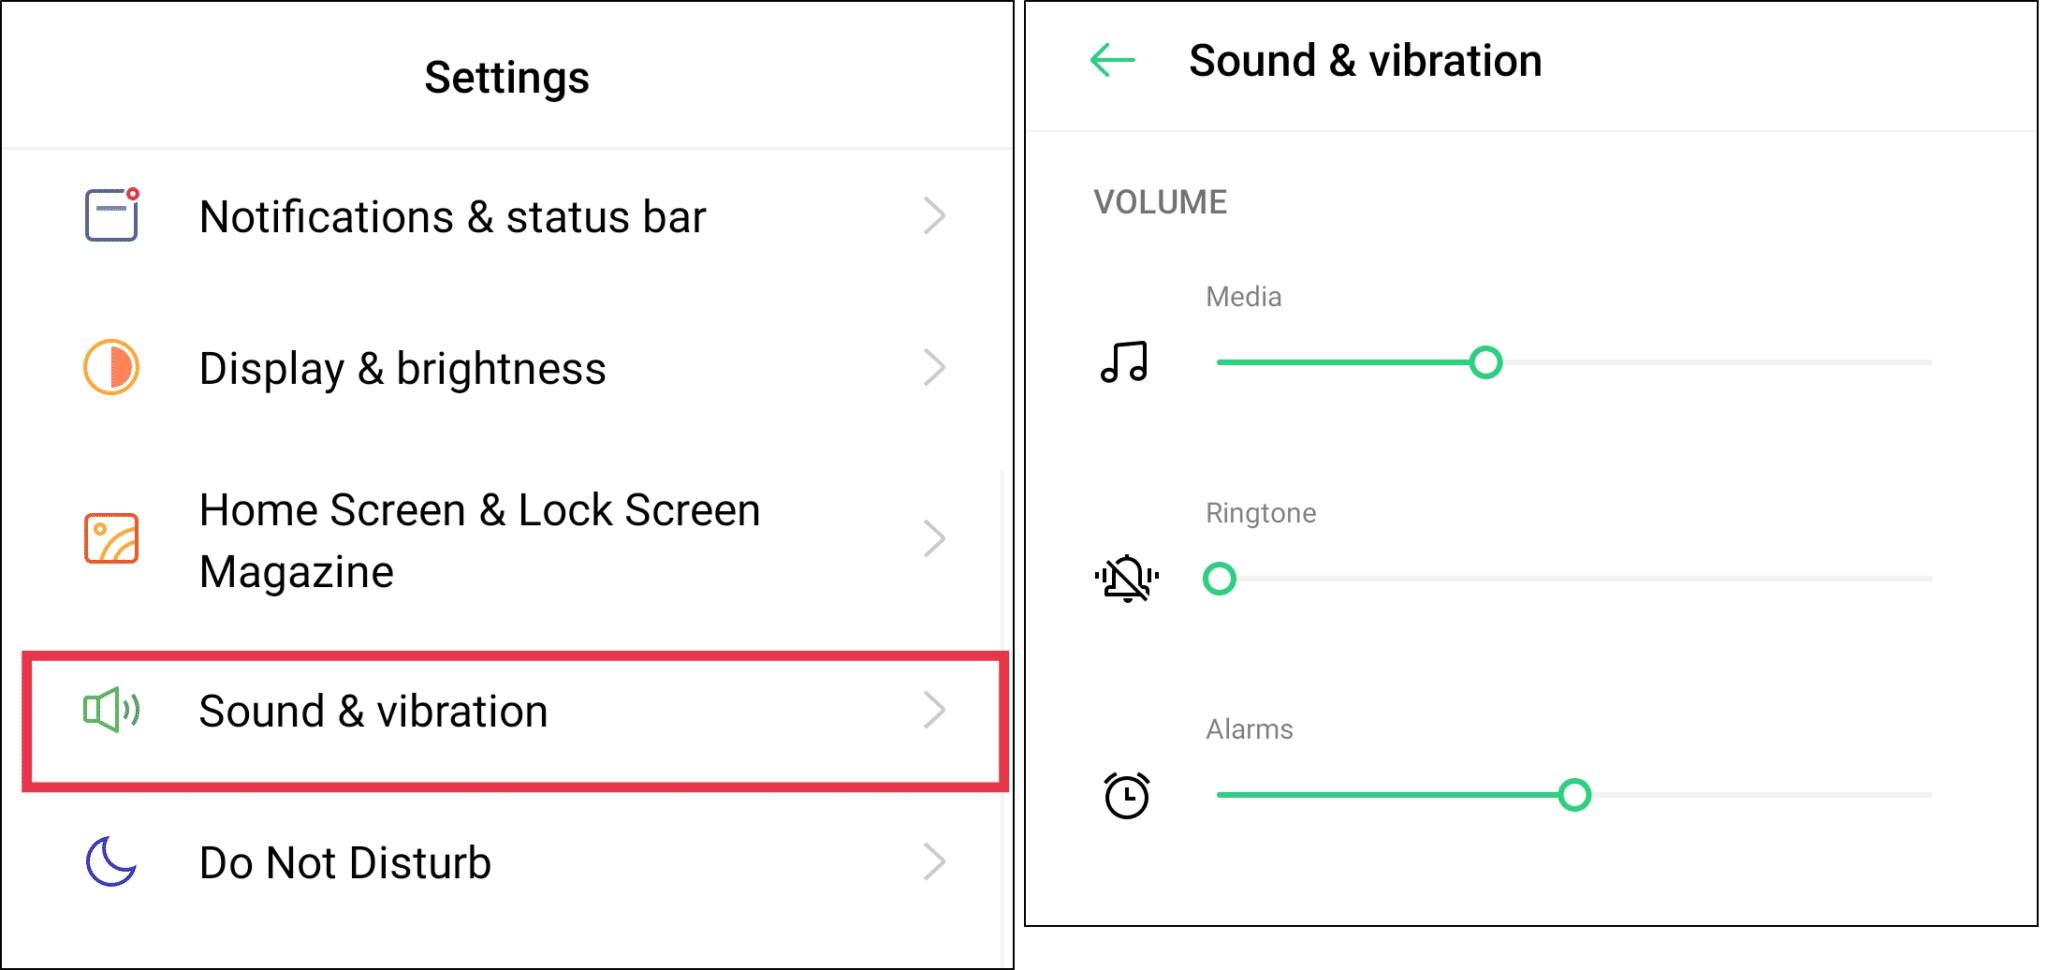
Another way to access the media volume level is via your mobile device Settings. From Settings, find the Sound and Vibrations menu and increase the Media volume.
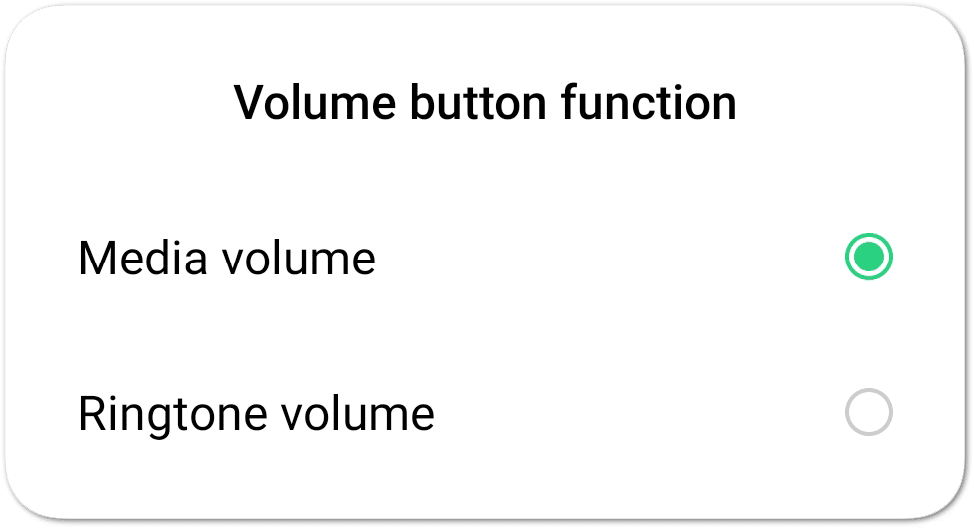
Suppose you watch YouTube frequently and need to adjust the media volume more often than the ringtone volume. Then, some mobile devices also provide you with the option to set media volume as the default function for the volume button.
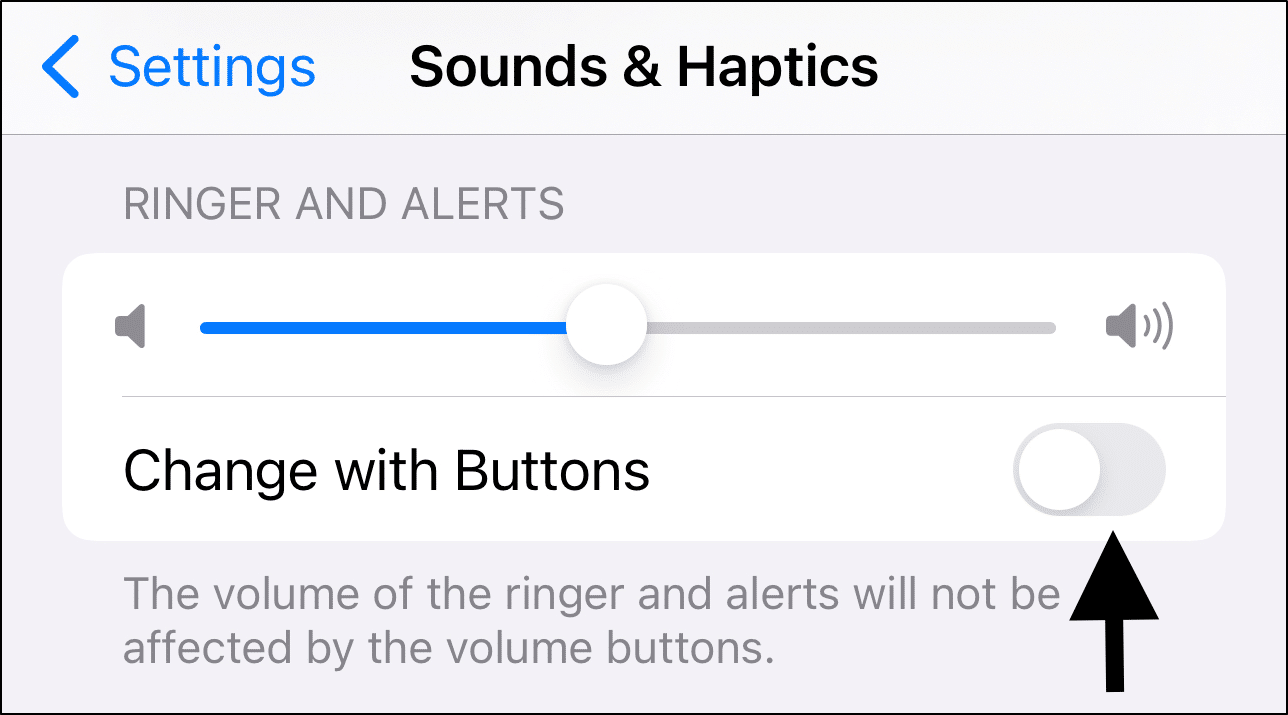
This is usually the default case for iOS devices as well. For iOS devices, you can navigate to these settings by opening Settings > Sound & Haptics. Then, under Ringer and Alerts, disable Change with Button.
Make Sure That Bluetooth Is Turned Off
Additionally, we also recommend ensuring that your device’s Bluetooth is turned off before playing any YouTube videos or any other applications for that matter. This is because you may be unaware of any Bluetooth speakers or earphones being connected 🎧 to your device. From there, the audio output for your YouTube videos will always be channelled to these external devices instead of your device’s main speakers. Consequently, you may have the misconception that there’s an audio issue with the YouTube video player.
Plus, this step is also important to ensure accuracy and efficacy when trying out other fixes. Hence, it is placed as a basic diagnostic step before trying any other technical fixes.
With that said, to turn off your Bluetooth connection, you can follow these steps and it may vary between devices:
For Mobile Devices (Android & iOS)
- First, open the notification shade (Android) or control center (iOS).
- Then, locate the Bluetooth icon in the notification shade.
- Lastly, tap on the Bluetooth switch to turn it off. Bluetooth is turned off if the Bluetooth icon isn’t coloured.

For Windows
Follow the steps below to turn off your device’s Bluetooth:
- First, click on the Start Menu on the bottom-left corner of your display.
- Then, select Settings.
- After that, click on Devices.
- Finally, click on Bluetooth & Other Devices from the side menu and make sure that your Bluetooth connection is switched off.

For macOS
You can control your Bluetooth connection by doing the following:
- On your Mac, click on the Apple logo or Apple menu button on the top-left corner of your display.
- After that, click on System Preferences.
- Lastly, click on Bluetooth and make sure that it’s off.

For Set-Top Boxes
Ensure Speakers are Connected Correctly
Perhaps you’re using external audio devices such as external headphones 🎧, earbuds or speakers. Many prefer these external accessories as they help to significantly enhance the overall audio quality when streaming YouTube videos. This is because device speakers, especially smartphones, don’t offer the best sound quality that one might desire. In contrast, accessories are astonishingly loud and are capable of delivering higher volumes compared to the device’s built-in speakers. ensuring that you get a better more immersive streaming experience!
However, sometimes using external audio devices can lead to audio issues when they are not connected correctly, especially when it comes to handling various wires 🔌. These wires are crucial as they’re responsible for sending audio signals from your YouTube player to the audio output device. Unfortunately, over time with wear and tear, some problems can occur with the audio device’s wiring such as loose connections.

To resolve this problem, you can try to reset the cables in their proper position. To do so, try simply unplugging and then plugging them back into their respective correct ports until they’re fitted tightly and in place. If you’re dealing with a lot of different wires and cables, we also suggest colour coding the cables to avoid confusion.
If you still notice a minor movement in the cables after plugging them in, you should check the pins on both the cable and the port. Look for any signs of bent pins and broken locks that may have occurred from the constant connection, removal and reconnection of the cables. Frequent use of the cables can cause pin ends to corrode and damage to the cables such as hits, nicks and bends. Consequently, they cannot send signals to the system. If that’s the case, we strongly recommend using spare cables or buying a new one instead.
2. Test the Audio on Headphones or an External Audio Device
As previously mentioned, external audio devices can improve the audio quality of YouTube videos and your overall streaming experience. However, when troubleshooting for audio problems on YouTube, these external audio devices can serve a bigger purpose as well. In this case, they can be used to determine whether the audio issues are caused by a problem with your device speakers. 🔊
The steps for this fix are easy. Simply plug in an external audio device (i.e., headphones or speakers), play a YouTube video and check if any audio is outputted from there. If you can hear the YouTube audio perfectly fine, there’s a high chance that the problem lies within your device’s built-in speakers.
For that matter, you may head over to step 10 for fixes related to your system sounds. On the other hand, if the YouTube audio problem persists, we recommend performing more troubleshooting by referring to subsequent fixes. This is because it’s still too early to conclude that it’s an issue with the YouTube video itself.
Note: If you’re using any wireless audio devices, do ensure that they’re properly connected for accurate troubleshooting results. Once you’re done with this step, you should also remember to turn off your Bluetooth connection (Step 1).
3. Check the YouTube Server Status
Moreover, when you encounter audio problems on YouTube, it may not always be an issue on your end but instead a problem with the YouTube servers.
When YouTube’s servers are down, your device will not be able to establish a stable connection with the servers. As a result, the audio files from the server cannot be transmitted to you, leading to YouTube videos having no sound.
While it’s uncommon for YouTube servers to experience downtime, unforeseen circumstances may take place. In these cases, we wouldn’t want you to spend hours trying fixes only to find out that the problem is with the YouTube servers. Therefore, we find that checking the YouTube servers status for any abnormalities is a fix worth the effort.
Method 1: Through Downdetector or Other Third-Party Status Checkers
There are a few ways to check YouTube’s server status. For starters, YouTube does not have a designated page on its help center that displays its server status. Therefore, we can settle for using third party status checker websites instead.
Third-party status checker websites are user-based websites that use the number of customer reports to determine YouTube’s current server status. The website that we highly recommend is the DownDetector page for YouTube.

This page provides a live graph that shows the number of reports in the past 24 hours based on users’ geolocations. From there, it analyses the data collected and lists out the top three problems with the highest number of reports. Perhaps you’re looking for additional details regarding the problems reported. In that case, you can also scroll and interact with other users in the comment section.
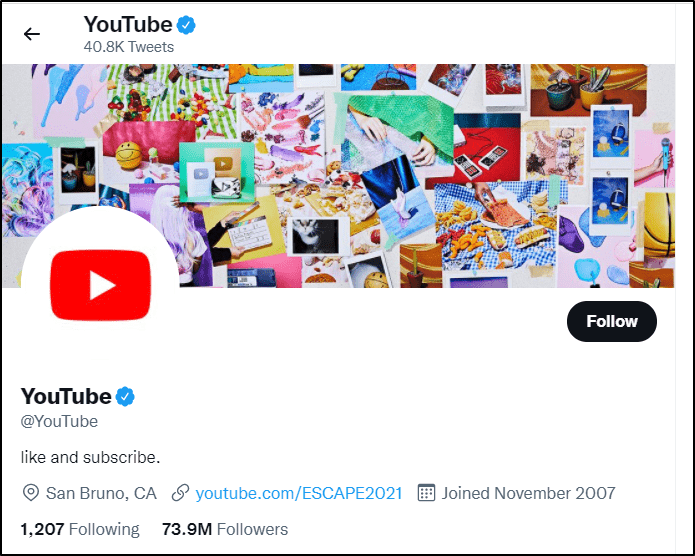
Method 2: Through the YouTube Twitter Page
Another way to identify whether YouTube servers are experiencing downtime is by checking for any updates on YouTube’s Twitter page. Suppose there is any important news or situation that affects a large group of users. YouTube will post updates on this page to keep users updated.
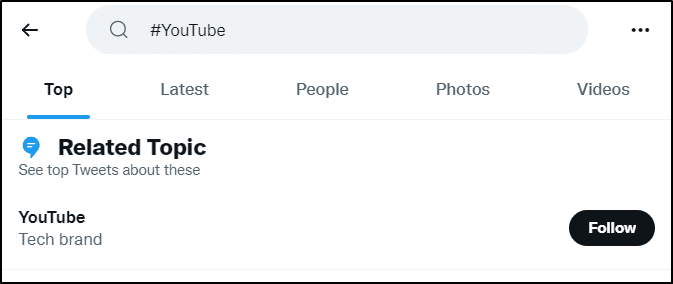
In addition to the method above, via Twitter, you can also search for YouTube timestamps where other users may have posted about problems they’re currently facing with the application. Simply head over to the search bar, type in #YouTube and you’ll be provided with a list of YouTube-related tweets.
After checking for the YouTube server status via one of the methods above, perhaps you’ve noticed the YouTube server is down. In this case, there’s good and bad news. The good news is that you don’t have to proceed with troubleshooting the audio issue yourself anymore. However, on the downside, there isn’t much you can do other than to sit around and wait until the YouTube service is restored.
In contrast, if YouTube servers are up, they aren’t the culprit for the audio problems on your device. Hence, we suggest either reporting the issue to the YouTube Help Center for any possible fixes (Step 25). You can also continue reading this article and try to fix the problem yourself!
4. Update the YouTube App
Suppose you have verified that the audio problem resulted from an issue on your end and have run the basic diagnostics. We can start looking into the various possible causes that can lead to YouTube audio problems.
To begin, if you’re streaming on the YouTube app, videos may not have audio due to app-related complications such as app bugs and glitches 👾. An app bug refers to a flaw or failure in the software program that can result from your YouTube app being outdated. So, if your YouTube app is outdated, it is unable to process the audio content retrieved from YouTube servers correctly. This is because of compatibility issues where the outdated app cannot recognize the new formats added into the audio content. As a result, this communication problem can cause your YouTube videos to keep losing sound.
Hence, it’s important to always ensure that you install any pending YouTube app updates on your device. This is a practice that you should resort to regularly, including for other apps on your device as well and not only when a problem arises. This is because the latest version of the YouTube app may have new features added into it for a better viewing experience. Plus, app updates are also the medium used by YouTube developers 👨💻 to release bug fixes. Therefore, while we’re here troubleshooting, a patch for the audio problem may have already been released in the new version of the YouTube app.
With that said, to update the YouTube App, follow these steps:
- Firstly, head over to the app store where you initially installed YouTube.
- Then, search for the YouTube app and visit its app page.
- After that, if there are updates available, click the Update button and allow installation to take place.
- Finally, restart the YouTube app to apply the updates.

5. Restart the YouTube App or Refresh Your Web Browser
Furthermore, having too many instances of YouTube running in the background can also potentially lead to app bugs.
What goes on when you’re restarting the YouTube session? Here’s a simple analogy!
This statement essentially means that when an app is running on your device, it will create new instances of itself to handle requests such as button clicks. So, imagine a card deck. When the app is first launched there is only one card in the deck 🃏. Every time a user request is made, another card is added and the cycle repeats for each new user input. However, these app instances are not removed automatically and will remain unless the app is closed or when the back button is clicked. Over time, these stacked up instances can become corrupted, leading to app glitches and causing the YouTube app to have audio problems. A similar concept applies when you’re streaming videos on the YouTube website as well.
On that note, this problem can be solved by restarting the YouTube app or refreshing the YouTube web page on your browser. This step will clear out all existing instances of the app, including those which are possibly corrupted.
Reload the YouTube Web Page
If you’re streaming YouTube via your web browser on PC, a simple reload of the page might do the trick. During this process, the browser cache is accessed and this cached data is used to load the webpage. No matter which browser you use (Chrome, Firefox, Edge), the steps to refresh the YouTube page are similar:
- Click the reload button
 on the web browser.
 - Press the Ctrl + R key (For Windows) or the Command + R key (For macOS).

You can take this a step further and restart your web browser. All you need to do is simply close your web browser, then reopen it and visit YouTube.
Hard Refresh the YouTube Web Page
In contrast, hard-refreshing not only reloads the page, but also removes some minor cache associated with it. It loads the webpage using resources retrieved again from its server. The reason is that hard-refreshing doesn’t use the cached data from the browser cache. Therefore, it’s a straightforward way to clear the YouTube page cache and force load the most recent version.
On Windows: For most web browsers (Chrome, Firefox, Edge), press the Ctrl + F5 keys together at the YouTube page to perform a hard refresh.

On macOS: For Safari and other web browsers on macOS, press the Command + Option + R keys simultaneously.

Restart the YouTube App
For the YouTube app installed on your phone, tablet, set-top box or Smart TV, rebooting the app can bring about similar effects. However, most people may not perform it completely or effectively. Simply clicking the home button only brings you back to the home page on your device. However, it doesn’t remove any of the app instances.
Hence, to correctly carry out this method, follow the steps below:
- First, exit the YouTube app and close it by removing it from your Recent Apps or App Switcher. If you’re using Android devices or other set-top boxes, you can Force Stop the YouTube app through your Settings app.
- Then, relaunch the YouTube app from your homepage or app list.

Note: This step can be used after app updates to allow updates to be applied. It can also be used after other fixes to check if the problem persists.
6. Close Unused Apps and Browser Tabs
When watching YouTube videos, you may have another audio file or video being played on another tab or app such as the VLC player or iMovies. Suppose these apps or tabs are not being used, it’s important to close them when streaming YouTube.
The main reason for this step is that some devices can only play audio from one app at a time. These apps on your device or tabs on your browser might be playing audio and occupying your audio device. Hence, it gives the misconception that there’s something wrong with the YouTube video’s audio.
Secondly, we advise you to close any unused browser tabs and apps to free up memory and processing power on your device. This is because the number of system resources available can affect the performance of YouTube as well. For YouTube to run smoothly and correctly, a certain amount of free system resources are required. When there aren’t enough system resources, it can lead to YouTube sound problems when streaming.
With that said, to close browser tabs, there are two ways around it:
The first method is to close browser tabs using the X icon located at the side of each tab. This method allows you to choose which browser tab you would like to close.
![]()
Another way is to close the entire browser app. This step can be executed by clicking the X icon located at the top right corner of the browser interface.
![]()
7. Reboot Your Streaming Device
After clearing the corrupted YouTube app instances, you can take a step further and restart your streaming device by turning it off and then back on again. We recommend doing this because the YouTube app requires a sufficient amount of device resources in order to run correctly.
However, when your device has been working for long periods of time, large amounts of device memory is used. The RAM can get filled up by all the programs loaded and used on the device.
Hence, this step can help to clear off the device memory, allowing more available resources to be allocated to the YouTube app.
For Android devices: Press and hold the power button until the restart or power off option appears. Tap the Restart option, and you are all set!

For iOS devices: Press and hold either the volume button and the side button until the power off slider appears. Then, drag the slider and wait 30 seconds for your device to turn off. To turn your device back on, press and hold the side button (on the right side of your iPhone) until you see the Apple logo.

After that, turn the device on and try YouTube again to check if the audio problem has been resolved.
Power-Cycle your Streaming Device
In some cases, when the YouTube no audio error occurs on a device connected to an electrical outlet 🔌, it may require power-cycling. This is because power can still be supplied from stored charge in the capacitors in your device. Thus, power-cycling your device can help to reset the power source and flush these energy storage units in your streaming device.
On that note, to power-cycle your streaming device:
- For starters, turn off the device you’re streaming YouTube from and switch off your TV.
- Next, unplug all the cables, mainly the power cord and HDMI cable.
- Then, wait for about 1-2 minutes before plugging the wires back correctly and turning on your device and TV.

While a full hardware shutdown and reset does the trick most of the time, if it doesn’t, you should move on to the next solution.
8. Check and Improve Your Internet Connection
Moving on, when streaming YouTube videos, you should also ensure that you have a strong and stable Internet connection. Without it, it can lead to YouTube audio problems such as distorted visuals and desynchronized audio when playing YouTube videos.
Internet Requirements for YouTube
Now, you must be wondering how high is the recommended speed in order to be considered a strong Internet connection. According to an article on YouTube Help, the recommended sustained speed varies according to the video resolution. As the video resolution increases, the minimum required internet speed also increases.
For starters, standard definition videos of 360p and 480p are available on YouTube. For 360p, the minimum recommended Internet speed is 0.7 Mbps and for 480p, at least 1.1 Mbps of Internet speed is needed. Moving on to the higher resolutions, High Definition 720p video resolution requires an Internet connection speed of at least 2.5 Mbps while 1080p needs a minimum Internet speed of 5 Mbps. Lastly, for 4K video streaming, YouTube set its recommended sustained speed at least 20 Mbps. Therefore, if your internet speed is low or your connection is unstable, your YouTube video’s audio may be out-of-sync.
Test the Internet Connection Speed
Now, you have gone through the list of recommended internet speeds. Hence, looking at your current Internet plan, you may be thinking that your connection speed is sufficient or maybe even more than enough! However, is it really enough? While you may have subscribed for an Internet plan of 5 Mbps, you aren’t guaranteed a consistent delivery of 5 Mbps Internet speed. Therefore, we suggest testing your Internet speed for any low speeds or latency.
To do so, you can try this Internet speed tester Fast.com, created by a fellow streaming service, Netflix! It’s a quick and easy process where results are returned almost instantly!

From there, perhaps you realize that your Internet speed is slower than usual. In that case, you can try out these quick and nifty steps to improve your Internet connection:
Switch Between Mobile Data and Wi-Fi
For starters, you should try switching between mobile data and Wi-Fi when streaming YouTube videos. This step serves two main purposes:
One, switching between Internet connection sources can help you to identify whether it is the cause of your YouTube audio problems. Two, by switching between internet connection sources, you can identify the more stable options at that point of time. By theory, mobile data should be more stable than a Wi-Fi connection due to the lack of broadband infrastructure. However, in cases of bad weather, the mobile data connections may also be down if there are problems at the 4G towers.

Forget and Reconnect to the Wi-Fi
Unfortunately, even though mobile data is more stable in most cases, we understand that not everyone has access to it due to the lack of coverage. Moreover, for some, their mobile data is bound by a quota system where they only have a limited amount of high-speed data. Hence, they’re unable to spend it watching YouTube videos as it consumes a high amount of data in short periods of time.
Therefore, in these situations, we suggest working on improving your Wi-Fi connection. Firstly, you can try reconnecting to your Wi-Fi connection. You can do so by simply turning the Wi-Fi setting off and on again via the notification shade or control center.
This step can be taken further by forgetting your Wi-Fi network on your streaming device before reconnecting. To do so, follow these steps:
- To start, go to Settings.
- Then, select the Wi-Fi option.
- Next, click on the Wi-Fi you’re connected to.
- Subsequently, choose the Forget this Network option.
- After 2 to 3 minutes, reconnect to the Wi-Fi again.

Adjust Your Internet Router’s Position
Furthermore, your Wi-Fi speed is highly susceptible to Wi-Fi interference. Wi-Fi interference refers to any signals outside of the configured Wi-Fi network that impairs the normal operations of the Wi-Fi connection. Hence, to ensure good Wi-Fi signal strength 📶, it’s important to minimize the chances of interference.
Interference can commonly occur in two situations. Firstly, physical barriers may be blocking your Wi-Fi signal and the signal is unable to reach your device. In that case, we suggest repositioning your Wi-Fi router. You can consider moving your router to a central location as the reception at these locations are at optimum levels. You can also pick a more elevated position off the floor, such as on a bookshelf or desk. In any case, avoid hiding your router behind furniture such as cabinets and sofas.

Secondly, frequency interference can also cause Wi-Fi interference. Frequency interference occurs when another signal 📡 with a similar bandwidth is crossing paths with your Wi-Fi signal. It can be caused by other nearby wireless devices such as cordless phones and microwaves. Consequently, this signal may end up corrupting or overpowering your Wi-Fi signal. Therefore, you have to keep them away from your router.
Power-Cycle Network Devices
Moreover, we recommend power-cycling your router. This step is another method to improve your Internet speed by reconfiguring your Wi-Fi.
The steps to do so are:
- First, turn off and unplug the power from your modem or router.
- Then, wait approximately 30 seconds.
- Subsequently, reconnect the power source to the router or modem and wait for it to connect to the Internet.
- Lastly, connect your streaming device to the Wi-Fi and try streaming YouTube again.

Ensure the Ethernet Cable is Connected Properly
Additionally, YouTube has also advised hardwiring your Internet connection by connecting your device to the Internet via an Ethernet cable instead of using a wireless network connection. This step is especially helpful if you’re streaming on a Smart TV or a computer.
As previously mentioned, Wi-Fi connections are susceptible to interference because they are transmitted via wireless signals. In contrast, Ethernet cables help to transmit data through a wired connection, minimizing the odds of interruptions or disconnections. Therefore, it can provide a more stable and secure Internet connection.

However, when using an Ethernet cable, it’s important to ensure that it’s properly plugged in and connected to your device. A loose cable cannot transmit the necessary data correctly, bringing you back to square one on the YouTube audio issue.
Disconnect Bandwidth Hogging Devices from your Wi-Fi
Next, when troubleshooting your YouTube audio problem, we suggest getting others who are using the same Internet connection to pause their network activities temporarily. This is in order to get as much bandwidth as possible for watching YouTube videos and to ensure more accurate results when troubleshooting. When more than one person is using the Internet connection, the connection speed can get limited and decrease accordingly for each individual.

Lower the Streaming Quality on YouTube
Another way to conserve Internet bandwidth for troubleshooting is by lowering the streaming quality of the video itself for the time being. YouTube has a feature that automatically selects the streaming quality based on the detected Internet speed. However, sometimes you’ll still encounter YouTube audio issues such as the audio being out-of-sync. In that case, we recommend lowering the quality to one setting below the default selected one. The steps to do so are as follows:
- First, launch the YouTube app or web page.
- Then, play a YouTube video.
- From there, hover over the video and click the Settings icon, ⚙️.
- In the settings menu, select Quality or Playback quality.
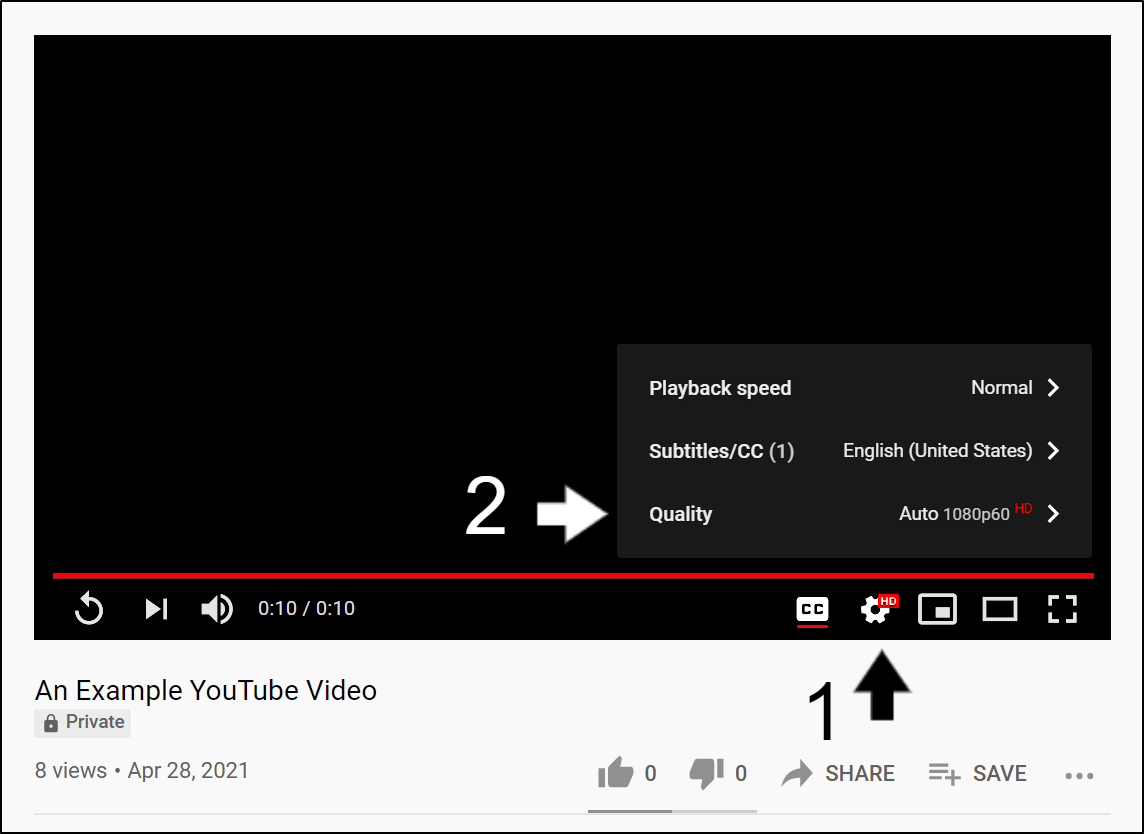
- After that, check the streaming quality selected by YouTube
- Here, select a lower streaming quality below the default settings.

Once you’ve changed the settings, try playing any YouTube title and check if the audio is working again. If it isn’t, repeat the same steps but change to a lower quality this time. Then, verify if the problem persists. If it does, you may move on to other fixes in this post.
9. Test the Audio Stream on a Different YouTube Video
Apart from having problems with the YouTube app causing audio issues, another possibility is that the problem originated from the initial title you selected. This is because certain videos on YouTube can encounter problems with their associated content and audio files. As a result, the videos can have no audio during playback.
To verify this, simply pick another video on YouTube by random and inspect if the audio plays without errors. You may repeat this step multiple times by selecting more than one different video for higher accuracy.
Suppose the same audio error occurs for every video you play. In that case, the audio problem most likely arose from an issue with your device or browser. Hence, we recommend trying out other related fixes.
Therefore, in the further parts of this post, both possible devices and browser-related issues that can lead to YouTube audio problems are covered. However, if the other videos are playable without audio errors, then you should report the issue to YouTube Help (Step 25) to clarify the reason behind this scenario.
10. Check the System Sounds (Windows)
When it comes to device-related issues that may have caused no audio to play for your YouTube videos, it may be due to incorrectly configured system sound settings. So, we can clarify this by checking the system sounds on your device:
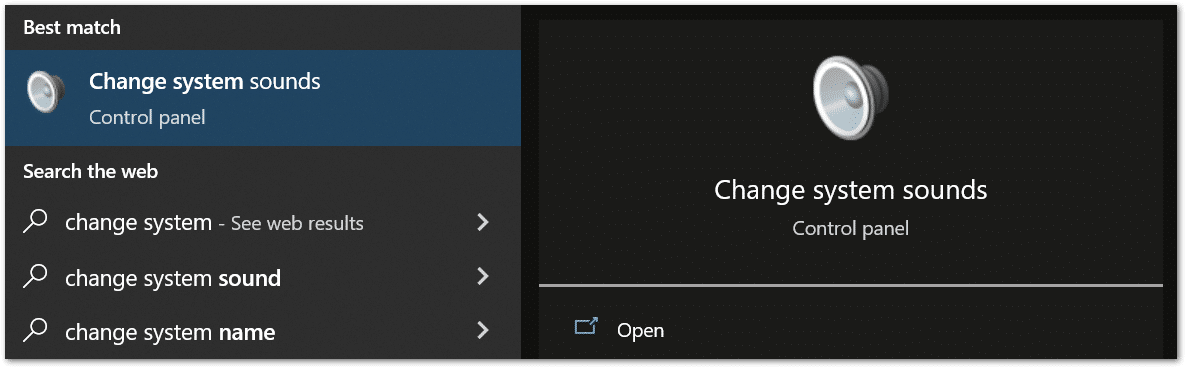
- First, from the Start menu, use the Windows search bar to search for Change system sounds.
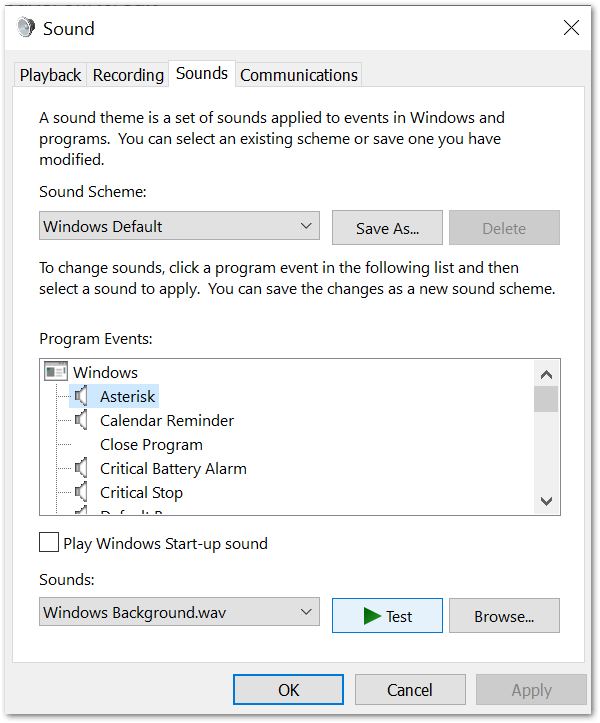
- Then, under Sounds, choose any Program Events sound that has a speaker icon next to it.
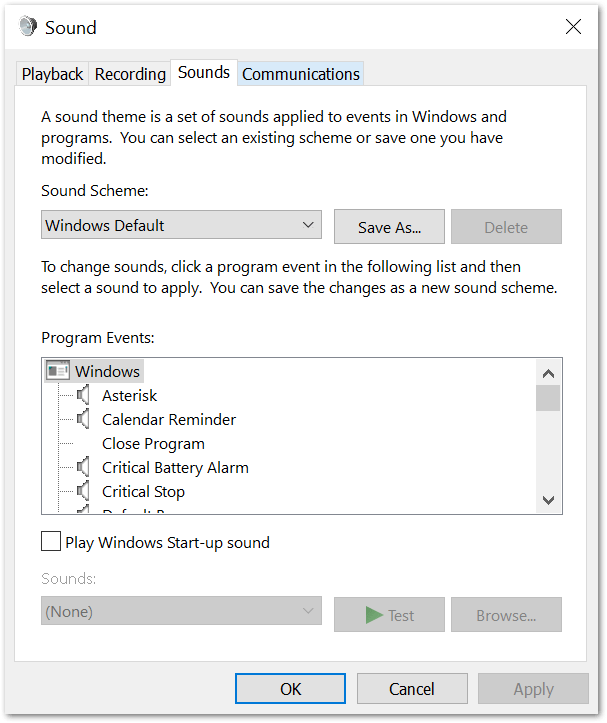
- After that, click Test and check if any audio is outputted.
Suppose you hear sound being produced from your device speakers, you can cross off this possible cause from your troubleshooting list.
However, if you don’t manage to hear any sound, there’s possibly a problem with your system settings and you should proceed to try the following fixes:
- Adjusting the system volume (Step 1)
- Ensure that speakers are properly connected (Step 1)
- Update and enable the audio drivers (Step 12)
Note: On Windows 10, You may also access the system sounds settings by right-clicking the speaker icon in the taskbar’s notification area and selecting the Sounds option.
11. Check the Volume Mixer Settings (Windows)
Another setting on your Windows device that can potentially cause your YouTube videos to have no sound is the Volume Mixer settings. It’s a utility setting that can be accessed through your computer’s main settings page and is used to define volume levels for each specific app.
However, seeing that your device can’t have multiple apps’ audio blasting simultaneously, it will lower down the volume for certain apps. For example, by default, if another app is used along with Google Chrome, the volume mixer will lower down your audio. Consequently, it may give you the misperception that your YouTube videos are having audio issues.
To verify this problem, open the same YouTube video in another browser. Suppose the audio plays without any errors, then the problem is with the audio levels of the original browser.
Therefore, to adjust this volume mixer setting, the steps are as follows:
- First, right-click the Volume icon from the taskbar
- Then, select the Open Volume Mixer option.
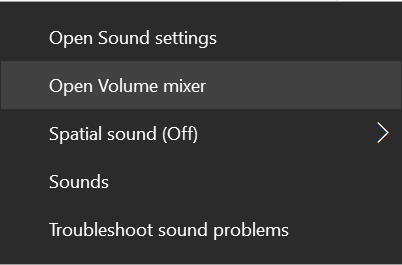
- After that, under the Applications section, you’ll see all the active apps along with their audio settings.
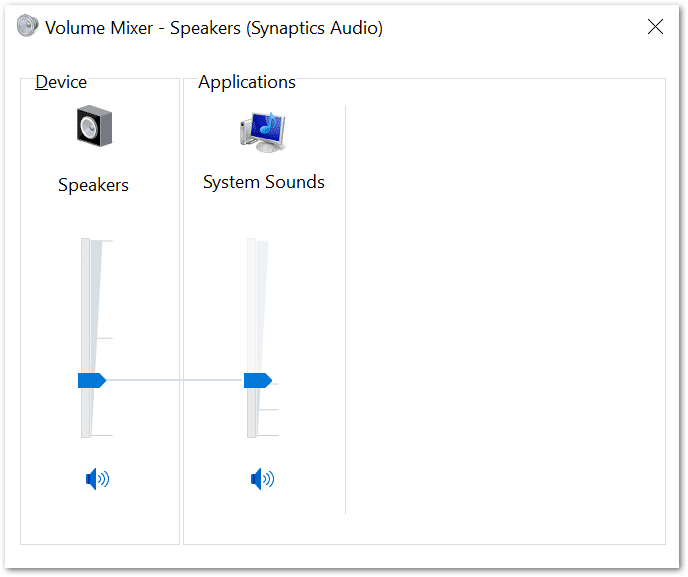
- From there, use the volume slider to lower or increase the volume for each app. You can either slide it down to lower the volume or slide it up to increase it.
- Alternatively, you can also locate the specific browser with issues or the Adobe Flash Player and ensure that the volume is maximized.
12. Reinstall or Update the Audio Drivers (Windows)
Suppose there is a problem with your system sound settings, causing YouTube videos to have no sound. This issue can be related to your device’s audio drivers.
So, What is an Audio Driver?
Audio drivers are software files installed on a computer used by the device’s operating system to recognize and interact with audio devices. So, these audio devices can vary from speakers to headphones to earbuds. However, all of them involve a sound card that enables the computer to process and convert audio data into auditory sound to be outputted. The sound card provides the features while the audio drivers bridge the gap between the sound card and your computer.
Why Should You Consider Updating the Audio Drivers?
Similar to apps, updates are frequently released for audio drivers and available for download on manufacturer websites. The purpose of these updates is not only to introduce new features that take better advantage of the audio device hardware. Additionally, they also help to fix device software-related issues and improve the overall audio driver used by the device. Hence, you should keep your audio drivers updated. This is to avoid cases of corrupted audio drivers that can disrupt the proper input and output process of audio files.
Checking for Driver Updates Through Device Manager
For Windows PCs, you can automatically check and install pending driver updates with just a few clicks through the Device Manager settings as in the steps below:
- First, right-click the Start menu. It will bring up a menu of options.
- Under the menu, choose Device Manager.

- Then, expand the Sound, video and game controller option.

- Subsequently, find and right-click the device named Synaptics Audio or any other main audio driver your device uses. A contextual menu will appear.

- Next, choose the Update device option. Then, it’ll begin checking for pending driver updates and it’ll proceed to install them if available.

Reinstalling an Audio Driver
However, in some cases, the drivers are not properly installed on your device and you will need to reinstall a fresh copy of the audio drivers. The steps are similar to that of updating the audio drivers. Simply follow the procedure as given below:
- First, repeat Steps 1 to 4 from the Update audio drivers guide above.
- Next, instead of Update driver, choose Uninstall device.

- Then, check the Delete the driver software for this device option before uninstalling. If this option isn’t available, move on to the next step.
- Finally, click the Uninstall button.

After the device driver is uninstalled from your system, restart your computer. Once your computer restarts, connect it to an internet connection. The Windows OS will automatically reinstall the generic device driver from the Microsoft server.
Note: Additionally, you can also launch the Device Manager by pressing Windows + R. Then, type devmgmt.msc in the search box provided.

However, updating or reinstalling drivers may not be a straightforward process. It’s risky because you may end up downloading and installing the wrong driver version. As a result, it can lead to permanent damages to your system. In that case, you can simply contact the computer or device manufacturer for assistance.
13. Update Your Device’s System Software and Firmware
Furthermore, out-of-date software or firmware can also be a potential factor leading to YouTube sound issues. To begin with, software updates are essential in increasing the performance of your device while patching any security vulnerabilities 🩹.
These newly-released updates for both software and firmware can also change the way your device connects to the YouTube servers. Suppose a line of communication cannot be established between your device and the servers, they can lead to audio issues on YouTube.
Additionally, new audio drivers for different devices are also added through software updates. Hence, if you’re connecting your device to external audio devices, this step will be crucial for you.
For YouTube, it requires your device to be running on at least a Windows 7+, a Mac OS X version 10.7 or an Ubuntu 10 and above. Suppose you’ve been putting off important updates most of the time. Then, your device may no longer have compatible software to support the YouTube app. This scenario can result in your device not being able to process new audio formats used by YouTube.
All in all, to update your device software, follow these steps:
Installing System Software Updates for Mobile Devices
For Android
- First, open the Settings app, scroll down, and select System.
- After that, choose System Update.
- Then, on this page, you can tap Check for update to search for pending updates.

Note: These steps may differ between Android devices depending on your phone’s model and current OS version. However, you should find the steps are generally like the above.
For iPhones (iOS)
- First, open the Settings app and tap General.
- Next, select Software Update to search for pending updates.

Installing the Latest Version of Microsoft Silverlight (Windows)
YouTube makes use of Microsoft Silverlight, so make sure that you have the latest version of Microsoft Silverlight on your Windows computer.
- First, open the Start menu, then search and open Windows Update settings.

- Next, click the Check for updates button.

- After that, if there are updates available, click the Download button to begin downloading and installing them. Finally, you may be prompted to restart your PC (step 7) to apply the changes.

From there, you should allow Windows to check for any available updates. Windows will proceed to install any pending updates available for your PC.
Installing the Latest macOS Version
- First, select the Apple menu icon and tap System Preferences.

- After that, click Software Update.

- Next, if there are pending software updates, proceed to click the Upgrade Now or Update button.

Installing Updates for Set-Top Boxes and Smart TVs
The following are links to official guides you can refer, to check for pending OS updates on your set-top box:
- Amazon Fire TV Devices
- Roku
- Apple TV
- Google Chromecast
- Android TV or Google TV
- Sony TVs
- Samsung Smart TVs
Note: Some TVs don’t come with software updates, especially older or cheaper models. Their software version will remain as it is and will not receive updates. Therefore, some of you may find this fix irrelevant for your TVs.
Firmware Updates
Next, firmware updates. Now, let us clarify that software and firmware are two different things. Firmware updates are also known as BIOS upgrades and work on the read-only memory of your device. The difference between a software and firmware update is that firmware updates don’t necessarily improve your device’s performance. Instead, it simply increases the compatibility of your device to new hardware.
However, we don’t suggest carrying out a firmware update if your hardware is running correctly. This is because firmware updates cannot be interrupted before completion. In cases where interruption takes place, it can brick your device as the hardware will lose the proper instructions to follow. Consequently, your device will no longer be usable.
14. Stream YouTube on an Incognito Window
Occasionally, the audio problems have nothing to do with web browser settings. To assess this, you can also try watching YouTube videos using the Incognito window 🕵️. Plus, in incognito mode, you can be sure that no web browser extensions or plugins act on the YouTube web page. Similarly, no previously-stored web cache is used to load the YouTube page.
Therefore, we can use this step to troubleshoot the point of failure. From there, we can either clear the web browser data (Step 20) or disable the problematic extensions (Step 15) to fix the YouTube audio issue for good!
Here’s what to press on your keyboard to open an incognito window on Chrome, Firefox, Edge and Safari:
Google Chrome
Shortcut keys
- Windows: Ctrl + Shift + N
- macOS: Command (⌘) + Shift + N
- First, click on the kebab menu ⋮ on the top-right corner of the browser.
- Then, select New incognito window.

Mozilla Firefox
Shortcut key
- Windows: Ctrl + Shift + P
- macOS: Command (⌘) + Shift + P
- First, click on the hamburger menu (三) on the top-right corner of the browser.
- Then, select New Private Window.

Microsoft Edge
Shortcut key
- Windows: Ctrl + Shift + N
- macOS: Command (⌘) + Shift + N
- First, click on the meatball menu icon
 on the top-right corner of the browser.
 - Then, select New InPrivate window.

Safari (macOS)
Shortcut key
- macOS: Command (⌘) + Shift + N
- First, click on File. It is on the top-left corner of the browser.
- Then, from the drop-down menu, select New Private Window.

Suppose the YouTube video is able to play audio correctly when in the private tab. Then, the issue may be related to your browser cache or cookies and the browsing history or even one of your extensions.
With that said, we recommend heading over to Step 20 for steps to clear your browser cache data. By doing so, you may lose saved information such as saved passwords and autofill. However, it’s worth a shot if it’s able to fix the sound problem. Else, you would have to constantly open a new private tab to watch YouTube videos.
15. Disable the Web Browser Extensions
Perhaps you’re encountering YouTube videos that have no sound on the web page only. In that case, it may be caused by some web browser extensions that were enabled.
Web browser extensions are small software modules used to customize a web browser. They’re commonly used nowadays because they allow users to add desired web service features and functionalities to their browsers.
However, sometimes these external browser extensions, plugins and add-ons may not be built for YouTube. Hence, when enabled, they can impede and affect the normal operations of the YouTube web page and affect troubleshooting results.
Therefore, you should temporarily disable all of them when troubleshooting the YouTube audio issues. You can follow the steps below to disable extensions on your web browser:
For Google Chrome, Microsoft Edge and Mozilla Firefox (Windows)
- Firstly, click the 3 dots at the upper-right, hover over More tools, and click Extensions.

- On the Extensions page, under the extension you wish to disable, turn the switch off.

For Safari (macOS)
- With Safari launched, from the Menu Bar, select Safari and click Preferences.

- At the next window, choose Extensions from the top bar.
- To disable a Safari extension, uncheck the box next to the particular extension.

Once you have disabled all extensions, refresh the YouTube website (Step 5). If this fix didn’t work for you, we recommend trying another web browser (Step 18).
16. Turn Off AdBlocker Extensions on the Web Browser
Continuing from the previous fix, one of the most common web browser extensions used nowadays is the adblocker extension. As the name suggests, they can effectively remove any advertisements from appearing on web pages. However, this may contradict the normal operations of YouTube as they have advertisements slotted at the start or in the middle of videos. With the normal operation disrupted, it can cause audio issues when watching YouTube videos.
That being said, we suggest turning off the adblocker for the YouTube site. The steps to disable the AdBlock extension differs from other extensions as it can be turned off for specific sites based on users’ preferences.
For Chrome, Firefox and Microsoft Edge (Windows)
- First, visit the YouTube web page.
- Then, click the AdBlock icon on the top-right of your browser. A drop-down menu will appear.

- Then, select Always under the Pause on this site section.

- At this point, the web page should refresh. The AdBlock icon should turn from red to green. This change indicates that AdBlock is disabled for the YouTube website.

- Finally, refresh the YouTube page again (Step 5) if necessary.
Note: While Chrome and Microsoft Edge supports both AdBlock and AdBlock Plus, Firefox no longer supports AdBlock. However, the steps to disable other ad blocker extensions are similar.
For Safari (macOS)
- First, open up your Safari browser.
- Then, click on Safari located in the menu bar.
- Next, select Preferences. The Preferences window will be displayed.
- Subsequently, click on the Extensions button. A list of all extensions you’ve installed to Safari will appear.
- After that, navigate to and click on AdBlock/AdBlock Plus in the list of extensions in the left pane.
- Finally, uncheck the box next to the AdBlock extensions. AdBlock/AdBlock Plus will then be temporarily disabled, until the user decides to re-enable the extension.

17. Check for Any Pending Browser Updates
Subsequently, we also suggest checking your browser for any pending updates. This is because an outdated browser may be causing your YouTube videos to have no sound. An outdated browser cannot communicate with YouTube’s servers correctly. Therefore, there’s a chance that audio files aren’t retrieved properly, leading to YouTube videos losing audio or having no sound at all.
For YouTube, the minimum browser version needed is the newest version of Google Chrome, Firefox, Edge, Safari, or Opera. These browser requirements are listed in this article.
To update your browser, follow these steps:
For Google Chrome
- For starters, open Chrome on your device.
- Then, look at the More icon on the top right corner.
- Next, check if pending updates are available. If an update is pending, the icon will be coloured. The colour of the icon indicates how long the update has been released.

- Subsequently, if an update is available, click on the More icon.
- Finally, click Update Google Chrome. If you can’t find this button, your browser is up-to-date.

For Microsoft Edge and Mozilla Firefox
- First, launch the web browser.
- Then, click on the main menu button in the top right corner.
- Next, select Help (Firefox) or Help & Feedback (Edge).

- After that, click About Mozilla Firefox or About Microsoft Edge.

- From there, the browser will automatically check and download the available updates.

Once the browsers are updated, don’t forget to relaunch the browser to configure the updates.
18. Try Streaming YouTube on Another Browser
Perhaps you’ve given the previous steps a shot but the YouTube audio is still not working. In that case, the problem may be hidden in your browser itself and you may have to consider using a different web browser.
This is because different browsers typically run on different engines that render pages differently. While they all give a different user experience, some may not be supported by the YouTube website. Hence, they may not deliver the video and audio content to users correctly.
From what we know, YouTube supports the most commonly used browsers, namely Google Chrome, Microsoft Edge, Mozilla Firefox, Opera and Safari. Hence, if you’re on Chrome, you can consider switching to any of the other options and vice versa.

19. Ensure That the YouTube Website Is Not Blocked
Moreover, suppose you’ve previously blocked the YouTube webpage on your browser. It can cause problems with the YouTube audio as well. The idea of blocking YouTube on your web browser involves restricting access to any information or resources on the YouTube servers. Hence, if the YouTube website is blocked, your device is unable to retrieve audio files for the streamed YouTube videos.
With that said, here are the steps to unblock the YouTube web page:
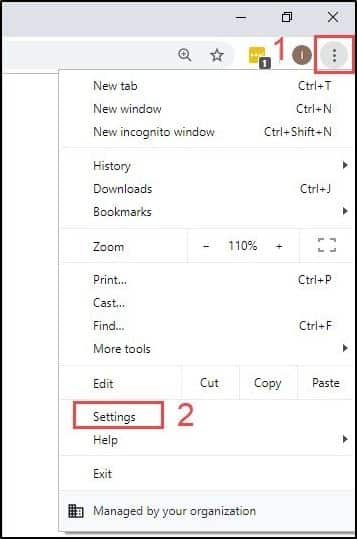
- First, launch your web browser. In this case, we will be using Google Chrome.
- Then, click the three dots button in the upper-right corner.
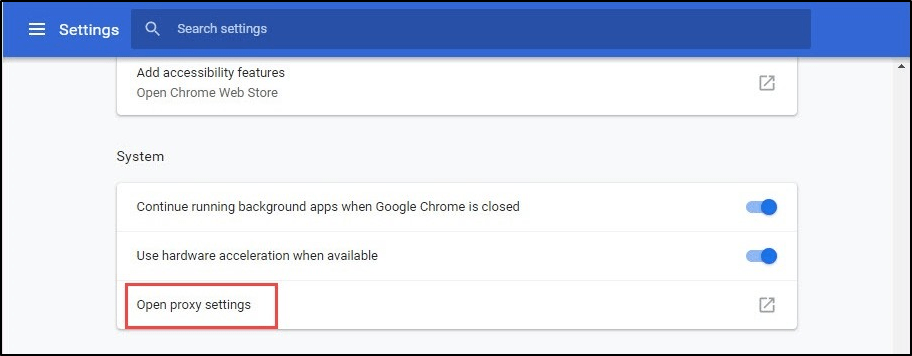
- After that, select Settings.
- Subsequently, locate the System section and click Open proxy settings.
- Next, under the Security tab, select Restricted sites > Sites.
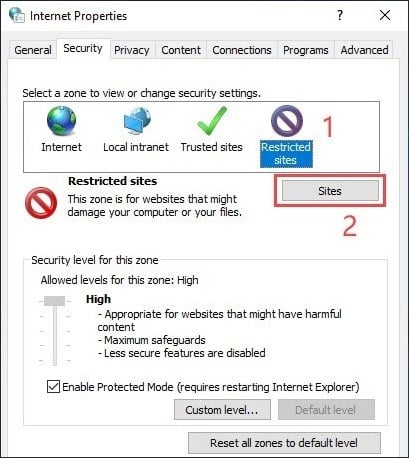
- Then, under Websites, if you find the YouTube URL in the list, select it and click Remove.
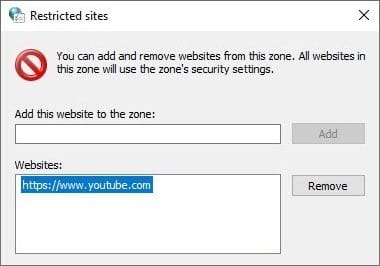
- Lastly, click OK.
From there, restart your web browser, launch YouTube, play a video and inspect if the audio problem persists.
20. Delete the Web Browser Cache Data
Furthermore, YouTube audio problems can also be caused by outdated and corrupted web browser cache data and files.
To begin with, cache files are static assets that your computer stores in its hard drive when it was first retrieved by your browser from the YouTube servers. So, its main purpose is to shorten the access time needed to load the YouTube webpage.
However, with the release of updates for the YouTube webpage for new features and bug fixes, these files become outdated. However, your device’s hard drive isn’t notified of these changes and continues to load these cache files instead of requesting new assets. Consequently, when the new features meet the old layouts, mismatch formatting occurs and the necessary audio files cannot be received and played. This hindered communication causes YouTube to have various audio problems.
Therefore, you should clear your browser cache from time to time by following the steps below:
On Windows
The following steps are catered for Google Chrome. However, if you’re using a different web browser on Windows (Firefox, Edge), the steps are still similar:
- You can access your browsing history by pressing Ctrl + H together. Or click the menu button at the top-right and choose History at the drop-down.
- On the following page, click the Clear Browsing Data button. For Google Chrome, that’ll be on the left.

- Next, under Basic, check all options. Plus, you should select a time range of All time. Then, click Clear Data.

On macOS
- First, with Safari launched, from the Menu Bar, click Safari and select “Preferences…”

- At the following window, choose Advanced from the top bar, and tick the box next to “Show Develop menu in bar”.

- Subsequently, from the menu bar, click Develop, and select Empty Caches.

- After that, you can clear your search history and even more Site Data and Cookies. To do this, from the Menu Bar, click Safari, and choose “Clear History…”.
- Lastly, click Clear History at the following window.

21. Clear the YouTube App Cache and Data
In a previous step, we mentioned how watching YouTube on a browser produces cache. We also covered how these cache data can become the cause of the audio issues. The same applies to the YouTube app where the corruption of any uncleared cached data can result in YouTube sound issues as well.
Hence, here we’ll touch on the steps to delete the YouTube app cache and data files:
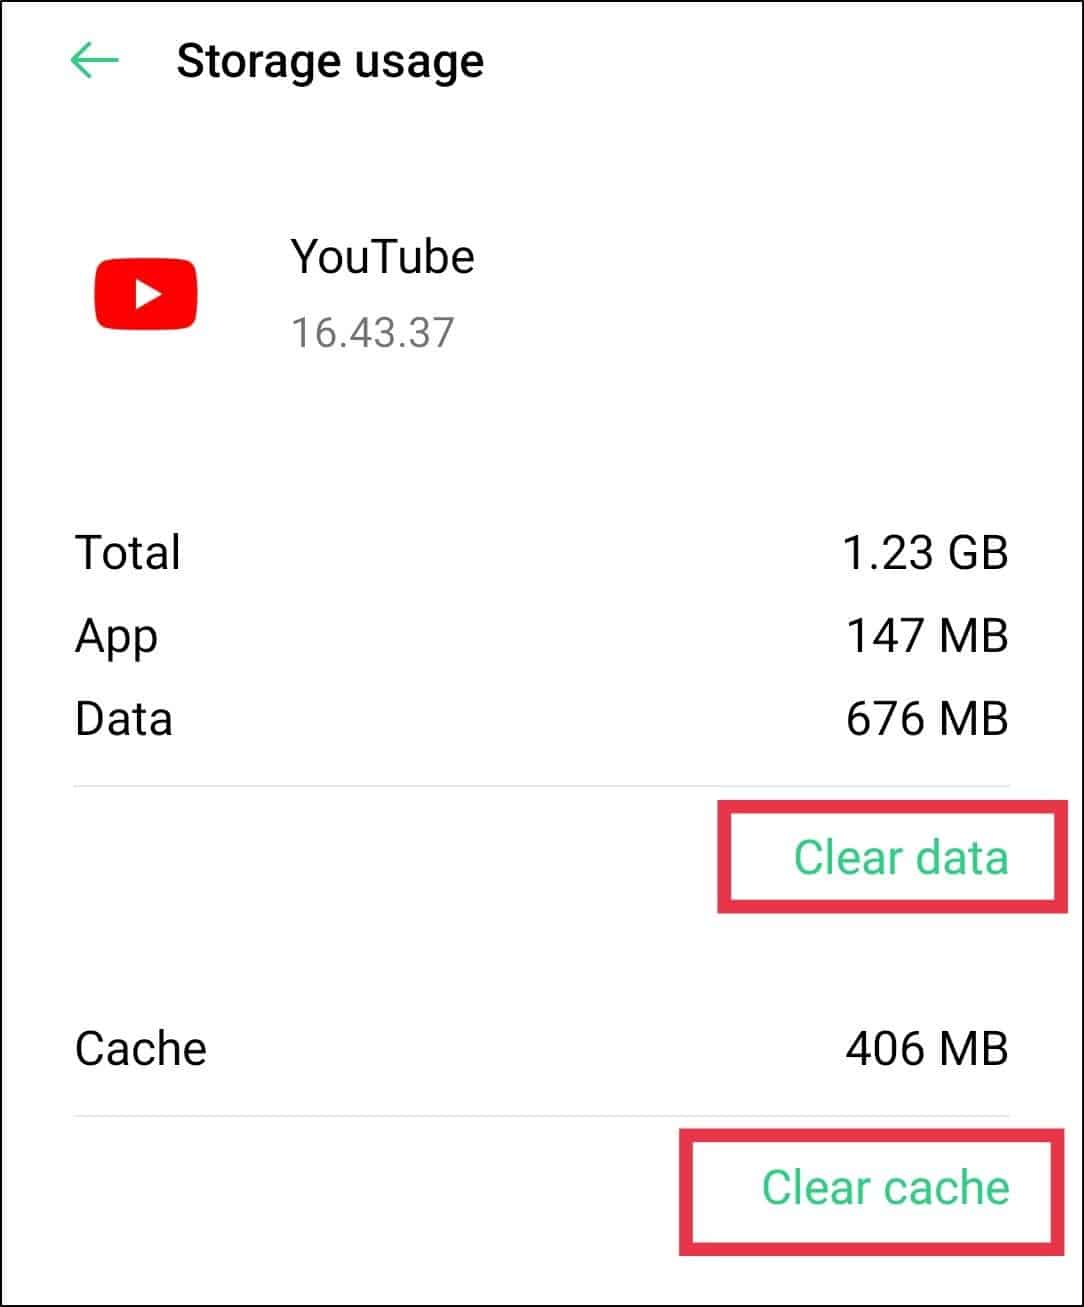
Delete the YouTube App Cache and Data Through Settings
For Android devices, Android TVs, and some set-top boxes like Amazon Firestick, you can clear all the YouTube app data through the Settings app.
To navigate to these settings:
- Firstly, open the Settings app
- Then, tap on Apps & notifications.
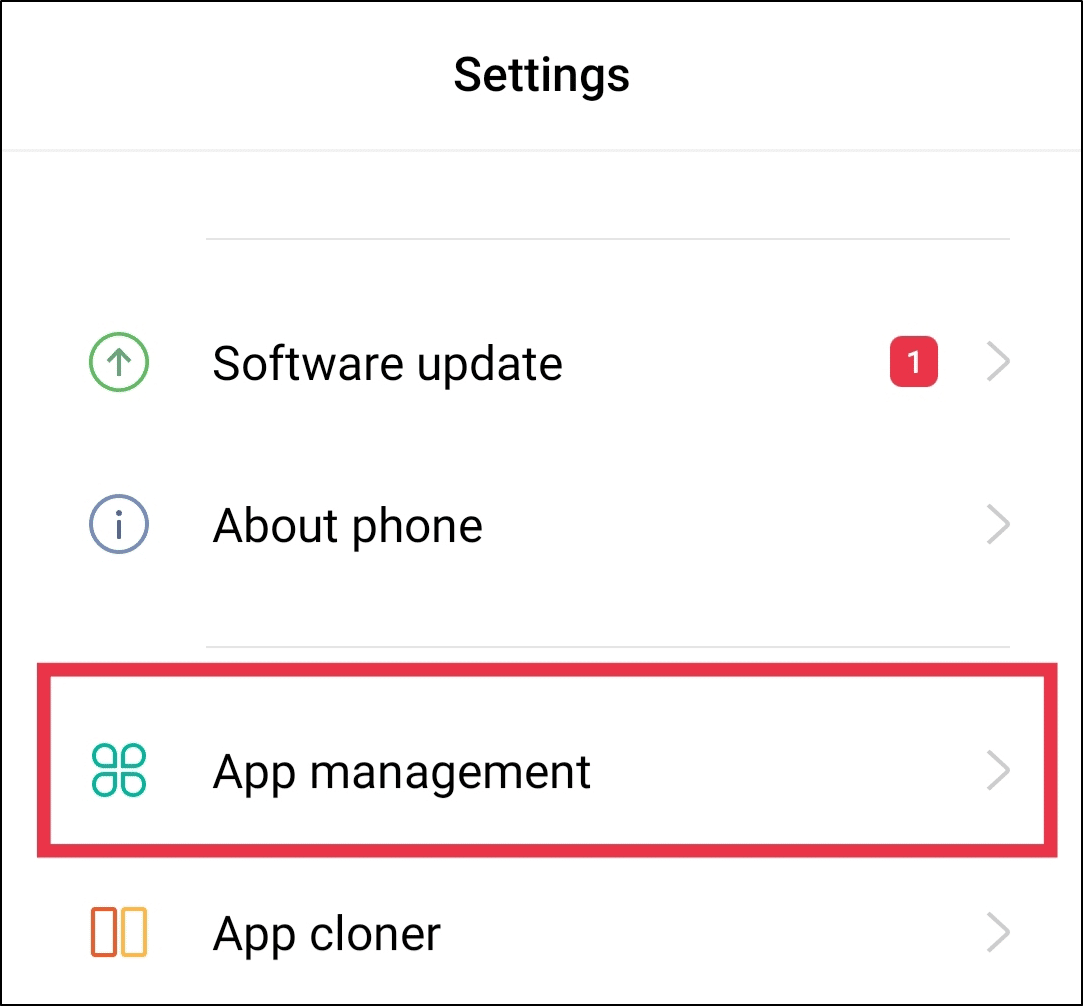
- Next, select YouTube from the list of apps.
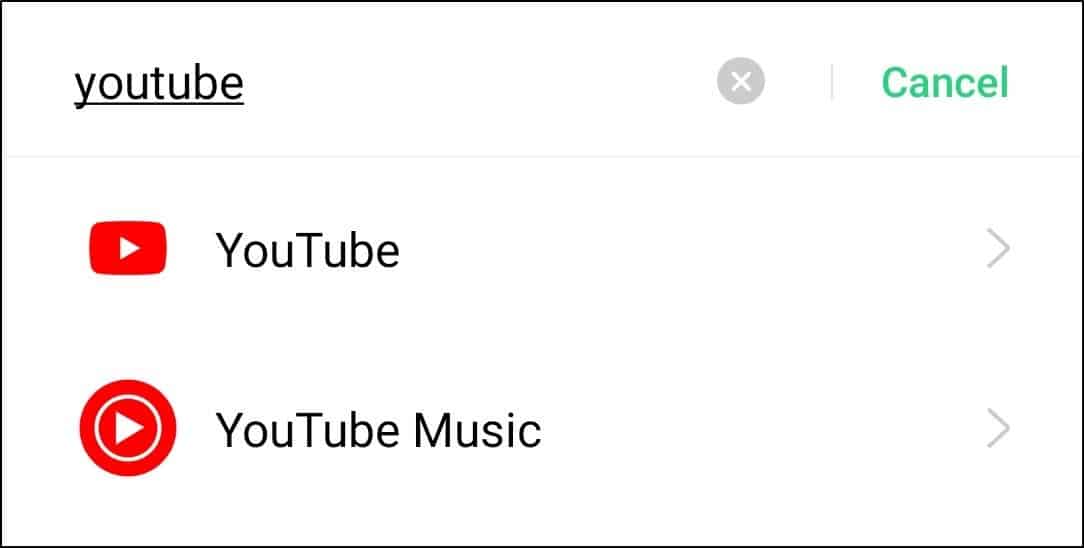
- After that, tap Storage & cache.
- Lastly, start by tapping Clear Cache, and then you can choose Clear Storage or Clear Data.
For Amazon Fire TV devices, you can check out their guide to clear app cache by clicking here.
22. Reinstall the YouTube App
Moving on, you can also try reinstalling the YouTube app by uninstalling it and installing a fresh copy onto your device. A complete reinstallation is also another way to clear the YouTube app cache on your device.
However, it’s a more thorough and effective method seeing that it will remove all files associated with YouTube. Hence, it ensures that no corrupted files will be left behind. Additionally, this step also helps to keep your YouTube app updated as a fresh new copy with all the latest updates will be downloaded.
With that said, generally, the steps to reinstall the YouTube app are similar across most streaming devices and are as follows:
- First, uninstall the YouTube app. This can be done by long-pressing for the selection menu or through the Settings.
- Then, select Uninstall or Remove App.
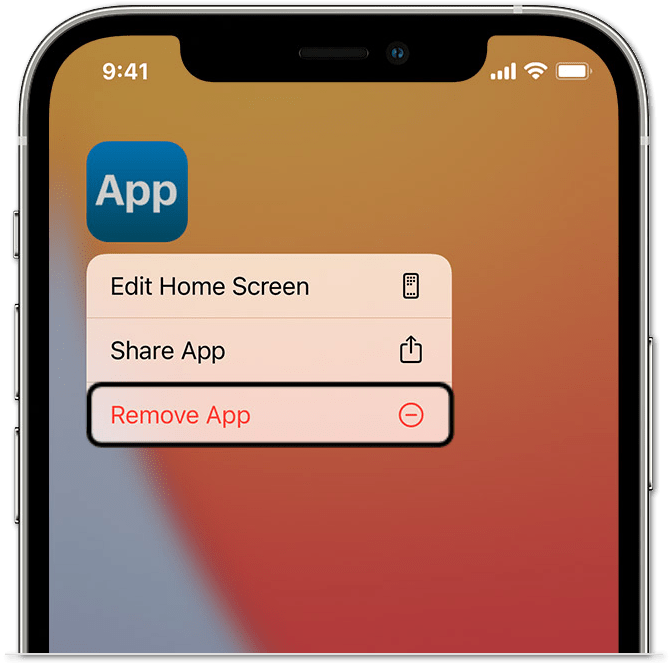
- Next, you can opt to restart your device or go straight to your App Store to install the YouTube app.
On the other hand, for Windows PCs, there are a few ways you can uninstall YouTube. The easiest way on Windows would be to search for YouTube through the Start Menu. Then, select Uninstall.
23. Update the Adobe Flash Player
Moreover, YouTube utilizes the Adobe Flash Player plugin to stream videos. Therefore, we recommend checking if the player is outdated. If so, the Adobe Flash Player could be the culprit behind your YouTube audio problems. In some cases, a Flash Player error may appear on the YouTube video player if the site cannot play a video.
To solve this problem, uninstall the old version of the Adobe Flash Player and download the new version. The steps to do so are as follows:
- First, press the Windows key + R on your keyboard.
- Then, in the Run prompt that opens, type appwiz.cpl and click Ok.
- After that, on the left-hand side of the window, click View installed updates.
- Locate Flash Player in the list and check the date it was last updated. If it is recent, click on it and select Uninstall.
- Now, try playing your video and see if the audio issue is resolved.
To reinstall the latest version of the Adobe Flash Player, simply head over to the official website and download and then install it onto your device.
Note: Adobe no longer supports Flash Player after December 31, 2020 and has blocked Flash content from running in Flash Player from January 12, 2021 onwards. Therefore, you can uninstall Flash Player from your system to protect your system.
24. Troubleshoot Using the Built-in Audio Troubleshooter
If all of the methods above failed to fix the YouTube sound problem, then you need to check the connected speakers. You can run the Audio troubleshooter to troubleshoot any sound problems on your machine. Windows comes with a built-in troubleshooter that comes in handy for these types of issues. This step has worked for many users and might work for you too!
Here’s how to run the utility to troubleshoot sound problems on Windows 10
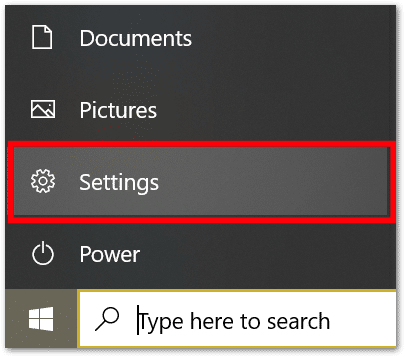
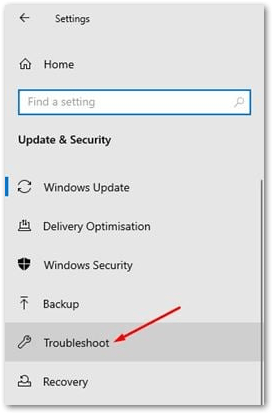
- To begin, click the Start menu and select Settings.
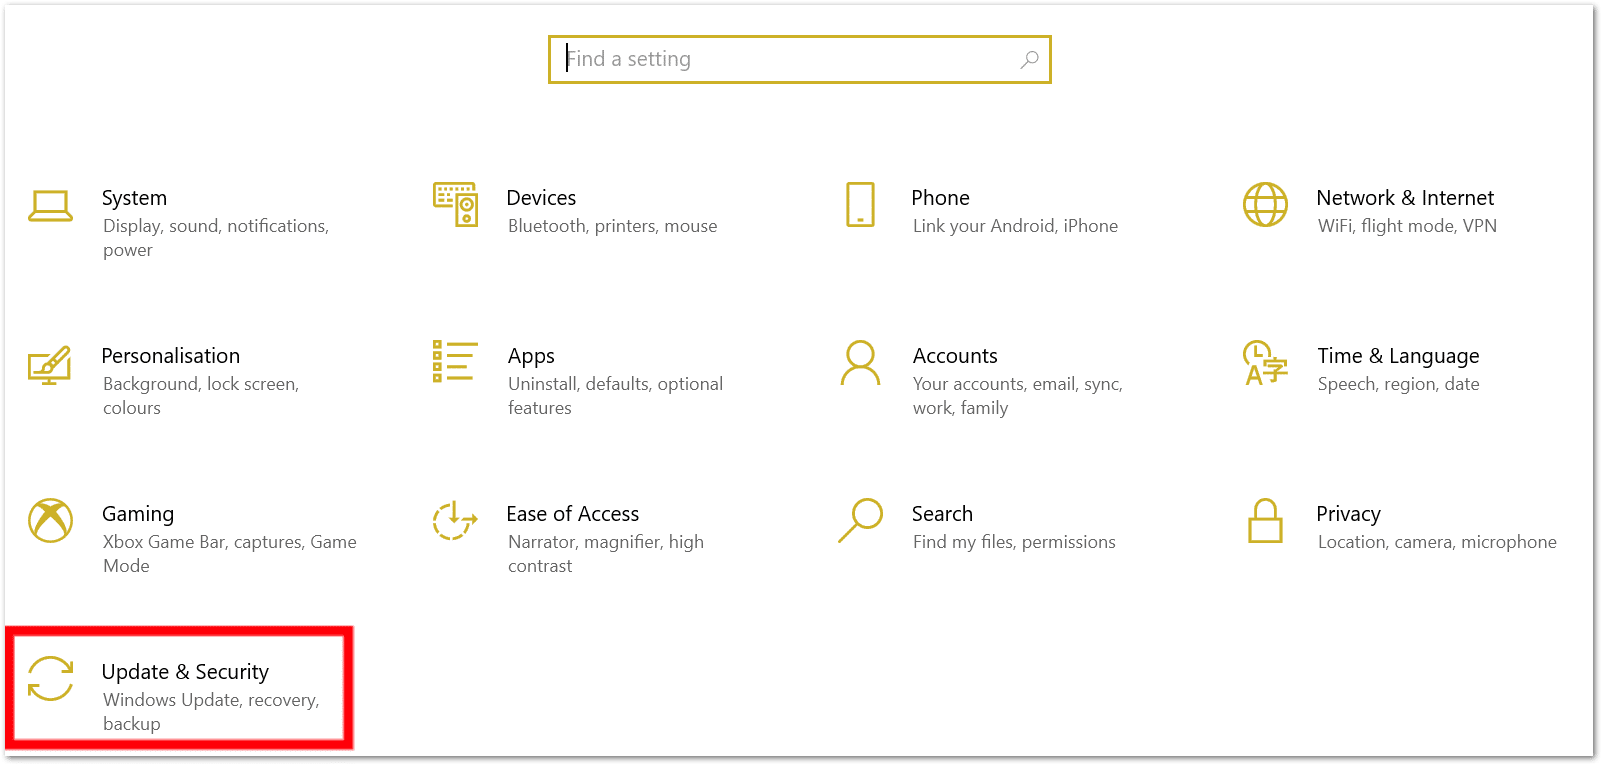
- Then, on the Settings page, click on the Update & Security option.
- Next, on the left pane, click on the Troubleshoot option.
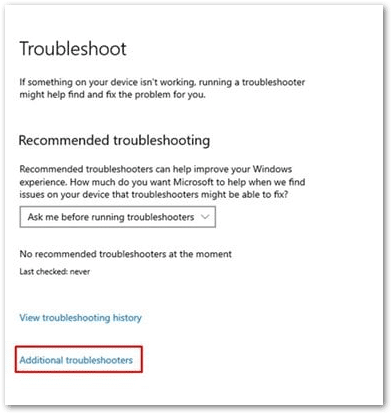
- After that, on the right, click on Additional troubleshooters.
- Finally, on the next page, click on the Playing audio option and then on Run the troubleshooter.
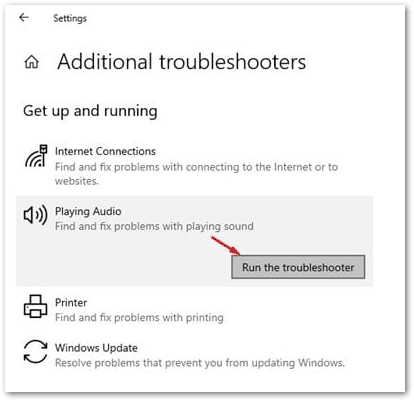
That’s it! You’re all set. Now the audio troubleshooter will automatically scan and fix sound problems in your Windows device.
25. Report the Audio Problem to YouTube Help
Last but not least, if none of the fixes and workarounds have worked for you, don’t hesitate to report the issue to YouTube Help. By doing so, you’ll be able to get a more suitable fix for your YouTube audio problem fit for your streaming device.
There are a few ways to get in touch with YouTube Help:
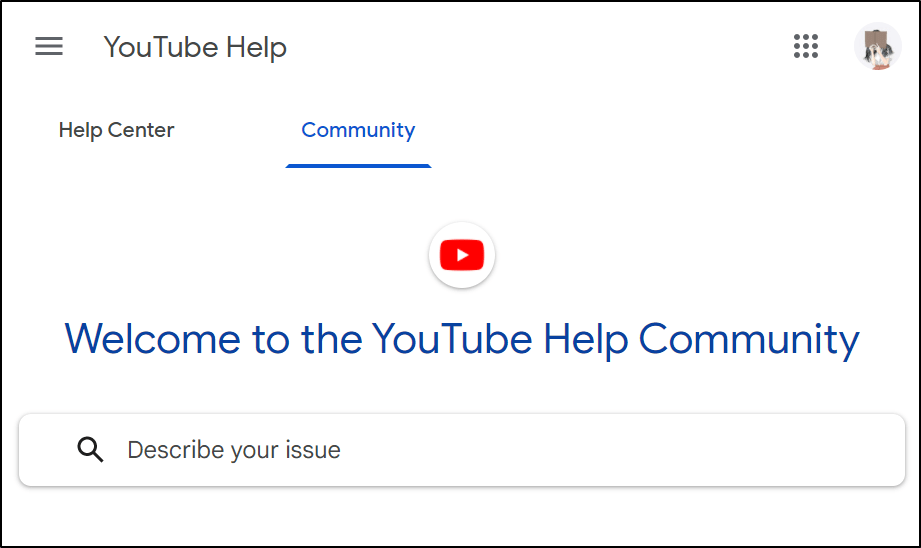
Method 1: Visit the YouTube Help Page
For starters, when encountering the YouTube audio problem, you can head over to the YouTube Help page for guides and information. The page has various articles prepared for any kinds of problems you may encounter on YouTube.
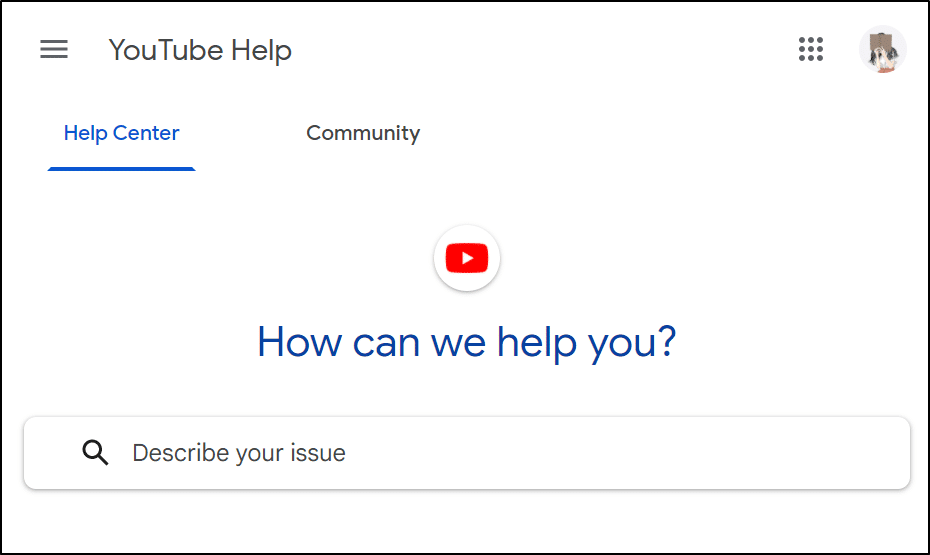
Furthermore, the YouTube Help page also comes with a community feature where you can look up for user posts and replies for similar audio problems. Suppose you’re unable to find the answer you’re looking for, you can also ask the Help Community for assistance!
Method 2: Send a Feedback to YouTube Help
Suppose your particular audio problem isn’t listed in the existing guides on the YouTube Help page. In that case, you can follow the steps below to report an issue.
However, note that since this step involves submitting a Feedback form to YouTube or Google support, it won’t guarantee that you’ll get a reply. Nevertheless, it’s a great way to draw YouTube’s attention to any ongoing audio problems that might be affecting multiple users.
The steps may vary slightly across different devices:
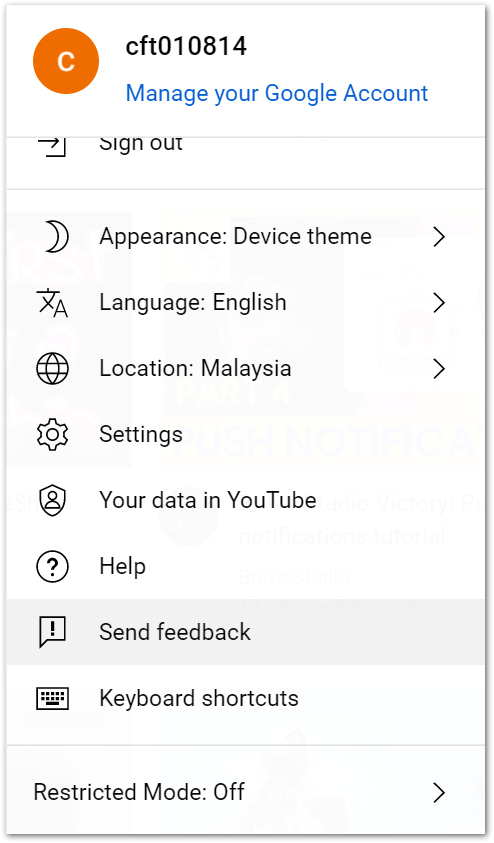
- First, sign in to your YouTube account.
- Next, select your profile picture on the top-right corner of the page.
- Then, under the pop-up menu, select Send Feedback.
- After that, in the feedback form, describe the issue you’re experiencing.
- Subsequently, while optional, you can include a screenshot of the problem in the form.
- Lastly, click Send.
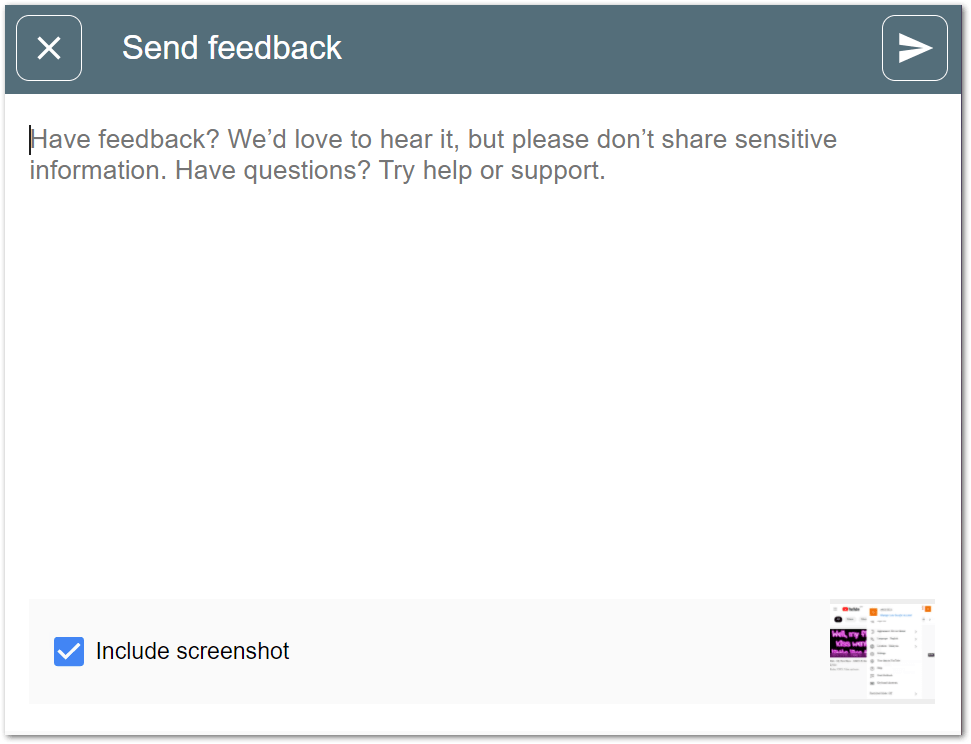
Note: When sending feedback, do include as much information as possible in your report. This is because these important details such as app version and system data can help to diagnose the issue quicker. Suppose you’re concerned about personal data being leaked when attaching screenshots. Feel free to highlight the info on the screen or remove any personal information.
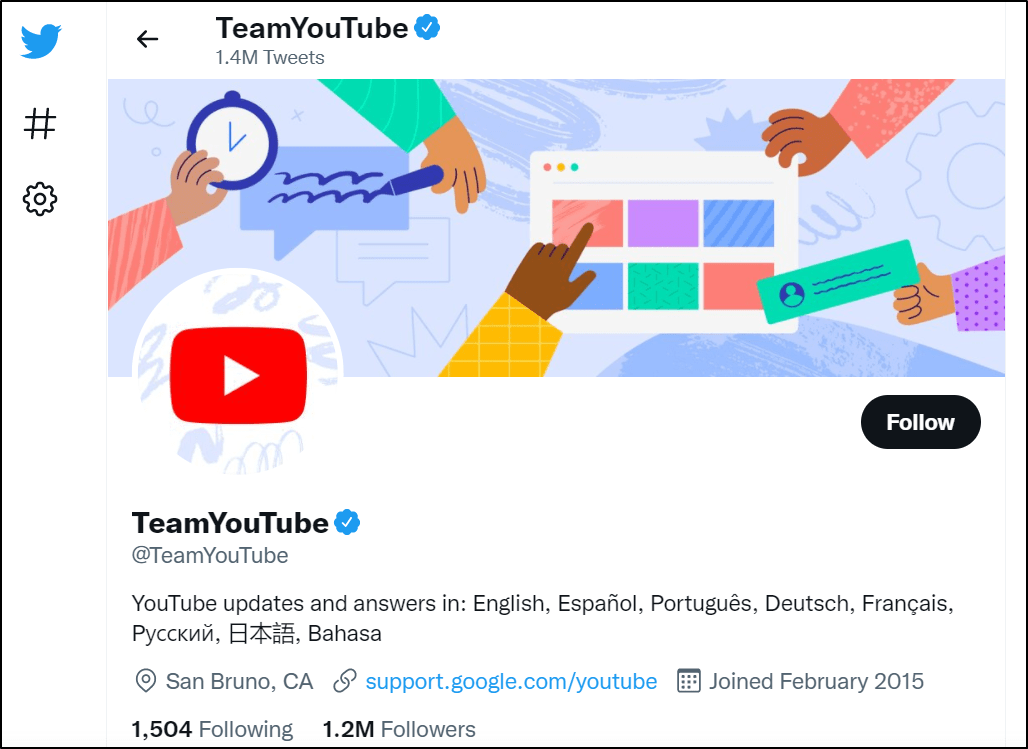
Method 3: Via Twitter
Thirdly, you can also contact the YouTube Help team via their Twitter page. Here, you can also find posts about solutions and updates for different problems.
Conclusion
That marks the end of this guide of 25 fixes for when you find the YouTube audio isn’t working or playing. Each of these fixes can be used either as an individual effort or combined together to solve the audio problems. We hope that this post has been useful to you and you were able to resolve the YouTube audio issues.
Additionally, we also hope that this article has given you a better understanding of the reasons behind each fix to better troubleshoot this YouTube audio problem.
Suppose you ever encounter any other technical issues. Feel free to check out more of our articles at Pletaura.com! Leave us a comment and we’re always happy to help. 😊
Lastly, let us know in the comments:
- Are your YouTube videos suffering from audio problems too?
- Did any of the fixes above work for you?
- Are there other useful fixes that you think we should add to the list?
Know a friend that is struggling to hear the background music for the newest trending videos on YouTube? Stay in trend together and don’t hesitate to share this post with them!