
Find that messages on Microsoft Teams are loading only hours later or not sending or showing up at all?
If the messaging or notification system in Teams, both crucial features, don’t work properly, then that makes it kind of useless since that’s the whole point of the platform! You could potentially miss an important event or update because of it.
Types of Messaging Errors on Microsoft Teams
We’ve seen a lot of people report such issues regarding messaging and notifications in Microsoft Teams. More specifically, symptoms include:
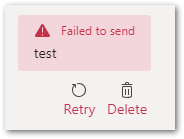
For instance, many Microsoft Teams users find that messages get sent with delay or aren’t even sending at all with the error message “Failed to send”.
When attempting to load messages on Teams, some report getting the “We can’t access your content. Please refresh to try again.” error.

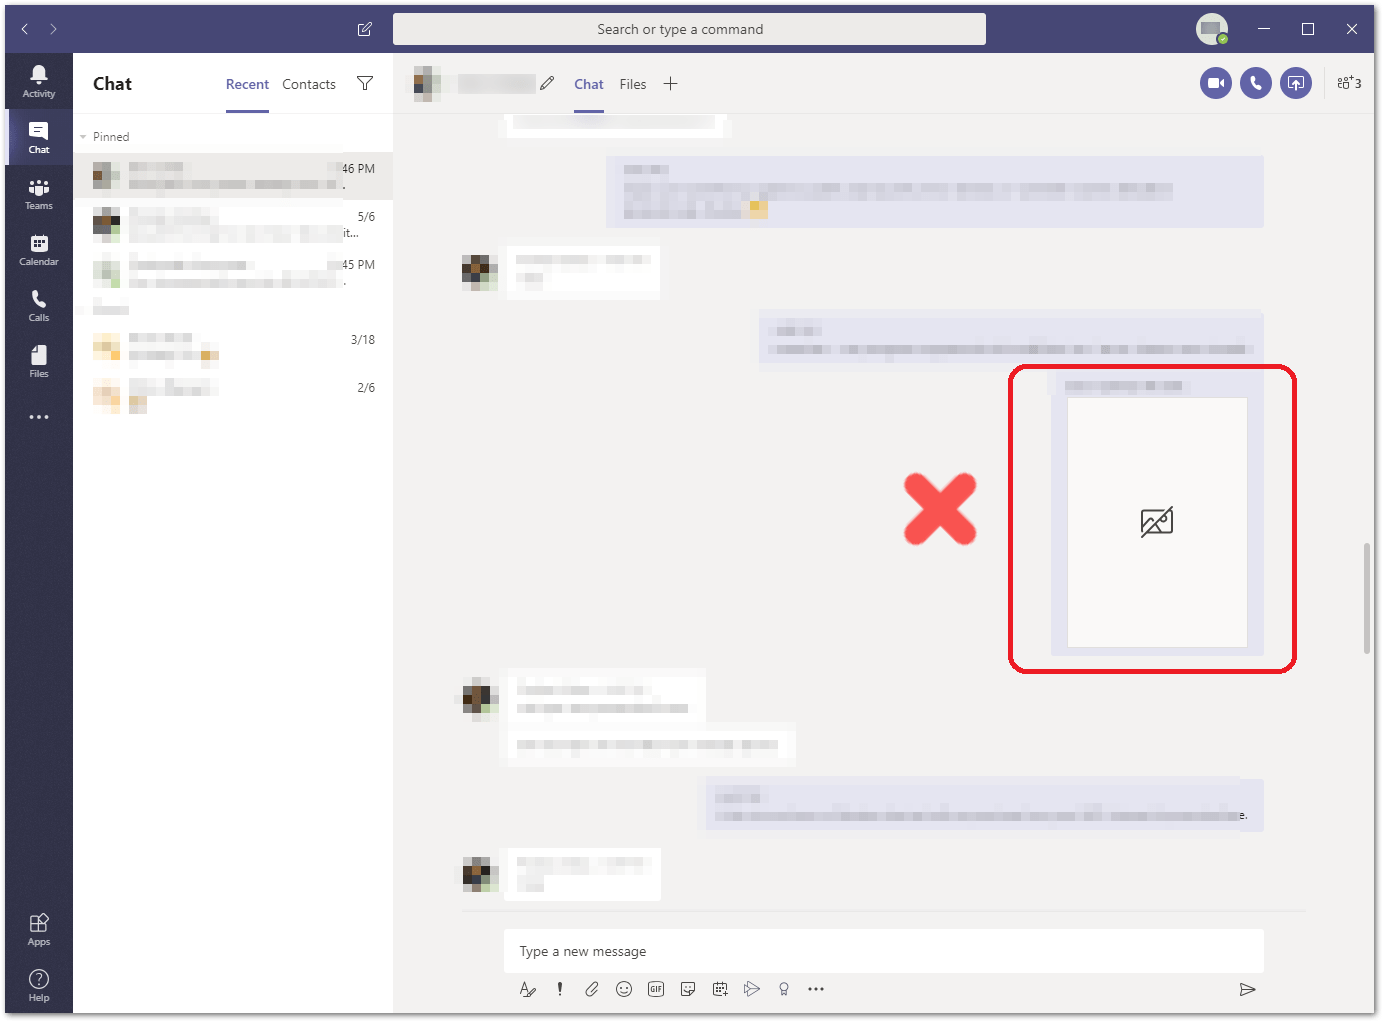
Otherwise, images in their Microsoft Teams chats might not be showing or loading up correctly.
What’s odder, some users even find that the Chat option isn’t showing on the left sidebar of the Microsoft Teams app.

As for notifications of messages, they arrive and show up hours later or not at all. Sometimes these notifications may show a particular message that’s not appearing in the actual channel.

So, are you encountering any similar messaging errors on Microsoft Teams? Share your experience in the comments below. We’ll love to hear your stories and how you conquered these issues. 😄
That being said, we’ve done some research and detective work 🕵️♂️ to find out how to solve these rather serious problems for your convenience.
With detailed steps, compiled below are 17 fixes for when Microsoft Teams chat messages are not sending or showing up. Most of them will apply to Windows, macOS, Android and iOS, though there are some that may require your administrators to deal with.
Having said that, let’s get started!
Table of Contents
- Log Out and Log Back Into Microsoft Teams
- Check and Change the Channel Permissions
- Restart the Microsoft Teams Application
- Try the Web Version of Microsoft Teams
- Use Microsoft Teams on a Different Device
- Check Microsoft Team’s Server Status
- Update the Microsoft Teams Application
- Try Messaging Another User or in a Different Channel/Team
- Disable Your VPN or Proxy
- Refresh Your IP Address or Flush Your DNS
- Clear the Microsoft Teams App Cache
- Reinstall the Microsoft Teams App
- Allow the Teams App Through Your OS Firewall
- Check Your Network Firewall
- Set the Policy Settings
- Check if Your Team is on “Teams Only/Islands” Mode
- Contact Microsoft Support
1. Log Out and Log Back Into Microsoft Teams
Yes, as trivial as it may seem, we’ve done some digging and this is actually one of the ways you can resolve this annoying issue. A simple logout and login refreshes the app and it only takes a few seconds to do, which is why we put it first for you to try.
However, even if it does solve the issue, we’ve seen user reports of the issue cropping back up a few hours after the fix, so you may need to redo it.
Regardless, here’s how to do that on desktop and mobile:
Windows/macOS
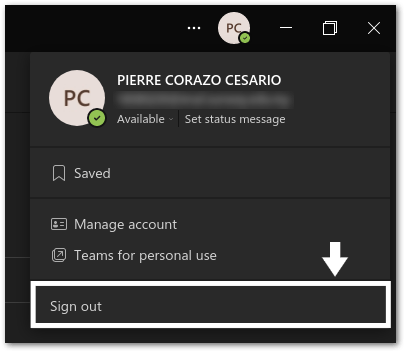
- Firstly, click on your profile on the top-right corner of the Teams window.
- Then, in the context menu, simply click Sign out.
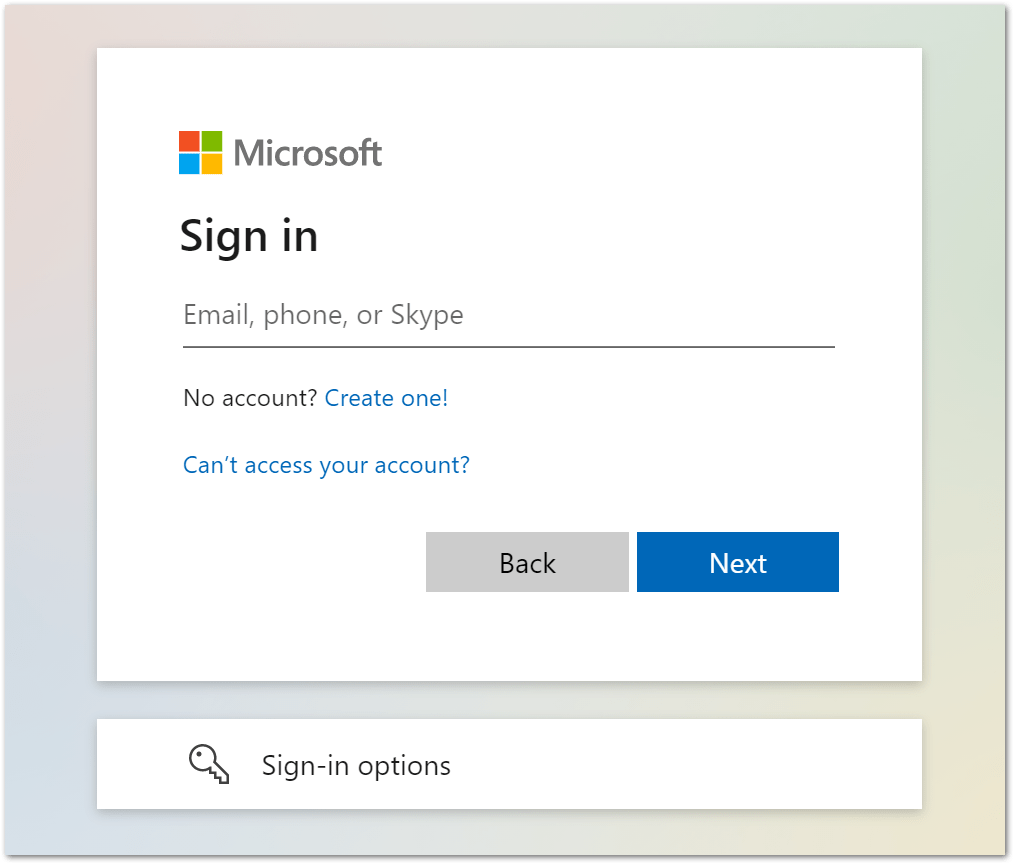
- Once that’s done, you can log in as usual at the login page.
Android/iOS
- First, open the sidebar by selecting your profile on the top-left corner of the app.

- Then, select Settings.
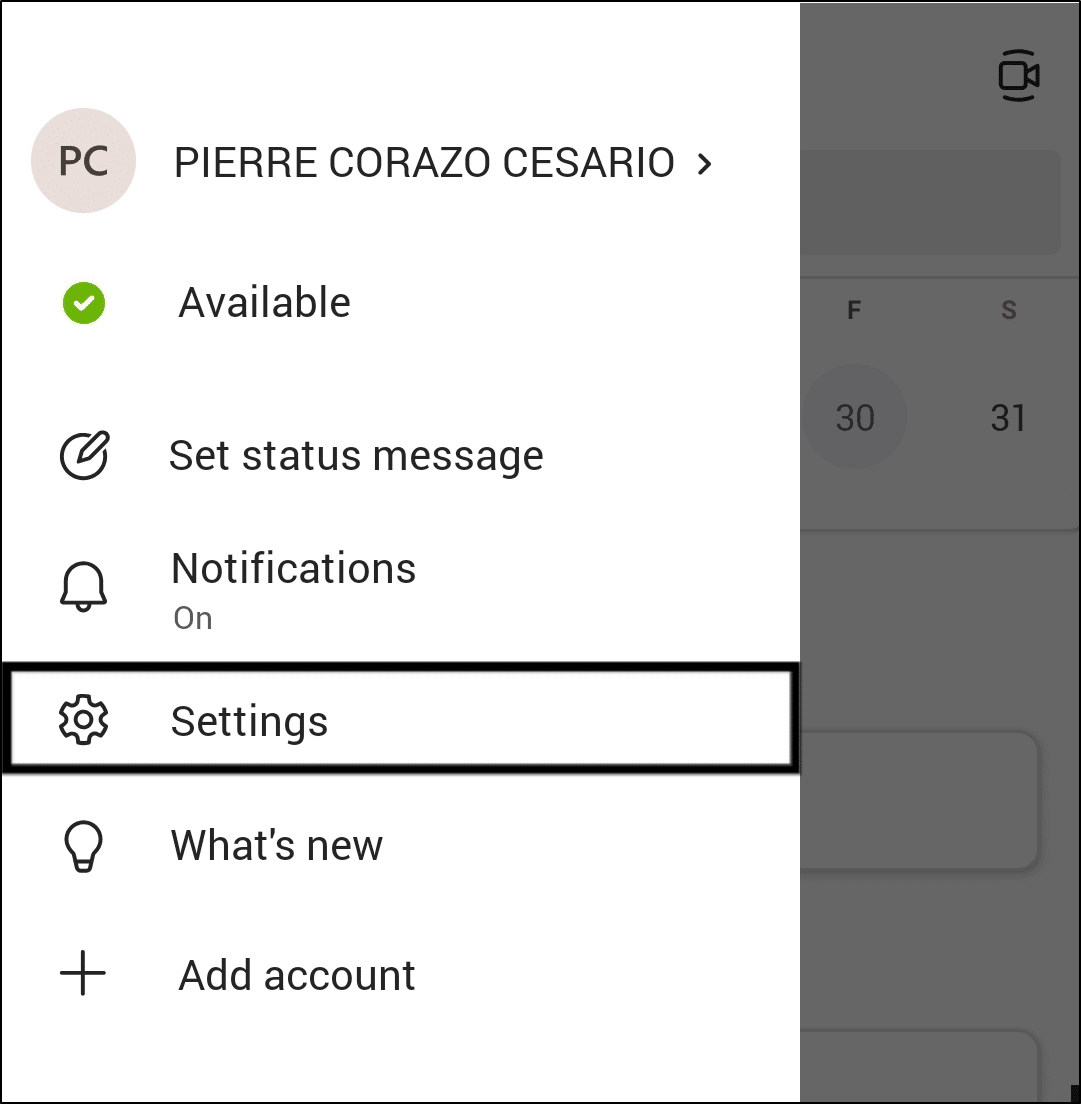
- In the Settings menu, simply select Sign out and confirm with OK.
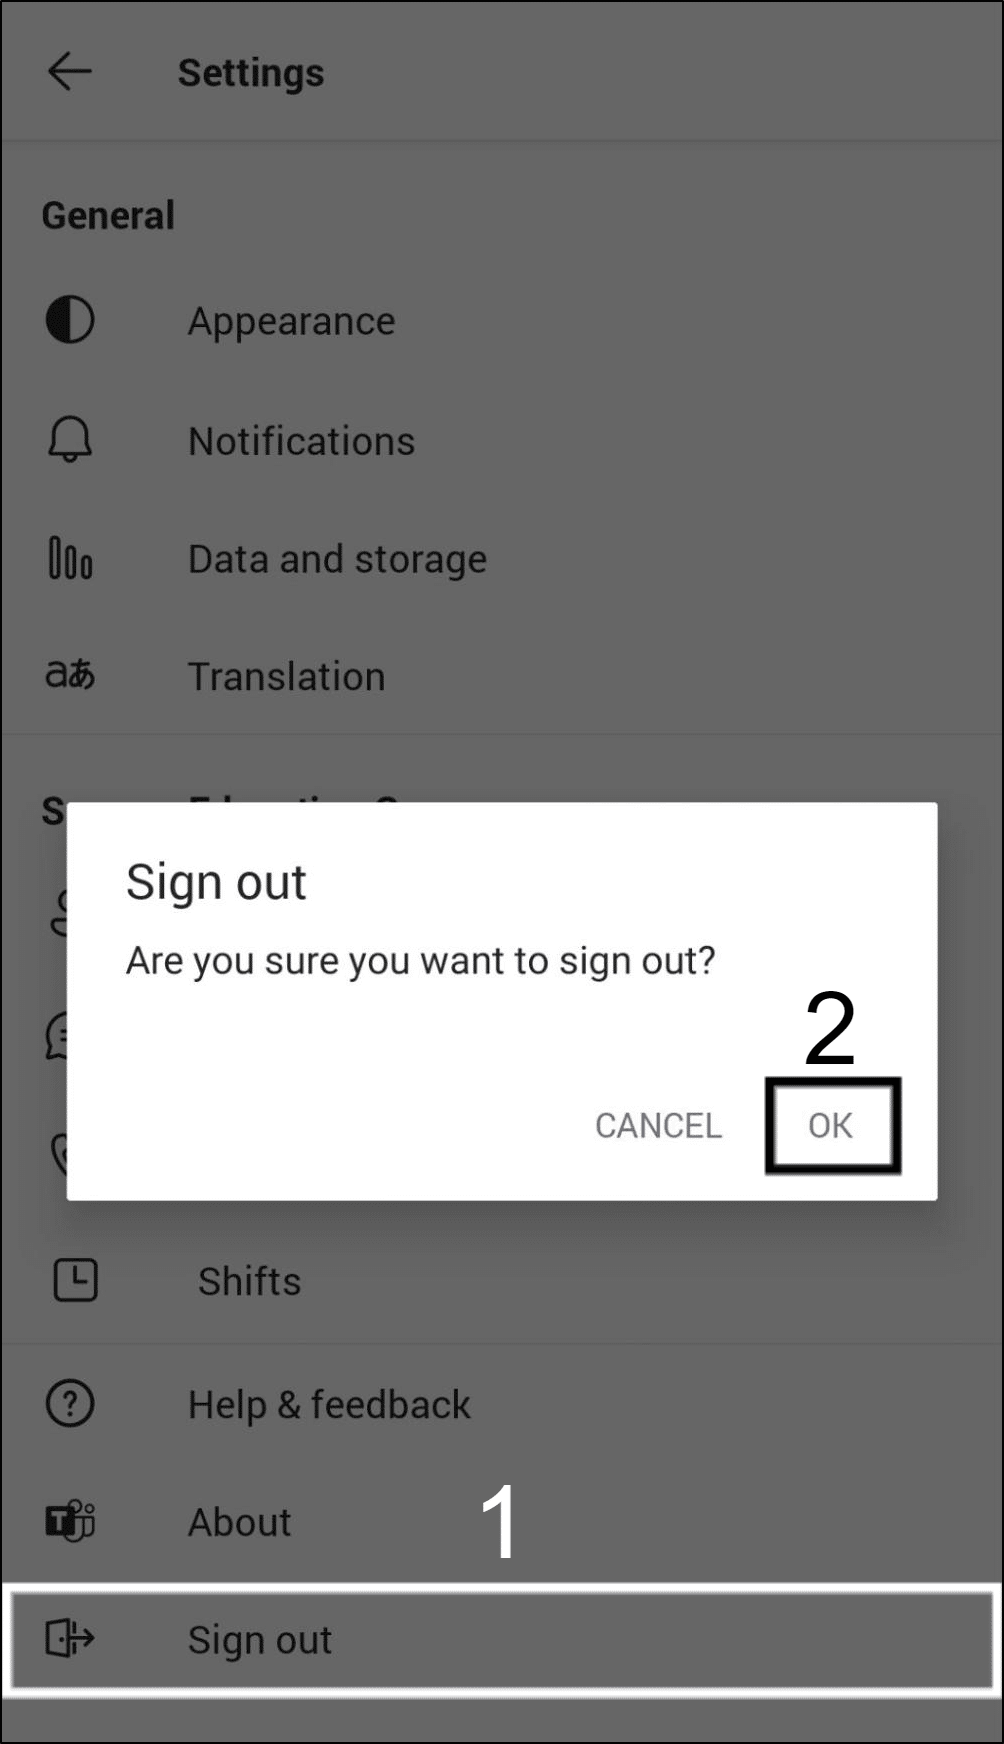
- Finally, you’ll be redirected to the login screen where you can log in as usual.

2. Check and Change the Channel Permissions
Like all major communication platforms, Teams has an option to set channel permissions to restrict and control which users get to post messages in channels. Of course, this is a good way to make sure there’s order within the team, but it may also inadvertently be the reason why your members aren’t able to post in the channel. Hence, possibly giving the members the impression that their messages aren’t sending or showing up on Microsoft Teams.
Unfortunately, these settings can’t be changed on the mobile app. So, here’s how to check for those permissions on desktop:
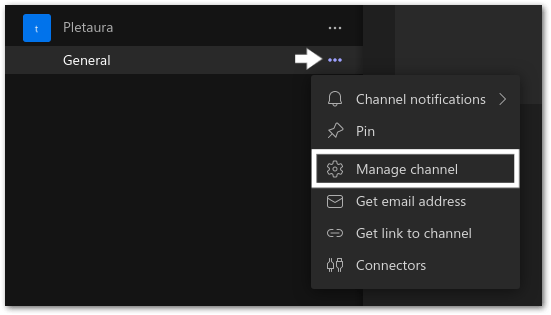
- To start, in the left sidebar with all your teams and channels, click on the three-dotted icon for the channel you wish to check permissions.
Note: This is NOT the three-dotted button for the team, but for each individual channel in the team.
- Then, in the context menu, click on Manage channel.
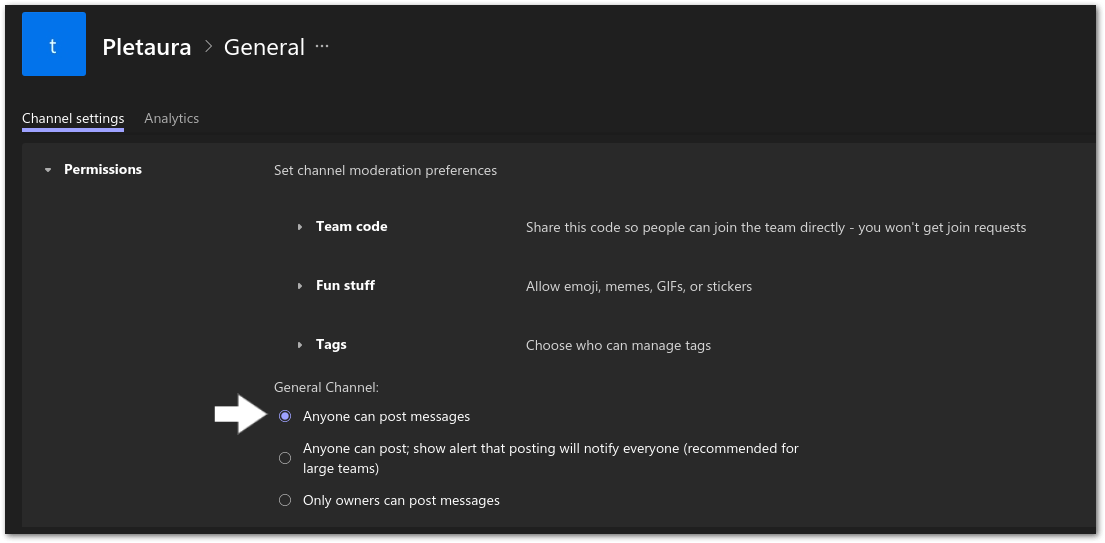
- Next, the chat box will be changed to a settings page, where you can change the channel’s permissions under the Channel settings tab.
- Finally, make sure to have the General channel section set to Anyone can post messages.
3. Restart the Microsoft Teams Application
Following the trend of easy fixes first, we highly recommend restarting the app as this seemed to have fixed the issue for multiple users. You know how software can be at times!
However, in some cases, simply closing the Teams window doesn’t completely close the app, so this is how to thoroughly do it. Plus, you’ll need to ensure that all instances of the Teams app are completely closed for a thorough restart.
Therefore, at times, it might even be a better idea to restart your device as well to completely end all background processes which are inessential and potentially conflicting.
Note: For all these methods, you’ll want to save any unsaved work before stopping them, as Teams will be forced to stop running.
Windows
- To start, open the Task Manager by pressing Ctrl + Shift + Esc on your keyboard.
- Simply select the Teams app then click on End task in the bottom-right corner of the Task Manager’s window. Alternatively, you can right-click the task and select End task.

macOS
- Start by opening the Force quit application menu by holding down Command + Option + Esc.
- In the menu, select Microsoft Teams and click Force Quit.

Android
There’s a lot of different flavors of Android, so the steps won’t be exactly the same depending on the brand of phone you have. Nonetheless, they’re all very similar so it shouldn’t be too hard to follow these steps.
- First, access the recent apps menu.
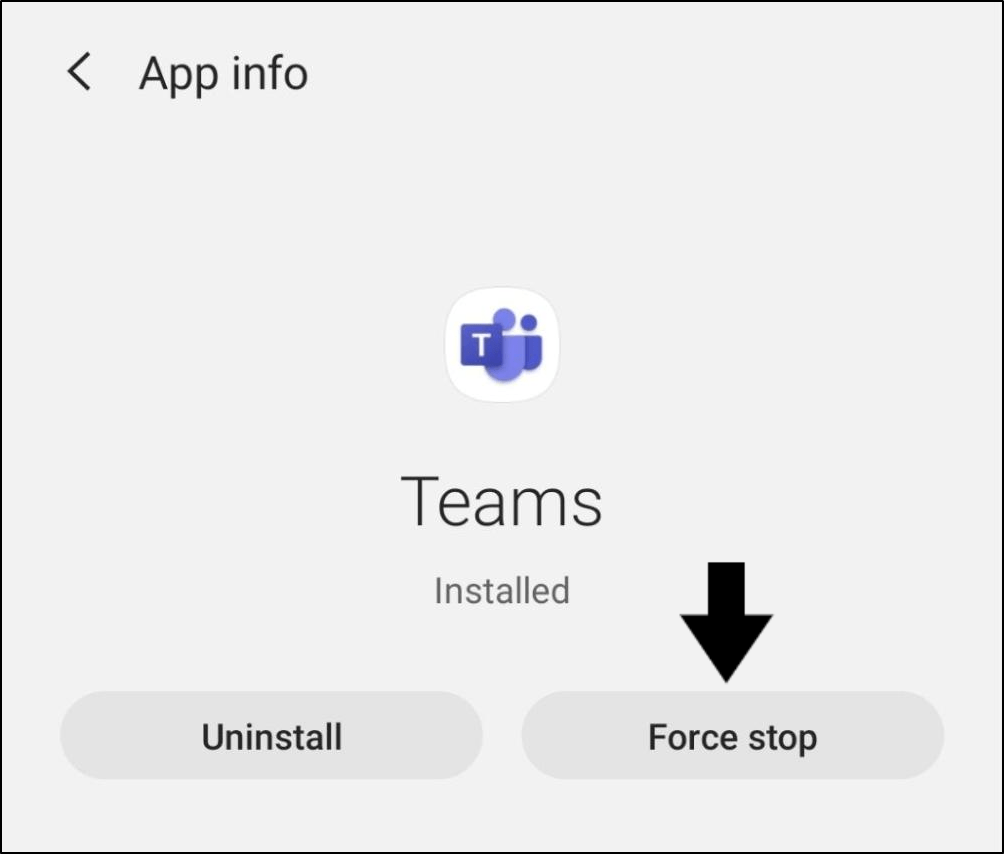
- Then, long press on the Teams icon and select App info.
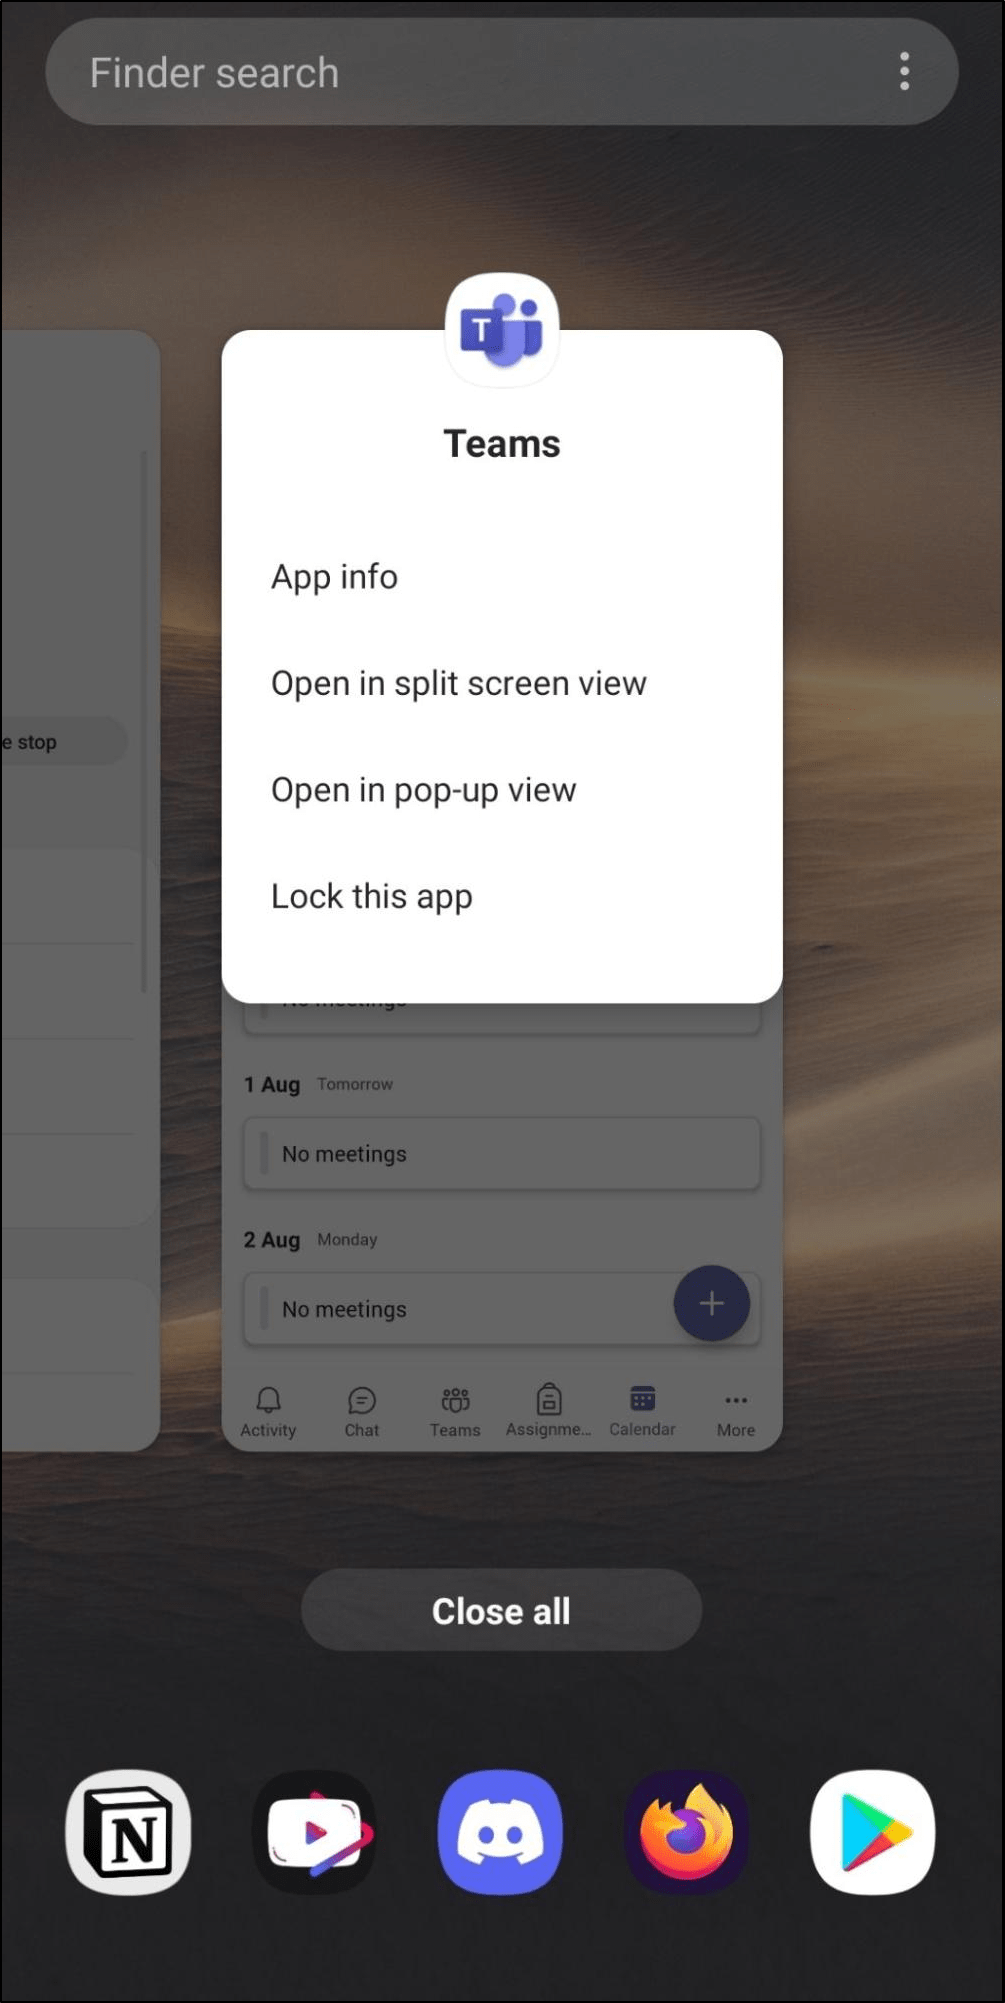
- In Teams’ app info, simply select Force stop.
- Finally, open the Teams’ app as usual.
iOS
- First, access the recent apps menu. If you’re using an iOS device without a home button, swipe up from the bottom of the screen. Otherwise, double-tap on the home button.
- Then, simply swipe the Teams app up and away.

4. Try the Web Version of Microsoft Teams
As Microsoft themselves suggest, we can troubleshoot the root of the issue by checking if the web version of Teams doesn’t exhibit this issue. Hence, if the issue isn’t present on the web version, then it may be a problem with the client app on your device. So, this could mean that Microsoft is yet to release for the
Keep in mind that the Teams’ web version only works on Chrome, Edge or Safari. It goes without saying that only those on desktop should use the web version as navigating a desktop website on a phone is certainly not ideal.
Therefore, click here to visit the web version of Microsoft Teams. There, you’ll have to Sign in to your Microsoft account that you use for Teams to access your teams and calls.

If you find that Teams isn’t working on your particular day-to-day web browser, try using a different browser. Perhaps there could be problems with the initial browser such as cache and cookies, browser settings, optimization problems, etc. resulting in your Teams issue.
Alternatively, if Teams isn’t working on your web browser, you can try installing and using the desktop application instead. For this, simply visit the Microsoft Teams Downloads page, and select Download for Desktop, to get the client installation file fit for your OS.
5. Use Microsoft Teams on a Different Device
You can take this a step further, and even try using Microsoft Teams on a different device. This will help you troubleshoot any errors with the initial device that’s resulting in your Microsoft Teams messages not sending or showing up. This is especially a handy troubleshooting step when the Chat option isn’t showing on the sidebar. Hence, you can find that even Microsoft themselves recommend this step for this purpose.
For instance, if you encountered messaging issues when using the desktop application, test the mobile app on your phone. You can attempt to either load new messages 📬, send your intended texts 📧, or even to just check if the Chat option is showing.
6. Check Microsoft Team’s Server Status
Moving on, if the web version doesn’t work either, then we can confirm by checking if it’s a server-side issue. So, it’s always a good idea to check if the servers hosting the service in question are acting up. This can evidently save you a lot of time if you know the problem is something you can’t fix yourself, as is the case with server-side issues.
While there’s a bunch of websites that track the status of various popular servers for free, we highly recommend using Downdetector.

In addition to displaying server status in big and bold lettering at a glance, it informs users about the affected regions. It also has an embedded feed of @MSFT365Status, Microsoft’s official Twitter account for reporting any issues with Microsoft 365 services such as Teams.
If Downdetector says there are server issues and both the client and web versions have messaging issues, then that’s a pretty good indicator that it’s indeed a server-side issue. Unfortunately, there’s nothing much you can do about this other than to contact them through their official channels and report the problem (Step 16).
Luckily, issues with services like these usually take only a few hours to a day to resolve. So, sit tight and perhaps use an alternative communication platform such as Slack.
We have a list of official Microsoft Teams support channels and what to tell them in Step 16 should you need it.
Nonetheless, we still recommend trying the other fixes below just in case the problem resides locally.
7. Update the Microsoft Teams Application
If their servers are working fine, then it’s likely that the issue resides somewhere on the client’s end. It’s always a good idea to keep your application updated as it usually introduces new features and irons out any bugs 👾 like the messaging issue. Plus, updating is pretty easy to do!
Hence, there could indeed be a pesky app bug resulting in your Microsoft Teams messages not sending or showing up correctly.
Of course, this won’t apply to you if you use the web version of Teams. Nonetheless, it’s really easy to do on any platform. So, just jump to the relevant section and follow along:
Windows/macOS
The client’s user interface for both Windows and macOS are the same, so naturally, the same steps will apply to both operating systems. This one’s really straightforward:
- To start, open up the Teams app.
- Then, click on the three-dotted button beside your profile photo in the top right of the app.
- Next, click on Check for updates in the drop-down menu.

- Finally, if there are any updates, let them download and install.
Android/iOS
Again, similar to the Windows and macOS reasoning, since both of these apps come from app stores, the process will be similar for both. That’s the Google Play and the App Store for Android and iOS respectively:
- First, open the appropriate native app store for your device.
- Search for Microsoft Teams and select the listing. Here’s a link to the listing for Google Play and the App Store.
- If there’s an update for the app, you can tap the Update button and let it do its thing.

8. Try Messaging Another User or in a Different Channel/Team
Perhaps there could be issues on the receivers end, whether server-side problems, internet connection issues, or setting configuration errors. So, these problems could give you the impression that your messages on Microsoft Teams aren’t sending or posting whether to a user or in a particular team/channel.
Therefore, we recommend this troubleshooting step to identify whether the issue is truly on your end.

So, if other users and channels find that your messages are successfully sent, it may just be an issue with that particular user or channel. Hence, the Teams channel may possess restrictive permissions settings that need reconfiguring (Step 2).
Otherwise, if your Microsoft Teams messages are still not sending, this could then be a problem on your end. Thus, you can proceed to try the other fixes.
9. Disable Your VPN or Proxy
VPNs are an excellent addition to your Internet browsing activities, especially with ever-growing concerns for online privacy. However, for Teams to work properly, it needs unrestricted access to Microsoft’s servers, so having a VPN may actually prove to be detrimental.
To rule this out as a possibility, try disabling your VPN and restart Teams as we detailed in step 3. If the messaging issues go away, then you’ll have to reconfigure your VPN to allow Teams services to go through uninterrupted, or whitelist it. Otherwise, try our other fixes listed below.

10. Refresh Your IP Address or Flush Your DNS
Seeing as Teams is a communication platform, networking inevitably plays an important role to ensure its functionality. Thus, we recommend refreshing your device’s IP address and flushing your DNS so that everything stays in order. The DNS, in particular, could be corrupt so it’s a good idea to reset it for a brand new set to be made.
Thus, possibly resolving your network connectivity issues that are resulting in messages not sending or showing up on Microsoft Teams.
That being said, the following steps show how to refresh the IP address data and flush the DNS cache on your desktop:
Note: This fix does not apply to Android or iOS.
Windows
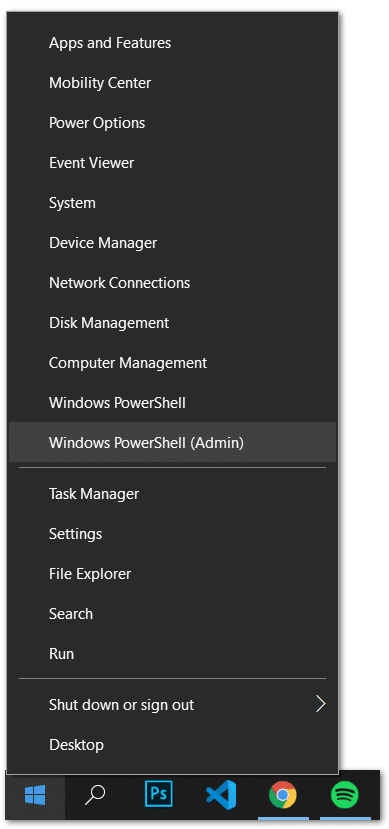
- Firstly, right-click on the Windows icon or Start button in the bottom-left corner of your desktop.
- Then, in the context menu, click on Windows PowerShell (Admin)
- In the PowerShell window, copy and paste this command to refresh your IP address: ipconfig /renew
- After that, hit enter on your keyboard and wait for it to complete. You’ll know it’s done when it shows your current directory.
- Then, repeat steps 3 and 4 but with ipconfig /flushdns so that your DNS cache is reset.
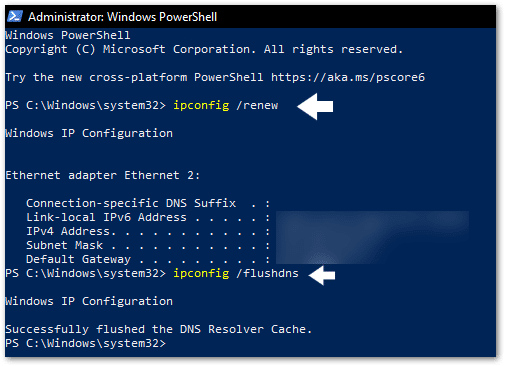
- Finally, you may close the PowerShell window.
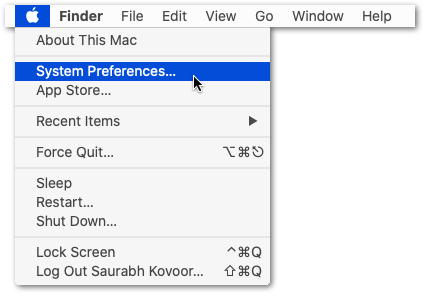
macOS
- First, we’ll renew your IP.
- Start by clicking on the Apple icon in the top left corner of your desktop.
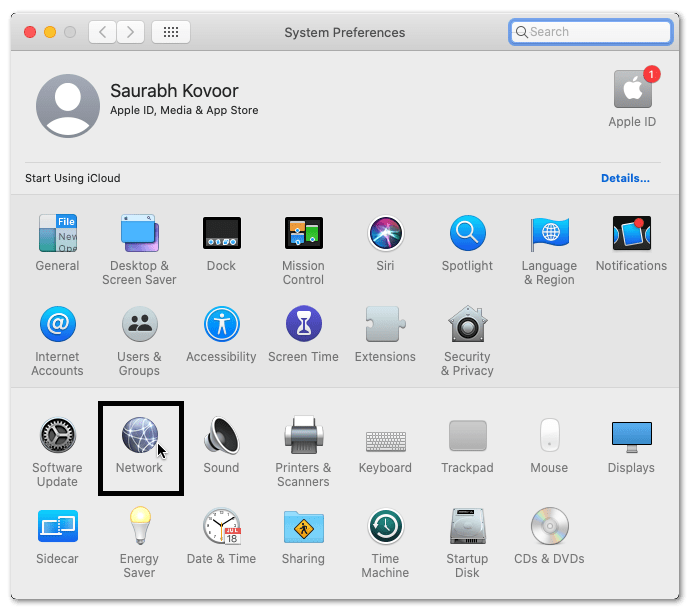
- Then, click on System Preferences.
- After that, select the Network option.
- In the left sidebar, select the network device you’re currently using and click on Advanced in the bottom-right corner of the window.
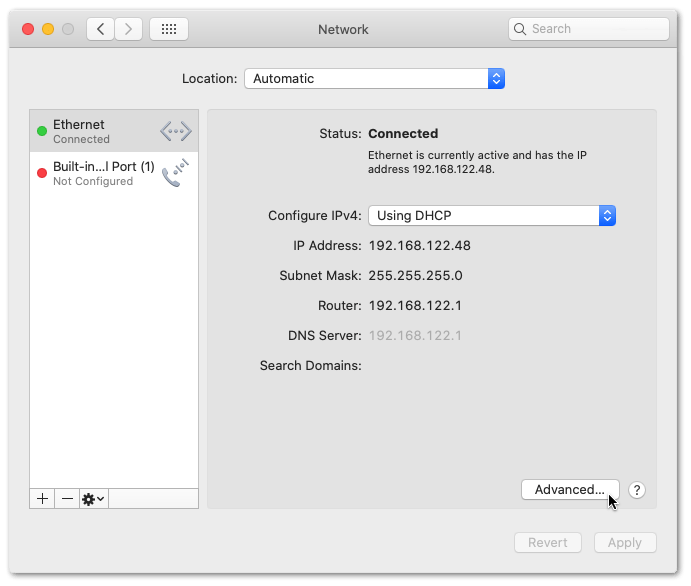
Note: If you’re unsure of which one you’re currently using, it’s likely the option that’s lit in green.
- Then, in the new menu, select the TCP/IP tab.
- In there, simply click on Renew DHCP Lease. This refreshes your IP.
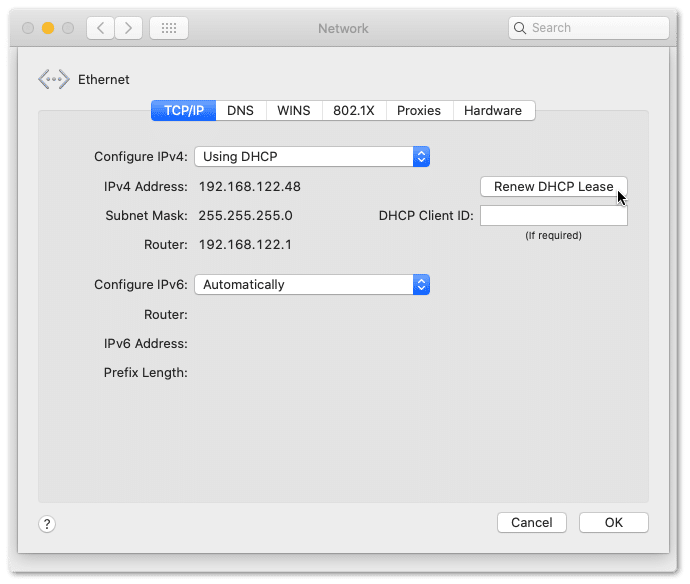
- Finally, press OK and close the entire Network window.
- Now, we’ll flush your DNS.
- Start by opening the Terminal by searching for it in Launchpad

- In the terminal, type in sudo killall -HUP mDNSResponder then hit enter on your keyboard.
- You’ll need to enter the administrator password for the account since this is a sudo command.
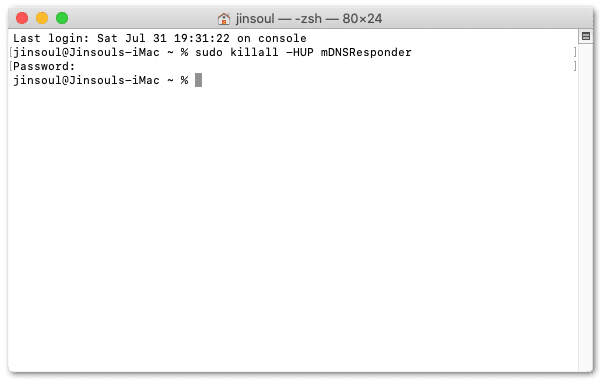
- Lastly, close the terminal once it’s done.
11. Clear the Microsoft Teams App Cache
Cache is used by apps to quickly load frequently accessed resources or pages so that you have a faster and more responsive experience. Unfortunately, they’re also susceptible to corruption so you should try clearing them whenever you encounter issues. This forces Teams to create brand new caches which are likely not corrupted and could resolve the messaging issue.
Likewise, if you’re using the web version of Microsoft Teams, cache, cookies 🍪, and other site data are stored on your web browser.
That being said, the following are steps to clear the Microsoft Teams app cache on whichever device you might be using:
Windows
- Firstly, ensure the Teams app is fully closed and not running. You can double-check by looking in the Task Manager (Ctrl + Shift + Esc). End the Teams process in there if you see it running. (Step 3)
- Next, open up the Run dialog. (Win + R)
- Copy and paste the following address to access Teams’ cache: %appdata%/Microsoft

- You should see a list of folders in here like in the screenshot.
- Then, simply select Teams and delete it.

- Finally, open up Teams and let it set up all the new cache.
macOS
- To start, make sure Teams is fully closed. We detailed how to do so in 3.
- Then, hold down Command+Shift+G and paste the following directory: ~/Library/Application Support/Microsoft

- Here, simply delete the Teams folder.
- After that, open up the Keychain Access app through Launchpad.
- Next, while login is selected in the left sidebar, delete the Microsoft Teams listing.

- Finally, open up Teams and let it set up all the new cache.
Web Version
The following steps were performed on Google Chrome, but are generally similar regardless of whichever browser you’re using:
Note: Clearing cookies and site data will log you out of the website, so save everything before you perform these steps.
- First, navigate to the Teams web version and log in.
- On the left side of your address bar, click on the lock or similar.

- Then, click on the Clear cookies and site data… option or similar.
- Finally, in the new window, click on Remove in the bottom right corner.

Android
An easy way to do this on mobile OSes without digging into system files is to simply reinstall the app. Uninstalling the app removes the stored cache so this approach works.
- Firstly, open the Settings app, and tap on Apps & notifications.
- Then, select Microsoft Teams from the list of apps.

- Next, tap Storage & cache.

- Following that, start by tapping Clear Cache, and then you can choose Clear Storage.

Note: Another simple method to clear Teams app cache on mobile OSes without digging into system files is to simply reinstall the app (Step 12). Uninstalling the app removes the stored cache so this approach works.
12. Reinstall the Microsoft Teams App
Now that you’ve cleared the Microsoft Teams app cache, you can take another step and completely reinstall the app as well. From the previous step, we’ve deleted all the app files of the Teams client. Hence, this allows us to perform a complete reinstall, where we can simply uninstall the client and afterwards download and install a fresh copy of the Teams app from their website.
Thus, this new app can be free from possible corrupted installations or hidden lingering bugs. Therefore, making it another go-to solution for various Microsoft Teams problems, including messaging errors.
Note: For a complete reinstall, you can delete the Teams files through the previous step beforehand. Additionally, restarting your device after the uninstallation is helpful for a complete reinstall as well.
Windows
- First, open the Run prompt by pressing the Windows and R keys together.
- After that, enter appwiz.cpl and click OK.

- From the list of apps, select Microsoft Teams and click Uninstall.

- After that, proceed with the rest of the guided uninstallation steps.
- Finally, you can visit this Microsoft page, to download the Teams client installation file and proceed to run it.
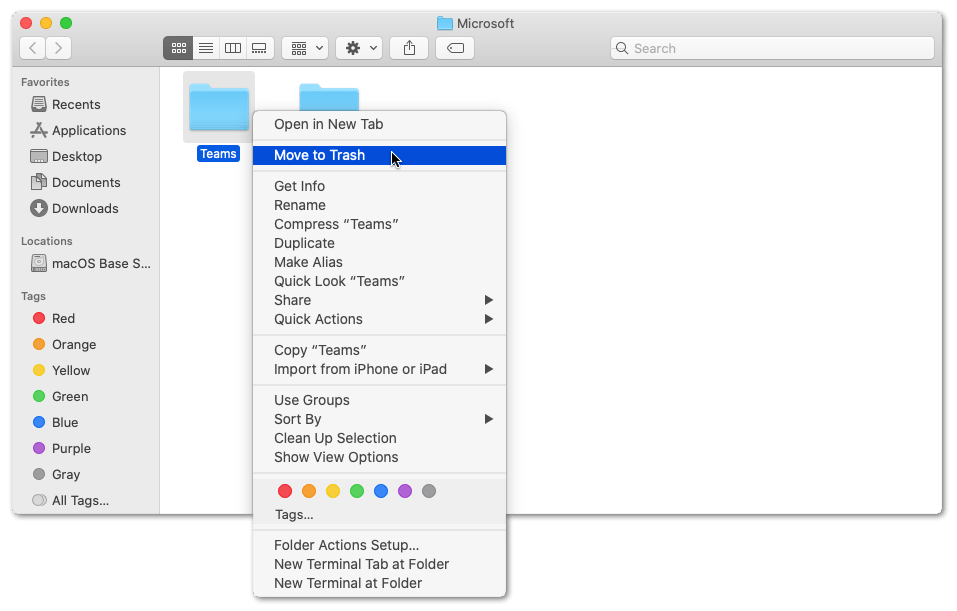
macOS
- Firstly, open up Finder and look for the Microsoft Teams app. It’ll likely be in the Applications tab, which you can open by clicking Applications in the Finder’s sidebar. Alternatively, you can use Spotlight to find the app, then press and hold the Command (⌘) key while double-clicking the app in Spotlight.
- Then, drag the Microsoft Teams app to the Trash, or select right-click the app and choose Move to Trash.
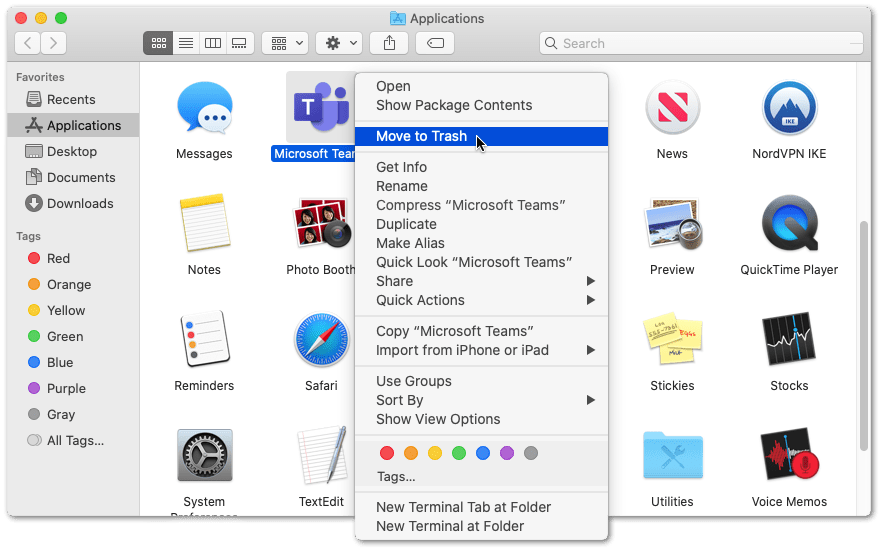
- After that, if you’re asked for a user name and password, enter the name and password of an administrator account on your Mac. This is probably the name and password you use to log in to your Mac.
- Next, to delete the app, open the Trash, right-click it, and select Empty Trash.

Finally, like before, visit this Microsoft page, then Download the Teams client and proceed to install it.
Android/iOS
- Start by opening the appropriate app store for your device.
- Next, search for Microsoft Teams and select the listing. Here’s a link to the listing for Google Play and the App Store. Then, on the app page, select the Uninstall button.
- Alternatively, from your app list or menu, long-press the Microsoft Teams app for the selection menu. Then select Uninstall or Remove App.

- Finally, reinstall it by selecting the Install button.
Once that’s done, open up the newly-installed Microsoft Teams app and check if your messages are still not sending or showing up correctly.
13. Allow the Teams App Through Your OS Firewall
As a safety precaution, many desktop operating systems like Windows and macOS have a firewall 🔥 to block and allow ingoing and outgoing connections. They protect your device from any unsolicited data from unknown sources, working especially well against malicious hackers who wish to send you viruses.
If your firewall doesn’t allow Microsoft’s servers to connect to your computer and send data such as messages from your teams, then you definitely won’t receive them. The same can apply for the reverse — you won’t be able to send messages to your team since your firewall has prevented you from ever interacting with Microsoft’s servers.
Thus, restrictive firewall settings could be the culprit for your Microsoft Teams messages not sending or showing.
The proper permissions should have been given upon Teams’ installation, but it doesn’t hurt to have a look at the permissions just to make sure:
Note: This fix doesn’t apply to Android or iOS.
Windows
- Start by holding Win + S or click the search bar in the bottom left.
- Then, search and select Allow an app through Windows Firewall.

- Then, click the Change Settings button.

- Find Microsoft Teams in the list of programs. If it’s there, select it. Else, skip to Step 6.
- With Microsoft Teams selected, click the Remove button. Then, confirm that you want to remove the entry.

- Next, click the Allow another app button. The Add a Program window will appear.

- In the Add an app window, click the Browse button.
- After that, navigate to the Teams program directory (e.g. C:\Users\[YOURNAME]\AppData\Local\Microsoft\Teams\current) and double-click on the Teams.exe file.

- Then, click the Add button.

- Lastly, click the OK button to close the Allowed apps panel.
macOS
- First, select the Apple menu and from the drop-down choose System Preferences.

- After that, click Security & Privacy.
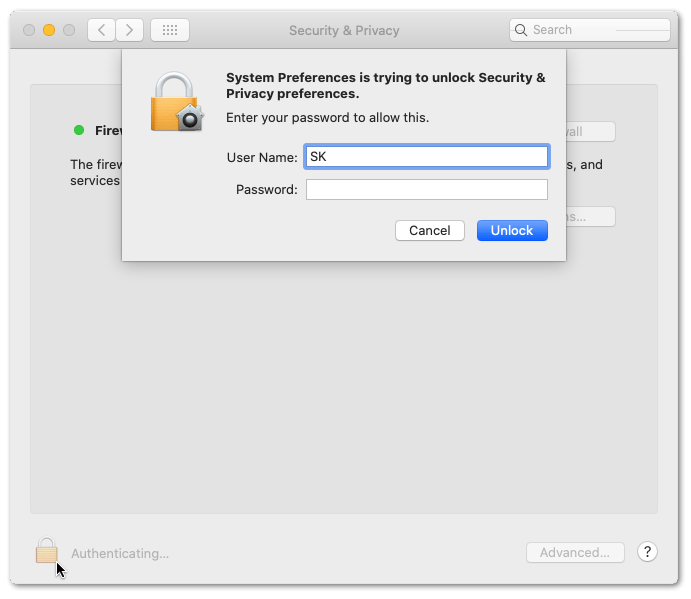
- On the following window, select the Firewall tab. If the lock at the bottom left is locked, click it to unlock the preference pane.
- Next, click Firewall Options. If the Firewall Options button is disabled, first click Turn On Firewall to turn on the firewall for your mac.
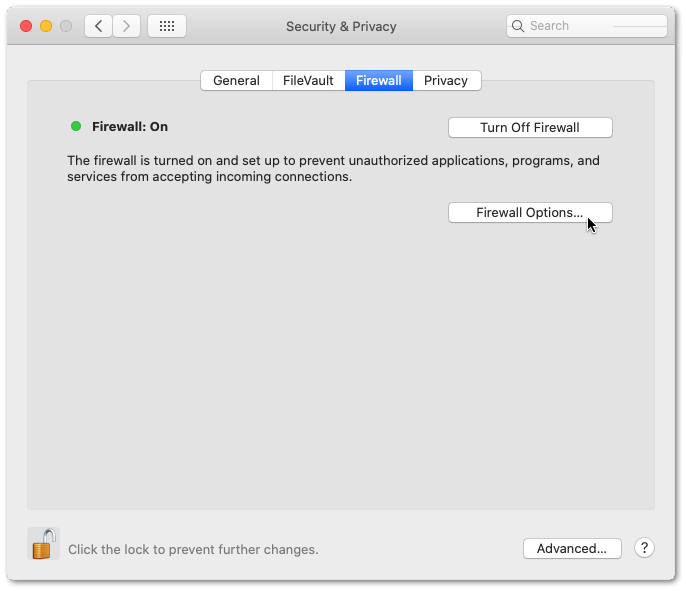
- After that, click the Add button under the list of services, then select the services or apps you want to add – in this case, Microsoft Teams. After an app is added, click its up and down arrows to allow or block connections through the firewall.
14. Check Your Network Firewall
An OS firewall is quite common and nifty to have, but it can also exist in the network itself as hardware or software. If the issue occurs on your company’s network, then we recommend asking your network administrator to check on the firewall system they have — it may be preventing Teams from working properly.
On the other hand, if the issue is at home, then you can take a look at your router’s built-in features. Many modern routers have built-in software firewalls so we recommend taking a look at what exactly they filter as they may be blocking some of Teams’ features. A quick Google search for something along the lines of “how to access [router model here] router settings” should yield some useful results.

15. Set the Policy Settings
You can think of policy settings as a higher level of permissions for everyone in that Team’s organization. As such, these settings are only accessible to the admin. So, unless you’re the admin, you’ll need to contact them to check if this is causing the messaging problem.
This is mainly to solve the issue where you don’t have permission to message in a particular channel or team, or if the Chat option isn’t showing.
Nonetheless, this is how to alter those policy settings to ensure the chat feature is enabled:
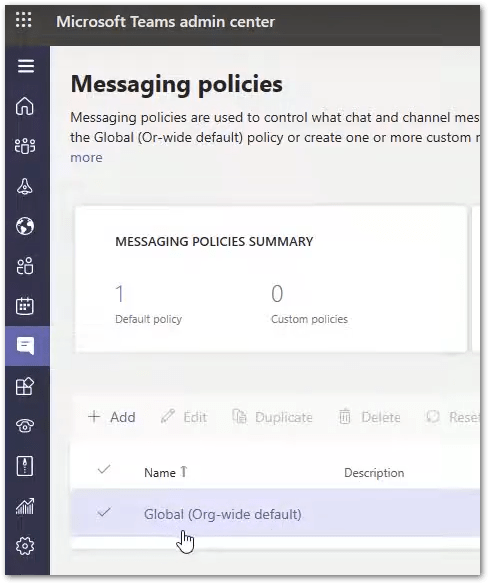
- First, go to the Microsoft Teams Admin Center.
- Then, on the left sidebar, select Messaging policies
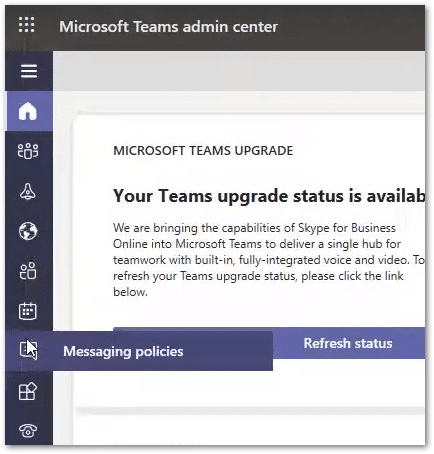
- In the Messaging Policies page, select the Global option. Alternatively, you could also create a totally new policy.
- After that, in the Global policy settings page make sure Chat is enabled.
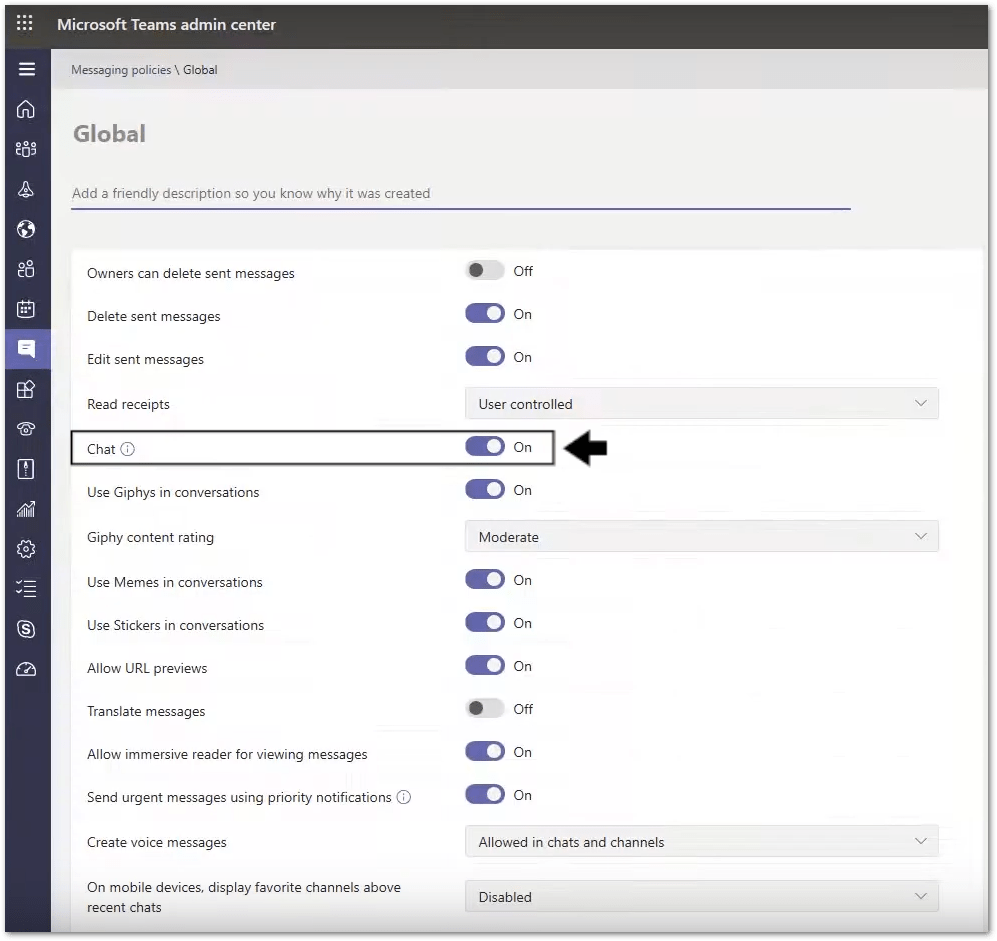
- Finally, scroll down and click on the Save button in the bottom left corner of the page.
After making the changes, you can restart the application (Step 3) or even clear its cache (Step 11) for an improved effect.
If that didn’t work, you may have to create a new custom messaging policy. This will reset the settings of the particular Team to their default configurations, which freely permits messaging by members.
16. Check if Your Team is on “Teams Only/Islands” Mode
Another setting to check for on the Teams admin console at the messaging policy is whether the particular Team is configured for Skype Only. So, when it’s configured for Skype only, you won’t get the Teams privileges, such as members being able to send messages. Instead, it should be set to Teams Only or Islands.
For more information on these 3 modes and their capabilities, we recommend checking this guide by Microsoft to help you to make the right upgrade choice.

That being said, like before, you can check this at the Microsoft Teams Admin Center under Account, Teams Upgrade, and Coexistence Mode.
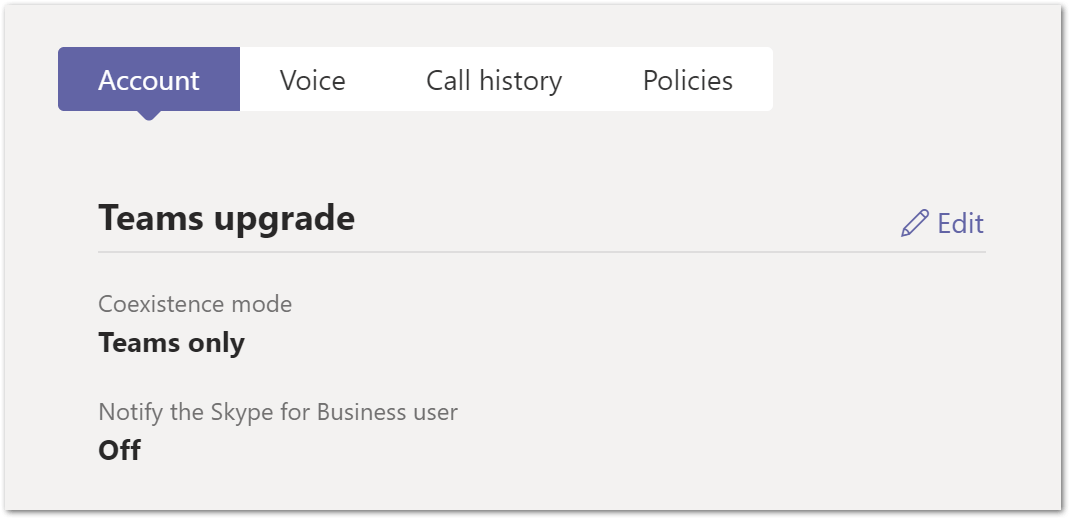
From there, if you notice that your Team is on Skype Only mode, you can change it to Teams Only. To do this, you can find the steps to perform this upgrade (from Skype for Business Online to Teams) in this guide by Microsoft.

17. Contact Microsoft Support
Tried every single thing on this list but still encountering the pesky messaging issue? It’s likely a problem on Microsoft’s end with their servers and that always sucks since you usually can’t do anything about it other than reporting the issue to Microsoft themselves. So, here are some links to their official support channels:
Regardless of which channel you choose, be sure to give them a detailed explanation of your issue, how to replicate it and what you’ve tried so far to remedy it. Furthermore, other users may be reporting the same issue as you. Hence, Microsoft may have already responded with a specific fix or announced what’s wrong on their end — keep a lookout for them.

Conclusion
Well, there you have it! Those were our 17 fixes for when Microsoft Teams chat messages are not sending or showing up.
Even an integral part of a communication platform, such as messaging and notifications, tends to have occasional issues like these. However, admittedly, part of that could be blamed on the potentially complex networking systems. As internet services get more complex, we inevitably have to troubleshoot every single point of failure whether that be Teams’ cache, firewalls or even Microsoft’s own servers just to name a few.
We know it can take hours of Googling and troubleshooting to find out what’s actually wrong with whatever application has an issue, especially if it’s something like Teams. So that’s precisely why we compiled all of the fixes we’ve discovered and tried ourselves for your convenience. Worst comes to worst, none of the fixes works and you’ll have to report the issue to Microsoft themselves.
All in all, hopefully, this article managed to help you in some way, at least a little bit!
Be sure to comment down below:
- Are your chat messages not sending, loading or showing up correctly on Microsoft Teams? Share your experience!
- What steps worked for you or other fixes would you like to recommend?
- Are you struggling with any other issues on Microsoft Teams?
Feel free to share this post with your friends and coworkers whose messages on Microsoft Teams aren’t sending or showing up. 😄