Do you find that desktop notifications from Microsoft Teams are showing up delayed or not working at all? This guide shows 14 fixes you should try out, whether you’re on Windows or macOS.
Microsoft Teams is a team management app created by Microsoft in 2017 that has garnered a lot of user attention through the COVID-19 pandemic 😷 — especially as online meetings and virtual offices have become the norm. Teams’ rise in popularity is largely attributed to its many useful (and free!) features, as it offers its users a large number of functions. This includes chat rooms, video calls, file-sharing, and many more collaboration features.
Needless to say, it has certainly become a rather important part of the workplace, as people from all walks of life, ranging from students to office workers, use it for school and work.

However, there are also some minor grievances that are present within the Microsoft Teams application 😓, with one such example being the notifications feature not working properly. So, in the past, we’ve seen Teams users reporting issues with chat, call, and email notifications showing up delayed or not working correctly.

This can be a thorn in the flesh for users as no one likes to constantly miss out on important notifications, whether it be from a teammate, or even from your boss. 😱
Therefore, in this article, we’ll guide you in resolving the issue with Microsoft Teams notifications. Hence, we have meticulously prepared 14 fixes 🛠️ to help you root out the source of the problem and solve it once and for all.
With these fixes, you won’t have to worry about missing out on important notifications again!
Enough said, let’s get to the fixes!
Note: This article only focuses on the desktop app version of Microsoft Teams, and NOT the mobile version of Teams. So, the fixes cater to both Windows and macOS users. If you’re missing out on Microsoft Teams mobile notifications on Android or iOS, we recommend checking out our guide here.
Table of Contents
14 Ways to Fix Microsoft Teams Desktop Notifications Not Working
- Restart Your PC
- Configure the Notification Settings in the Teams App
- Check the Additional Notification Options in the Teams Chat
- Check and Enable the Notification Settings for Microsoft Teams in Your PC’s System Settings
- Turn Off Focus Assist
- Turn Off Battery Saver
- Make Sure Teams is Running in the Background
- Update the Microsoft Teams App to its Latest Version
- Install Pending OS Updates
- Clear the Microsoft Teams App Cache
- Reinstall the Microsoft Teams Application
- Workaround: Enable Notifications for the Microsoft Teams Website in Your Web Browser
- Launch the Microsoft Teams Web Client Automatically at Startup (Optional)
- Contact Microsoft Support
14 Ways to Fix Microsoft Teams Desktop Notifications Not Working
1. Restart Your PC
There could be temporary issues or network problems in your current session with the Microsoft Teams client or your PC. Thus, these temporary glitches could be affecting the push notification service or the Teams app from displaying your latest notifications. Therefore, we recommend rebooting your PC, to ensure everything is set up and configured properly again.
Plus, rebooting can end all background processes, even ones that were possibly resulting in your Teams notifications not working or showing up.
Therefore, the following are steps to restart your PC, depending on its particular OS:
For Windows
- First, click the Windows icon at the bottom left corner.
- Then from the Start menu, click the Power button.
- Finally, choose Restart.

For macOS
- The easiest way to prompt a restart is, click the Apple Menu, situated at the top left corner of the screen.
- Then, from the drop-down, select Restart.
- Finally, at the subsequent message asking “Are you sure you want to restart?”, click Restart.

2. Configure the Notification Settings in the Teams App
The first step to look into the source of the problem 🔍 is to check out the notification settings in the Teams desktop application itself. Microsoft Teams offer a lot of options for customizing the user’s experience on the desktop application, including which types of notifications to push or ignore, and under which conditions to disable notifications entirely.
From the users’ perspective, it’s entirely possible that the notification settings may have been accidentally toggled off when configuring these settings. Otherwise, the settings may have reset after an app or OS update as well.
Hence, for starters, we’ll check the notification settings in the MS Teams desktop application:
- First, click on the meatball menu icon (···) next to your profile picture in the top-right corner of the application.
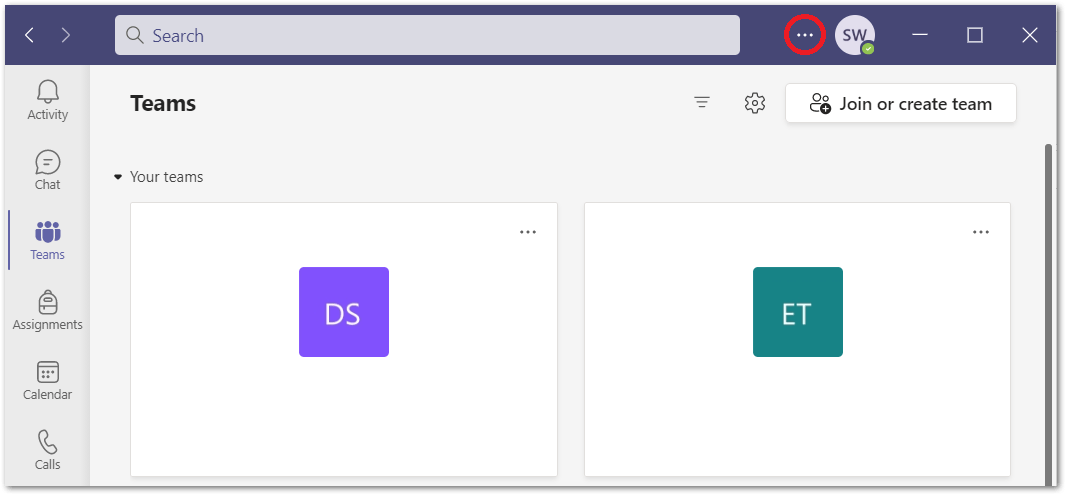
- Next, select ⚙️Settings.

- After that, a settings window should appear. Here, select the 🔔 Notifications tab from the left pane.
- In the Notifications menu, under Teams and channels, make sure that All activity is selected.
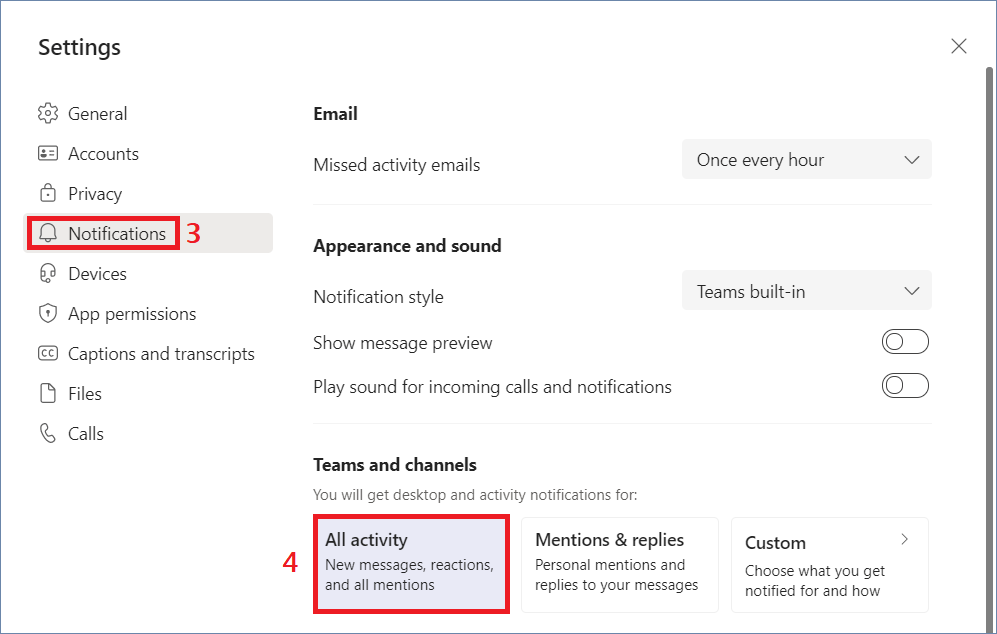
- Alternatively, you may also select the Custom notification option, and configure the notification settings to suit your use case.

3. Check the Additional Notification Options in the Teams Chat
Not only does Microsoft Teams allow its users to customize their notifications, but users can also apply custom notification settings for individual chats and groups too 😀! While it’s a good thing to have a highly customizable notification system, it can sometimes be disorienting for users who are trying to keep track of different notification settings for different groups.
Therefore, in this step, we will take a look at the notification settings for individual chats and groups and make sure that they are not muted 🔕 or configured incorrectly:
Checking if a Chat is Muted
- First, open the Teams desktop application and select Chat on the left column.
- If there is a slashed bell icon 🔕 next to the name of the chat, it means the chat is muted.
- To unmute the chat, simply click on the meatball menu (···) for more options.
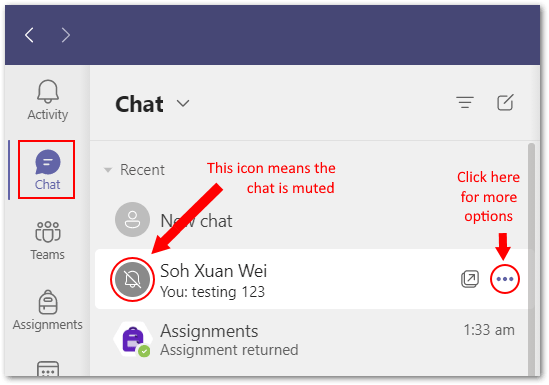
- Finally, click on Unmute to unmute the chat.

Checking if Notifications are Enabled for a Teams Group
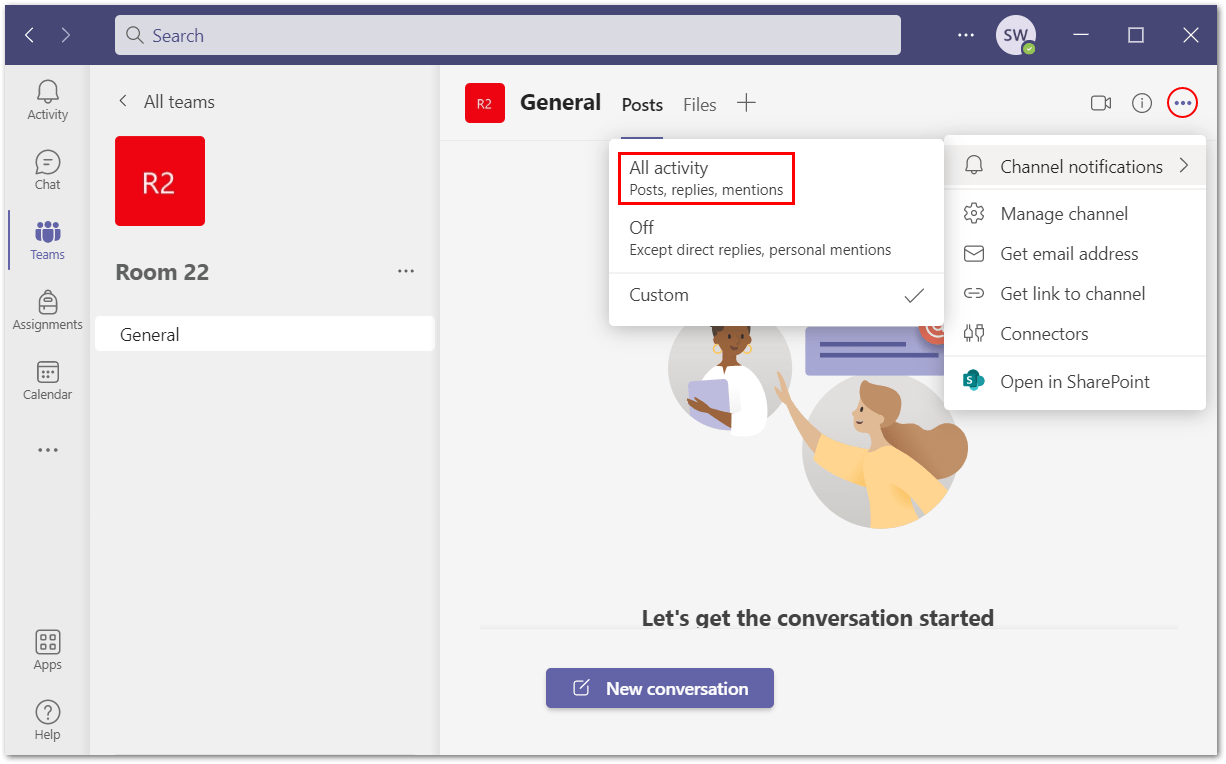
- First, open the particular Teams Group.
- Next, click on the meatball menu (···) located on the top-right corner of the app, as illustrated with a red circle in the screenshot below.
- After that, select 🔔 Channel notifications and then enable notifications for All activity.
4. Check and Enable the Notification Settings for Microsoft Teams in Your PC’s System Settings
In the previous step, we have checked out the notification settings on the MS Teams desktop app, but that isn’t all of it. Push notifications from desktop apps can still be blocked on your PC if they are disabled in the system settings.
Thus, before we move on to the other steps, we are going to make sure that Teams notifications aren’t disabled due to misconfigured settings on your PC.
Fortunately enough, this step is straightforward for both Windows and macOS PCs:
For Windows
- First, open the Settings ⚙️ app. To do this, type “Settings” in the search bar on the bottom-left corner of your screen and Open it.
Alternatively, you can use the keyboard shortcut Windows key ![]() + i
+ i

- Next, select System.

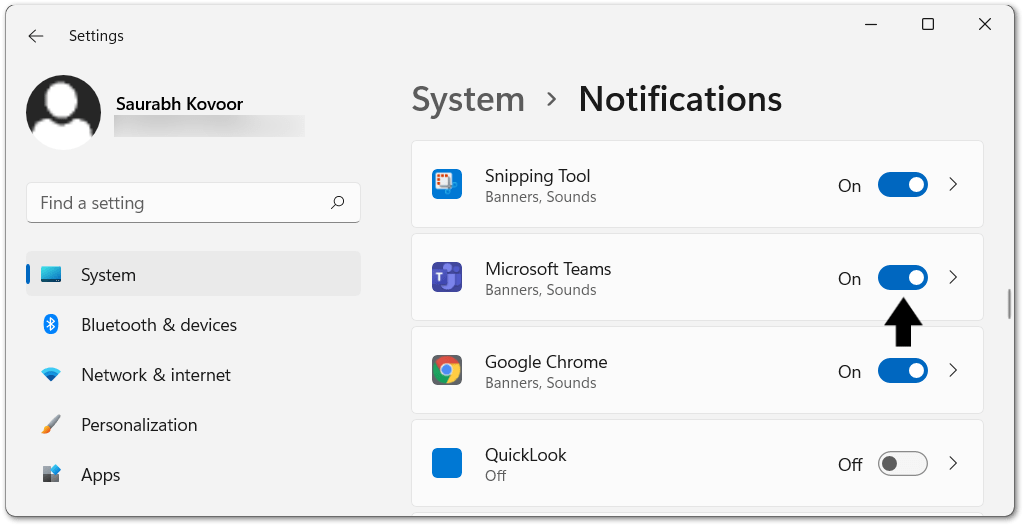
- After that, go to Notifications and Actions on the left side menu. Here, make sure that the Get notifications from apps and other senders setting is turned on.

- After that, scroll down to Get notifications from these senders, and find Microsoft Teams among the list of applications. Then turn on the switch next to it.
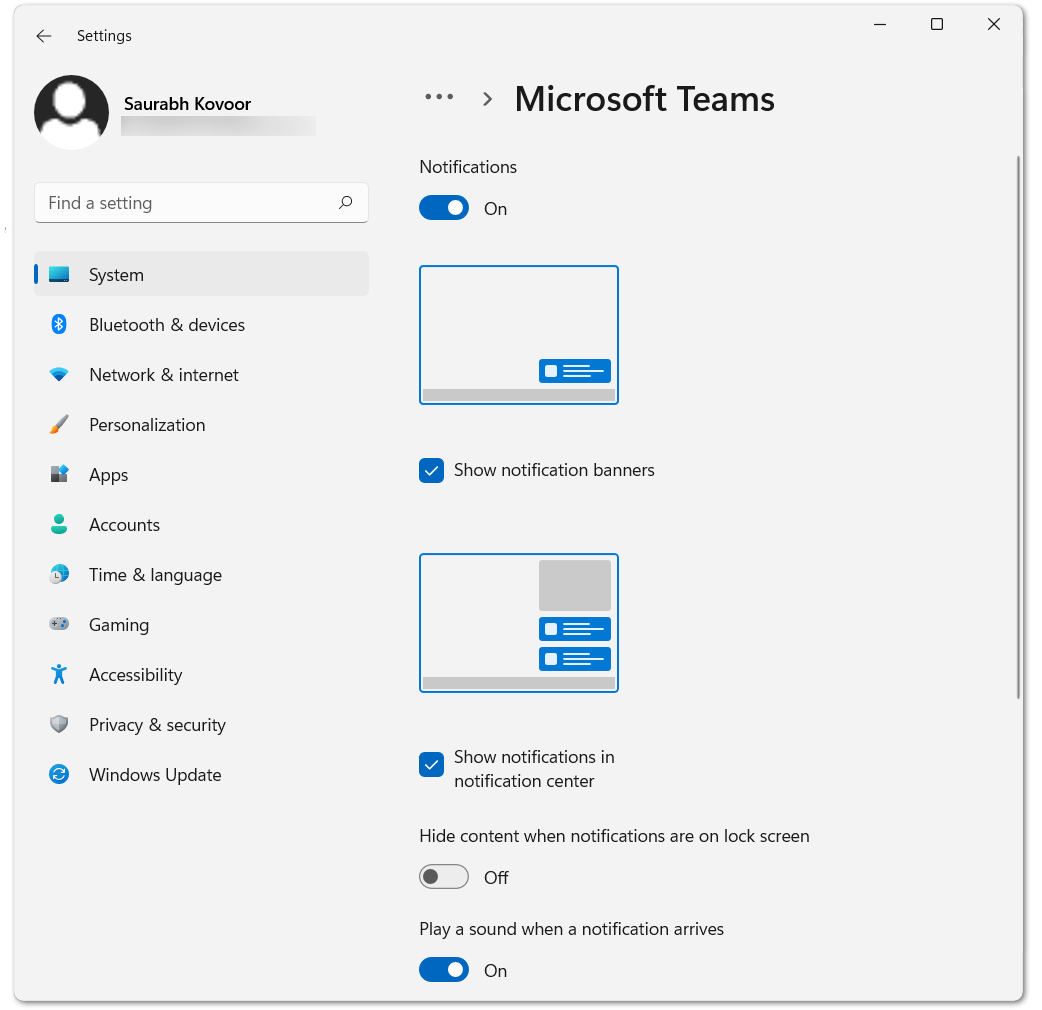
- Finally, make sure that Notifications is switched on for Outlook and the appropriate notifications settings such as Show notification banners, Show notifications in action center, and Play a sound when a notification arrives are enabled as well.
For macOS
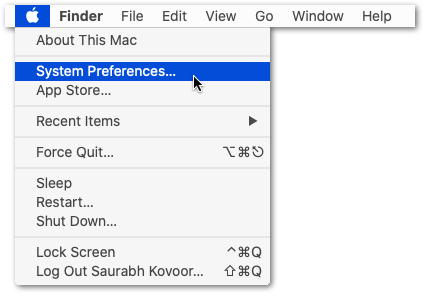
- First, click on the apple icon on the top-left corner of the menu bar.
- Next, select System Preferences.
- After that, select Notifications.

- From the list of applications on the left-hand column of the window, select Teams from the list.
- Finally, make sure that Allow Notifications from Teams is switched on. You can also check the additional options for notifications for further customization.

5. Turn Off Focus Assist
Even after ensuring that the notification settings are allowed for Teams on your PC, there are still some quick checks that we need to run to make sure that the notifications aren’t blocked by the operating system. In this step, we will need to make sure that Focus Assist is turned off.
So, what is Focus Assist?
Focus Assist, also known as the Do Not Disturb mode on macOS, is a setting that allows users to disable all incoming notifications from the desktop. This is useful for users who want to concentrate on a certain task and eliminate all disturbances.
By default, these settings can activate automatically when the user is engaging in tasks such as display duplication, gaming, or using apps in full-screen mode. Additionally, the Do Not Disturb function can be programmed to activate automatically at scheduled intervals.
With that said, it’s common for users to have unknowingly turned on the Focus Assist / Do Not Disturb function. Therefore, we will simply run a quick check to make sure that this feature is not blocking your notifications from Teams:
For Windows
You can quickly check if the Focus Assist feature is turned on by opening the Action Center on the taskbar.
- For this, click the chat bubble icon 💬 on the bottom-right corner of the taskbar.
- Then, click on Expand.

- Finally, make sure that Focus assist is turned off. (i.e., not highlighted in blue)

- Moving on, you can further customize the Focus assist feature by right-clicking Focus assist and selecting Go to Settings.

- In the Settings, make sure Focus assist is in the Off mode.
- Additionally, we recommend checking the Show me a summary option at the bottom of the menu.

For macOS
The equivalent of Focus assist on macOS is the Do Not Disturb feature, which can be accessed by following these steps:
- First, click on the apple icon on the top-left corner of the menu bar.
- Next, select System Preferences.

- After that, select Notifications.

- Then, select Do Not Disturb.
- Finally, make sure that Do Not Disturb is switched off.

6. Turn Off Battery Saver
Next up, we will run a quick check to ensure that your computer is not running on Battery Saver mode 🔋. This is mostly applicable to laptop users 💻, as laptops will usually have a Battery Saver mode which activates automatically when the battery is low. Plus, this can cause complications with the push notifications from MS Teams as well. This is because the feature will likely try to conserve your battery percentage by reducing the resource usage of background applications.
For desktop PC users 🖥️, the Battery saver option is most likely disabled already or greyed out in the Action Center. If you are a Desktop user, or you currently have a power source plugged into your laptop, then it should be fine to skip to the next step.
Here’s how to check if Battery Saver mode is enabled on your PC:
For Windows
By default, battery saver mode activates automatically when your laptop has a low battery. Therefore, you can try plugging your laptop into a power source and this feature will be turned off. 🔌
Alternatively, you can check if Battery saver mode is enabled through the Action Center:
- First, click on the chat bubble icon 💬 on the bottom-right corner of the taskbar.
- Then, click on Expand.

- Finally, make sure that Battery saver is turned off. (i.e., not highlighted in blue)

For macOS
- First, click on the Apple menu
 .
. - Next, select System Preferences.

- After that, click on Battery or Energy Saver.

- In the configurations menu, you’ll be able to choose between different sets of options depending on whether your Mac is plugged in.
7. Make Sure Teams is Running in the Background
MS Teams’ notification system is built into the app — Therefore, the Teams app needs to be running to be able to push notifications to the desktop. By default, MS Teams starts automatically at startup and runs silently in the background 🤫 even after the user closes its window.
While users have the option of disabling Teams from starting automatically when the PC is booted, they will still need to manually launch the Teams application in order to receive notifications. Similarly, users also have the option to disable Teams running in the background when the app is closed, which is sometimes enabled to help conserve RAM usage on PCs.
Therefore, in this step, we’ll enable Microsoft Teams to open on startup and run in the background, so you can actively receive notifications:
Check the In-App Microsoft Teams Settings
First, we’ll look at the settings in MS Teams to make sure that the Teams app runs automatically when the PC is started up and is able to run uninterrupted in the background when the application is closed:
- First, open the Microsoft Teams desktop app.
- Then, click on the meatball menu icon (···) next to your profile picture in the top-right corner of the application.

- Next, select ⚙️Settings.

- In the General settings, make sure that these 3 options are enabled:
- Auto-start application
- Open application in background
- On close, keep the application running

Check System Settings
Next, we’ll look at the computer settings to make sure that these 2 features are enabled as well:
For Windows
- First, launch the Settings ⚙️ app. To do this, type “Settings” in the search bar on the bottom-left corner of your screen and Open it.
Alternatively, you can use the keyboard shortcut Windows key + i

- Next, select Apps.

- After that, in the Startup settings, scroll down the list of applications and look for Microsoft Teams. Make sure that the switch next to Microsoft Teams is enabled.

- Then, go back to the Settings ⚙️ menu and select Privacy.

- In the left column, scroll down and select Background apps.
- Finally, make sure that the Let apps run in the background option is enabled.

For macOS
- First, click on the apple icon on the top-left corner of the menu bar.
- Next, select System Preferences.

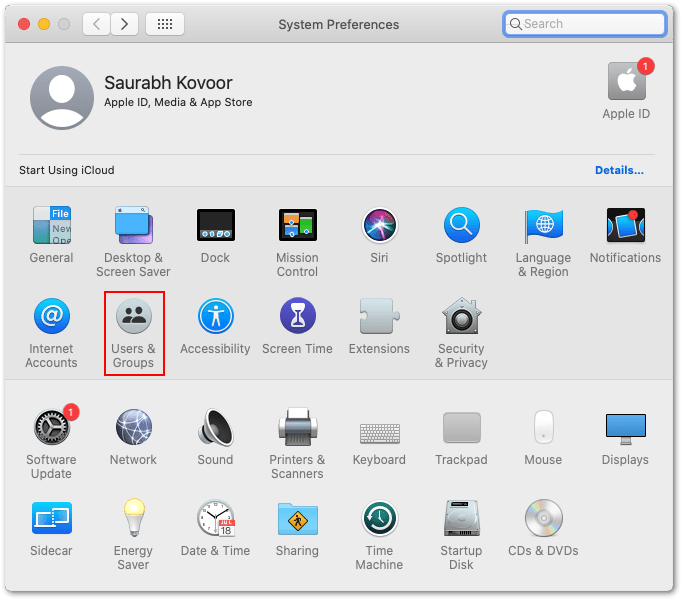
- After that, select Users & Groups.
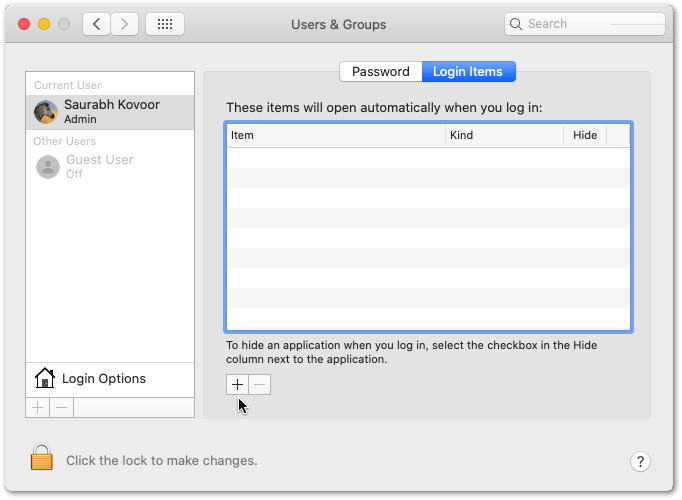
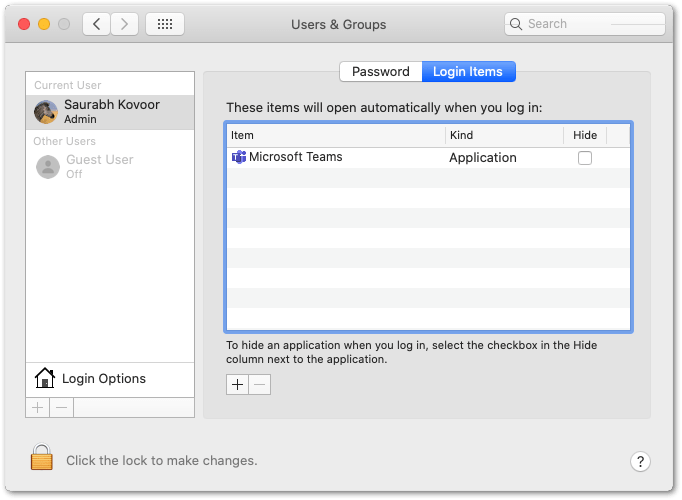
- Next, select your account in the left column and click on the Login Items tab, which is located on top of the right column.
- After that, click the + button to add an app to the list of items.
- On this next page, look for and select Microsoft Teams in the list of applications displayed. Then, click Add at the bottom-right.
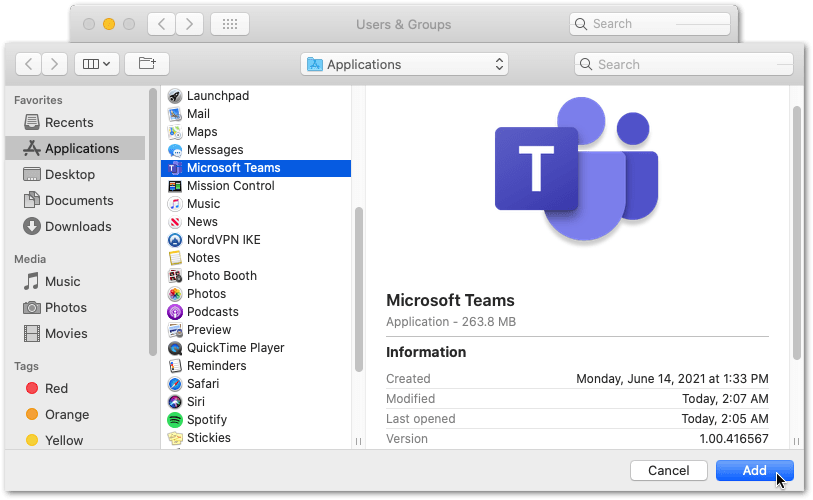
With that done, Microsoft Teams should appear under the list of Login Items. Hence, it should open automatically the next time you start up your mac and log in.
8. Update the Microsoft Teams App to its Latest Version
In the previous steps, we have looked at the various settings that are able to affect MS Teams’ notification system 🤔. However, there may be other underlying issues that are resulting in MS Teams push notifications not working properly on your desktop.
One such possibility is that the app version of MS Teams on your PC is outdated or hasn’t been updated for a long time. This is because software products that aren’t being kept up-to-date are more likely to suffer from glitches and result in suboptimal performance. Therefore, it’s important to make sure that your Teams app is properly updated.
With that said, Microsoft Teams has made it very simple for users to keep up with all the ongoing updates — the desktop client for MS Teams is able to detect new updates and download these updates automatically in the background.
However, you can still manually check if your version of Teams is up-to-date, just in case the auto-update feature isn’t working properly:
- First, launch the Teams desktop application.
- Next, click on the meatball menu icon (···) next to your profile picture in the top-right corner of the application.
- Then, click on the Check for updates option.

- After this, the application will check for updates automatically in the background. If any updates were installed, you will need to restart your PC (Step 1) for the update to take effect.
9. Install Pending OS Updates
Aside from updating the Teams app, you should also make sure your PC’s OS version is up-to-date. This is because these latest updates arrive with vital bug fixes for various components on your PC, including the push notification service.
Thus, if the service is experiencing unaddressed issues, this could be why your Microsoft Teams notifications are showing up late or aren’t working at all. Overall, these software updates ensure an optimal environment for your various applications to operate correctly, including Microsoft Teams.
So, to check for OS updates on your device:
For Windows
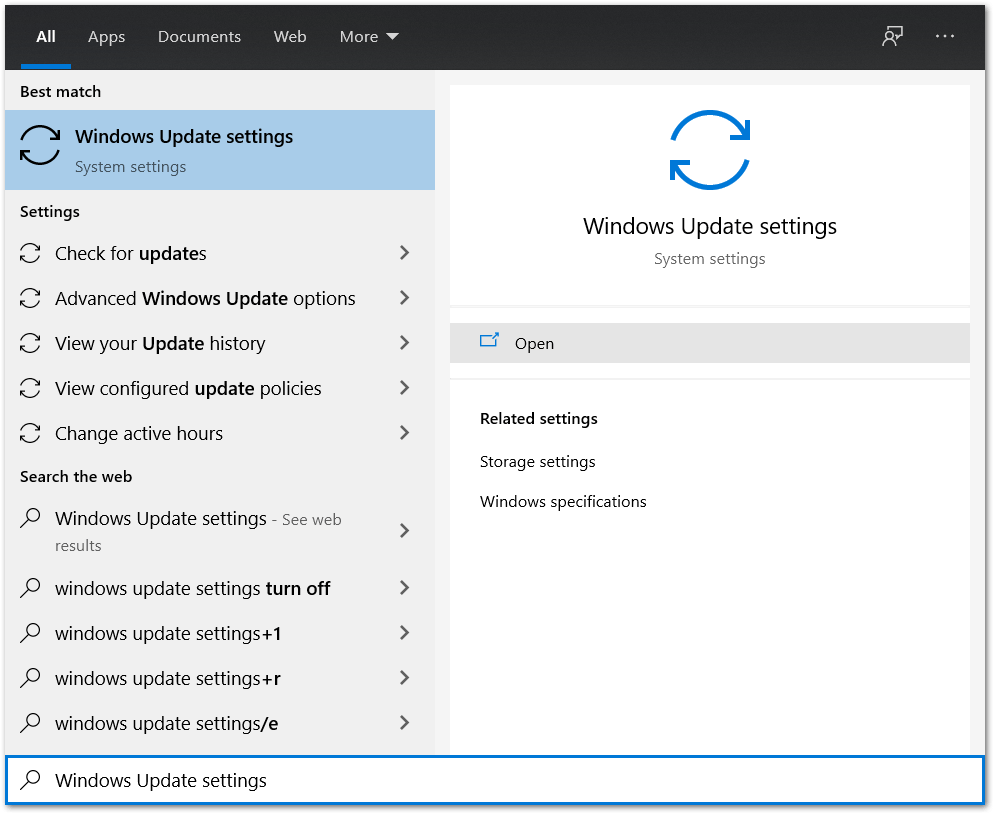
- First, open the Start menu, then search and open Windows Update settings.
- Next, click the Check for updates button.

- After that, if there are updates available, click the Download button to begin downloading and installing them. Finally, you may be prompted to restart your PC (step 1) to apply the changes.

For macOS
- First, select the Apple menu icon and tap System Preferences.

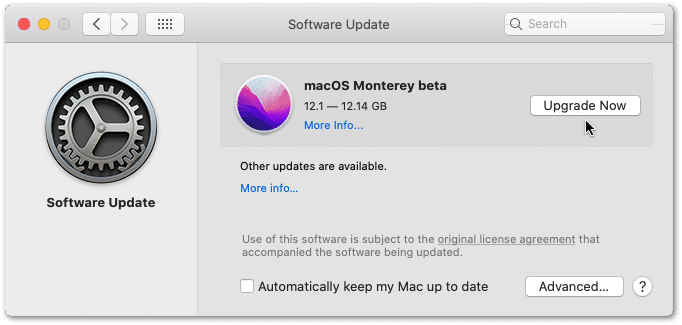
- After that, click Software Update.

- Next, if there are pending software updates, proceed to click the Upgrade Now or Update button.
10. Clear the Microsoft Teams App Cache
The more you interact with Teams client, the app stores frequently accessed resources and data in the form of cache. Hence, these caches are essentially useful to reduce the access time when the client requests the same resources.
Nevertheless, within this complex file storage, there could be lingering bugs 👾 or corrupted files that are affecting the normal orderly operation of the Teams app. Hence, clearing these cache files is an effective fix for various Teams client issues, including when you’re not receiving notifications.
After this, we even recommend reinstalling the Teams application (Step 11) for complete cleansing.
On that note, the following are steps to clear the Microsoft Teams cache:
For Windows
- Firstly, ensure the Teams app is fully closed and not running. You can double-check by looking in the Task Manager (Ctrl + Shift + Esc). End the Teams process in there if you see it running. (Step 3)
- Next, open up the Run dialog. (Win + R)
- Copy and paste the following address to access Teams’ cache: %appdata%/Microsoft

- You should see a list of folders here, like in the screenshot.
- Then, simply select Teams and delete it.

- Finally, open up Teams and let it set up all the new cache.
For macOS
- To start, make sure Teams is fully closed. We detailed how to do so in 3.
- Then, hold down Command+Shift+G and paste the following directory: ~/Library/Application Support/Microsoft

- Here, simply delete the Teams folder.

- After that, open up the Keychain Access app through Launchpad.
- Next, while login is selected in the left sidebar, delete the Microsoft Teams listing.

- Finally, open up Teams and let it set up all the new cache.
For the Web Version of Microsoft Teams
When using the Microsoft Teams website for video calling and what-not, the platform data is stored on the web browser. This data consists of browser cache, cookies 🍪, and other site data. Therefore, you can clear this data within the browser settings.
That being said, the following steps were performed on Google Chrome, but are generally similar regardless of whichever browser you’re using:
- First, navigate to the Teams web version and log in to your Microsoft account.
- On the left side of your address bar, click the lock icon or similar.
- Then, click the Clear cookies and site data… option or similar.

- Finally, in the new window, click Remove in the bottom-right corner.

Note: Clearing cookies and site data will log you out of the website, so save everything before you perform these steps.
11. Reinstall the Microsoft Teams Application
If you have tried all the steps above and found no luck in resolving the issue, then it may be a good idea to try and reinstall the Teams desktop app. Doing so will essentially reset all Teams settings stored on the computer, as the default settings will be used when the application is installed again.
Plus, this step can completely delete all the app files along with any cache or installation errors that could’ve resulted in your Teams notifications not working. Hence, this is yet another fix for various Microsoft Teams app issues, including notification problems.
Note: You may be prompted to re-enter your account credentials when launching the app after the re-installation. So, remember to jot down your Teams username and password or keep them in mind!
For Windows
- First, open the Run prompt by pressing the Windows and R keys together.
- After that, enter appwiz.cpl and click OK.

- From the list of apps, select Microsoft Teams and click Uninstall.

- After that, proceed with the rest of the guided uninstallation steps.
- Finally, after uninstalling, you can visit this Microsoft page, to download the latest version of the Teams client installation file. Then, run the downloaded file and the installation should start automatically!
For macOS
- Firstly, open up Finder and look for the Microsoft Teams app. It’ll likely be in the Applications tab, which you can open by clicking Applications in the Finder’s sidebar. Alternatively, you can use Spotlight to find the app, then press and hold the Command (⌘) key while double-clicking the app in Spotlight.
- Then, drag the Microsoft Teams app to the Trash, or select right-click the app and choose Move to Trash.

- After that, if you’re asked for a user name and password, enter the name and password of an administrator account on your Mac. This is probably the name and password you use to log in to your Mac.
- Next, to delete the app, open the Trash, right-click it, and select Empty Trash.

Finally, like before, visit this Microsoft page, then Download the Teams client and proceed to install it.
12. Workaround: Enable Notifications for the Microsoft Teams Website in Your Web Browser
A workaround also exists if you are still having trouble receiving notifications from Teams even after trying out all the steps listed above. The idea is to ditch the desktop client application and use the web client instead. In simpler terms, you can use the browser version of Microsoft Teams to receive notifications instead. 🤔
Therefore, you can access the web version of Microsoft Teams, here.
After signing in to your Microsoft account, you will be prompted to allow Teams to send you desktop notifications via the web browser. So, simply click Turn On to begin receiving desktop notifications from Teams.

As a reminder, you will also need to approve Teams’ request to send notifications from the web browser when prompted. So, click on the Allow option, as shown in the screenshot below.

Now, you can follow step 2 and step 3 to customize the notification settings on the web client for MS Teams.
13. Launch the Microsoft Teams Web Client Automatically at Startup (Optional)
Understandably, it can be very annoying 🙁 to have to manually start the web client for Teams every time you start your PC — especially so that you can receive the Teams notifications. Fortunately, we can automate this task using a simple batch file in the startup folder:
Note: These steps are only applicable to Windows users.
- First, access the Run Command Box using the search bar in the bottom-left corner of the UI. Alternatively, you can press the Windows and R keys together.
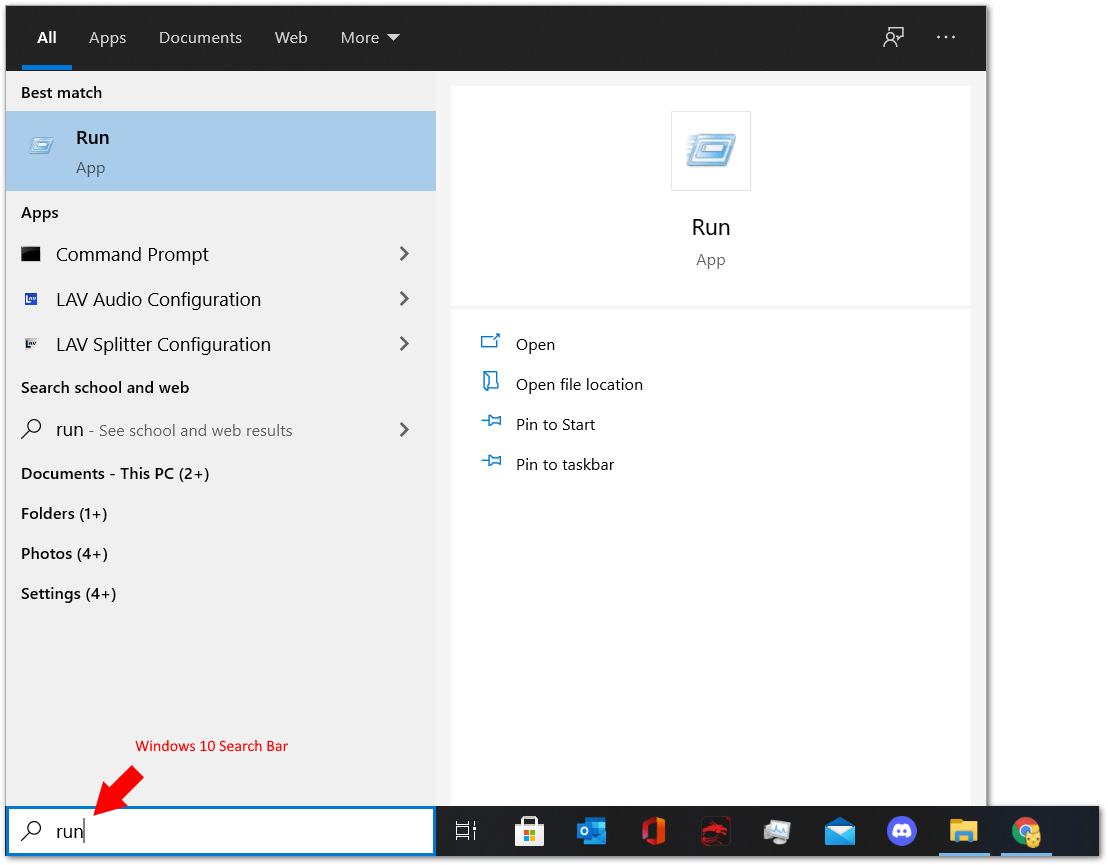
- Next, launch the run command box and type shell:startup in the command box. Then, click on OK to proceed.

- You will be brought to the Startup folder via File Explorer. Here, create a new file and rename it “start_teams.bat”. It’s important to make sure that the file is a Windows Batch File (.bat), and not a text file (.txt).

- After that, right-click on the file and select Edit.
- Then, paste the following line of code into the notepad editor, so that Google Chrome automatically opens a tab to https://teams.microsoft.com at startup.
start "C:\Program Files (x86)\Google\Chrome\Application\chrome.exe" https://teams.microsoft.com
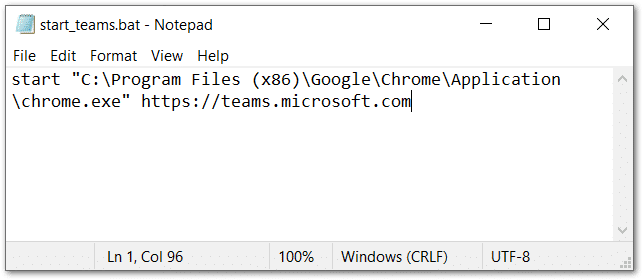
- Finally, save the file and restart your PC. The web client should start automatically in Google Chrome after you start your PC.
Alternatively, you can also replace the file path to any web browser of your choice:
start “[file path to browser]” https://teams.microsoft.com
14. Contact Microsoft Support
Perhaps you’ve tried everything under the sun, and no matter what you try, the Teams notifications are still not working. In that case, we recommend reaching out to the support team or even the Teams community to get more suitable fixes for your particular device.
Chances are, some other users may have encountered similar issues with Teams notifications before. Hence, through this step, you can possibly get to the bottom of this notifications issue and see what’s the real cause.
So, here are some links to their official support channels:

Conclusion
Missing important notifications can be agonizing 😭, especially in today’s workplace environment where everything is fast-paced and highly digitized.
On that note, in this article, we listed out 14 fixes that you can do when desktop notifications from Microsoft Teams aren’t showing up or working correctly. We hope that this article has been able to help you identify and resolve the problem once and for all. 🙏
Before you leave, let us know in the comments:
- Did we leave out any potentially helpful fixes? What other fixes do you think are effective for this Teams desktop notification problem?
- Have you encountered similar notification issues on Microsoft Teams as well? Do share your experience down below.
- What other issues are you struggling with on Microsoft Teams?
Feel free to share this post with others who are experiencing problems with MS Teams’ desktop notifications not working properly. 😇
