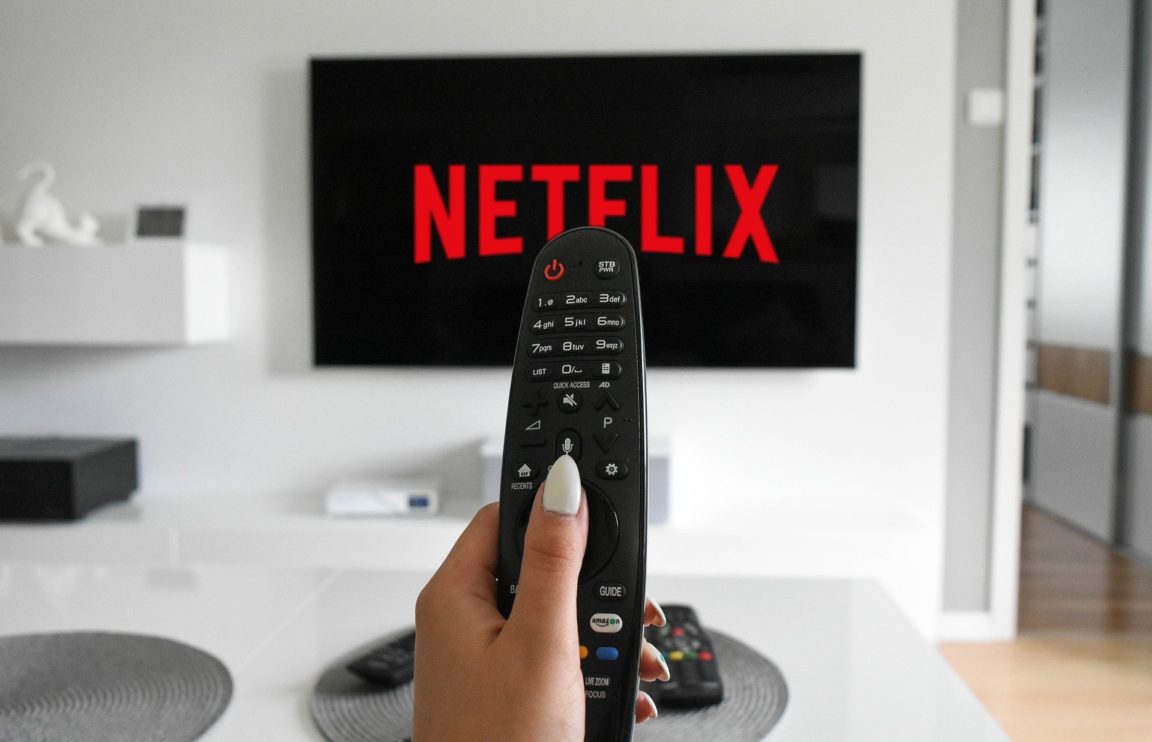
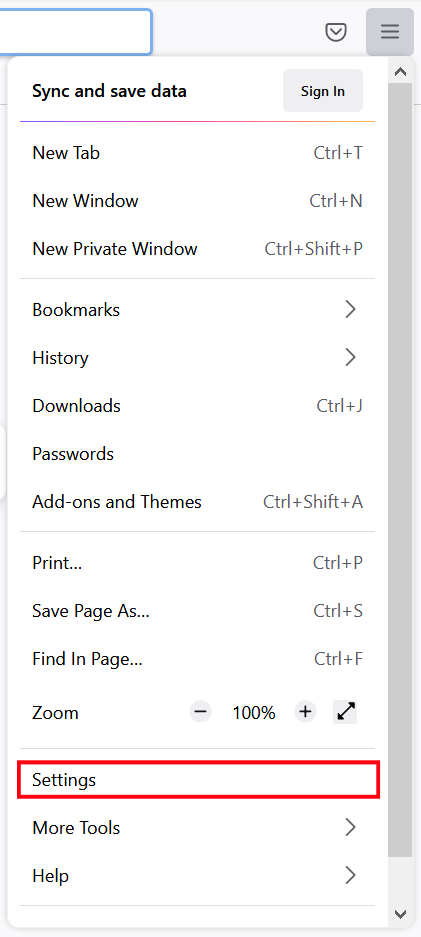
Do you find that your Netflix stream has no sound or that the audio or volume isn’t playing or working correctly at all?
Netflix is considered one of the most common streaming services present with it being available across 190 countries up to date! What makes Netflix even better is that it’s easy to use as any other simple web app. You simply install the Netflix app or sign in to the Netflix website, pick a title and you’re ready to kick back and enjoy your favorite show. 🍿
However, no streaming service is perfect, especially with the increase in demand nowadays. Occasionally, you’ll encounter problems when streaming Netflix movies. One rather peculiar Netflix problem reported by users is that there’s no sound playing although the video plays correctly.
Seeing that you’re reading this article as well, we reckon you’re facing a similar problem and looking for fixes. Some of the reported audio issues include Netflix movies having no sound, the out-of-sync audio or the show keeps losing sound during playback.
Well, you have come to the right place! We’ve prepared this guide with 35 fixes to try on your end whenever you find that Netflix has audio issues during playback.
But before that…
Before proceeding to the fixes, there are a few basic things that you should check. For one, make sure that the volume is turned up for both your device and the Netflix video player. Your volume shouldn’t be set to zero or too low.
Secondly, check for any other apps currently playing audio. Suppose there is another app occupying the device’s audio system or speakers and playing audio in the background, such as YouTube or Spotify. Remember, to turn it off or completely close it before troubleshooting your Netflix audio problem for better accuracy. Better yet, you can try closing any other apps that are still running in the background.
Note: This guide provides pictures and steps taken from the Netflix website or app on Windows, macOS, Android, iPhone, and iPad. However, the steps work effectively and similarly for other streaming devices, including game consoles (PS4, PS5, Xbox, Nintendo 3DS), Smart TVs and set-top boxes (Roku, Firestick, Apple TV).
Table of Contents
35 Fixes When Netflix Has No Sound, Audio or Volume is Not Working
- Turn Down the Volume and then Turn the Volume Back Up
- Turn Off Bluetooth
- Pause, Forward or Rewind the Stream
- Test the Audio on Headphones or an External Audio Device
- Check the Netflix Server Status
- Update the Netflix App
- Restart the Netflix App or Refresh Your Web Browser
- Close Unused Apps and Web Browser Tabs (PC)
- Reboot Your Netflix Streaming Device
- Check and Improve Your Internet Connection
- Try Testing the Audio Stream on a Different Netflix Title
- Change the Netflix Audio Settings
- Set the Audio to Studio Quality (Windows)
- Enable Lip/Sync/Audio Output Delay (Smart TVs)
- Disable Dolby Digital (Apple TV)
- Disable Match Frame Rate (Apple TV)
- Calibrate the Wireless Audio Sync (Apple TV)
- Deactivate Volume Mode (Roku)
- Edit the Dolby Digital Audio Settings (Roku)
- Disable Autoplay (Windows)
- Turn Off System Fast Startup (Windows)
- Disable Netflix’s Exclusive Control (Windows)
- Edit the Appearance and Performance Options (Windows)
- Reconnect the HDMI Cable
- Ensure Speakers are Connected Correctly
- Reinstall or Update the Audio Drivers (Windows)
- Update Your Device’s System Software and Firmware
- Switch the Audio Output to HDMI
- Turn Off the Hardware Acceleration Feature on the Web Browser (Windows)
- Disable the Web Browser Extensions or Try Incognito Mode (PC)
- Try Using Another Web Browser (PC)
- Install Pending Web Browser Updates (PC)
- Clear the Web Browser Data and Cache (PC)
- Clear the Netflix App Cache and Data
- Report the Audio Problem to Netflix Support
35 Fixes When Netflix Has No Sound, Audio or Volume is Not Working
1. Turn Down the Volume and then Turn the Volume Back Up
For starters, turn your device’s volume down. Then, immediately turn it back up. This can help you troubleshoot if the volume levels are the root of the issue.
We aren’t too sure of the sorcery 🔮 behind this step. However, some users have reported that it has worked well in fixing their Netflix audio problems.
We believe this step ensures that your device’s audio is unmuted and also helps to reset the volume. Nonetheless, seeing that it’s simple enough, we reckon you can give it a shot as well!
2. Turn Off Bluetooth
Secondly, you should troubleshoot your device’s Bluetooth connections by turning it off before playing any videos on Netflix or other applications. The reason is that your device may be unknowingly connected to one of your unused Bluetooth speakers or earphones. 🎧
In this case, your device will always send the audio output to the connected audio device. As a result, it gives you the misconception that your Netflix movie has no sound. Moreover, this step is also placed before other technical steps to ensure accuracy when testing other fixes.
Even if you plan on using Bluetooth speakers while streaming Netflix, reestablishing your connection by turning it off and on again could be the right solution.
Therefore, to turn off your Bluetooth connection, you can follow these steps. The steps involved will vary between devices:
For Android/iOS
- First, open the notification shade (Android) or control center (iOS).
- Then, locate the Bluetooth icon in the notification shade.
- Lastly, tap on the Bluetooth switch to turn it off. Bluetooth is turned off if the Bluetooth icon isn’t colored.

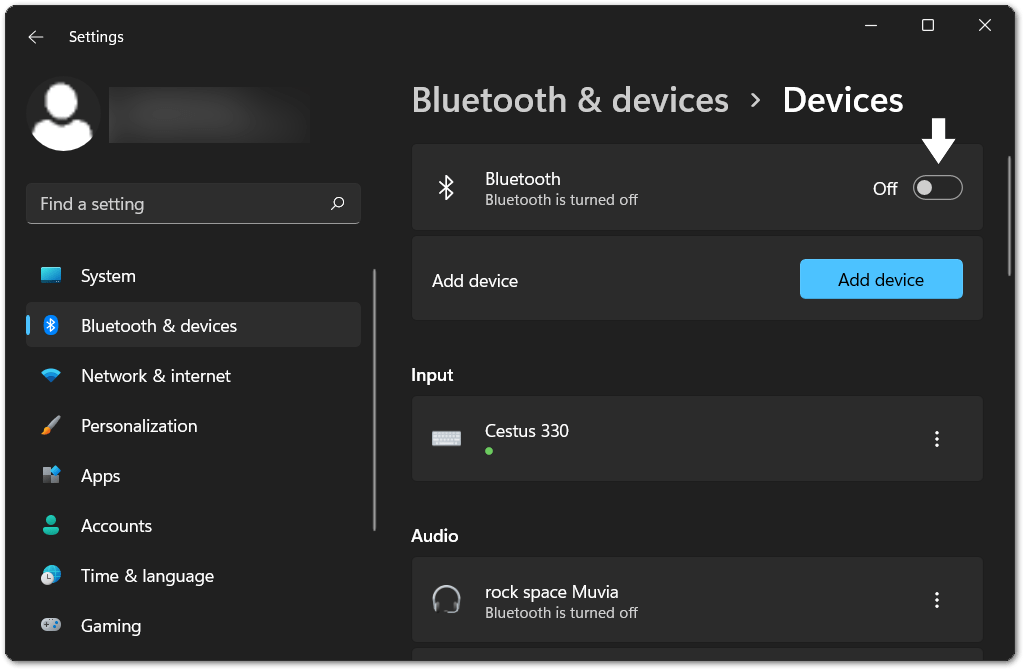
For Windows
Follow the steps below to turn off your device’s Bluetooth:
- First, click on the Start Menu on the bottom-left corner of your display.
- Then, select Settings.
- After that, click on Devices.
- Finally, click on Bluetooth & Other Devices from the side menu and make sure that your Bluetooth connection is switched off.
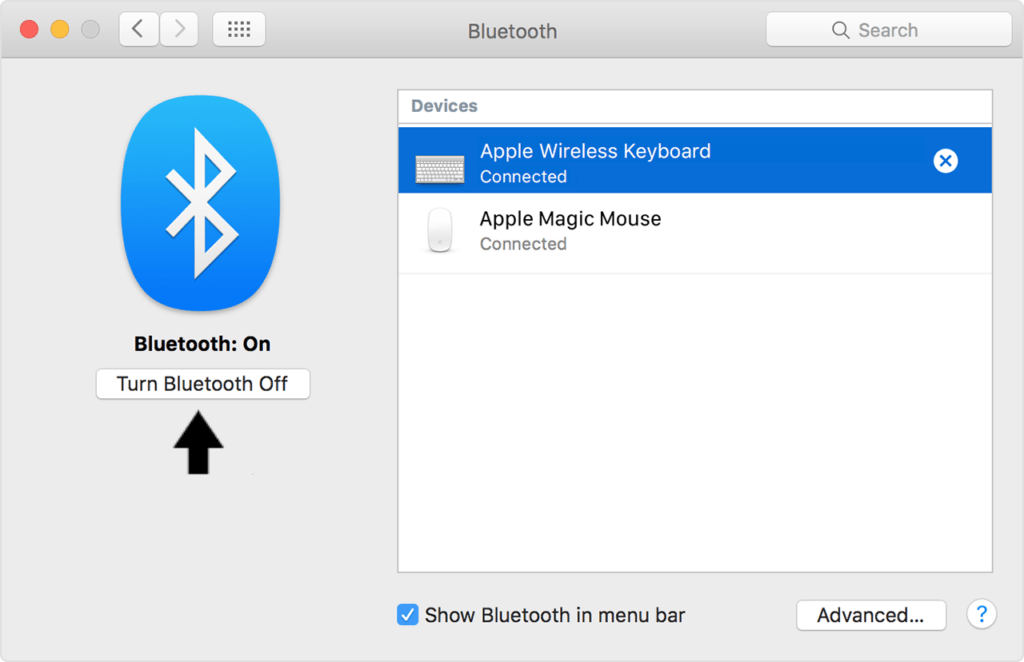
For macOS
You can control your Bluetooth connection by doing the following:
- On your Mac, click on the Apple logo or Apple menu button on the top-left corner of your display.
- After that, click on System Preferences.
- Lastly, click on Bluetooth and make sure that it’s off.
For Set-Top Boxes
3. Pause, Forward or Rewind the Stream
Next, suppose the audio issue you’re facing on Netflix is the audio stream being out-of-sync with the video. This situation can occur if the Netflix or TV settings are not properly configured.
In that case, you can try to pause ⏸️ the movie, wait for a minute, and then play ▶️ it again to allow the audio to catch up with the video.
Depending on the type of audio desynchronization you’re encountering, you can also repeat this step by forwarding or rewinding the movie. For instance, if the audio is slower than the video, rewind the movie. However, if the audio is faster than the video itself, try fast-forwarding the movie.
While this step may not be 100% accurate, it may get your audio to sync roughly with the video. However, for more straightforward steps, you can check out other fixes in this post as well.
4. Test the Audio on Headphones or an External Audio Device
Suppose you’ve turned off your device’s Bluetooth connection. However, you find that there’s still no sound when streaming Netflix titles. In this case, you should identify whether it’s a problem with your audio output device, namely your device speakers. 🔊
You can do so by plugging in headphones and checking if any audio is outputted from there. So, this step can also be done using other external audio devices such as speakers.
Suppose no audio problems occur when using your an external audio device. Then, it may be a problem with your device’s built-in speakers. In that case, we recommend heading to Step 12 and after for steps to change audio settings. However, if the Netflix audio is still not working, we cannot conclude that it’s an issue with the Netflix title. Hence, more troubleshooting needs to be done with the other fixes.
Note: If you’re using any wireless audio devices, do ensure that they’re properly connected for accurate troubleshooting results.
5. Check the Netflix Server Status
Furthermore, before meddling with your device settings, we recommend checking if the cause is on Netflix’s end. We wouldn’t want you to spend hours trying fixes only to find out that the problem is with the Netflix servers. Therefore, it’s always worth checking Netflix’s servers status for any abnormalities.
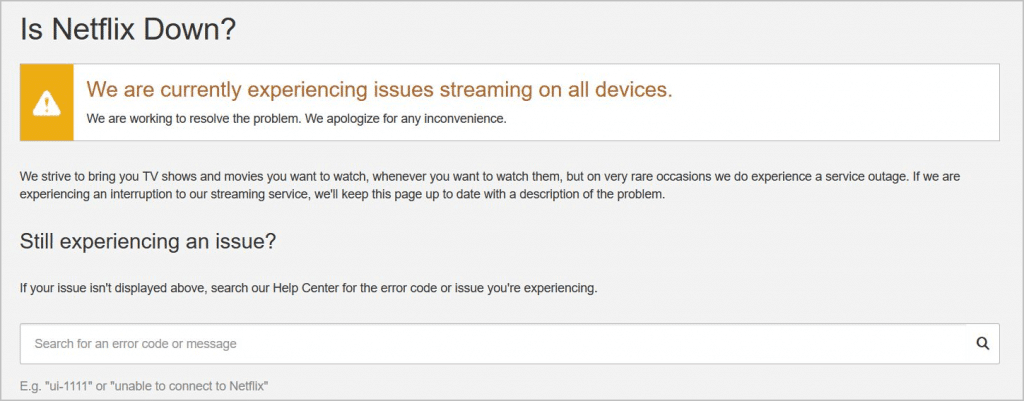
Method 1: Through the Netflix Help Center
There are many ways to check Netflix’s server status. For one, you can check whether there’s downtime for Netflix through their Official Help Center. From there, suppose you see an orange triangle with an exclamation mark. This sign indicates that the Netflix server is currently down. It usually comes with a message stating “We are currently experiencing issues streaming on all devices”.
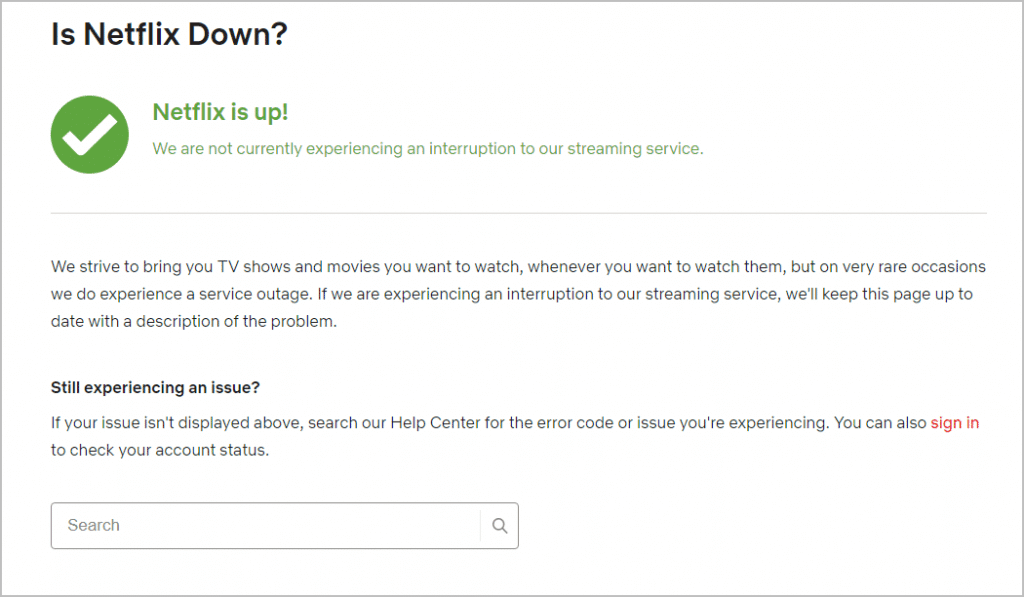
On the other hand, suppose you see a big green tick icon with the message “Netflix is up!”. Then, it means that Netflix service is currently up and running properly.
Method 2: Through Downdetector or other Third-Party Status Checkers
Additionally, you can also check the Netflix server status using third-party websites, such as the Downdetector. This website is a user-based site and uses the number of customer reports to determine Netflix’s server status.
Additionally, the Downdetector page provides a live map that shows the number of reports in a particular area in the past 24 hours. It also analyses these data to identify the top three problems with the highest number of reports. User descriptions of the problem faced are also available in the comments section.

Therefore, perhaps you’ve noticed the Netflix server is down. In this case, there’s a good news and bad news. The good news is that you don’t have to troubleshoot the audio issue yourself. However, on the downside, there isn’t much you can do other than to wait until the Netflix service is restored.
In contrast, if Netflix servers are up, they aren’t the culprit for the audio problems on your device. Hence, we suggest reporting the issue to the Netflix Help Center for any possible fixes (Step 35). You can also continue reading this article and try to fix the problem yourself!
6. Update the Netflix App
Suppose you’ve identified that the problem is on your end. We suspect that one of the possible causes leading to audio issues on Netflix is app bugs 👾. They may have taken place because your version of the Netflix app is outdated. Therefore, your Netflix app is unable to process the audio content retrieved from its servers correctly. Consequently, this communication problem can cause your Netflix shows to keep losing sound.
To solve this problem, we recommend installing the latest version of the Netflix app on your streaming devices. The reason is that new versions of the app may have added features that can upgrade your streaming experience. Moreover, Netflix developers 👨💻 may have also released bug fixes or patches for the audio problem in the latest version of the Netflix app.
You can update the Netflix app by:
- First, go back to the app store where you initially installed Netflix.
- From there, visit the Netflix app page.
- If there are updates available, the Update button will be visible. So, go ahead and tap it!

7. Restart the Netflix App or Refresh Your Web Browser
Furthermore, app bugs can also be caused by too many instances of the Netflix app running in the background. These instances are created to handle various user requests. However, the instances can become corrupted over time, leading to glitches. So, chances are, these glitches could be causing malfunctions in your Netflix audio.
Therefore, we suggest restarting the Netflix app or refreshing the Netflix web page on your browser. This simple step clears out all instances of the app, including those which are corrupted. With instances removed, app updates can also take place correctly. Hence, this step can also be used after other fixes to check if the problem persists.
Reload the Netflix Web Page
If you’re streaming Netflix via your web browser on PC, a simple reload of the page might do the trick. During this process, the browser cache is accessed and cached data is used to load the web page. No matter which browser you use (Chrome, Firefox, Edge), the steps to refresh the Netflix page are similar:
- Click the reload button
 on the web browser.
 - Press the Ctrl + R key (For Windows) or the Command + R key (For macOS).

You can take this a step further and restart your web browser. All you need to do is simply close your web browser, then reopen it and visit the Netflix website.
Hard Refresh the Netflix Web Page
In contrast, hard refreshing doesn’t use the cached data stored in the browser cache. Hence, the purpose of this step is to not only reload the page but also remove some minor cache associated with it. It loads the web page using resources retrieved again from its server. Therefore, it’s a straightforward way to clear the Netflix page cache and force load the most recent version.
On Windows: For most web browsers (Chrome, Firefox, Edge), press the Ctrl + F5 keys together at the Netflix page to perform a hard refresh.

On macOS: For Safari and other web browsers on macOS, press the Command + Option + R keys simultaneously.

Restart the Netflix App
For the Netflix app installed on your phone, tablet, set-top box or Smart TV, rebooting the app can bring about similar effects. However, most people may not perform it completely or effectively. Simply clicking the home button only brings you back to the home page on your device. However, it doesn’t remove any of the app instances.
Hence, to correctly carry out this method, follow the steps below:
- First, exit the Netflix app and close it by removing it from your Recent Apps or App Switcher. If you’re using Android devices or other set-top boxes, you can Force Stop the Netflix app through your Settings app.
- Then, relaunch the Netflix app from your homepage or app list.
8. Close Unused Apps and Web Browser Tabs (PC)
Additionally, it’s also important to close any unused apps or browser tabs when streaming Netflix. There are two reasons for this:
Firstly, another app on your device or tab on your web browser might be playing audio and hogging or occupying your audio device. Moreover, some devices can only play one audio at a time. Consequently, it gives the misconception that your Netflix movies aren’t outputting any audio.
Secondly, browser tabs and apps that are open (although not in use), tend to take up the memory and processing power of your device. However, Netflix also requires a certain amount of free system resources to run smoothly and correctly. Hence, the number of resources available can directly affect the performance of Netflix. When there aren’t enough system resources, it can lead to Netflix sound problems when streaming.
Hence, you need to free up as many resources as possible by closing any unused apps and browser tabs on your device before streaming. There are two ways to close browser tabs:
The first method is to close browser tabs using the X button located at the side of each tab. This method allows you to choose which browser tab you would like to close.
![]()
Another way is to close the entire browser app. This step can be executed by clicking the X button located at the top-right corner of the browser interface.
![]()
9. Reboot Your Netflix Streaming Device
Additionally, we also suggest taking an additional step and restarting your streaming device. This step involves turning off your streaming device and then turning it back on. Basically, it’s a general step that can be applied for various devices such as PCs, Smart TVs, set-top boxes, mobile phones and gaming consoles.
The purpose of this step is to clear the device memory. The reason is that when your device runs for long periods of time, there are many things loaded on the device. Most of these programs stay in the RAM. This temporary storage speeds up the process of accessing used apps compared to launching them for the first time in a new session. However, it also increases the risk of their RAM getting filled up.
Back in the days without Smart TVs, it was only a concern for PCs. However, with new technology implemented on TVs, more memory is used on TVs as well. Therefore, a restart is necessary to clear out any issues.
For Android devices: Press and hold the power button until the restart or power off option appears. Tap the Restart option, and you are all set!

For iOS devices: Press and hold either the volume button and the side button until the power off slider appears. Then, drag the slider and wait 30 seconds for your device to turn off. To turn your device back on, press and hold the side/power button (on the right side of your iPhone) until you see the Apple logo.

Power Cycle your Streaming Device
In some cases, certain devices require unplugging, which is also known as power-cycling. It is typically conducted on devices connected to an electrical outlet 🔌. This is because power can still be supplied from stored charge in the capacitors in your device.
So, to reset the power source and flush these energy storage units in your streaming device, it can only be done through power-cycling. A full hardware shutdown and reset does the trick most of the time. If it doesn’t, you should move on to the next solution.
On that note, to power-cycle your streaming device:
- For starters, turn off the device you’re streaming Netflix from and switch off your TV.
- Next, unplug all the cables, mainly the power cord and HDMI cable.
- Then, wait for about 1-2 minutes before plugging the wires back correctly and turning on your device and TV.

10. Check and Improve Your Internet Connection
Another possible cause leading to Netflix audio problems is a poor or unstable Internet connection. This scenario can be observed as a distorted screen or desynchronized audio when playing Netflix titles.
When streaming on Netflix, it’s important to ensure that your Internet speed is at least 3 Mbps for the standard definition quality. So, meeting Netflix’s minimum Internet requirements can help to ensure a good playback quality that’s free from audio issues.
Moreover, as the playback quality increases, the minimum amount of Internet speed needed also increases. For example, streaming Netflix on HD quality would require at least 5 Mbps while streaming on 4K quality will need up to a minimum of 25 Mbps. Hence, if the speed of your internet connection is low, your audio and video may become out-of-sync at times.
Test the Internet Connection Speed
While you may have subscribed for an Internet plan of 5 Mbps, you aren’t guaranteed a consistent delivery of 5 Mbps Internet speed. Therefore, we suggest checking your Internet speed for any speed drops or latency.
To do so, you can try this Internet speed tester Fast.com, which is created by Netflix themselves. It’s a quick and easy process where results are produced almost instantly!

From there, perhaps you realized that your Internet speed is slower than usual. In that case, you can proceed to the following steps to improve your Internet connection:
Steps to Improve Your Internet Connection for Netflix Streaming
Switch Between Mobile Data and Wi-Fi
For starters, you should try switching between mobile data and Wi-Fi when you experience connection issues while streaming Netflix titles. This step is for two reasons:
One, it can help to identify whether the source of the Internet is the cause of the Netflix audio issues. Secondly, you can get connected to the more stable Internet source provided at that point of time. Generally, your mobile data should be more stable than your Wi-Fi, owing to there being a lack of broadband infrastructure. However, your mobile data may also be down occasionally due to problems at the 4G towers.

Forget and Reconnect Your Wi-Fi Connection
In cases where you don’t have to access your mobile data, you can only rely on your Wi-Fi connection. Therefore, to handle these situations, we suggest these fixes to improve your Wi-Fi connection.
Firstly, you can try reconnecting to your Wi-Fi connection. You can simply do so by turning the Wi-Fi setting off and on again via the notification shade.
This step can be taken further by forgetting your Wi-Fi network on your streaming device before reconnecting. This clears all the saved data regarding the connection (i.e. saved ports, password, configurations, etc.), so your device can reinitialize these settings again.
To do so, follow these steps:
- To start, go to your device’s Settings.
- Then, select the Wi-Fi option.
- Next, click on the Wi-Fi you’re connected to.
- Subsequently, choose the Forget this Network option.
- After 2 to 3 minutes, reconnect to the Wi-Fi again.

Adjust Your Internet Router’s Position
Another method you can try is repositioning your Wi-Fi router. This method aims to ensure good Wi-Fi signal strength 📶 with minimal interference. There are two factors that can cause Wi-Fi interference.
For one, physical barriers may be blocking your Wi-Fi signal preventing the Wi-Fi signals from reaching your device. In that case, we recommend moving your router to a central location. The reception at these locations are typically at their optimum levels. Furthermore, you should avoid hiding your router behind furniture such as a sofa or shelf. It is best to elevate your router off the floor, such as putting it on a bookshelf or desk, for better reception.

Secondly, frequency interference can also cause Wi-Fi interference. This means that there is another signal 📡 with a similar bandwidth crossing paths with your Wi-Fi signal. This signal can end up corrupting, overpowering, or cancelling your Wi-Fi signal. Common devices that cause bandwidth interference are wireless devices such as cordless phones and microwaves. Therefore, you have to keep them away from your router.
Power-Cycle Network Devices
Moreover, we recommend power-cycling your Internet or Wi-Fi router. This step is another method to improve your Internet speed by cooling down your router, removing cache, and reconfiguring your Wi-Fi.
Therefore, to power-cycle your Internet router:
- First, turn off and unplug the power from your modem or router.
- Then, wait approximately 30 seconds.
- Subsequently, reconnect the power source to the router or modem and wait for it to connect to the Internet.
- Lastly, connect your streaming device to the Wi-Fi and try streaming Paramount Plus again.

Ensure Ethernet Cable is Properly Connected
Suppose you’re streaming on a Smart TV or computer. Then, it’s better for you to use a wired connection from your device to the Internet router via an ethernet cable. This is because an ethernet cord provides a more stable and secure internet connection. It can transmit data over a wired connection without any interruptions or disconnections. On the other hand, Wi-Fi is more susceptible to interference as it transmits data via wireless signals.
However, when using an Ethernet cable, it’s important to ensure that it’s properly plugged into your device. A loose Ethernet cable will not be able to transmit data to your device correctly either, leading to an unstable connection and audio issues on your Netflix stream. Additionally, another wiring you should check for is the wire connected to your router.

Disconnect Bandwidth Hogging Devices From Your Wi-Fi
Next, you should check for any other devices connected to the same Internet connection. The reason is that when more than one person or device is using the internet connection, the connection speed can get limited. Consequently, the Internet speed will decrease for each individual.
Hence, we recommend getting others to pause their network activities temporarily while you’re troubleshooting your Netflix audio issue. You’ll get as much bandwidth as possible for streaming Netflix for more accurate results.

Turn Off HD Streaming
Another Netflix feature that consumes high amounts of bandwidth is HD Streaming. When streaming in HD quality, suppose the bandwidth allocated to you isn’t enough. Then, you’ll encounter Netflix audio issues such as the audio being out-of-sync.
Therefore, we recommend turning off HD streaming for the time being to identify if it’s the cause for your audio problems. Once you have access to higher internet speeds, then you may re-enable it.
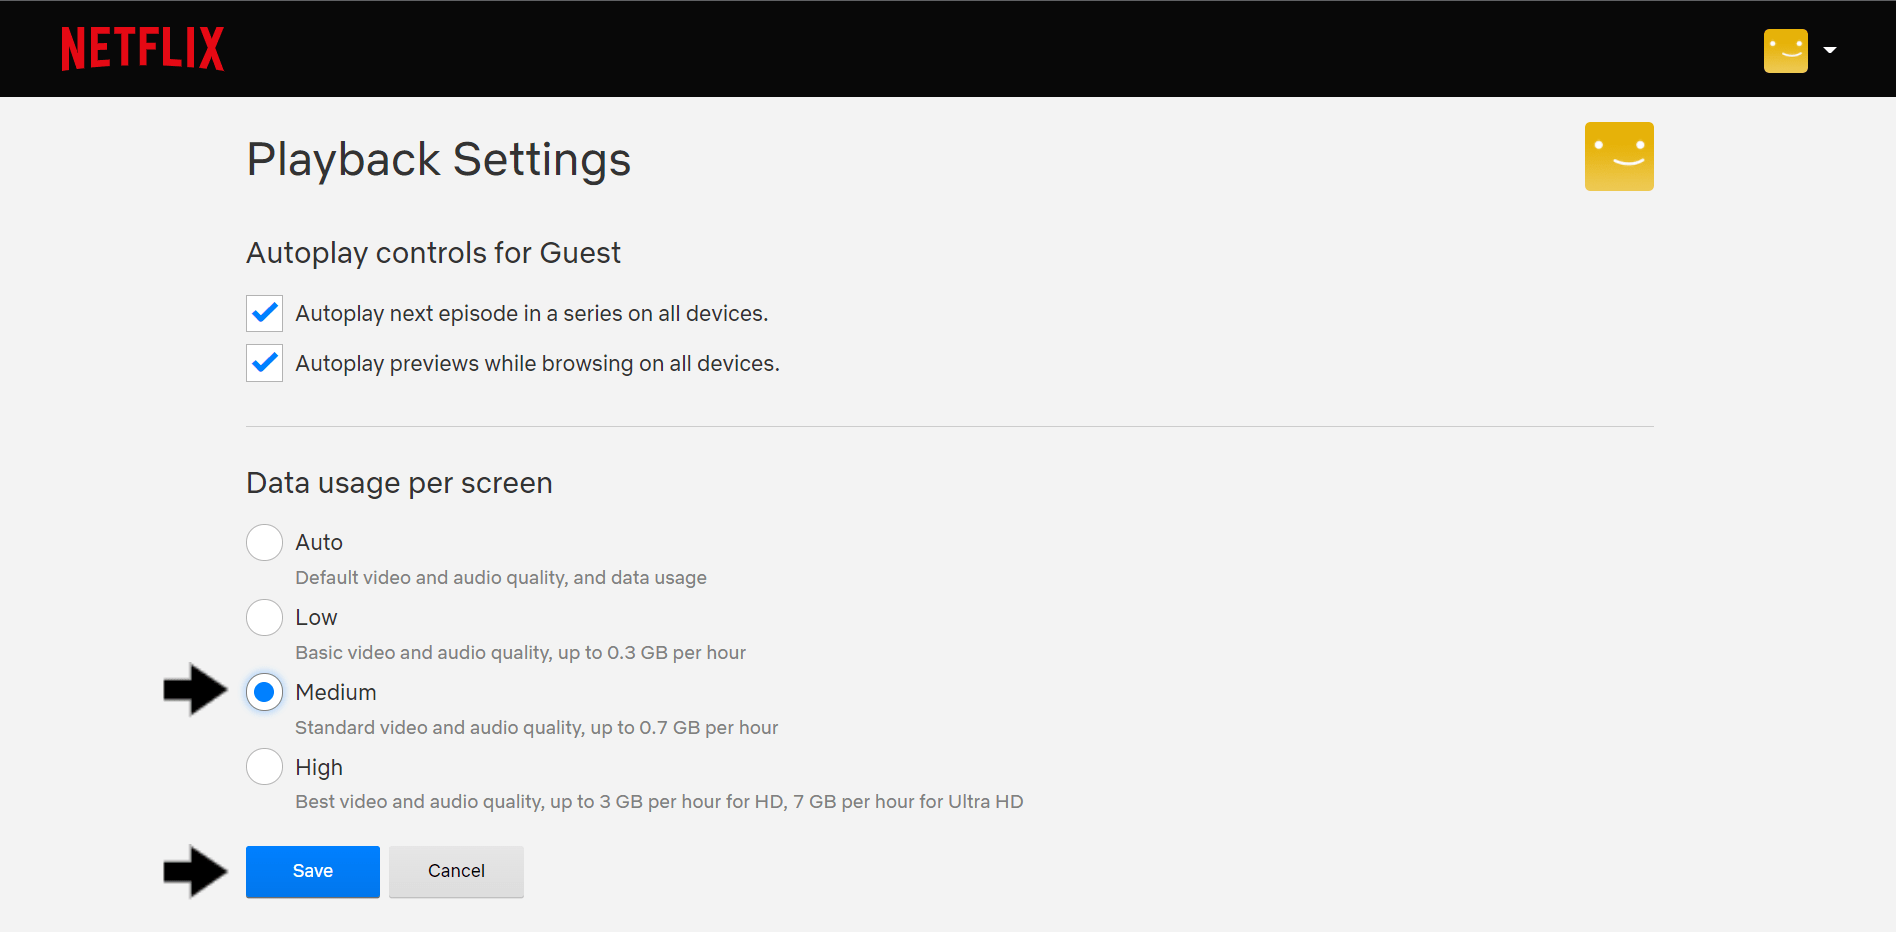
To disable HD streaming on Netflix, the method to do so is provided below:
- First, launch the Netflix app or web page.
- Then, hover over your Profile icon at the top-right.
- Next, choose Account.

- Subsequently, head to the Profile and Parental Controls section.
- After that, select and expand the profile you want to edit.
- Then, click the Change button next to Playback Settings.

- Under Playback Settings and Data usage per screen, check the Medium option.
- Lastly, Save your changes.
Once you’ve changed the settings, try playing any Netflix title and checking if the audio is working again. If it isn’t, repeat the same steps but change the quality to low this time. Then, verify if the problem persists. If it does and you still experience sound issues on Netflix, you may move on to other fixes in this post.
11. Try Testing Audio Stream on a Different Netflix Title
Another fix that we recommend is testing the audio stream on another Netflix movie or TV show. You can do so by randomly picking another Netflix title on the platform. The purpose of this step is to help you identify whether the problem is with the original/initial title you selected.
This is because certain titles on Netflix can encounter problems with the content. Hence, they become unplayable or malfunction during playback. For higher accuracy, we suggest repeating this fix and trying out more than one other show.

Suppose you encounter the same issue for every title you stream. Then, it’s most likely a problem with your device. In that case, you should try out the other recommended fixes.
On the other hand, perhaps other titles play without any such audio issues. Then, we recommend heading over to Step 35 and reporting the issue to Netflix to clarify the reason behind the error.
12. Change the Netflix Audio Settings
When streaming on Netflix, you’re allowed to configure the video, audio and subtitles for each title as Netflix has them in separate containers. There are a few common audio options provided by Netflix that are available in your native language with either 2.0, 5.1, or Atmos.
However, sometimes there is no audio when streaming on Netflix because the video is being set to a sound option that isn’t supported by your device. In that case, you should check the audio settings on Netflix and change them if necessary.
For one, Netflix always chooses stereo 2.0 audio by default. However, not all of us are streaming Netflix movies on our mobile phones or computers that use stereo. Therefore, if you’re watching Netflix on a Smart TV or game console, you may experience poor or no audio at all.
Requirements for Netflix’s 5.1 Surround Sound Audio Settings
Moreover, you may also experience audio problems if you’ve selected the 5.1 surround sound option as there are a few requirements your device has to meet. For one, the Netflix title itself must have the 5.1 audio available. However, not all titles have a 5.1 or Atmos track. Titles that support surround will display either a Dolby Digital Plus icon or a 5.1 icon on the movie/tv show description page.
Even so, not every episode or season of a 5.1-supported TV show will have 5.1 available. Hence, you’ll need to test the availability of later seasons as well. In addition, downloaded titles accessed offline also don’t support 5.1 audio for the time being.

Secondly, you also need to make sure that your device is compatible with a 5.1 or Atmos movie. Currently, 5.1 surround sound is not supported while streaming on a PC with Microsoft Silverlight or HTML5. However, it’s supported on the Netflix app for Windows 8 and Windows 10. For more information on the 5.1 surround sound setting on Netflix you can check out their guide here.
To check if your device supports this feature, you can look for the 5.1 audio option on any Netflix original title. Plus, you also need a receiver that supports Dolby Digital Plus and a connection speed of 3.0 Mbps or faster. To know more about Netflix’s Dolby Atmos feature, you can read the article here.
Steps to Set the Netflix Audio Settings to 2.0 or Non-ATMOS
Suppose your device doesn’t support the 5.1 audio or you’re facing audio issues when your audio settings are set as 5.1. In that case, you should try changing your Netflix audio settings.
The steps to do so are as follows:
- For starters, launch the Netflix app.
- Then, play any movie or TV show.
- Next, move your mouse over the screen. A toolbar will appear at the bottom of the screen.
- Subsequently, click the Dialogue icon. A menu will appear.

- From the menu, check if Surround sound (5.1) is selected. If yes, choose any other non-5.1 option available.
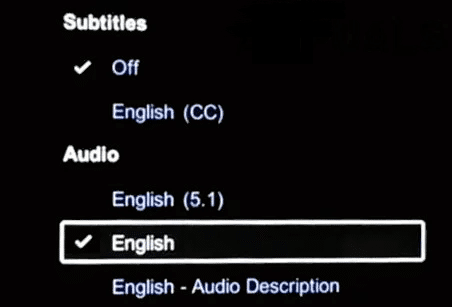
- Finally, replay the stream.
13. Set the Audio to Studio Quality (Windows)
Moreover, we also suggest changing your device’s audio settings to studio quality when running in shared mode. Audio formats are written as bit depth, sample rate. For example, 16 bits, 48000 Hz. Studio quality audio refers to an audio format with a higher bit depth and sample rate.
Here’s what goes on in the backend…
Sound or audio itself is a continuous wave represented as analog signals ∿. However, the computer can only understand digital signals, namely in binary with only 0 and 1s. Therefore, it has to convert the analog signal to the digital domain. It’s accomplished by capturing a rapid series of short samples of a specified size at a fixed rate. Each audio sample will contain an instantaneous amplitude level. This amplitude level undergoes a process called quantization to produce the value of the nearest measuring increment. Consequently, a copy of the original waveform can be produced by repeating these steps at the same rate and order.
What is Sample Rate and Bit Depth?
The sample rate is the rate of capture and playback. Whereas the bit depth is the number of bits used to describe each sample, also known as sample size. So, this bit depth determines the precision of values about each sample. The reason is that with a higher bit depth, the converter doesn’t have to quantize as much to obtain the nearest measuring increment.
If the bit depth is too low, information will be lost and the reproduced sample will be degraded. For instance, a 16-bit depth can contain any one of 65,536 unique values. However, a 24-bit depth provides a higher range up to 16,777,216 unique values. Moreover, for the sample rate, it has to be greater than twice the highest frequency of the signal being sampled. If a lower sampling rate is used, the original signal’s information may not be completely recovered in the sample signal.
Steps to Set and Reconfigure the Audio Settings to Studio Quality
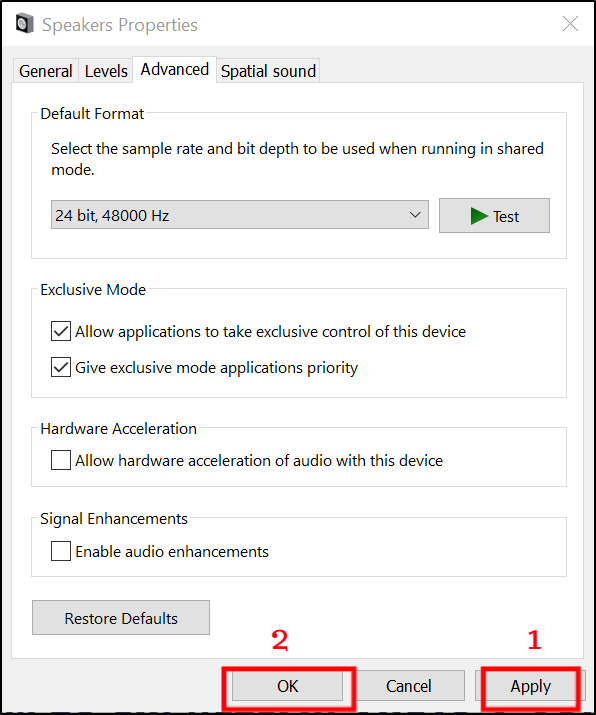
With all that said, when adjusting your device’s audio settings, we recommend choosing the option with both the highest bit depth and sample rate. The instructions for changing your audio settings are given below:
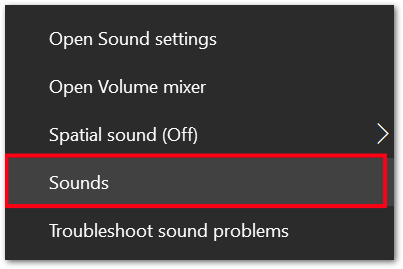
- First, right-click the Speaker icon located at the lower-right corner of the taskbar.

- Next, choose Sounds. This option may appear as Playback devices if you’re using Windows 8 and below.
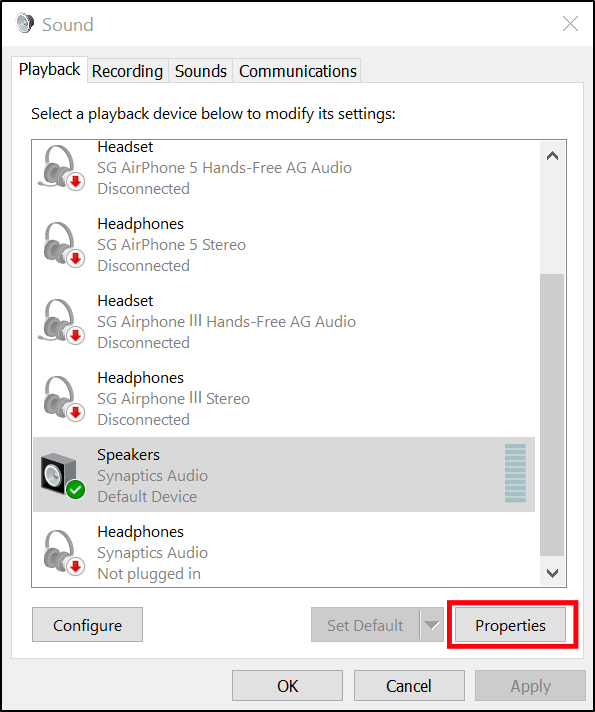
- Then, select the Playback tab and select your playback device. In this case, we’ll be choosing the Speaker option.
- After that, open Properties.
- Under Speaker Properties, go to the Advanced tab.
- Subsequently, under Default Format, select the 24 bit, 48000 Hz (Studio Quality) option.
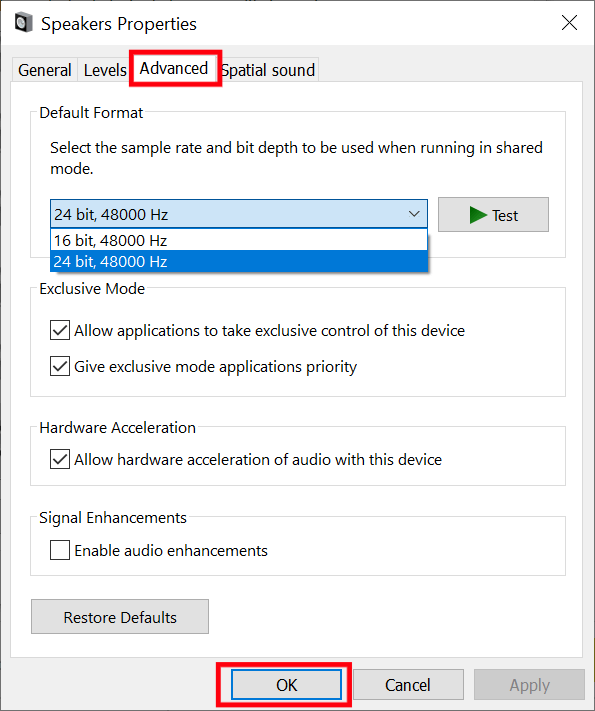
If you’re on Windows 8 or below, you may be given more options. In that case, you can choose the 24 bit, 192000Hz option instead.
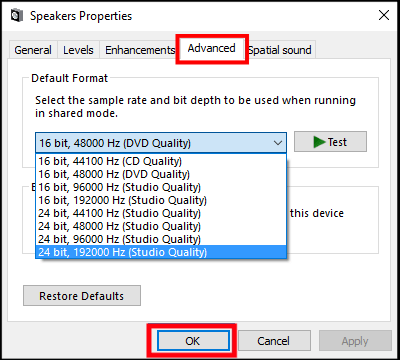
- Finally, click OK to save this setting.
14. Enable Lip/Sync/Audio Output Delay (Smart TVs)
For Samsung Smart TVs, the newer versions tend to have an audio problem where there’s a long delay between the audio from the TV speaker and the TV connector. This situation occurs when the two are connected using a Toslink cable.
By default, the audio delay setting is set to (“40”) for Samsung TVs. This means that the streamer signal may arrive approximately 40 to 50 milliseconds earlier in the hearing aids than the signal from the TV speakers. As a result, the sound does not match the picture on the screen when streaming Netflix programs.
Therefore, to sync the audio from the TV connector and the TV speaker, we suggest setting the audio output delay to 100 milliseconds instead. The general steps to do so are as follows.
Note: These instructions will differ slightly for different users and TV models. So, you’ll have to dig deeper to make it work for your device.
- First, launch the Settings menu on your TV and open Sound.
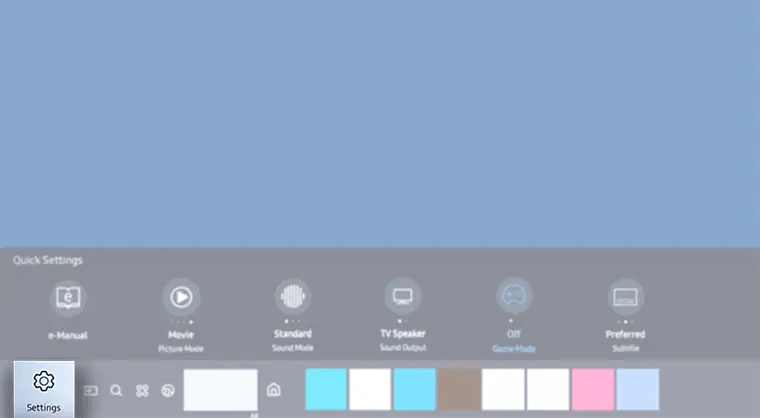
- Then, under Sound, go to Expert Settings.
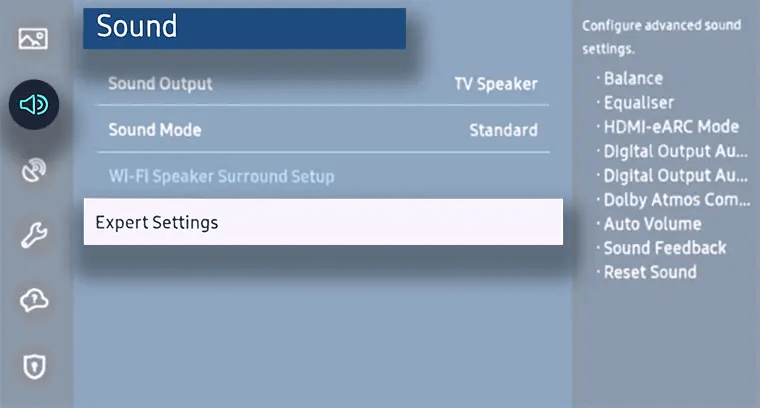
- From there, find the Audio Output Delay option.
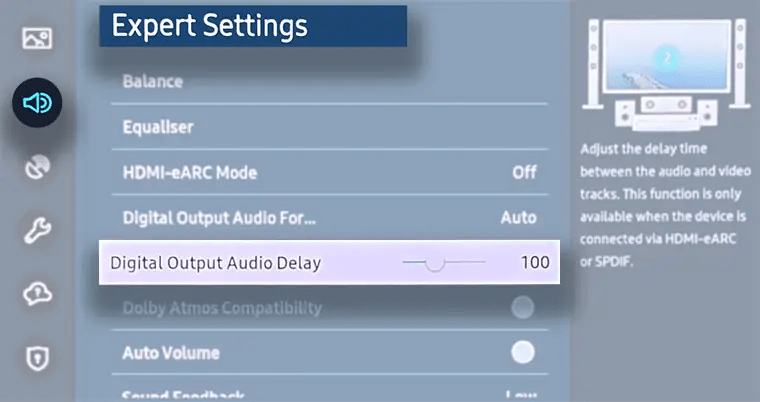
- Lastly, set the value 100ms for the Digital Output Delay

For Other Smart TVs (Sony, LG)
You can also find this feature on other Smart TVs such as the Sony and LG TVs. For LG TVs, the steps are similar to those for the Samsung TVs. You’ll find this feature named as Lip Sync in your LG TV’s settings. However, the steps to enable the A/V Sync feature are different for Sony TVs.
For Sony TVs, you’re either supplied a remote control with a System Menu button or an Options button.
- Firstly, on the supplied remote control, press either the System Menu button or the Options button.
- Then, press the up arrow or down arrow button repeatedly until A/V SYNC appears in the front panel display.
- Next, press the Enter button.
- Subsequently, adjust the delay between the picture and sound. For the System Menu remote controller, this is done by pressing the up arrow or down arrow button. In contrast, press the left arrow or right arrow for the Options remote control. At this point, you can adjust between 0 millisecond (ms) to 300 ms.
- If the sound is slower than the picture, adjust the A/V Sync setting to 0 ms.
- If the sound is faster than the picture, adjust the A/V Sync by starting at 0 ms and moving towards 300 ms until the issue is resolved.
- Then, press the Enter button to confirm selection.
- Finally, press the System Menu or Options button to exit the menu screen.
Note: Not all Smart TVs have the ability to adjust the synchronization between audio and video using the A/V sync feature. You can find more information by referring to your respective Smart TV user guide or through a quick Google search. Furthermore, you should also ensure that the latest software update has been downloaded and installed on your Smart TV (Step 27).
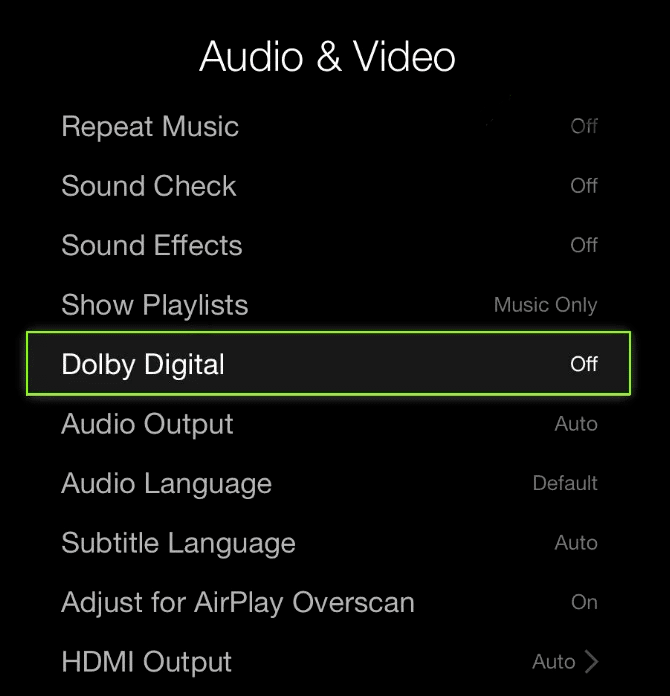
15. Disable Dolby Digital (Apple TV)
Next, another sound setting that may cause Netflix audio problems is the Dolby Digital audio enhancement feature. While it can provide an overall better audio quality when streaming, it isn’t compatible with all Netflix titles.
Some Netflix titles don’t support Dolby Digital, also known as the 5.1 labels (as explained in step 12). Hence, when playing these Netflix movies with Dolby Digital enabled, it can lead to audio problems, such as losing sound halfway through the show or bad sound quality.
Therefore, we suggest disabling Dolby Digital if the title you’re streaming doesn’t support it. You can find the information on the movie’s description page. As for turning off Dolby Digital, the steps are as follows:
- For starters, head to the TV Settings.
- Then, select Audio & Video.
- Finally, locate the Digital Dolby feature and turn it Off.
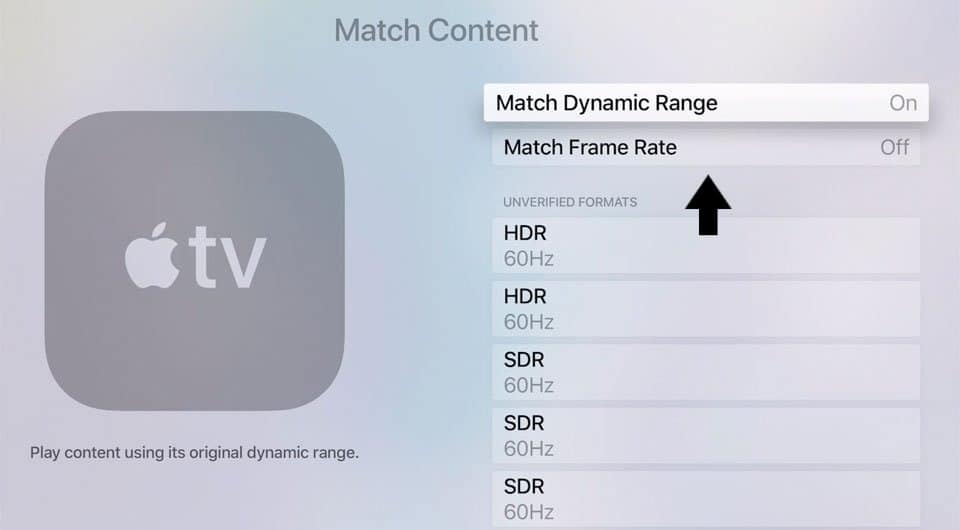
16. Disable Match Frame Rate (Apple TV)
Another setting that may be resulting in Netflix shows having no sound on your Apple TV is the Match Frame Rate feature. By default, your Apple TV will match the dynamic range to the highest refresh rate supported by your device. For example, suppose your Apple TV supports both Dolby Vision at 30 Hz and HDR10 at 60 Hz. So, the Match Frame Rate feature will automatically use HDR10 instead of Dolby Vision.
This feature can also be configured to switch the display format based on the frame rate supported by the content you’re viewing. For instance, when streaming Netflix HDR content, your Apple TV switches to HDR10. In contrast, when watching content that supports Dolby Vision, it switches to that display format instead.
However, during content matching, you may experience problems such as flickering as your television switches between formats. Moreover, occasionally, your Apple TV can’t determine which display formats are available, leading to desynchronization and audio problems. In this case, you’ll need to verify a format and run short display tests to check for compatibility.
However, for now, we suggest disabling the match frame rate feature altogether for your convenience:
- For starters, launch Settings.

- Then, select Video & Audio.

- Next, select Match Content.
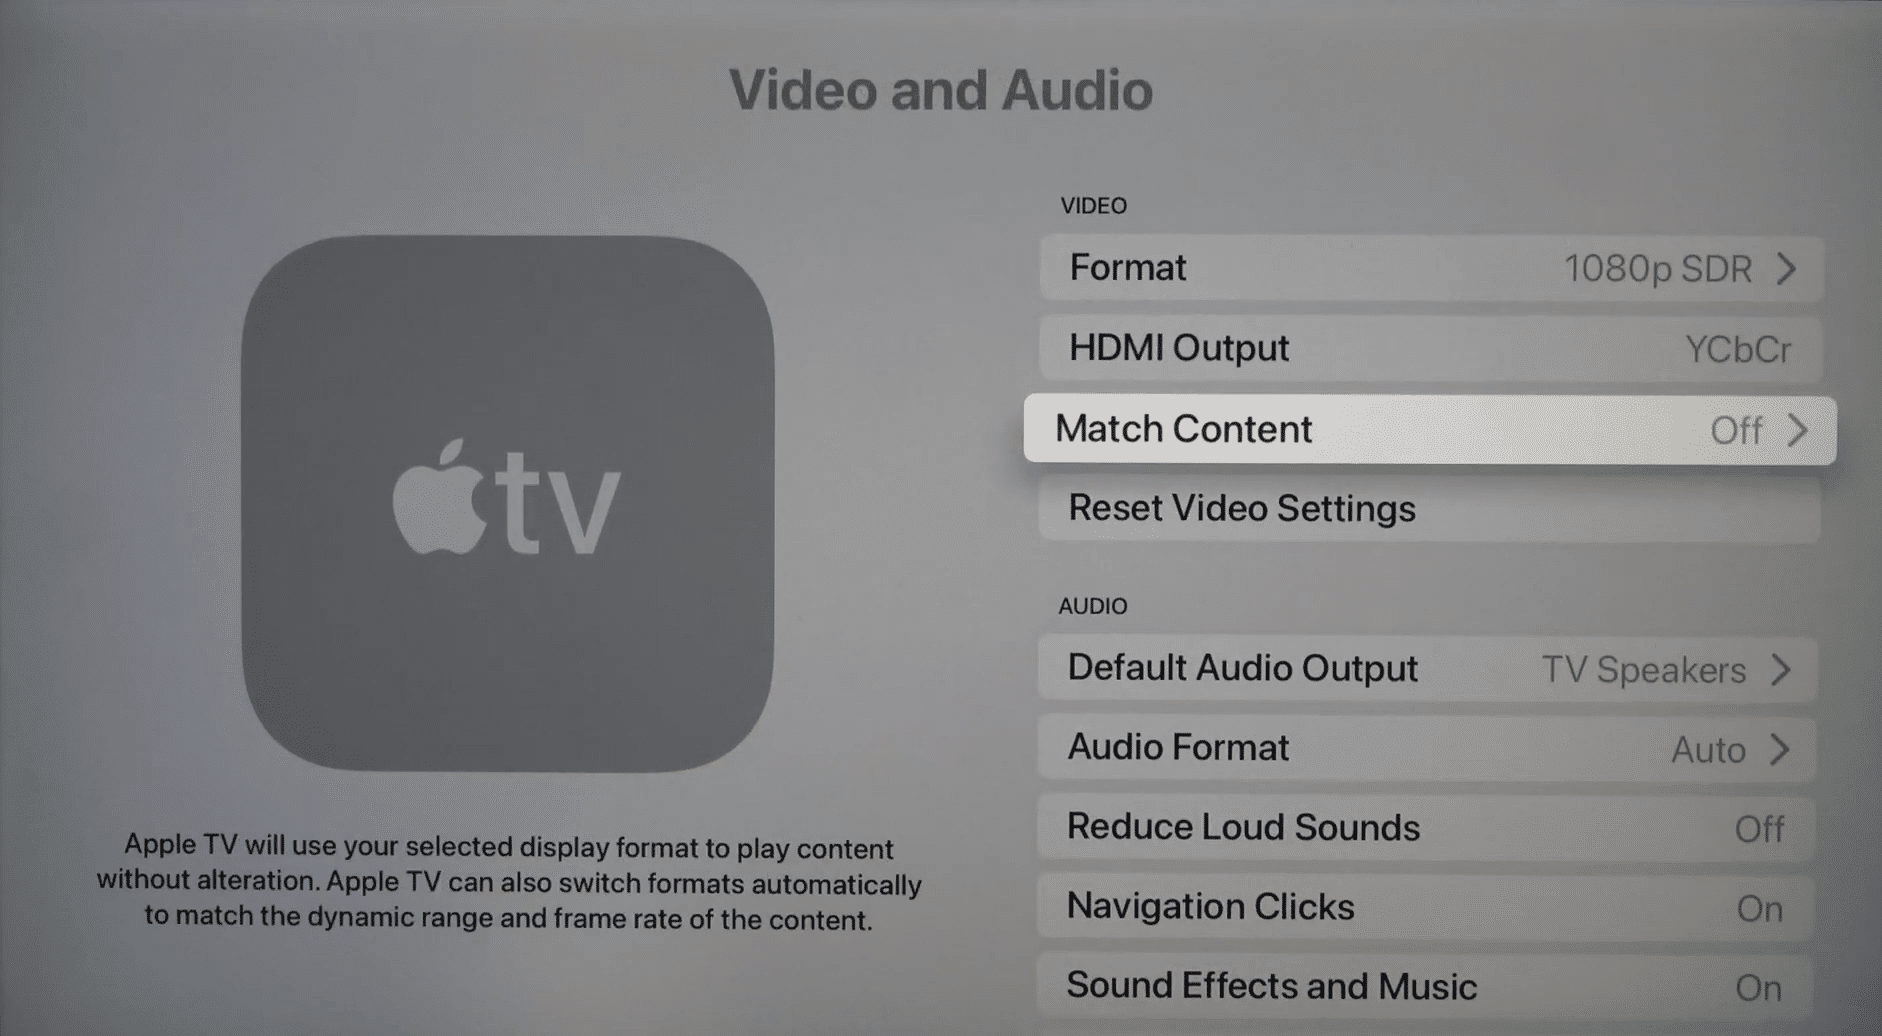
- Finally, locate and disable Match Frame Rate.
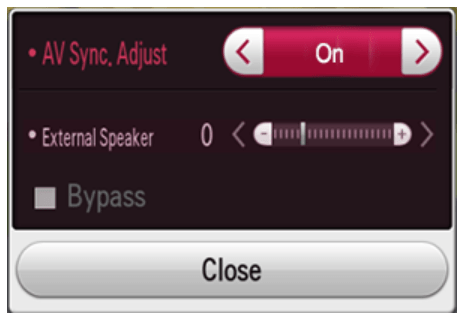
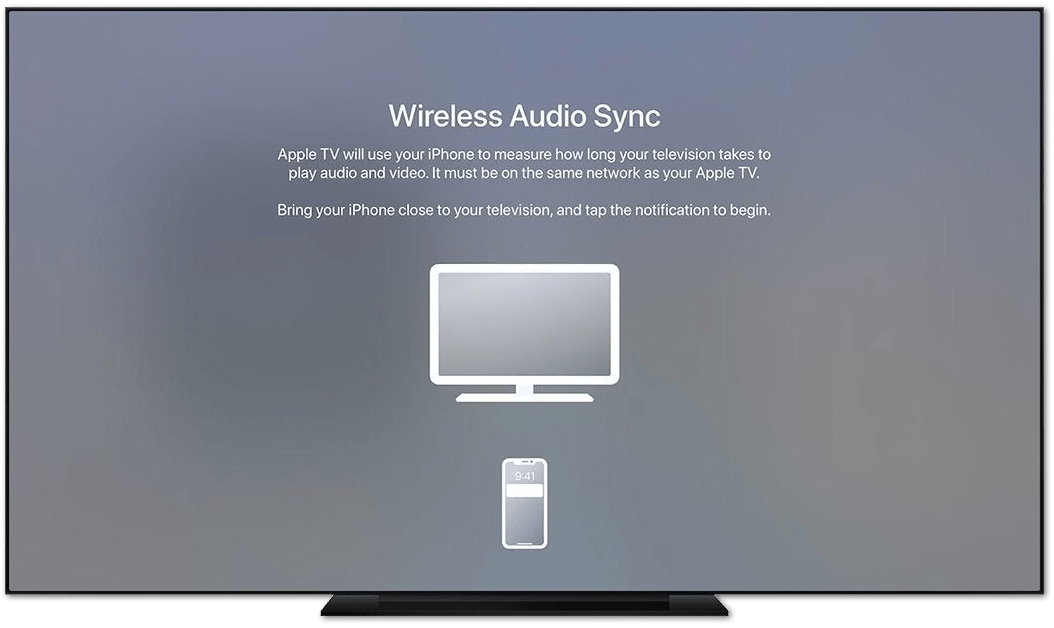
17. Calibrate the Wireless Audio Sync (Apple TV)
Next, suppose you’re streaming Netflix on your Apple TV with an external audio device plugged in. However, the audio produced is out-of-sync. In that case, you can also use the Wireless Audio Sync feature on your Apple TV to help resolve Netflix’s audio problems. This feature allows your headset to identify and correct audio problems that occur when your Apple TV uses secondary speakers.
So, to calibrate the Wireless Audio Sync on your Apple TV, follow these steps:
- For starters, launch Settings.
- Then, select Video & Audio
- Next, open Format and set Dolby Vision to 24Hz.
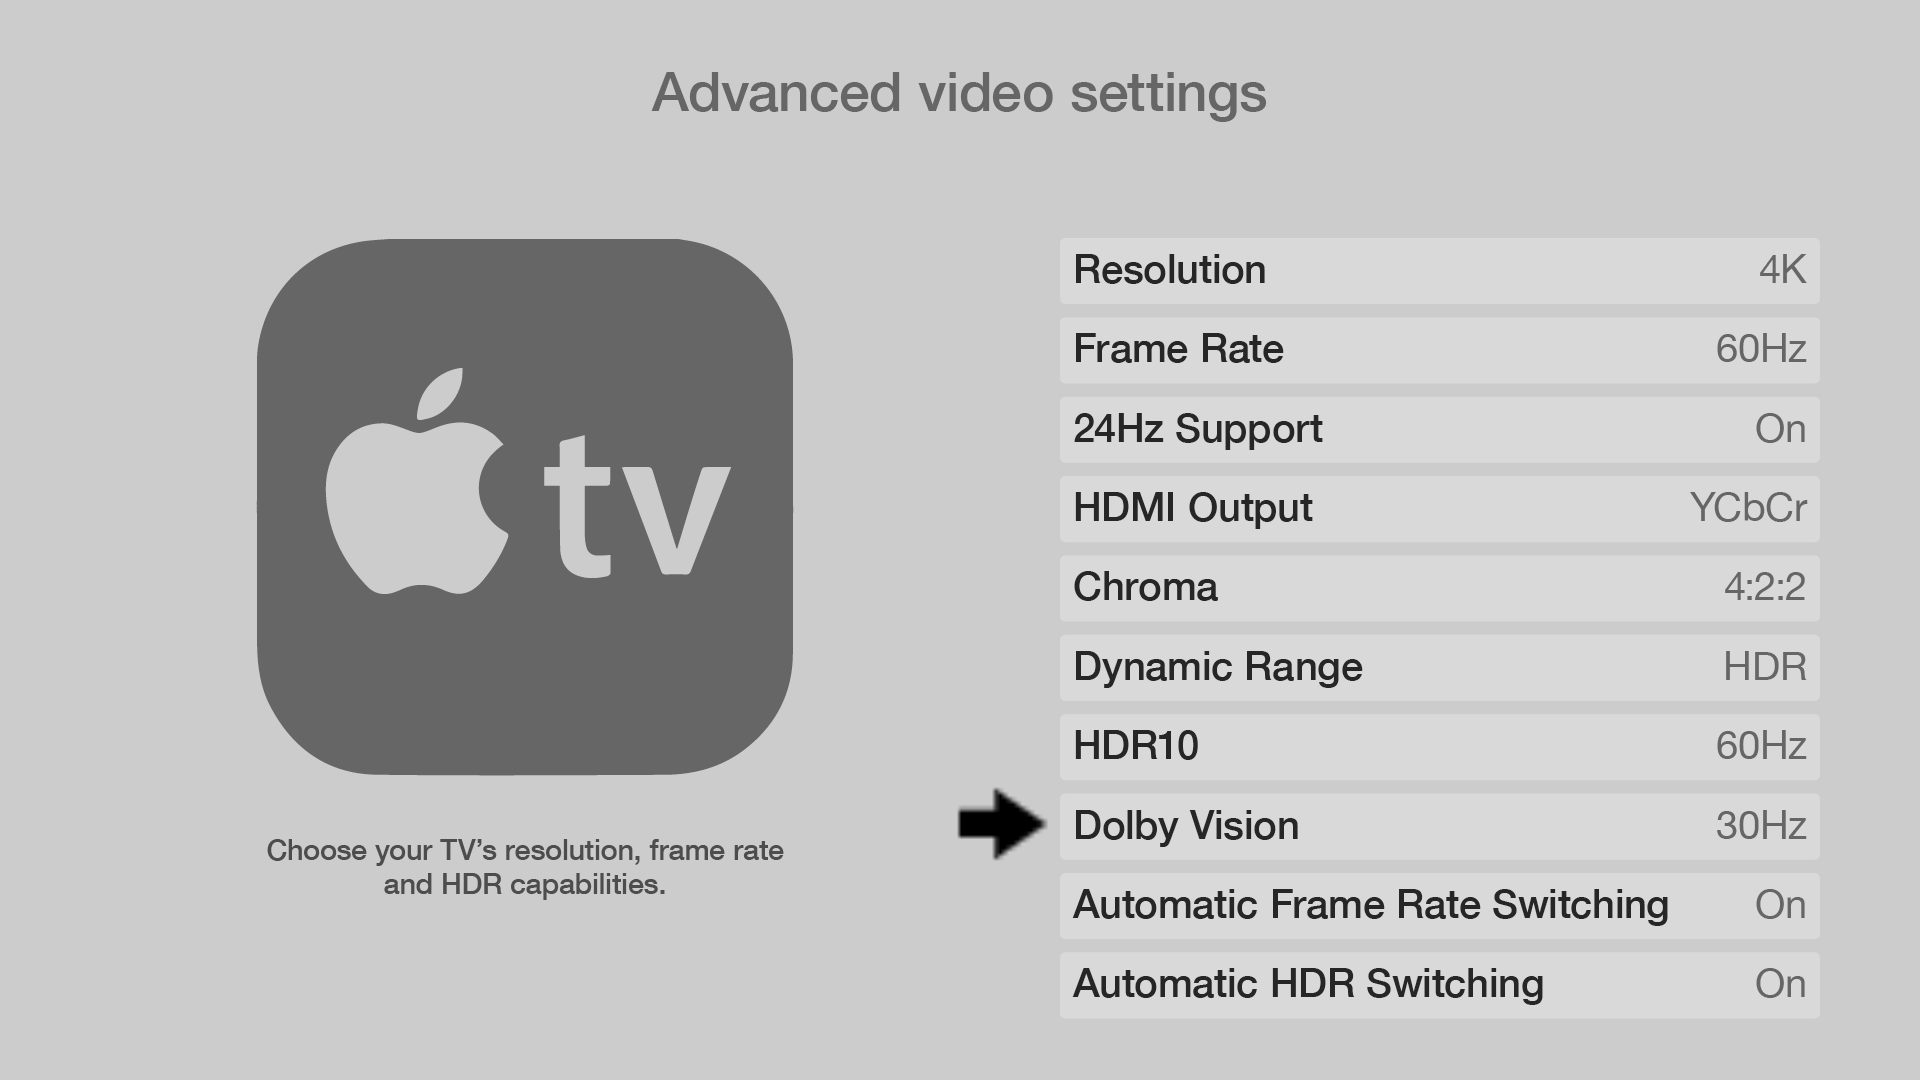
- After that, run Wireless Audio Sync. This option may also appear as Calibrate instead.
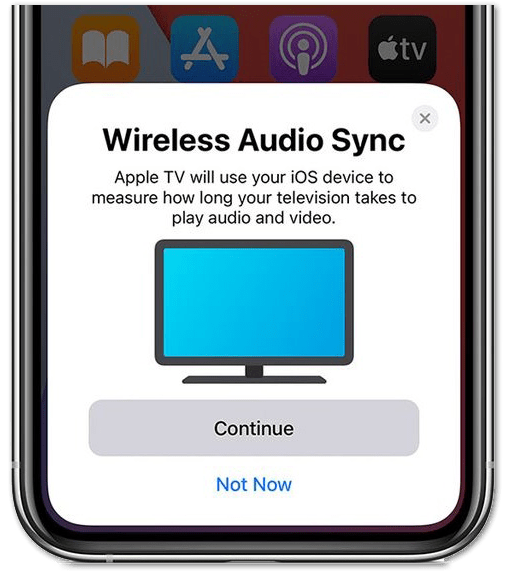
- Finally, follow the on-screen instructions to complete the process.
18. Deactivate Volume Mode (Roku)
For those of you who are streaming on your Roku TV device and face Netflix audio problems, this fix is for you! Roku TV has built-in audio devices like the Roku Streambar that aims to improve the audio performance. It also gives you the option to adjust your listening experience based on your preferences.
One of the audio settings available is the Volume Mode setting. It provides automatic leveling and night mode to lower the volume during loud scenes and boost the volume of quieter scenes. However, sometimes this feature backfires and gives you the impression that your Netflix movie keeps losing sound at certain parts of the movie.
Hence, to determine whether that is the case, we recommend deactivating the Volume Mode setting by following the instructions below:
- First, start streaming any movie or TV show on Netflix.
- Then, on the Roku Remote, press the * key.
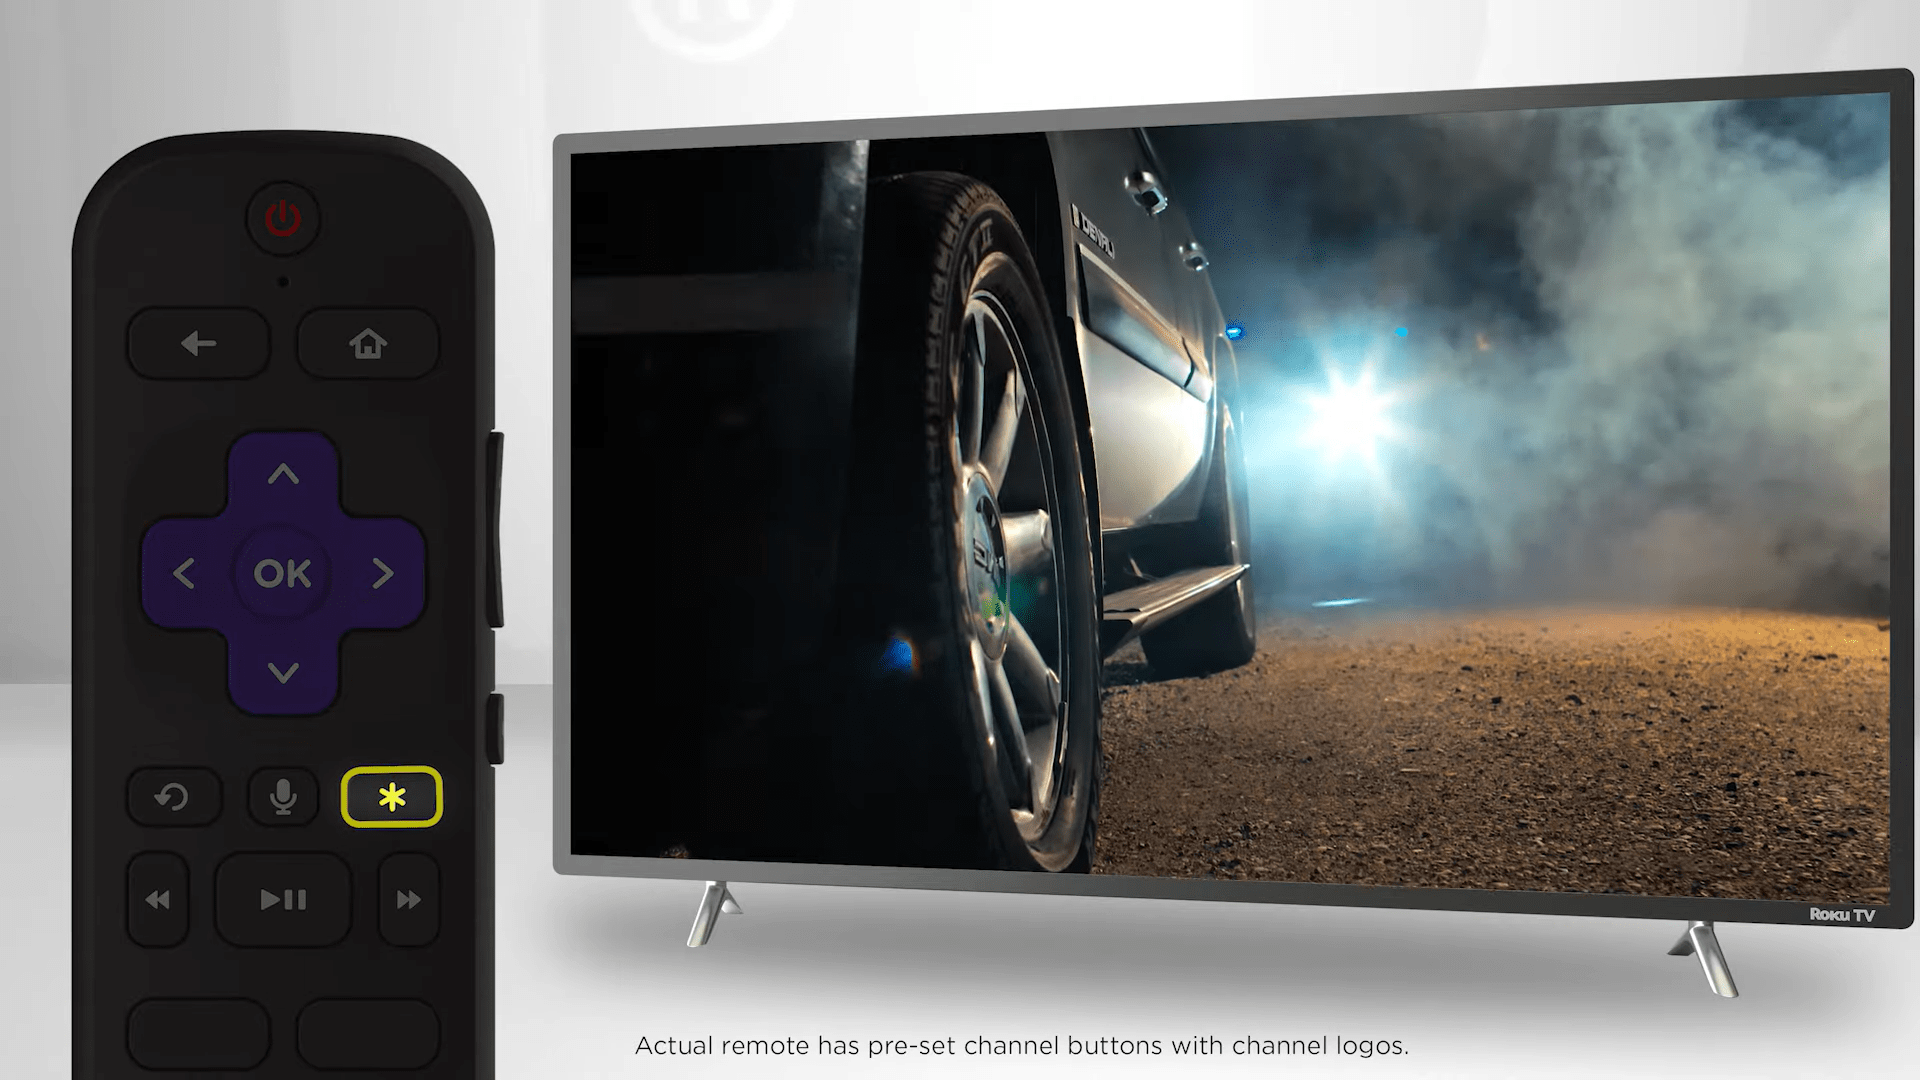
- Next, open Sound Settings and steer to Volume Mode.
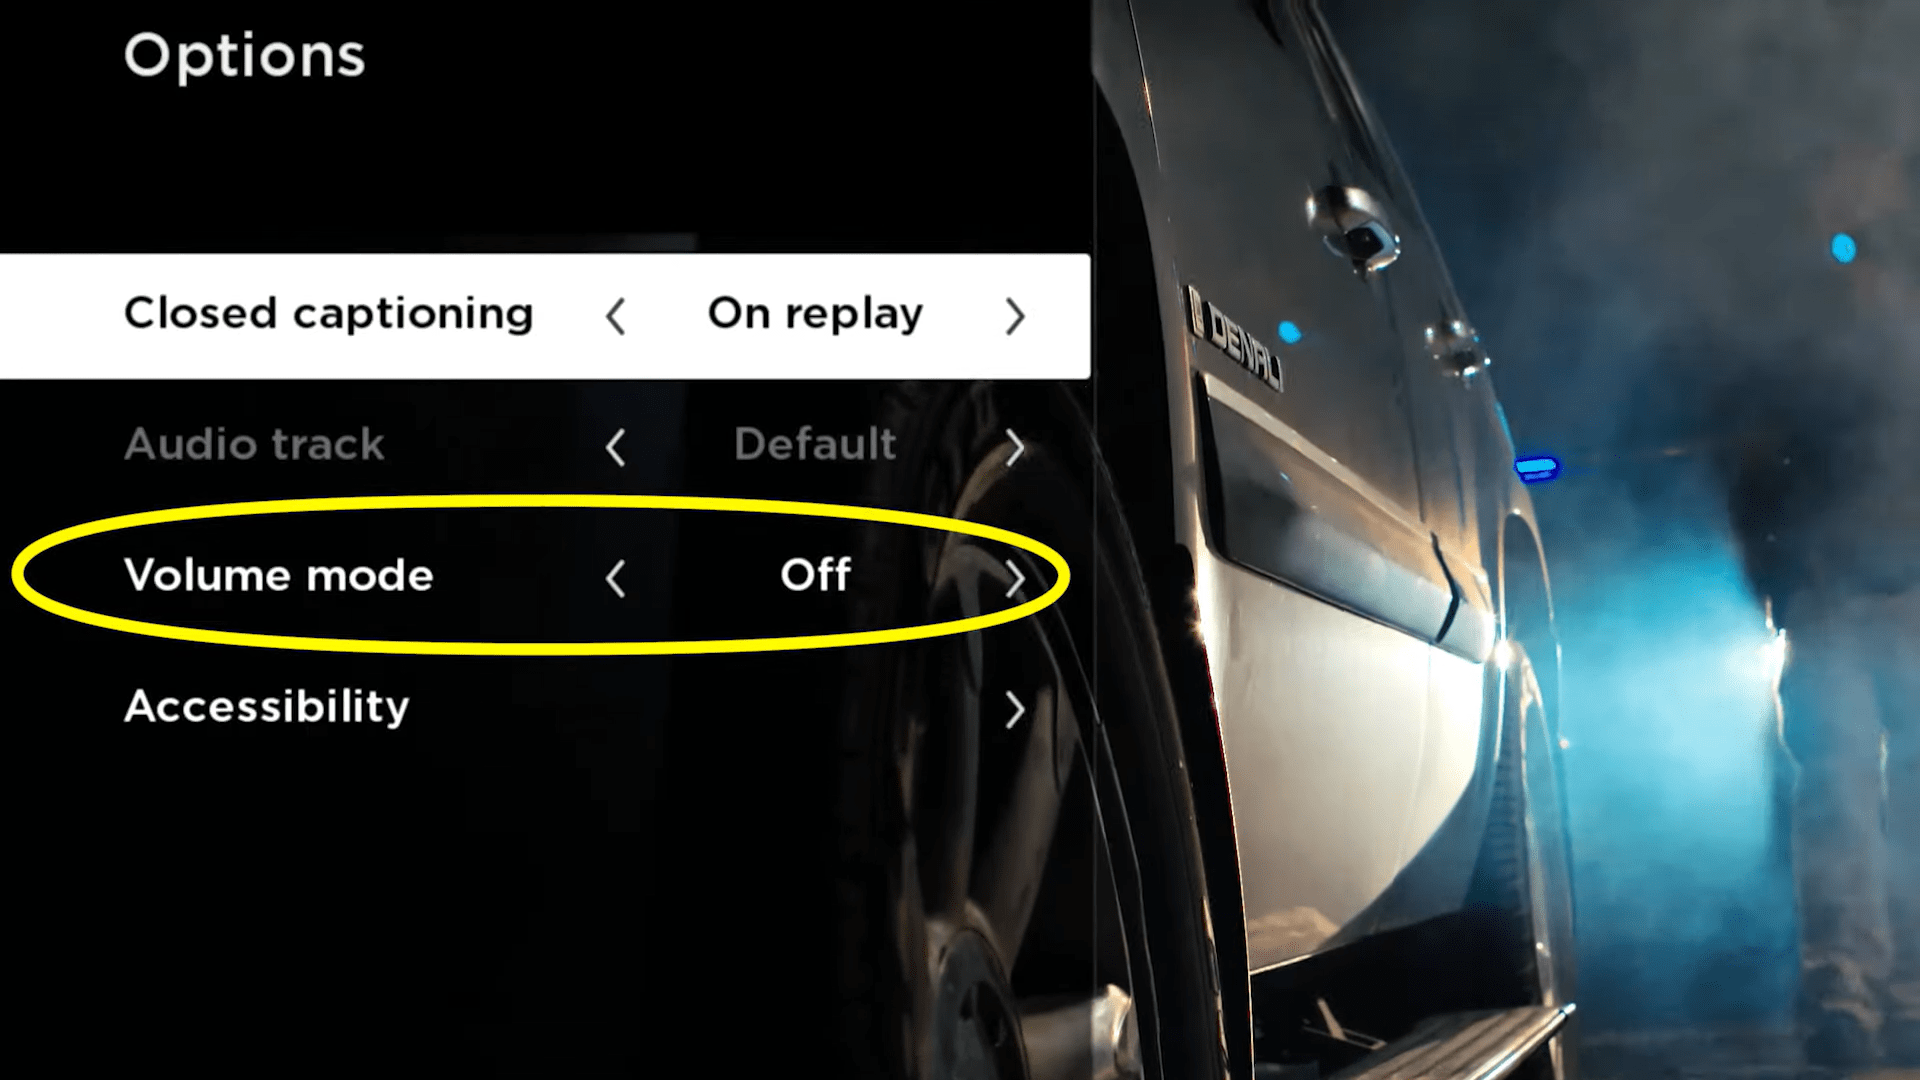
- Subsequently, set it to Off.
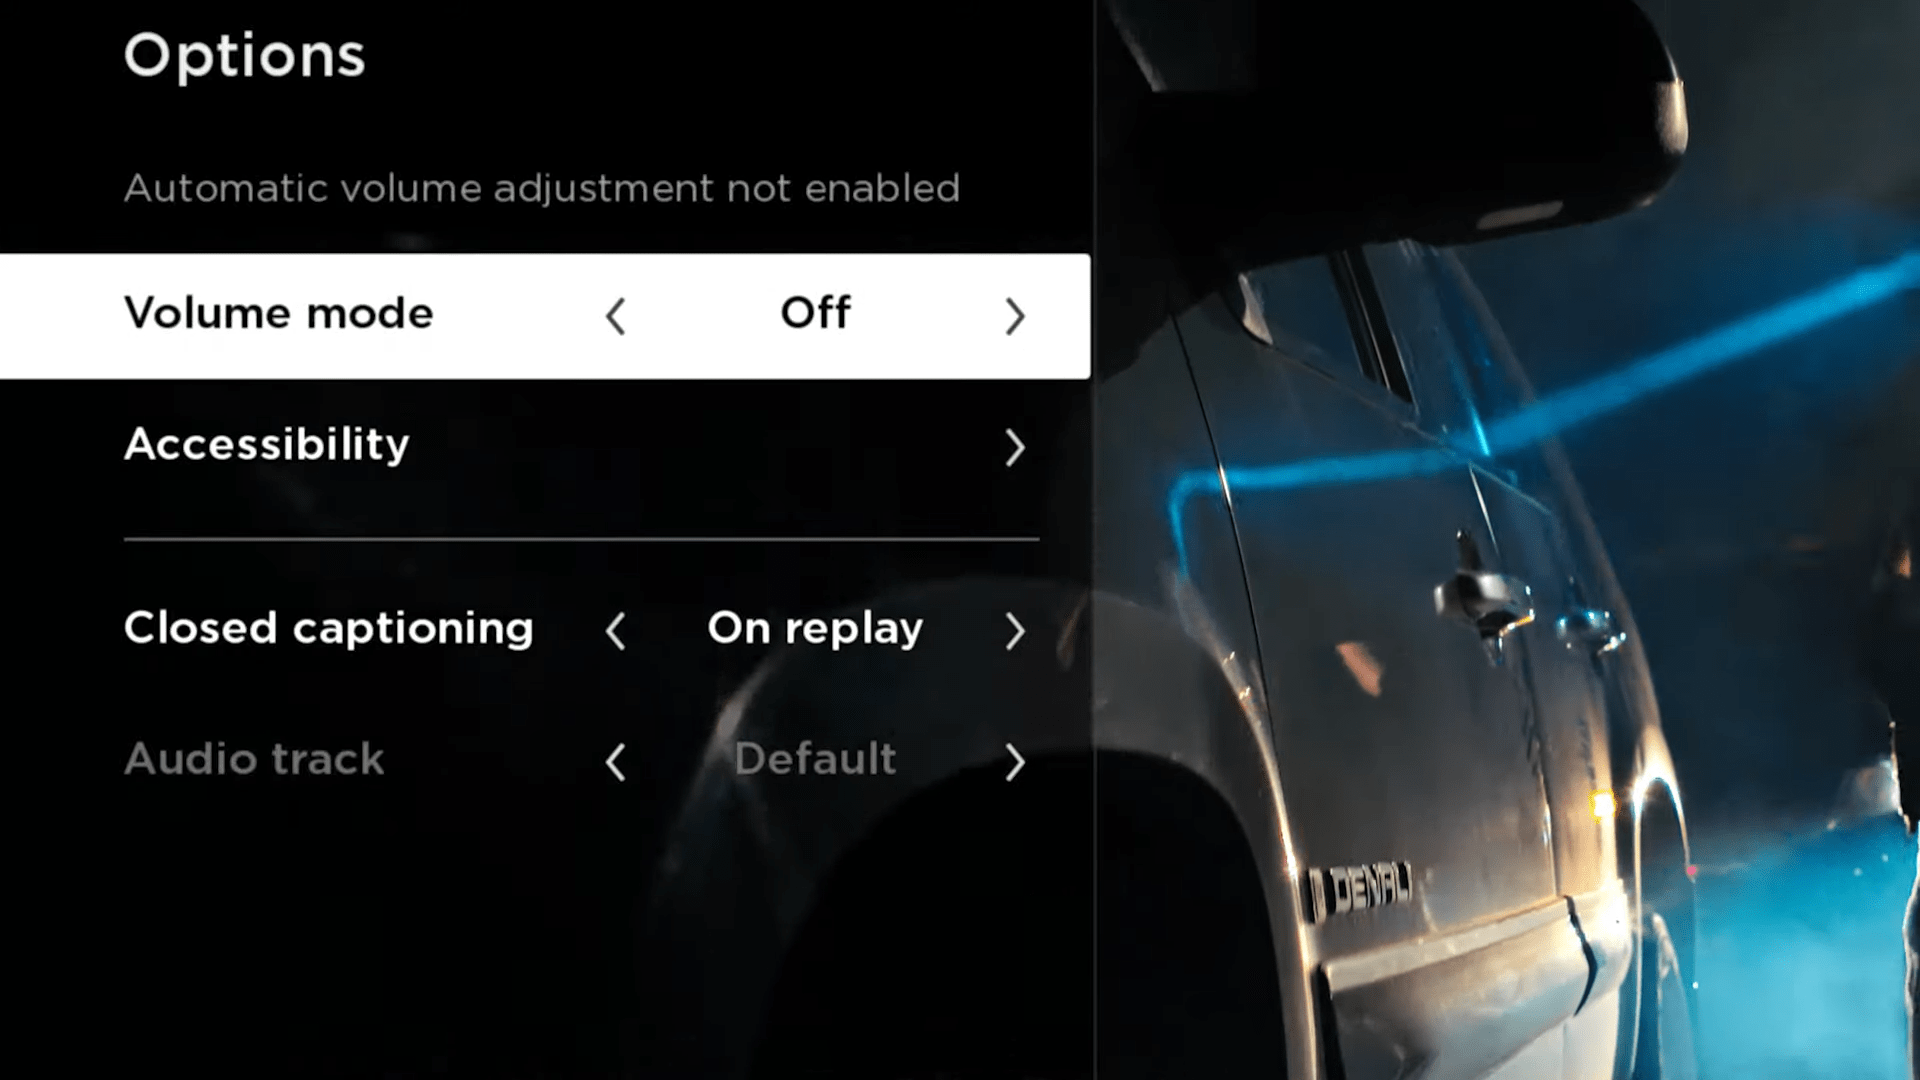
- Finally, check if the Netflix audio is working correctly.
19. Edit the Dolby Digital Audio Settings (Roku)
Streaming devices typically have their own ways of handling external audio output. In most cases, the default and automatic settings are more than sufficient in dealing with audio issues. However, in cases where Netflix audio problems persist, it’s better to take matters into your own hands and adjust these device settings.
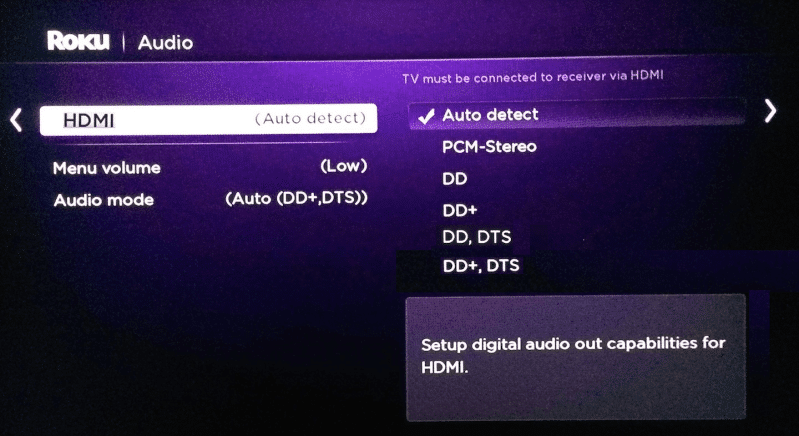
For one, suppose you’re streaming on a Roku TV. Then, you can make changes to the Dolby Digital audio settings and see if it solves your problem. We’ve provided the instructions in the section below:
- For starters, on your Roku device, launch Settings.
- Next, locate and open Audio.
- Then, select HDMI.
- Lastly, set it to PCM-Stereo.
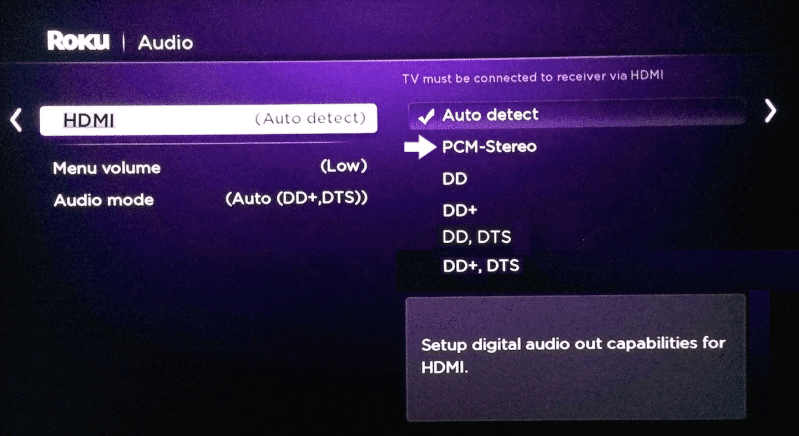
While there are other audio options available, PCM is important for your A/V setup. PCM stands for pulse-code modulation. It’s a type of audio file that describes the process used to convert analog audio signals to a digital representation (i.e., 1s and 0s). The goal of PCM is to replicate the properties of an analog audio signal as closely and accurately as possible. This format allows for digital signals to work with your analog systems and vice versa.
PCM is uncompressed. Therefore, it takes up more bandwidth transmission space. However, many users have reported that this step is enough to resolve most of their issues with Netflix’s audio.
20. Disable Autoplay (Windows)
Another possible cause for the Netflix audio issues on your PC is the Autoplay feature. The autoplay feature basically starts playing audio or video content without any human input. So, the purported benefits of autoplay are more user engagement and retention. However, in reality, autoplay can be a disturbance.
In this case, autoplay running on another site can hog or occupy your audio devices as it plays content from that site instead of Netflix. What makes it worse is that users may not be aware of it as they didn’t click anything. Apparently, at some point, Netflix has also implemented the autoplay feature that plays trailers and episodes automatically. However, they have added the ability to turn off autoplay as well.
On that note, to turn off autoplay on Windows, you can follow these steps:
- First, search for Autoplay settings in the search bar (Win + S) next to the Start button.
![]()
- Then, select the Autoplay settings option.
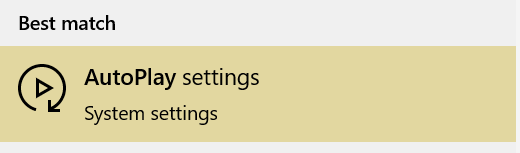
- Next, locate the Use Autoplay for all media and devices option.
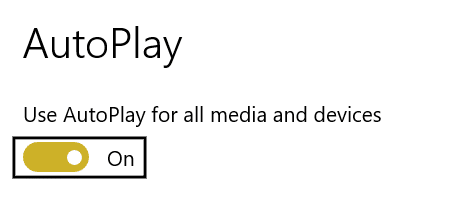
- After that, toggle the corresponding button to Disable.

- Finally, restart your computer.
21. Turn Off System Fast Startup (Windows)
Moreover, we suggest disabling the Fast Startup option that’s available on Windows computers. Essentially, the function of Fast Startup in Windows is to boot the system quickly. It does so by saving a state between the computer’s sleep and power off mode to the system storage device.
However, sometimes it overlooks some essential modules needed to operate the system audio. As a result, it can cause Netflix audio to be desynchronized when streaming.
Hence, you can disable it using the steps provided below:
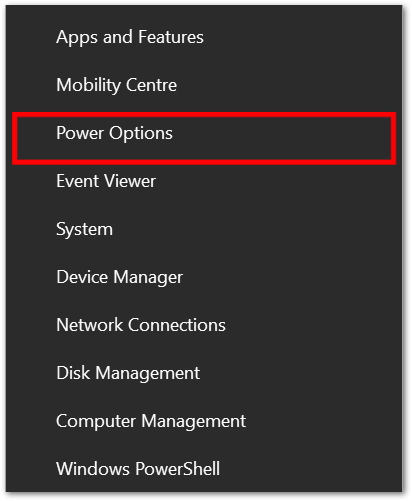
- First, right-click the Windows or Start Menu button and open Power Options.
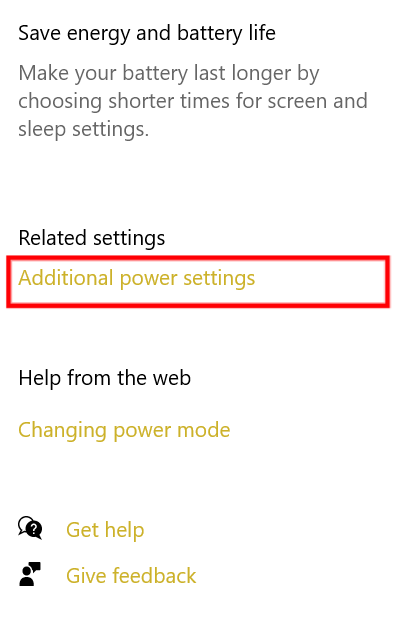
- Then, in the right pane, open Additional Power Settings
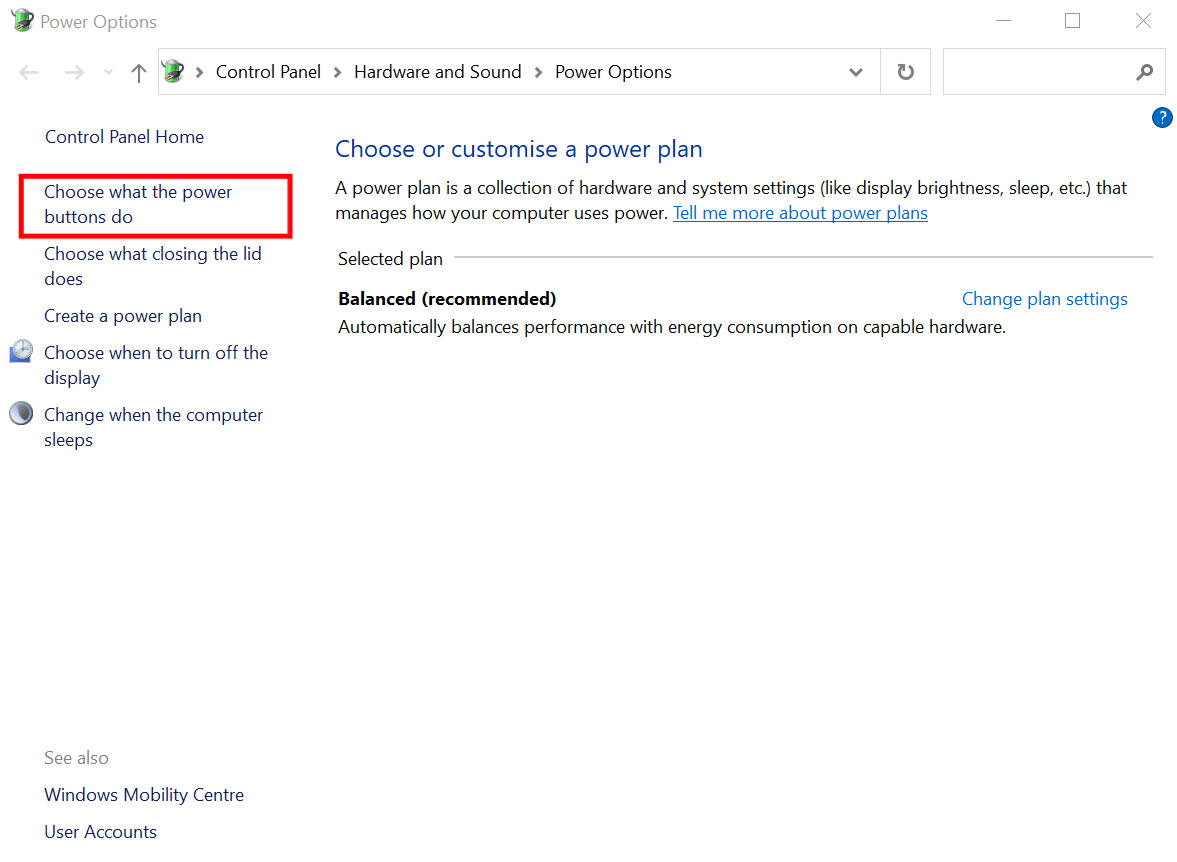
- In the next window, click Choose What the Power Buttons Do.
- After that, click Change Settings That Are Currently Unavailable

- From the options shown, uncheck Turn on Fast Startup.
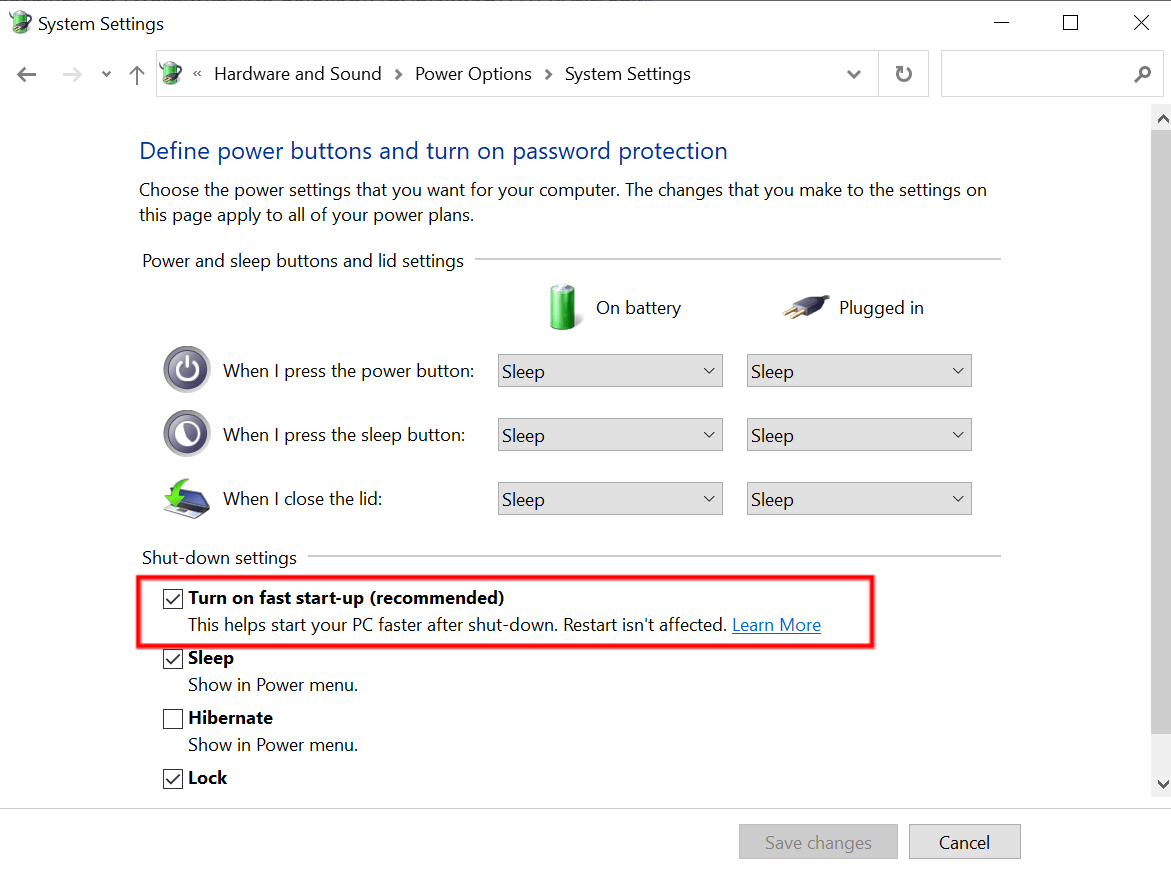
- Finally, Save Changes and Shut down (not restart) your computer.
Once that’s done, power on your computer and check if the audio out-of-sync issue on Netflix is resolved.
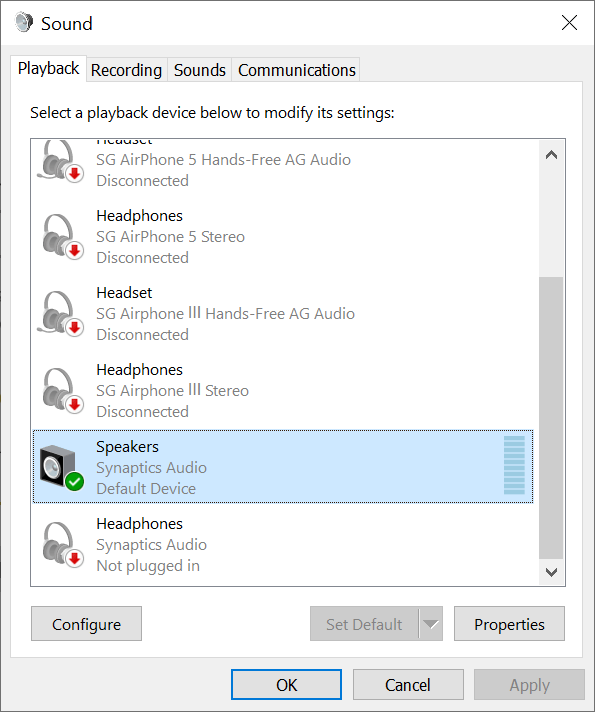
22. Disable Netflix’s Exclusive Control (Windows)
Furthermore, we recommend disabling applications’ exclusive control over your PC’s sound devices. This is because the Netflix no sound or audio out-of-sync issue may have arisen from the wrong sound device configurations. It can also occur when applications take control of sound devices and conflict with Netflix’s processes.
Therefore, turning this feature off may solve the audio problem you’re facing. However, before proceeding, you can also try disabling all other system sounds such as notifications and only use Netflix audio.
Perhaps that didn’t work either. Then, move on to try the following steps to disable application control:
- First, right-click the Speaker icon located at the lower-right corner of the taskbar.
- Next, choose Sounds. This option may appear as Playback devices if you’re using Windows 8 and below.
- Then, select the Playback tab and double-click on your playback device. In this case, we’ll be choosing the Speaker option.
- After that, click Advanced.
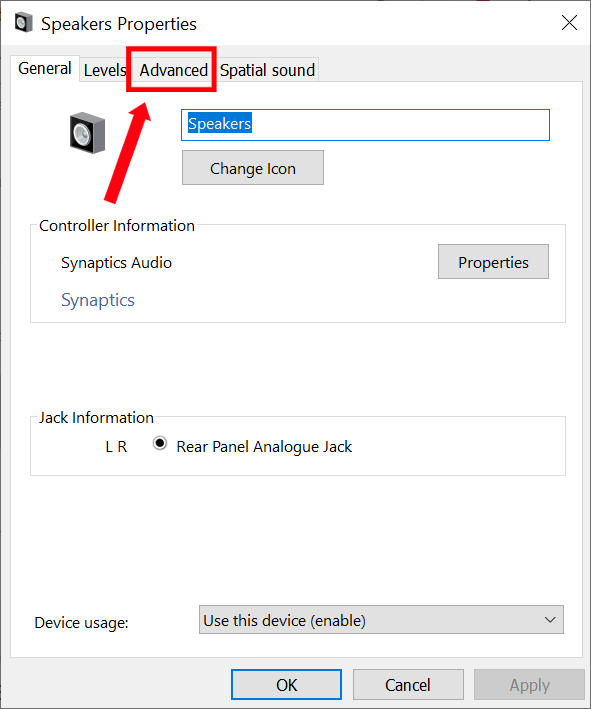
- Subsequently, uncheck the box next to the Allow Applications to Take Exclusive Control option.
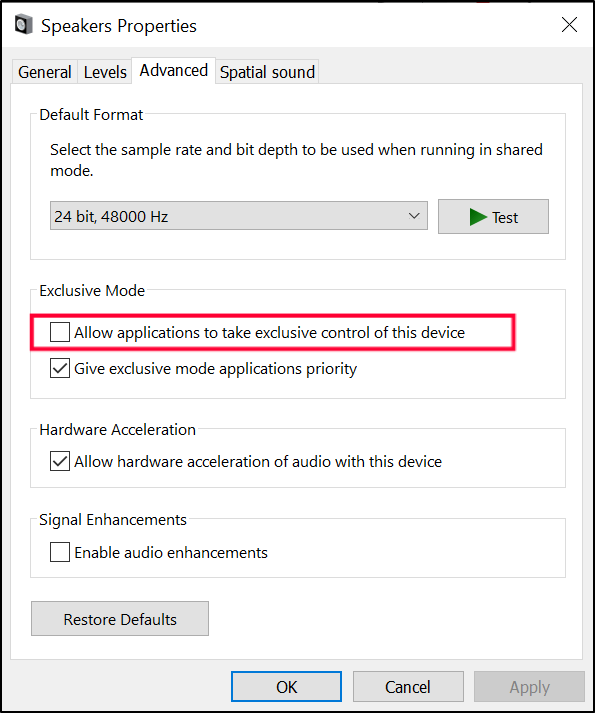
- Finally, click Apply and OK.
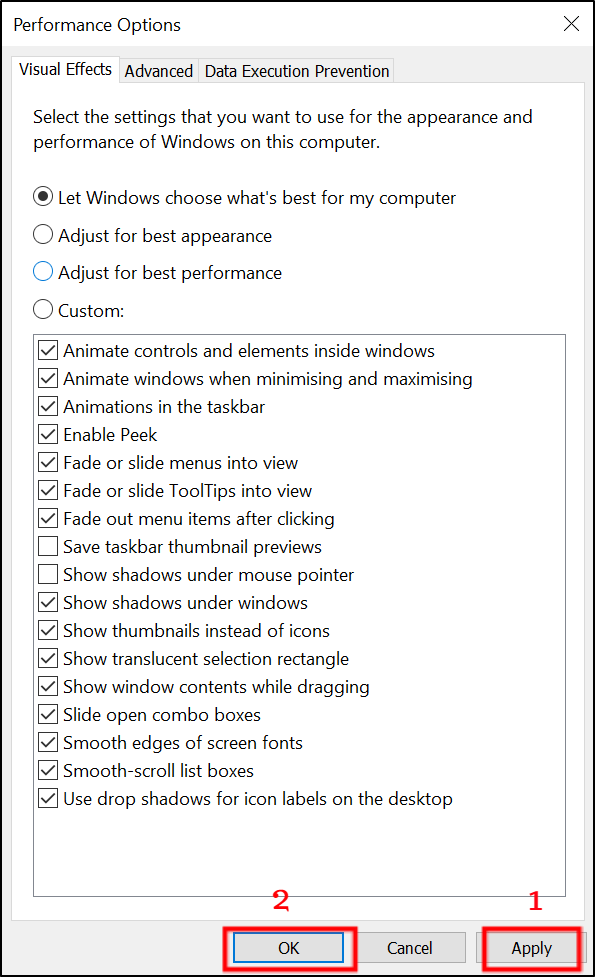
23. Edit the Appearance and Performance Options (Windows)
Another possible cause for your Netflix audio problem is unsuitable performance settings on your device. For one, this problem can occur if you have the performance settings set to Best Performance.
This is because Windows 10 includes many visual effects, such as animations and shadow effects. While these effects look great, they tend to consume additional system resources that can slow down your PC.
Plus, Netflix requires a sufficient amount of system resources to run smoothly. When system resources become insufficient during streaming, it can lead to audio issues on Netflix.
Hence, we suggest changing your performance settings by following these steps:
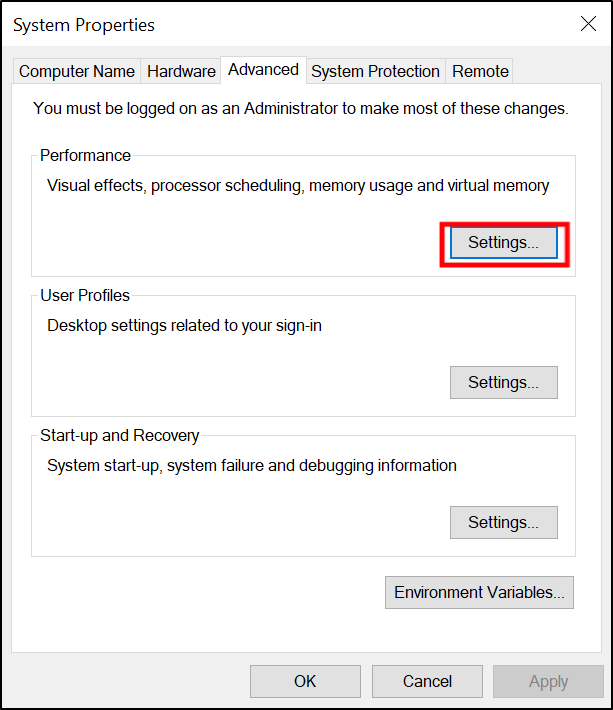
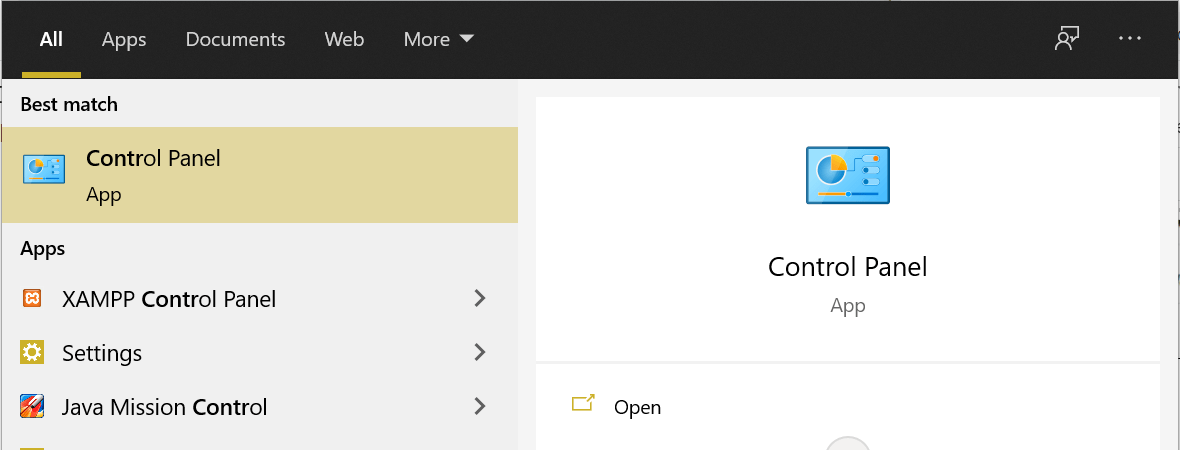
- First, click the Windows or Start button.
- Then, in the search bar, type Advanced System Settings.
![]()
- Next, open View Advanced System.
- Subsequently, under the Performance section, click the Settings button.
- After that, under the Visual Effects tab, select the Let Windows Decide What’s Best for My Computer option.
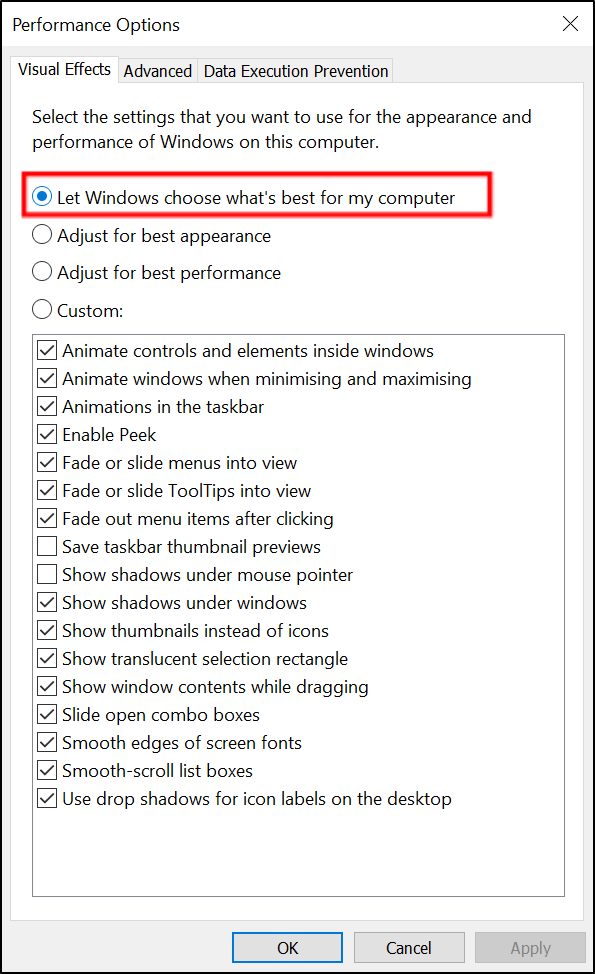
- Finally, Apply the changes and click OK.
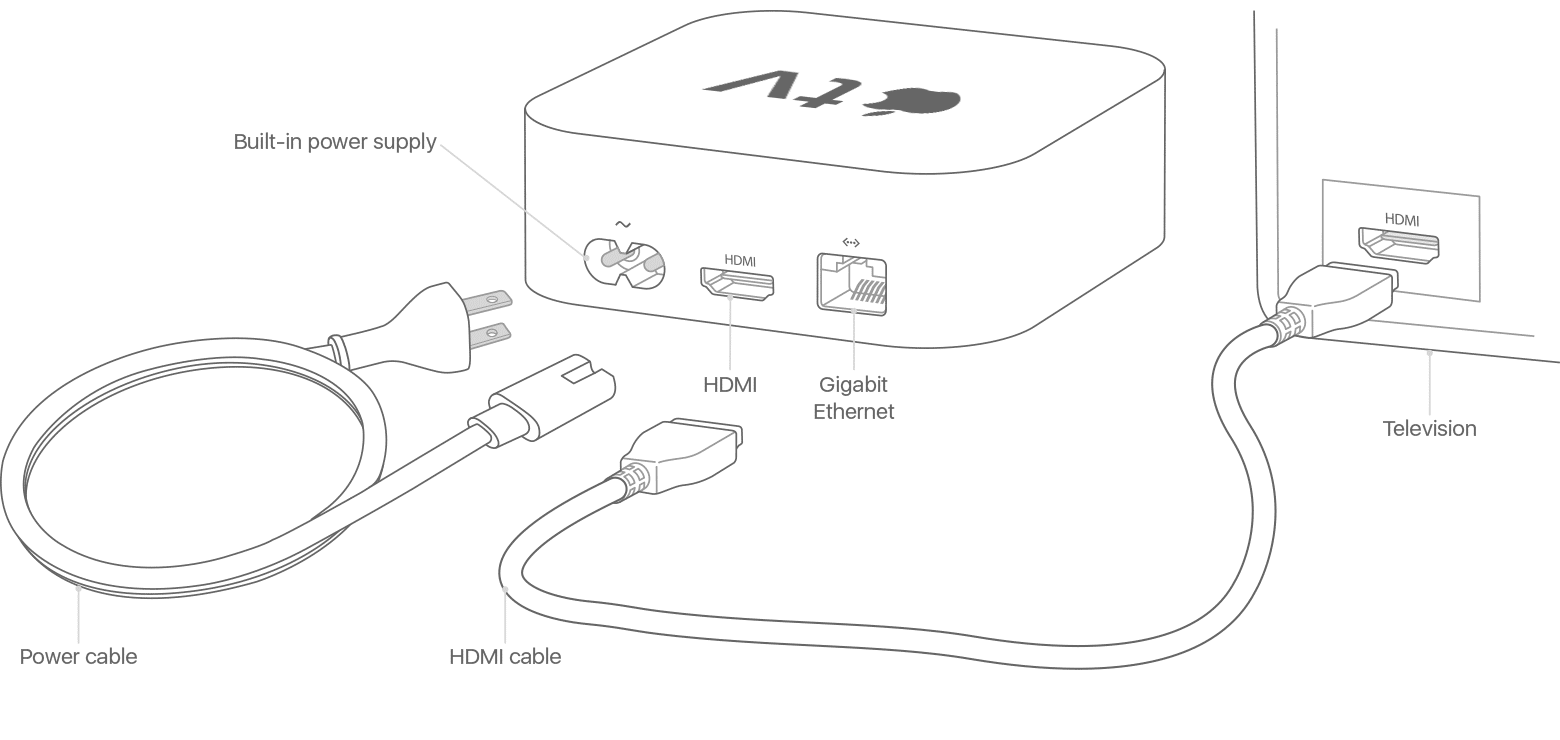
24. Reconnect the HDMI Cable
Occasionally, you would want to enjoy the content with a big group of people. Therefore, you connect your Netflix player such as a PC to a bigger screen like a projector. This connection is established using an HDMI cable. It allows you to connect all devices for both audio and video using only one cable.
When connected, the devices on both ends communicate through an HDMI handshake 🤝. It enables a device to recognize and communicate media with other devices. However, when an HDMI handshake is unsuccessful, it can lead to audio problems on Netflix. With that said, there are several causes for a faulty HDMI connection:
1. Check and Re-Fit the HDMI Cable Connection
For one, your HDMI cable may not be connected properly. Hence, we suggest checking the HDMI cable connections and making sure the cables are tightly fitted at both ends. Additionally, your HDMI cable may slip out in some cases as they don’t fit as correctly as other components or composite video connectors. To overcome this, you can opt to purchase locks for your HDMI cables or switch to self-locking cables.
2. Check and Apply the Same Video Resolution Settings
Secondly, your video resolution settings may not match the built-in resolution of your TV. Consequently, this can lead to Netflix programs having no sound as well. In this case, we recommend checking your source device’s resolution settings.
This can be done by heading to the settings menu of your HDMI device. From there, inspect if the video resolution is set to Auto. If it is, you would want to reset it to match your TV or projector’s built-in resolution.
3. Reverse the Turn-On/Startup Sequence
As an extra trick, some users have reported that switching the startup sequence of connected devices resolves the Netflix audio problem for them. For instance, you may have a habit of turning on the TV first followed by other connected devices. Hence, for this time around, you can change it up and turn on your secondary devices first followed by the TV and vice versa.
This step can be repeated multiple times with different start up combinations until you have decided on the best turn on sequence. Don’t forget to note it down for future use.
25. Ensure Speakers are Connected Correctly
Another common practice when streaming Netflix is that users enjoy connecting their Netflix players to external speakers or headphones 🎧. The reason is that good quality audio devices can provide better sound quality and improve your overall streaming experience. However, when connecting external hardware, the biggest annoyance is handling various wires 🔌. These wires are crucial in sending audio signals from the Netflix player to the audio output devices.

However, wear and tear along with bad handling of wires can result in audio problems when streaming Netflix movies. To resolve this problem, first, try to reset the cables in their proper position. Simply unplug and then plug them back into their respective correct ports.
To prevent confusion between various cables, you can also color code the different cables. At this point, you should also ensure that the port connection is fitted tightly and in place.
Some cables also tend to have minor movements when plugged in. If that’s the case, check the pins on both the cable and the port for any bent pins or broken locks. This is because constant connection, removal and reconnection wears down these cables. So overtime, the small pins at the ends can corrode. There’s also a chance that damages can be present on cables such as hits, nicks and bends. Consequently, they cannot send signals to the system. If that happens, it’s best to use spare cables or buy a new cable instead.
26. Reinstall or Update Audio Drivers (Windows)
In addition to the causes mentioned above, the problem with Netflix having no sound can also be related to your device’s audio drivers.
So, What is an Audio Driver?
An audio driver is a type of software file installed on a computer and your device’s operating system uses it to recognize and interact with audio devices. So, these audio devices can come in various forms, though usually a sound card is involved. This sound card enables a computer to process audio data and output the information through speakers as auditory sound. Therefore, with the audio driver, your computer can recognize and utilize all the options and features offered by the sound card and audio device.
Why Should You Consider Updating the Audio Drivers?
In terms of updates, many manufacturers of audio devices will also frequently update and improve the audio drivers used by their devices. These driver updates are available for download on manufacturer websites. So, these updates can help to fix problems with the device software and introduces new features that take better advantage of the hardware.
Suppose you’re having no sound when streaming Netflix and it has been a while since you last checked your audio drivers. Then, there’s a chance that your audio drivers are corrupted, disrupting the proper input and output process of audio files.
Hence, we suggest checking whether the drivers are properly installed. In some cases, you will need to reinstall a fresh copy of the audio drivers if necessary. Perhaps you aren’t too confident about getting the job done on your own in fear that something may go wrong. In that case, you can simply contact the computer or device manufacturer for assistance.
However, if you’re persistent in taking matters into your own hands, the steps to update or reinstall the audio drivers are listed as follows:
Checking for Driver Updates Through Device Manager
For Windows PCs, you can automatically check and install pending driver updates with just a few clicks through the Device Manager settings:
- First, right-click the Start button. It will bring up a menu of options.
- Under the menu, choose Device Manager.

- Then, expand the Sound, video and game controller option.

- Subsequently, find and right-click the device named Synaptics Audio or any other main audio driver your device uses. A contextual menu will appear.

- Next, choose Update device. Then, it’ll begin checking for pending driver updates and it’ll proceed to install them if available.

Reinstalling a Driver
Similarly, you can uninstall drivers through the Device Manager as well. Through a clean reinstallation of the drivers, you can resolve any corrupted installation issues with the driver software. Plus, if it’s missing out on any updates, through this step you can ensure its latest version is implemented.
On that note, to reinstall a driver on Windows:
- First, right-click the Start button. It will bring up a menu of options.
- Under the menu, choose Device Manager.
- Then, expand the Sound, video and game controller option.
- Subsequently, find and right-click the device named Synaptics Audio or any other main audio driver your device uses. A contextual menu will appear.
- Here, select the Uninstall Device option.

- Then, check the delete device driver software for this device option before uninstalling. If this option isn’t available, move on to the next step.
- Finally, click the Uninstall button.

After the device driver is uninstalled from your system, restart your PC. Once your computer restarts, connect it to an internet connection to allow the Windows OS to automatically reinstall the generic device driver from the Microsoft server.
Note: Additionally, you can also launch the Device Manager by pressing Windows + R. Then, type devmgmt.msc in the search box provided.

27. Update Your Device’s System Software and Firmware
Furthermore, Netflix audio problems can be caused by out-of-date software or firmware. Now, these are two different things. However, they’re equally problematic because, with newly-released updates, many platforms tend to change the way they connect to servers. As a result, they can lead to audio issues on Netflix.
For starters, software updates introduce bug fixes for your device. It also increases the performance of your device while patching up 🩹 any security vulnerabilities. However, these changes are usually hidden.
Suppose you may be skipping updates most of the time. That’s alright until your device no longer has a compatible software version to support the Netflix app. Hence, it may not be able to process new audio formats used in Netflix titles.
Plus, manufacturers also tend to add new drivers (Step 26) for different devices via software updates. Hence, it makes software updates crucial if you plan on connecting your device to other newer audio devices to stream Netflix.
All in all, to update your device software, follow these steps:
Installing System Software Updates for Mobile Devices
For Android
- First, open the Settings app, scroll down, and select System.
- After that, choose System Update.
- Then, on this page, you can tap Check for update to search for pending updates.

Note: These steps may differ between Android devices depending on your phone’s model and current OS version. However, you should find the steps are generally like the above.
For iPhones (iOS)
- First, open the Settings app and tap General.
- Next, select Software Update to search for pending updates.

Installing the Latest Version of Microsoft Silverlight (Windows)
Netflix makes use of Microsoft Silverlight, so make sure that you have the latest version of Microsoft Silverlight on your Windows computer.
- First, open the Start menu, then search and open Windows Update settings.


- Next, click the Check for updates button.


- After that, if there are updates available, click the Download button to begin downloading and installing them. Finally, you may be prompted to restart your PC (step 1) to apply the changes.

From there, you should allow Windows to check for any available updates. Windows will proceed to install any pending updates available for your PC.
Installing the Latest macOS Version
- First, select the Apple menu icon and tap System Preferences.

- After that, click Software Update.

- Next, if there are pending software updates, proceed to click the Upgrade Now or Update button.

Installing Updates for Set-Top Boxes and Smart TVs
The following are links to official guides you can refer, to check for pending OS updates on your set-top box:
- Amazon Fire TV Devices
- Roku
- Apple TV
- Google Chromecast
- Android TV or Google TV
- Sony TVs
- Samsung Smart TVs
Note: Some TVs don’t come with software updates, especially older or cheaper models. Their software version will remain as it is and will not receive updates. Therefore, some of you may find this fix irrelevant for your TVs.
Firmware Updates
Next, firmware updates, also known as BIOS upgrades, work on the read-only memory (ROM) of your device. It hardly improves the performance of your device but only increases its compatibility with new hardware.
While it’s important to keep your firmware updated, we suggest not risking it if your hardware is running perfectly. The reason is that firmware updates cannot undergo any form of interruption.
Suppose the update takes place but your device shuts down or resets before completion. In that case, you may end up bricking your device, rendering it unusable. This is because the hardware doesn’t have proper instructions to follow anymore.
28. Switch the Audio Output to HDMI
Moving on, suppose you’re planning to project your Netflix player to a bigger screen. Suppose you’ve checked the HDMI cables and connections, and all is plugged in properly. However, you’re still not getting audio when playing the Netflix movies.
In that case, it may be because you didn’t change your audio output settings. The audio output settings determine where the sound will be played. However, some devices don’t automatically change to the HDMI output option. Therefore, you’ll have to switch it manually.
To do so, you can follow these steps on your Windows PC:
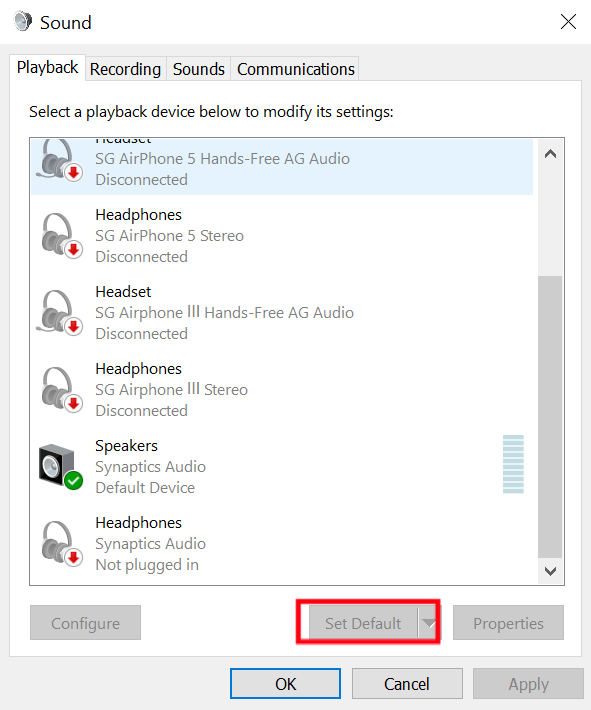
- First, open the Control Panel.
- Then, click Hardware and Sound and find the Sound option.
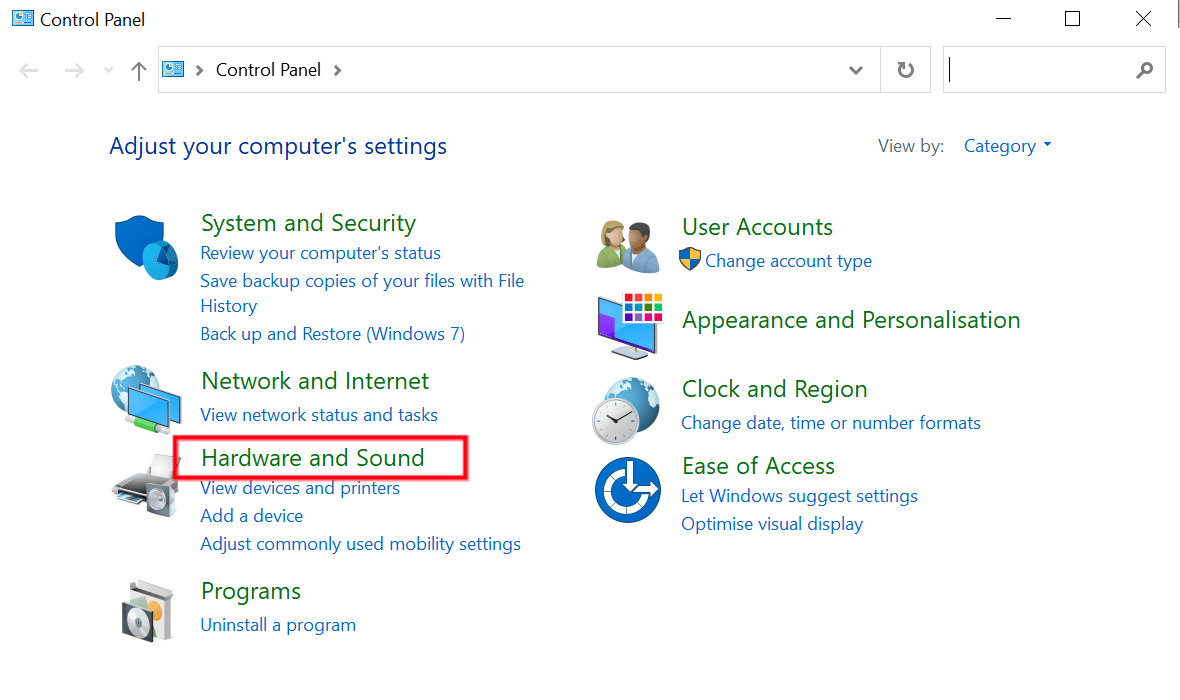
- Under Sound, select Manage audio devices.
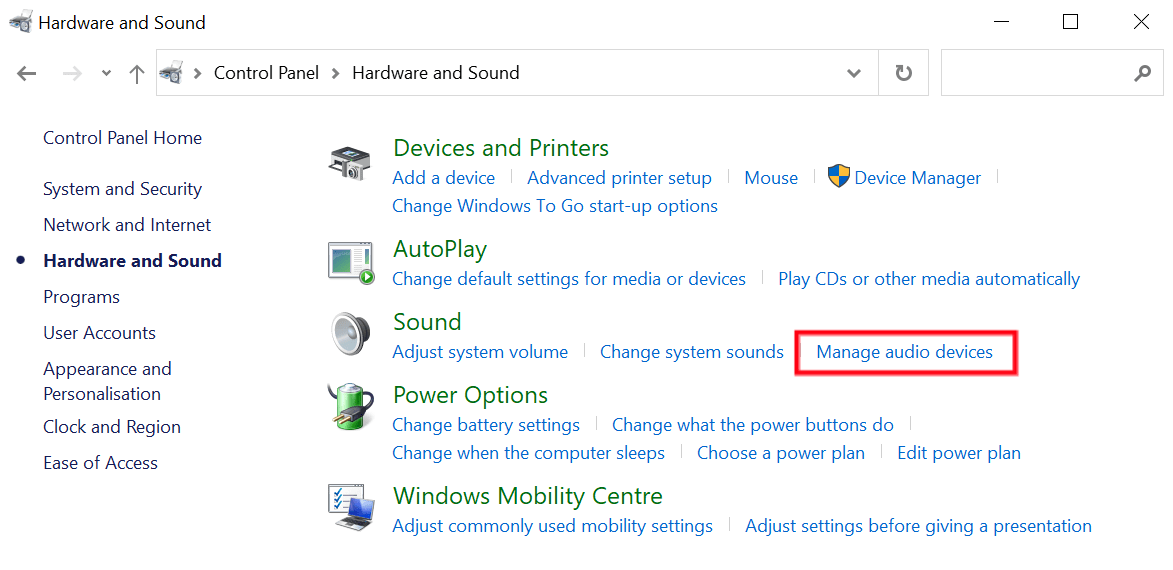
- Next, under the Playback tab, click the HDMI or Digital Audio device.
- Lastly, set the selection as the default audio device and click OK.
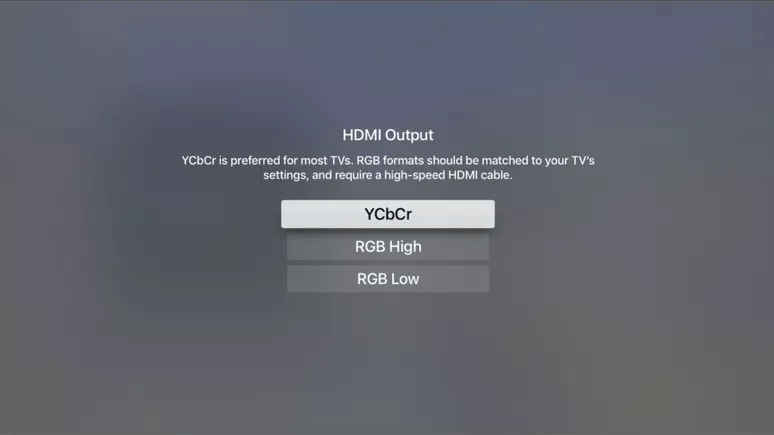
Note: Suppose you’re streaming on an Apple TV. You can switch your audio output through the TV Settings. From TV Settings, open Video and Audio and select HDMI Output.
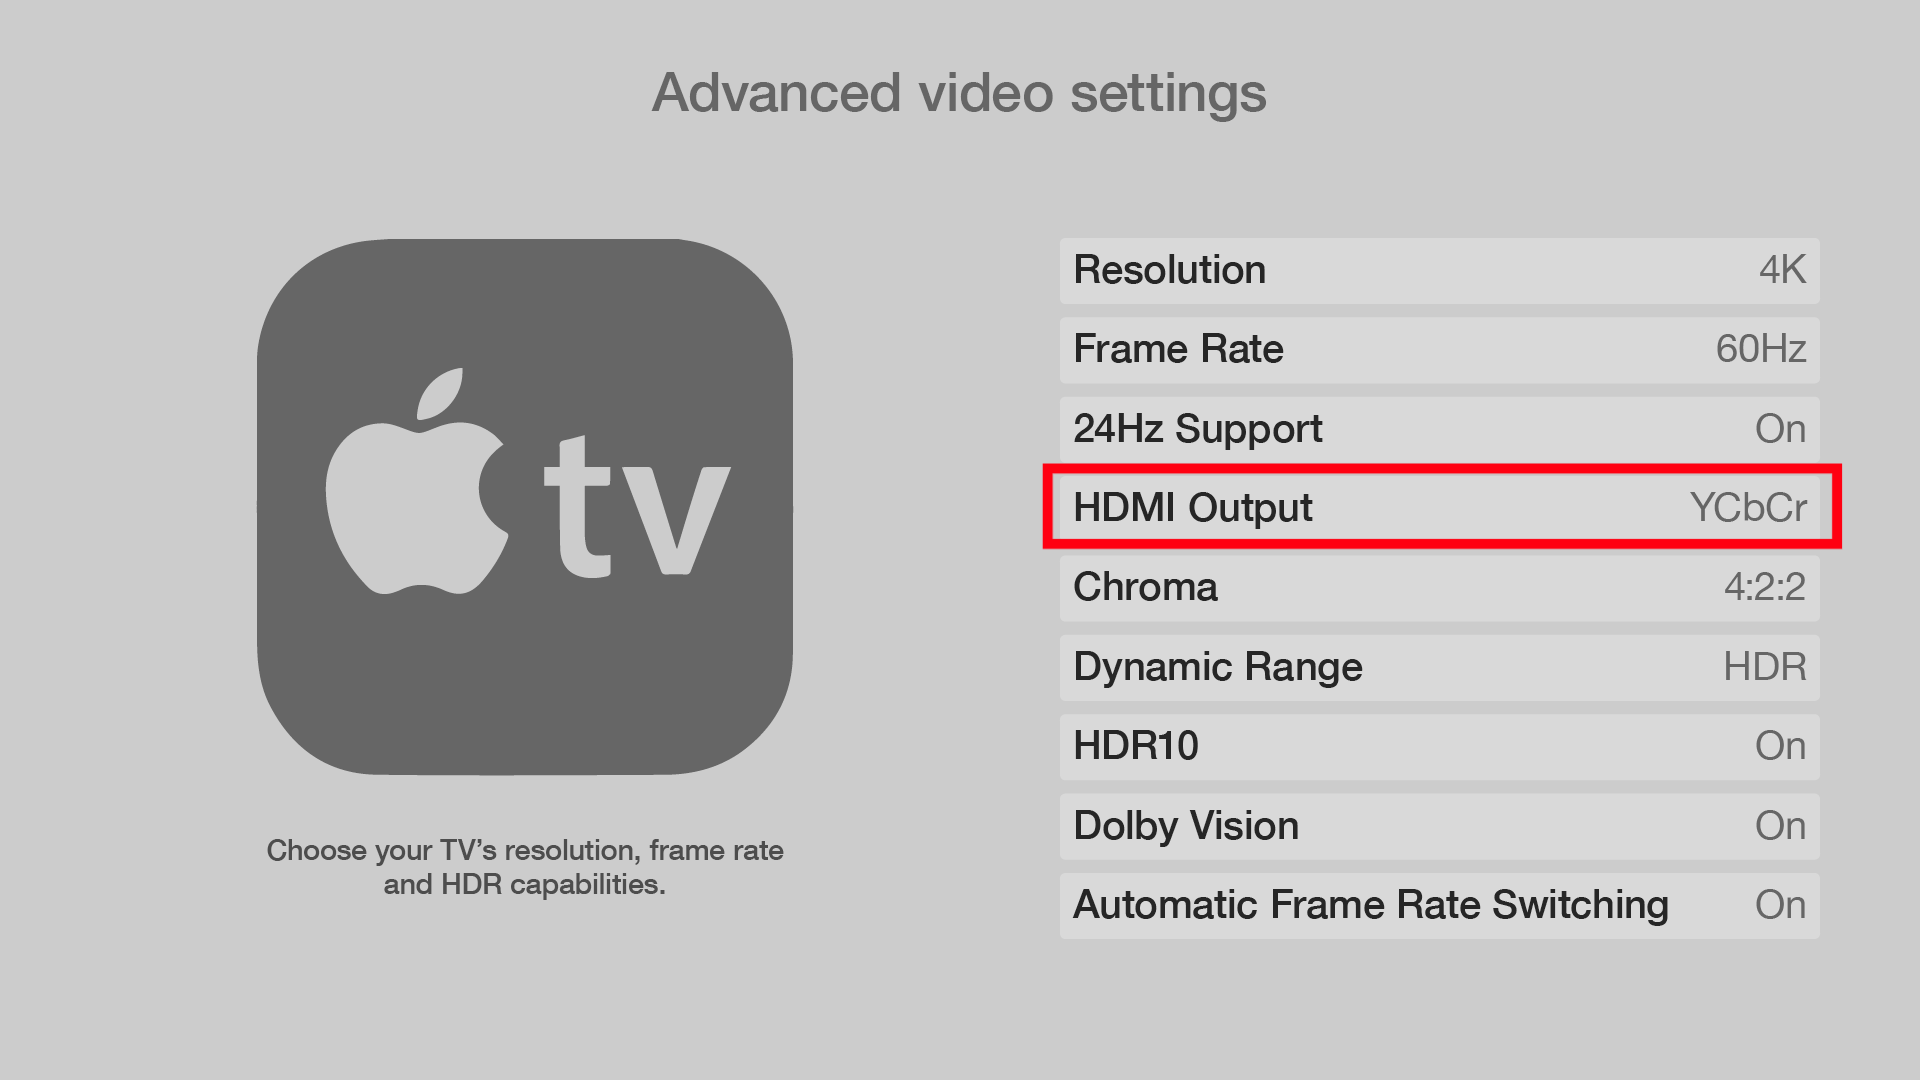
Lastly, change it to YCBCr.
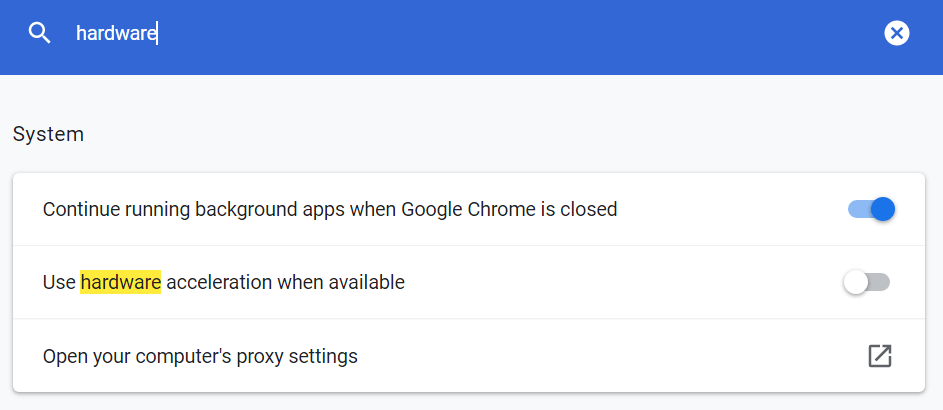
29. Turn Off the Hardware Acceleration Feature on the Web Browser (Windows)
Moreover, suppose you’re streaming Netflix on your device’s web browser. When experiencing problems with your Netflix audio, we recommend turning off the hardware acceleration feature equipped on most browsers.
Hardware acceleration allows a program to use a computer’s hardware to support and increase the efficiency when performing certain functions. It improves the performance of a software beyond its original capabilities. For example, the Chrome browser will utilize the graphics processing unit (GPU) of your computer to tackle graphics-intensive tasks when playing online games. By distributing some tasks, your CPU will be able to work on other functions.
However, while this feature sounds like plenty of help in most cases, it can cause your browser to lag, freeze or crash. For some, it also drains your device’s battery 🔋 more quickly. Occasionally, driver incompatibilities can also lead to this feature misbehaving.
All these downsides of hardware acceleration can be the culprit behind your Netflix audio issues. In that case, you can disable it using the steps below and see if that solves the problem:
For Google Chrome
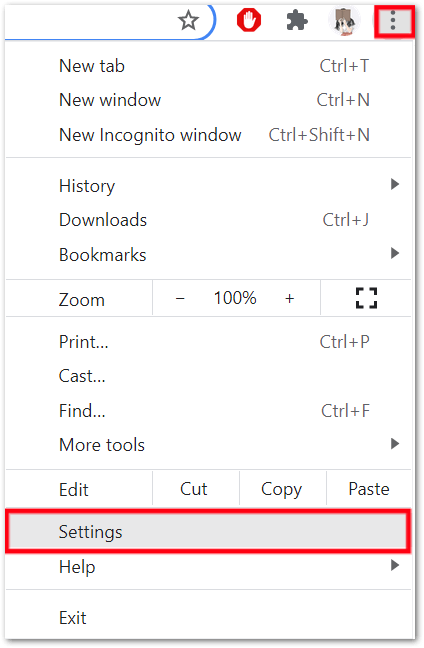
- For starters, click the three-dots on the upper-right corner of the web browser.
- Then, in the drop-down menu, select Settings.
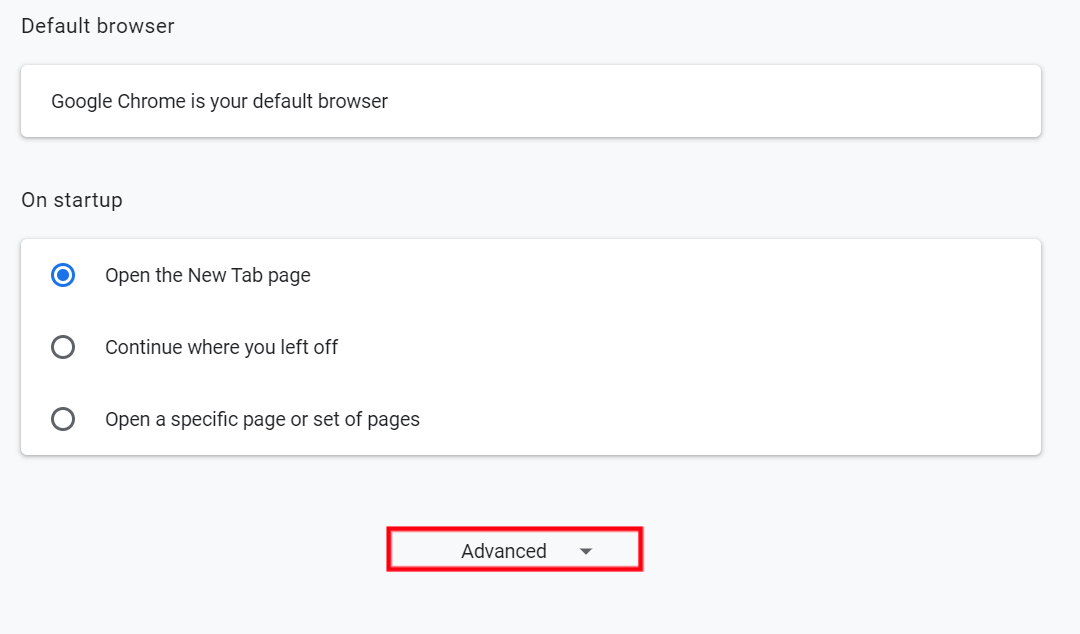
- Next, scroll down and click the Advanced option.
- After that, locate the System section.
- Under System, find and disable the Hardware Acceleration option.
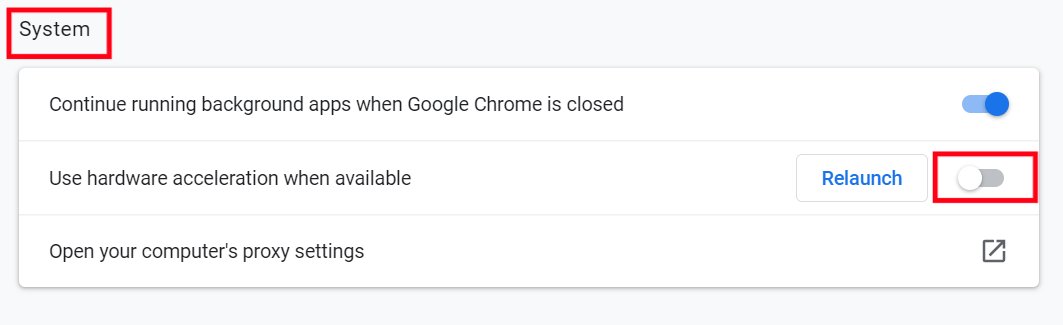
- Finally, refresh the web browser (Step 7). You may also take it a step further and restart your device.
For Firefox
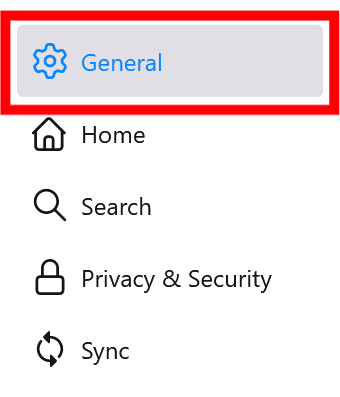
- First, click the menu button and select Settings.
- Next, select the General panel.
- Then, under Performance, uncheck the Use Recommended Performance Settings option. Additional settings will be displayed.
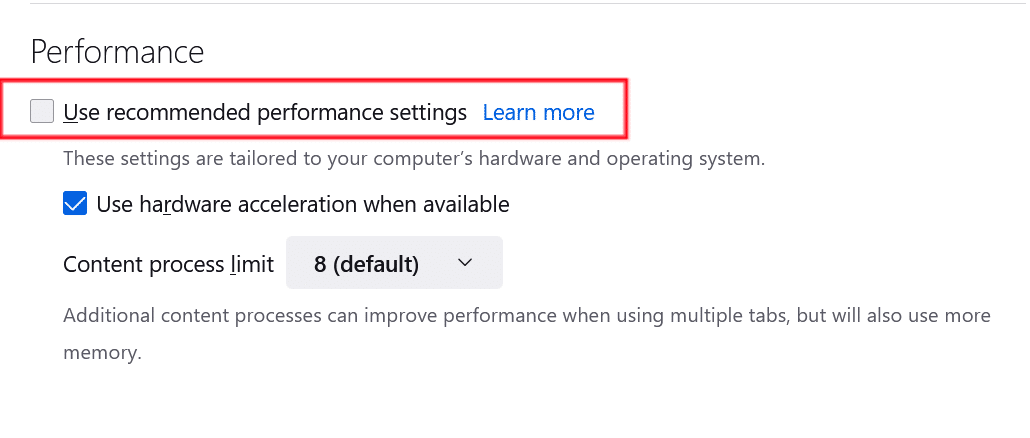
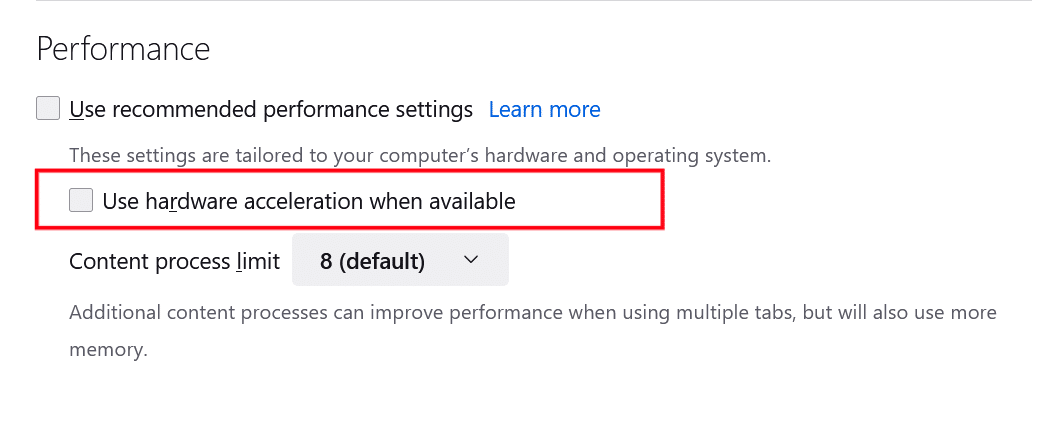
- From there, find and uncheck the Use hardware acceleration when available option.
- Finally, click the menu button and select Exit.
Additionally, without having to navigate through the settings menu, you can search for the Hardware Acceleration option through the provided search bar as well.
Note: Suppose you’re streaming Netflix using the Safari browser on a macOS device. Users are no longer allowed to enable or disable the hardware acceleration feature as of macOS Catalina.
30. Disable the Web Browser Extensions or Try Incognito Mode (PC)
One of the most common browser extensions applied is the adblocker extension. As the name suggests, it’s intended to effectively prevent annoying advertisements from appearing on web pages.
However, some streaming services, have advertisements inserted in the middle of a movie or around the website. Therefore, the adblocker extension might disrupt the normal operation of Netflix, leading to audio issues when streaming. Hence, to successfully resolve the audio problems, you’ll have to try disabling your adblocker or even your other browser extensions.
The steps to do so are as follows. Do take note that the steps may vary slightly depending on the type of browser you’re using:
Steps to Disable the AdBlock Extension
For Google Chrome, Mozilla Firefox and Microsoft Edge (Windows)
- First, visit the Netflix web page.
- Then, click the AdBlock icon on the top-right of your web browser. A drop-down menu will appear.
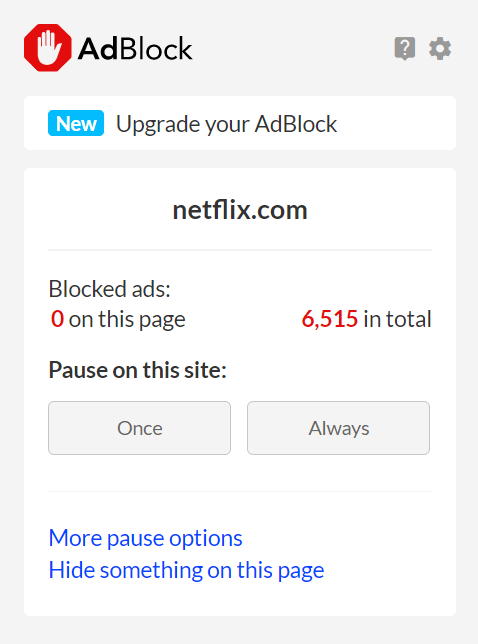
- Then, select Always under the Pause on this site section.
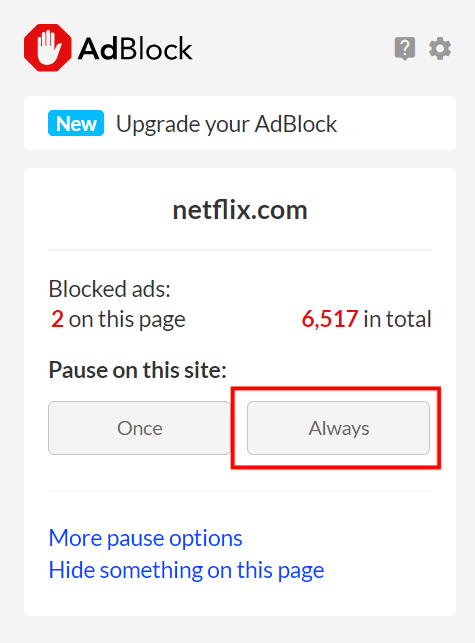
- At this point, the web page should refresh. The AdBlock icon should turn from red to green. This change indicates that AdBlock is disabled for the Netflix website.
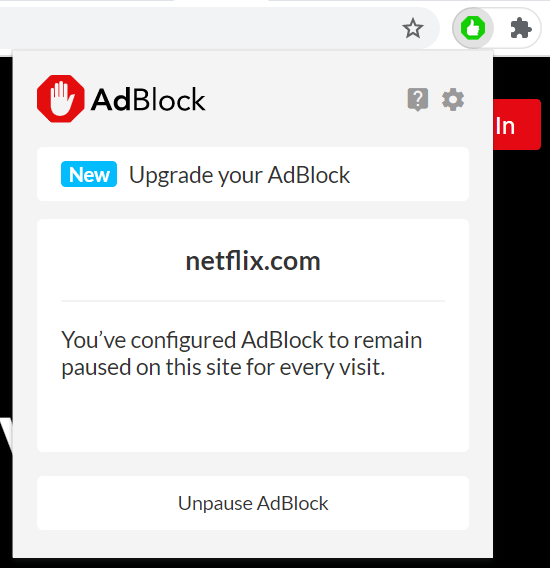
- Finally, refresh the Netflix page again (Step 7) if necessary.
Note: While Chrome and Edge supports both AdBlock and AdBlock Plus, Firefox no longer supports AdBlock. However, the steps to disable other adblocker extensions are similar.
For Safari (macOS)
- First, open up your Safari browser.
- Then, click on Safari located in the menu bar.
- Next, select Preferences. The Preferences window will be displayed.

- Subsequently, click on the Extensions button. A list of all extensions you’ve installed to Safari will appear.
- After that, navigate to and click on AdBlock/AdBlock Plus in the list of extensions in the left pane.
- Finally, uncheck the box next to the AdBlock extensions. AdBlock/AdBlock Plus will then be temporarily disabled, until the user decides to re-enable the extension.

Steps to Turn Off Other Extensions on Your Web Browser
After disabling the adblockers, suppose the Netflix audio problems still persist. In that case, we recommend checking for other enabled browser extensions, plugins and add-ons. These extensions may or may not be built for Netflix. Either way, they can also impede and affect troubleshooting results. Therefore, you should temporarily disable all of them when troubleshooting the Netflix audio issues.
But before that, you can try visiting the Netflix website on an incognito/private window (Ctrl + Shift + N). This is because in incognito mode, your browser extensions and cached data don’t act on the website. So, if you face no audio issues while you’re in incognito mode, then there may be an interfering extension that you need to disable.
That being said, you can follow the steps below to disable web browser extensions:
For Google Chrome (Windows)
- Firstly, click the 3 dots at the upper-right, hover over More tools, and click Extensions.

- On the Extensions page, under the extension you wish to disable, turn the switch off.


For Safari (macOS)
- With Safari launched, from the Menu Bar, select Safari and click Preferences.
- At the next window, choose Extensions from the top bar.
- To disable a Safari extension, uncheck the box next to the particular extension.

Once you have disabled all extensions, refresh the Netflix website (Step 7) and check if the audio is working correctly again. If this fix didn’t work for you, we recommend trying another web browser (Step 31).
31. Try Using Another Web Browser (PC)
Suppose the Netflix audio is still not working when streaming on your browser. In that case, you can think about using a different web browser. The reason is that different browsers give a different user experience as they run on different engines that render pages distinctively.
Therefore, some browsers may not deliver the best streaming experience to you with synced audio and video content. From what we know, Netflix supports most of the commonly-used browsers available, such as Google Chrome, Microsoft Edge, Mozilla Firefox, Opera and Safari. Hence, if you’re on Chrome, you can consider switching to any of the other options and vice versa.

32. Install Pending Web Browser Updates (PC)
Moreover, your browser may be causing the Netflix audio problem if it’s outdated. An outdated browser cannot communicate with Netflix servers correctly. Therefore, there’s a chance that audio files aren’t retrieved properly, leading to Netflix streams losing audio or having no sound at all.
To know more about Netflix’s browser requirement, you may refer to this article.
Hence, we also suggest checking your browser for any pending updates. To do so, follow these steps:
Steps to Check for Pending Updates on Your Web Browser
To start, we recommend visiting the updatemybrowser.org website, which will instantly check if you’re running the latest version of your web browser.
For Google Chrome
- For starters, launch Google Chrome on your device.
- Then, look at the More icon on the top-right corner.
- Next, check if pending updates are available. If an update is pending, the icon will be colored. The color of the icon indicates how long the update has been released.

- Subsequently, if an update is available, click on the More icon.
- Finally, click Update Google Chrome. If you can’t find this button, your browser is up-to-date.

For Microsoft Edge and Mozilla Firefox
- First, launch the web browser.
- Then, click on the main menu button in the top right corner.
- Next, select Help (Firefox) or Help & Feedback (Edge).

- After that, click About Mozilla Firefox or About Microsoft Edge.

- From there, the browser will automatically check and download the available updates.

For Safari (macOS)
To update the Safari web browser on macOS you just have to make sure you’re running the latest macOS updates (Step 27). So, the latest version of macOS will also include the most recent version of Safari.
Once the browsers are updated, don’t forget to relaunch the web browser to configure the updates.
33. Clear the Web Browser Data and Cache (PC)
Another consideration when streaming Netflix using your web browser is its cache data and files. Cache files are basically static assets that your computer stores in its device hard drive when it was first retrieved. Essentially it’s used to shorten the access time needed and increase your overall browsing speed, for instance when you’re on Netflix.
However, these cache data and files may become outdated over time as Netflix releases updates for new features and bug fixes. Without requesting for the new assets, your browser will continue to load Netflix using the old available assets. Thus, it can lead to mismatched formatting and broken programs. With the communication process hindered, the Netflix website may not receive necessary audio files for movies, leading to various audio problems.
Therefore, you should clear your browser cache from time to time by following the steps below:
On Windows
The following steps are catered for Google Chrome. However, if you’re using a different web browser on Windows (Firefox, Edge), the steps are still similar:
- You can access your browsing history by pressing Ctrl + H together. Or click the menu button at the top-right and choose History at the drop-down.
- On the following page, click the Clear Browsing Data button. For Google Chrome, that’ll be on the left.

- Next, under Basic, check all options. Plus, you should select a time range of All time. Then, click Clear Data.

On macOS
- First, with Safari launched, from the Menu Bar, click Safari and select “Preferences…”

- At the following window, choose Advanced from the top bar, and tick the box next to “Show Develop menu in bar”.

- Subsequently, from the menu bar, click Develop, and select Empty Caches.

- After that, you can clear your search history and even more Site Data and Cookies. To do this, from the Menu Bar, click Safari, and choose “Clear History…”.
- Lastly, click Clear History at the following window.

34. Clear the Netflix App Cache and Data
As mentioned earlier, streaming Netflix on web browsers can produce cached data. Likewise, this also occurs on the Netflix app that’s installed on your streaming device. Similarly, any cached data that’s left uncleared can become corrupted overtime. Hence, it can result in Netflix no sound issues as well.
To resolve this, you can clear the Netflix app cache and data files. We suggest practicing this step regularly to keep your device healthy. In this post, we’ll show you 2 different ways to clear your Netflix app cache and data:
Delete the Netflix App Cache and Data Through Settings
For Android devices, Android TVs, and some set-top boxes like Amazon Firestick, you can clear all the Netflix app data through the Settings app.
To navigate to these settings:
- Firstly, open the Settings app
- Then, tap on Apps & notifications.
- Next, select Netflix from the list of apps.

- Next, tap Storage & cache.
- Following that, start by tapping Clear Cache, and then you can choose Clear Storage.

For Amazon Fire TV devices, you can check out their guide to clear app cache by clicking here.
Reinstall the Netflix App
Another method to clear app cache is directly uninstalling the Netflix app and reinstalling it onto your device. This method is supposed to be more effective as it removes all files associated with Netflix, leaving no corrupted files out of the question. Furthermore, when reinstalling, a fresh new copy with all the latest updates will be downloaded. Hence, it also solves the outdated app problems along the way.
Generally, the steps to reinstall the Netflix app are similar across most streaming devices and are as follows:
- First, uninstall the Netflix app. This can be done by long-pressing for the selection menu or through the Settings.
- Then, select Uninstall or Remove App.

- Next, you can choose to restart your device or straight go to your App Store to install the Netflix app.
Similarly, for Windows PCs, there are a few ways you can uninstall Netflix. The easiest way on Windows would be to search for Netflix through the Start Menu. Then, select Uninstall.

Finally, open the newly-installed Netflix app and check if the audio problem on your Netflix shows is fixed.
35. Report the Audio Problem to Netflix Support
If all else fails, you can raise the audio issue at the Netflix Help Center. Suppose many other users are experiencing the same issue, you can contribute to the fix too. This is because as more users report the issue, users can get the attention of the Netflix support team faster. As a result, they can release a proper fix from the backend 👨💻.
Plus, by doing this, you can get more suitable fixes for your particular Netflix audio problem, suited to your streaming device. On that note, the following are a few ways to get in touch with the Netflix support team:
Through the Netflix Help Center
To contact Netflix’s customer service, you can visit the Netflix Help Center. Then, scroll to the bottom of the page and you will find 2 contact methods which are either Voice Call or Live Chat. Hence, choose either 1 and explain the audio issue you’re facing.
However, if you’re a member, we recommend you to sign in to your account before calling the help center. This gives you a service code to enter for faster service, as well as the estimated wait time.
You can also browse the articles on Netflix’s Help Center and see if you can find any solutions for your problem.
If you’re using the preinstalled Netflix app on your streaming device, you can go to the Help Center through the settings. To do this:
- First, click your profile to access the settings menu.
- After that, select Help.
- Next, you should see the contact methods, Call and Live Chat, at the bottom.

Through the Netflix Video Player
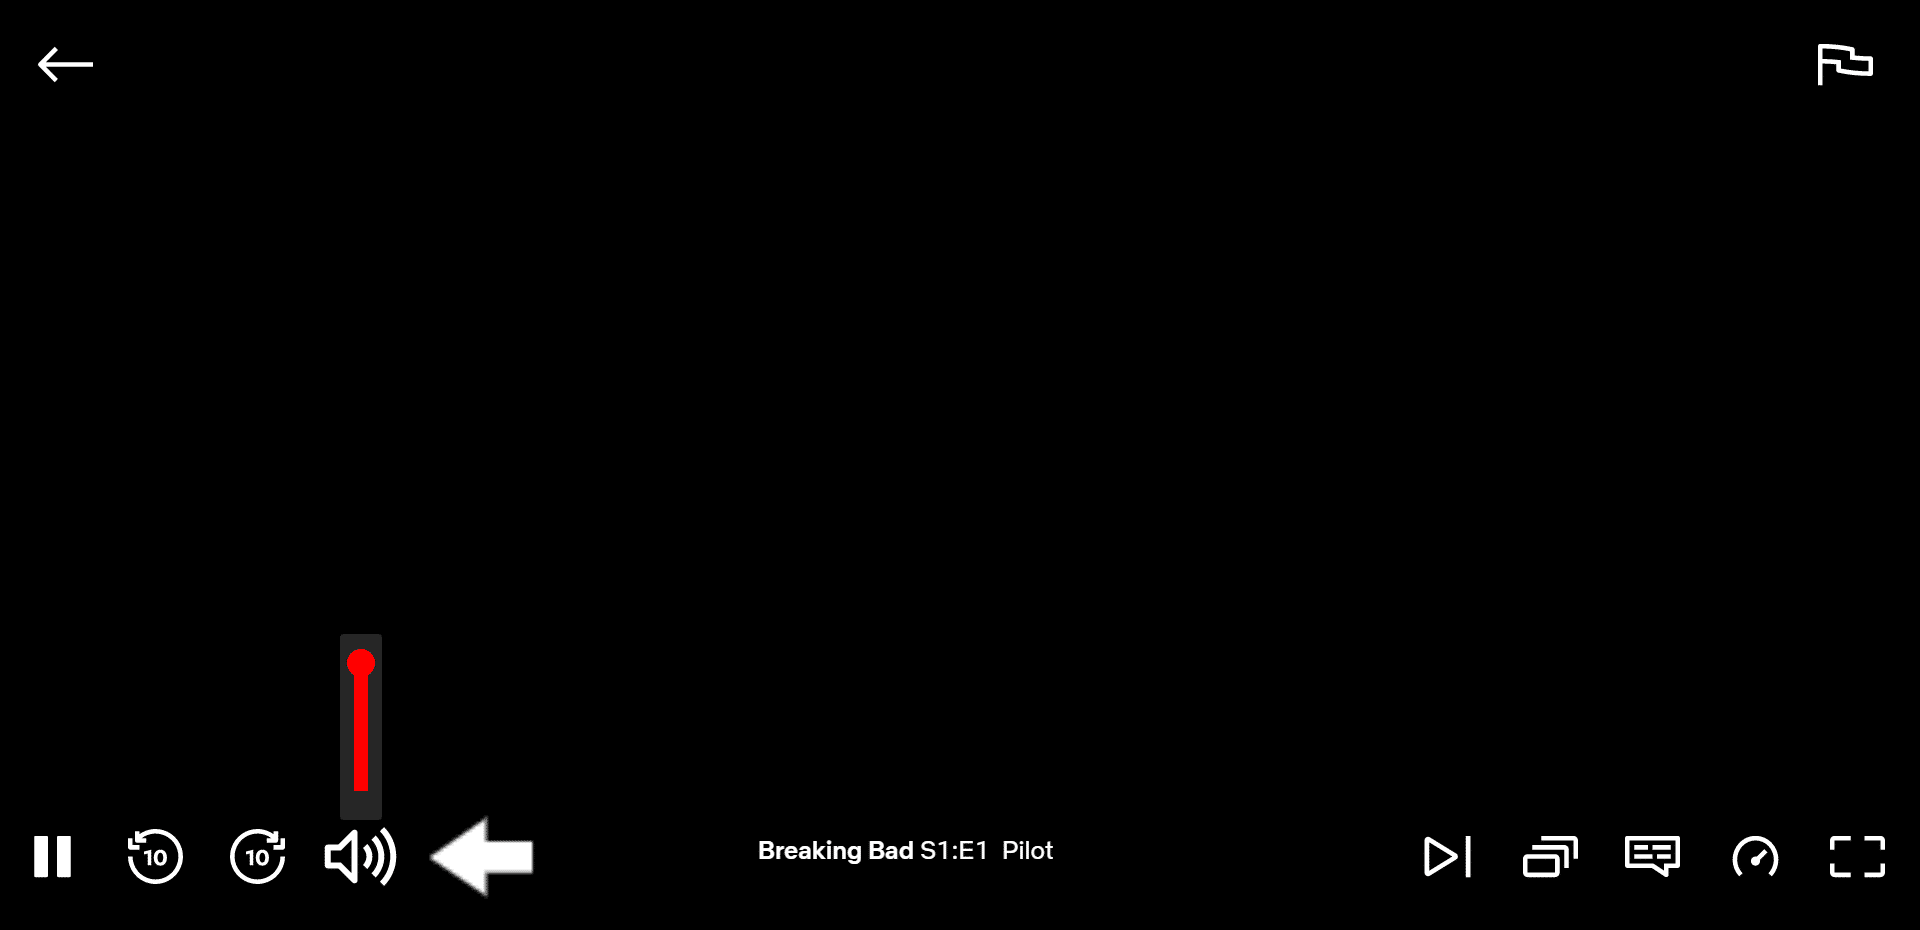
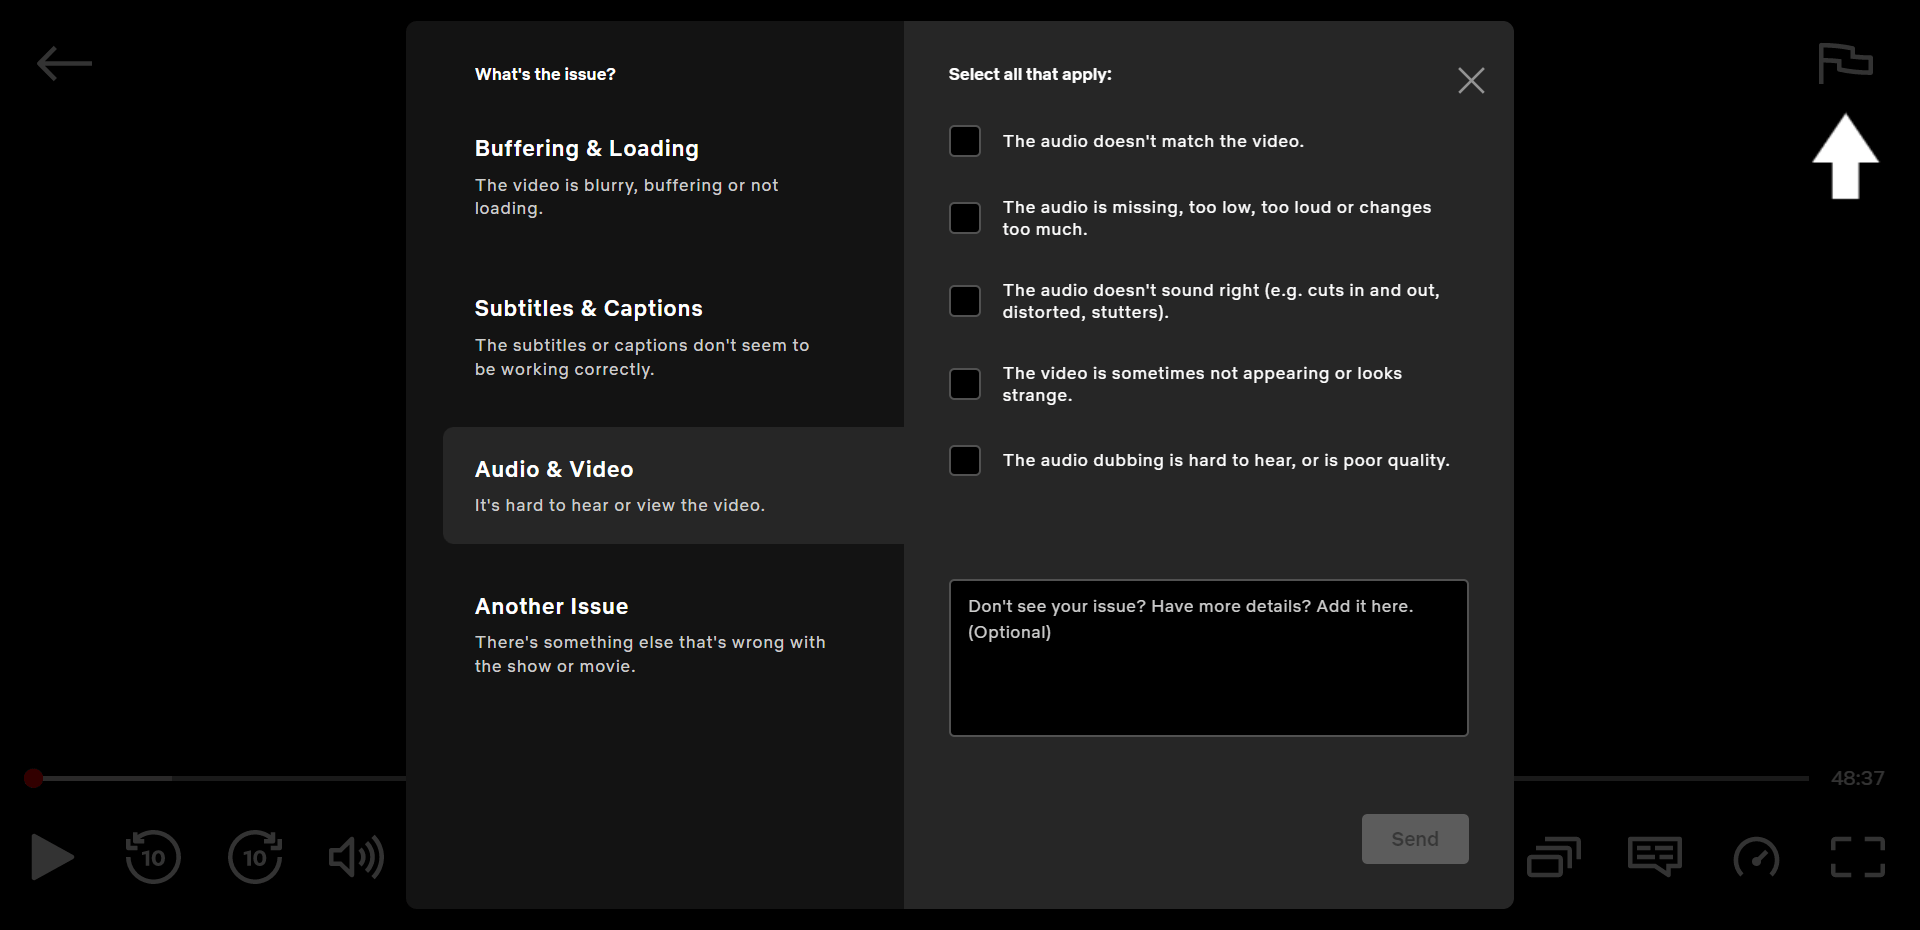
Additionally, you can also report the audio issue, within the Netflix video player. Simply select the flag icon at the upper-right, then under What’s the Issue?, choose Audio & Video. Afterwards, you can check the options that apply to your issue and proceed to describe the audio problem you’ve encountered. Once done, simply tap the Send button.
Through the Viewing Activity Page
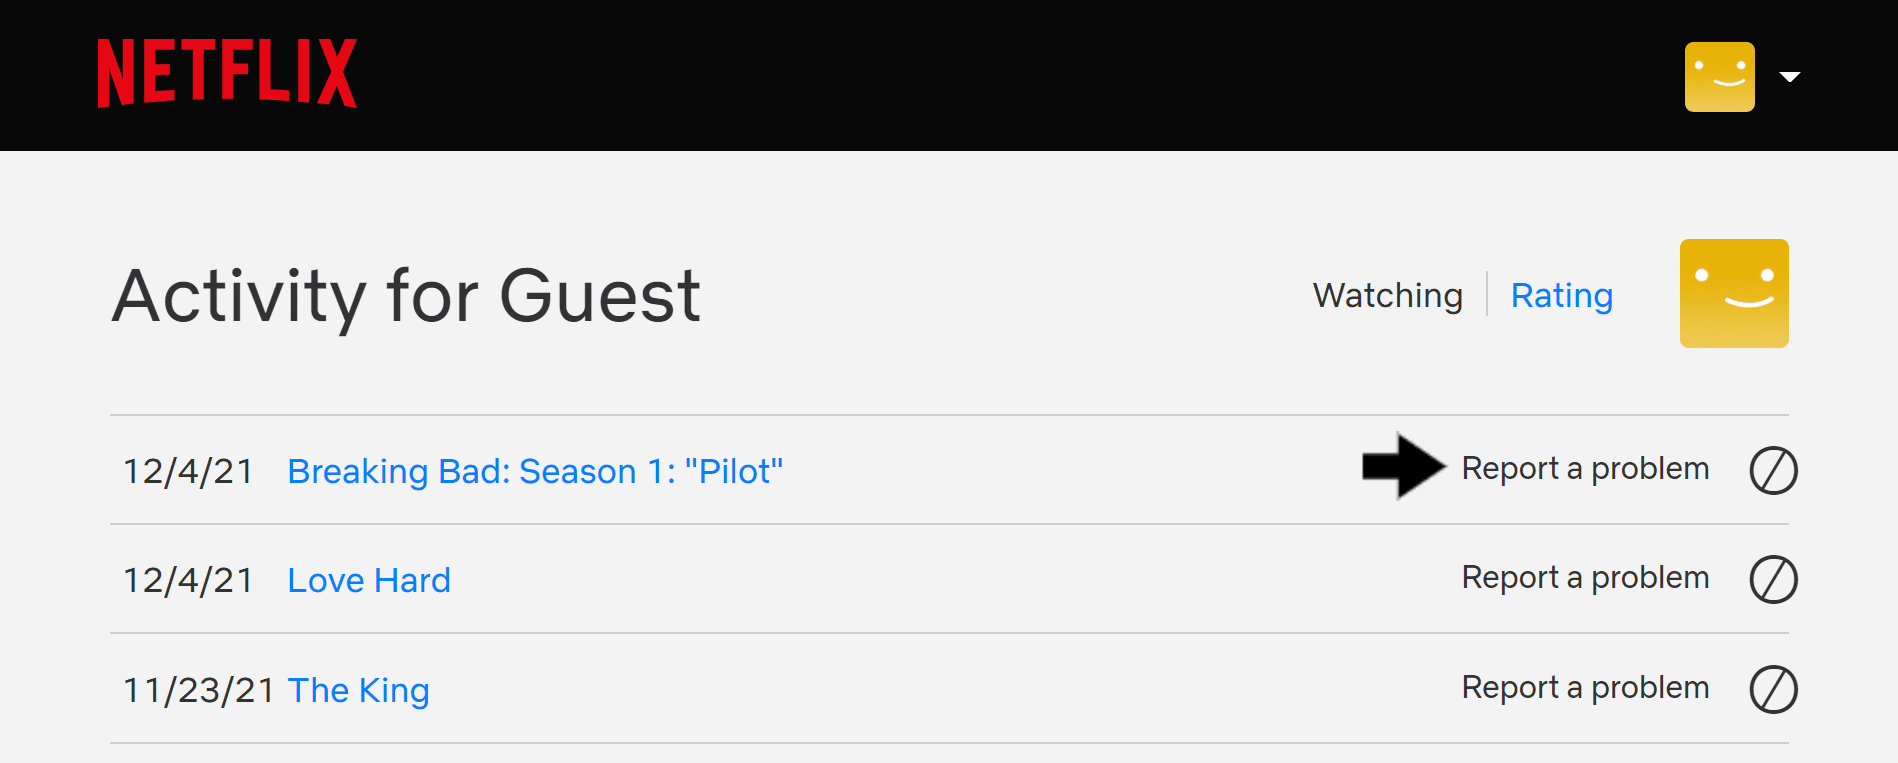
You can also head to the Viewing Activity Page and select the Report a Problem link next to the title that didn’t work. If you don’t see this option, then the problem has automatically been reported.
Note: Elaborate on the problem you’re experiencing on their platform. Make sure to provide all the essential details like your account information, the device you’re using, and the title you’re trying to play.
Conclusion
Overall, Netflix is an easy-to-use streaming service suitable for various groups of users. However, although rare, streaming services can suffer bugs and downtimes occasionally. Frustrating moments such as encountering an audio problem when streaming can be a real bummer, especially after a long and tiresome week. Nonetheless, you shouldn’t let this audio issue stand in between you, popcorn 🍿 and your favorite movies.
With that said, we’ve prepared this guide with 35 fixes to try when your Netflix stream has no sound or loses audio halfway.
Each of the fixes can be used as an individual effort or combined with other fixes in the post to solve the audio problems. A quick reminder is that after every fix, don’t forget to play a movie and check if the problem persists.
Nonetheless, if none of the fixes worked for you, it may be a problem on Netflix’s end. So, give it a few hours before trying again!
Lastly, let us know in the comments:
- Are your Netflix shows suffering from audio problems too? Feel free to share your experience!
- Did any of the fixes above work for you?
- Are there other useful fixes that you think we should add to the list?
- What other Netflix issues are you struggling with? We might be able to help!
Is your friend complaining that they can’t hear their favorite actor when streaming Netflix? Don’t hesitate to share this Pletaura-certified post with them! They’ll love you even more. 😊